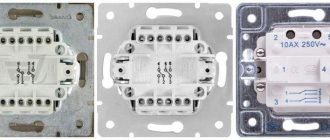
Don't confuse it with pass-through switches, which have different roles. They differ in the number of contacts. Therefore, when choosing, look first of all not at the front panel, but at the back of the switch.
two-key pass-through light switch
two-gang simple switch
Let’s say if you have 2 or more light bulbs in a chandelier, using a two-key switch you can make it so that when you press one key, only half of the lamps turn on, and when you press the second, all the rest turn on at once.
It can also control two different lamps located at separate points from each other - for example, sconces at different ends of the room or in another room altogether.
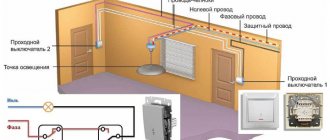
The two-key switch differs from its single-key counterpart not only in the number of switches, but also, most importantly, in the number of contacts. There are only 3 of them here. One common and two outgoing. Through them, the phase is separated and then returned to the junction box via separate wires or directly goes to the lamps.
Please note that to install a double switch you will need at least a three-wire wire, even if you do not have a PE protective grounding conductor in your apartment wiring.
Installation of a two-button light switch and connecting wires
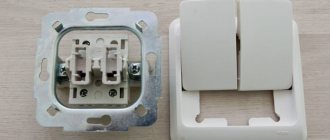
There is nothing complicated in the connection diagram and in the process of installation, installation and connection of wires to the switch contacts. First of all, the switch needs to be disassembled. To do this, remove the keys themselves. If you can’t do this manually by simply pulling them towards you, use an ordinary screwdriver, prying the keys off from the side.
Next comes the insulating decorative backing; it can either be snap-on or screwed on. Remove this frame.
As a result, what you have in your hands is the body itself with the fastenings on the sides and the internal contact part. The main task is to supply voltage from the phase conductor to the common contact. Further, when two keys are closed, this phase will diverge into one or the other lighting circuit.
To find the central contact, look at the marking, since it may not always be located alone and according to class=”aligncenter” width=”596″ height=”600″[/img]
What to do if you don’t understand the inscriptions or they are erased and painted over? Then you need to use a contact screwdriver with a battery-powered tester with a continuity test function. Insert any metal object (nail, screw) into the supposed common contact. You wrap your fingers around it and touch the other two contacts with a screwdriver.
When you press the keys one by one, that is, turn on one - check, then turn off the first and turn on the second - check, the screwdriver LED should light up each time. If this does not happen, then this is not a common contact.
When you have dealt with the contact part of the switch, take the three-core cable VVGng 3*1.5. It is desirable that the colors of the cable cores correspond to the color markings according to GOST. How to determine by color which conductor should be phase and which should be neutral by reading the article “How to distinguish wires by color.”
To connect the common contact, use the gray conductor phase coming from the junction box. Strip the end of the core, insert it between the contact plates and tighten the screw with a screwdriver.
Next, connect the other two wires in the cable to the outgoing contact connectors.
Connecting the conductors directly to the two-key switch itself is now complete. Insert the housing into the mounting box and tighten the mounting screws.
Then you tighten two spacer screws, which help the mounting fork with teeth to rest as much as possible against the walls of the box and firmly hold the switch body inside it.
After this, you can return all the decorative frames and the keys themselves to their place.
TOP 5 mistakes that should not be repeated
In practice, there are often situations where connection errors clearly interfere with the comfortable use of electrical equipment. Therefore, to avoid such troubles, we will consider the most common flaws:
- The phase conductor is connected to one of the terminals of the lighting equipment. In this case, switching will turn on only all lamps and only when both keys are pressed.
- Be sure to connect the phase conductor into the gap of the two-key switch, and not the neutral one. Such a mistake can result in serious trouble.
- To ensure full compliance of the phase and neutral conductors in the junction box, use color coding. If the connection is made to already installed wires, be sure to ring them.
- Poor quality installation of keys - due to the presence of two independent buttons, they are often not installed completely or with a slight offset. As a result, the switching does not occur completely and overheating of the contacts may occur.
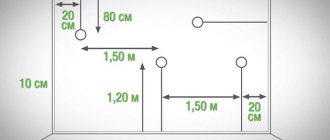
- The location of the switch is selected at the level of your hands for ease of switching. The two-key device must not be covered by a door or mounted directly on the door frame.
Installation of connections for a two-gang switch in a distribution box
The following cables can enter the junction or distribution box:
- power cable from the machine in the panel
- cable going down to the switch
- one (if you have a chandelier with two lighting circuits) or two cables (if the light points are in different places) to the outgoing lamps
To avoid confusion, follow the following order:
First of all, connect all neutral conductors. They are usually blue. Zero does not pass through the two-key switch and goes directly from the panel to the lamp, through the connections in the distribution box.
All stripped wires can be connected using Wago quick-release terminals.
Although everyone has a different attitude towards them, they are an ideal option for lighting circuits with minimal loads.
Next in order is protective grounding. This is a yellow-green wire. If you do not have a grounding conductor in your apartment or the lamp body is insulated and the cable is two-core, then this connection will not be in the junction box.
It remains to connect the phase conductors. Here you need to be extremely careful. First, clamp the phase that comes from the power supply into the Vago terminal block. Then insert a wire into the same terminal that comes from the common phase contact of the two-key switch.
You should have 4 free, unconnected wires left. Two of them are the wiring that goes to the chandelier or sconce, and the other two wires are phases connected to the lower outgoing contacts of the two-key switch.
Take two more clamps and SEPARATELY connect these conductors through them. Thus, you will connect two lighting circuits to the lamps independently of each other.
Purpose
types of switches
Despite all the variety of devices for controlling lighting (button, cord, chain, slider, dimmers, remote switches, timers), the keyboard option still remains classic. And the principle of operation is the same for all: the working mechanism has two main positions (“on”, “off”) and performs two main functions - to close the electrical circuit and apply voltage to the lighting element, to open the circuit and remove the voltage from the lamp.
A two-key switch is installed in household electrical networks with voltages up to 1000 V; the main purpose of its use is to turn chandeliers, light bulbs, and lamps on and off. The main advantage of a 2-key switch is two contact terminals at the output, to which two independent groups of lighting devices can be connected.
Installing a two-key household switch is used in the following cases:
- When the apartment has a separate bathroom and both rooms are located next to each other through the wall. In this case, it will be very convenient to connect a double light switch and install it just on the wall partition between the doors of both rooms. One key will turn on the lights in the bathroom, the second key will turn on the light in the toilet.
- Connecting a two-key switch is advisable when a chandelier with five or more arms or spotlights on the ceiling is installed in a large living room or office space. It is not always necessary for all the bulbs in a chandelier to light up at once; sometimes dim light is enough. For example, you can apply voltage to only two lamps by turning on one key. The second key will remain disabled, the remaining light bulbs in the lamp will not light up, thereby saving energy. Indeed, in the case when there is a single-key switch, when it is pressed, all the lamps in the chandelier light up at once. And if you calculate how much each extra burning light bulb consumes per kilowatt, you will get a decent amount in rubles per month. Why pay extra?
- Often a double switch for two light bulbs is used in country houses. It is best to install it in rooms located close to the exit to the street. One button turns on the light in this corridor, and the second turns on the street lamp.
Connection to a chandelier or lamp
In a lamp or chandelier, terminal blocks are usually used for connection. Place the wires of the cable coming from the junction box onto them according to the color marking.
A factory-made lamp must have cores of exactly the color specified in the rules. Phase - a gray or dark-colored conductor should go to the central contact of the lamp, and zero - blue to the light bulb base itself.
The yellow-green ground connection can be attached either to the terminal or directly under the screw on the housing.
Sources - https://cable.ru, Kabel.RF
Types of devices with LEDs
Based on the type of backlight, the following types of switches can be distinguished::
- LED with capacitor . In this mechanism, a resistor limits the capacitor current. A big advantage of using such a scheme is the increase in efficiency and significant savings in energy consumption.
- With resistor . This scheme has many disadvantages. When connecting an energy-saving lamp, it will blink or glow after it is turned off. And when an LED source is included in the circuit, the required voltage level will not be created, and the switch will not work. This is due to their high resistance. Therefore, this type of lighting is relevant only when using incandescent lamps.
- With a neon light bulb, the circuit always functions and is practically free of drawbacks. It is acceptable to use any type of lighting source.
We talked about how to connect an LED switch in a separate article.
Summarizing
What conclusion can be drawn from all the information presented today?
- For such work, basic knowledge of electrical engineering is required;
- Installation of electrical equipment requires extreme care and precision;
- There are no trifles in the work of an electrician;
- Before starting work, it is necessary to turn off the power from the input panel;
- Remember that electric shock is dangerous to life and health.
Some devices can be mounted even without a screwdriver
We hope that today's information was useful to our dear reader. If you have any questions or you disagree with the author on something, you can express your thoughts in the discussions. We will try to answer your questions as fully as possible. We also ask you to tell us about your experience - this will be useful for beginning masters. And finally, we suggest watching another short video on the topic.
Main conclusions
If you have a wiring diagram at hand, it is possible to install the switch correctly with minimal electrical knowledge. It is enough to remember that such work is carried out with the power supply turned off and requires increased attention to the quality of the wire connections. It is advisable to solder and insulate them, after first checking the functionality of the circuit.
You won’t have to worry about how to properly connect a two-key switch if you hire a qualified electrician. This is the best option if you are not sure that problems with lighting equipment or wiring will not arise in the future. It’s not worth taking risks, as the desire to save money can lead to a short circuit and fire.
Previous
Lighting in the apartment How to make lighting for the steps of the stairs yourself
Next
Lighting in an apartmentHow to correctly calculate lighting according to the area of a room
Where can I buy
You can purchase the required products as quickly as possible at your nearest specialty store. The optimal option, in terms of price-quality ratio, remains purchasing from the AliExpress online store. Mandatory long waits for parcels from China are a thing of the past, because now many goods are in intermediate warehouses in destination countries: for example, when ordering, you can select the “Delivery from the Russian Federation” option:
| Illuminated wall touch switch | Touch switch UBARO | Illuminated switch with BSEED socket |
| KAMANNI LED switch | Sensor switch | Minitiger touch switch |
Four-place lighting control circuit
To organize control of lighting devices from 4 points at once (in two directions) in the room, you will need to install a couple of cross switching products. If there are several lighting groups, preference is given to two-key cross-type switches. When they are connected in series, not only the electrical wiring becomes more complicated, but also the installation of the products themselves according to the algorithm already discussed above.
In this case, jumpers will need to be installed twice (in both pass-through switches, the diagram of which is shown above). When disconnecting such systems, it is recommended to strictly follow the sketch drawn in advance with the designations of the contacts and jumper conductors indicated on it.