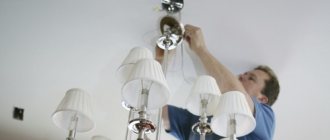
Due to the design features of a stretch ceiling, the installation of a chandelier is carried out differently than with traditional types of finishing. In addition, you will need thermal rings to protect the PVC film, and if the lighting fixture is attached through a bar, then also mortgages. Let's look at how to choose the right chandelier so as not to damage the material and look at several ways to install it on a suspended ceiling. Additionally, we will tell you what to do if the canvas is already stretched, but fastening was not provided.
Limitations when choosing a chandelier
Most often, the canvas for a stretch ceiling is made from PVC film, which does not withstand high temperatures. When heated, the material becomes stained and gradually deteriorates. Therefore, chandeliers with a heated metal base are not suitable.
When installing incandescent lamps, the lampshades must be directed downward, and the distance to the canvas must be at least 20 cm.
Unlike PVC film, fabric stretch ceilings tolerate temperatures up to +80°C. But in any case, it is better to choose energy-saving or LED lamps; they emit much less heat and last much longer.
The film can be easily damaged by sharp objects. Before purchasing, you need to make sure that there are no protruding edges, casting marks, etc. on the base of the lamp.
If the canvas is glossy, it is recommended to choose closed shades. Otherwise, a lot of glare will be reflected on the surface of the ceiling, unpleasant for the eyes.
There are no restrictions on weight or type of fastening. Any lamps are mounted not on the canvas, but on the base.
Read more: Requirements for chandeliers for suspended ceilings
Safety precautions
Before starting any electrical work, you need to take care of safety. Mounting a chandelier involves contact with wires carrying high voltage current, so this issue must be approached with complete seriousness. Here are the basic recommendations and guidelines:
- all electrical installation work must be carried out with the power turned off (you can simply turn off the circuit breaker in the panel);
- after turning off the machine, you should be on the safe side and check that there is no light;
- Having checked the absence of voltage in the wires with an indicator screwdriver, you can safely begin installation;
- Often, a Chinese manufacturer resorts to using low-quality materials when making chandeliers, so their choice should be treated more carefully.
Checking the presence of a phase with an indicator
Methods of attaching a chandelier to a suspended ceiling
Lighting fixtures are available with fixation on a hook or mounting plate. How exactly the work goes depends on this.
On the hook
When installing a chandelier on a suspended ceiling in this way, the fastening is reliable, but there is a risk that the base of the lamp will not be positioned completely evenly. The hook is attached directly to the rough ceiling, and a hole is made in the canvas through which the lighting device is suspended.
The following types of hooks are available:
- anchor - installed in a drilled hole and fixed by surprise;
- through - fastened through the ceiling, convenient for installation during the construction of a house;
- embedded - suitable if there are hollow channels in the slab.
The size of the mount is selected depending on the weight of the lighting fixture.
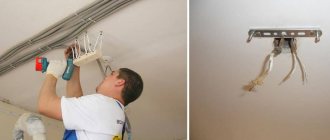
Through the mounting plate
Chandeliers with a strip are installed without a hook; for this purpose, a mortgage is attached to the base ceiling. It is made from wooden beams or plywood, or you can buy a ready-made plastic platform. The platform is attached to the floor slab using flexible steel hangers so that the base is located at the same level as the future ceiling. Then the fabric is stretched, holes are made and the mounting strip is screwed to the mortgage, and the lighting fixture is attached to it. Thus, the load falls on the floor slab.
Several types of strips are used for chandeliers:
- small longitudinal ones - for small devices;
- cross-shaped (composed of 2 long ones) - for heavier ones;
- I-beams - for the largest ones.
Installing a chandelier with a strip on a suspended ceiling is more difficult. But it is easier to ensure that the lighting fixture hangs evenly.
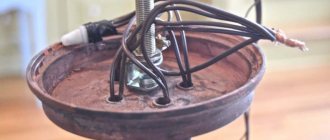
The process of dialing lighting devices
If the wires connected to the terminal have the same color or the marking does not meet the standard, before hanging the lamp on the ceiling, they need to be tested using a multimeter, for which the device is set to the appropriate mode.
Before starting the process, unscrew the light bulbs from the chandelier, and then proceed as follows:
- When the lamp contains metal conductive elements, and there are three or more wires, one of them may be grounding. To find out, one probe of the multimeter is placed on the conductive part of the housing, and the other is touched to the bare end of each wire or to the contacts of the connecting block. A sound indicates that a ground wire has been detected.
- To determine the neutral wire, one of the probes is placed on the side contact of any of the lamp sockets. Unmarked wires are touched until sound appears and a mark is applied to the neutral wire, the rest will be phase wires.
- In multi-arm chandeliers with two stages of lighting, sockets - one or more - are connected to all phase wires. If it is necessary to correlate them with a key on a switch, do this: attach the probe to the phase wire and sequentially touch the central contacts located on the bottom of the sockets. The cartridges connected to this wire are detected according to the sound signal. Do the same with the second phase wire.
When the luminaire wiring contains one phase wire and several stages of lighting, all sockets should be connected to it. In this case, the phase wires coming from the chandelier are combined by twisting or a jumper on the block. When the preparation of the electrical wiring and lighting device is completed, they begin to mount it on the ceiling.
How to hang a chandelier on a hook
The preliminary stage begins before the canvas is stretched. The method of attachment depends on the type of hook. Let's consider the installation principle of the four most common types of fasteners:
- The anchor one is the easiest to hang. A hole of a suitable diameter is drilled in the concrete floor using a hammer drill. Drive in the anchor and tighten the fastening nut so that the base is fixed in the ceiling.
- The through hook must be installed across the entire ceiling. A hole is made in the slab, then two metal plates are taken and placed on the rod. One of them is placed on the ceiling, and the other on the floor of the upper floor. The hook is inserted into the holes, and then the plates are pressed tightly with nuts to the ceiling.
- The spring version is available with a built-in holder. It consists of two parts, between which there is a spring. The rod has a screw thread. The moving parts are pressed and inserted into the hole. They pass through the ceiling and straighten out. Then tighten the nut to firmly fix the rod in the ceiling.
- hook is placed on a metal rod with a bend in the middle. Turn it so that it is adjacent to one of the ends. The structure is inserted into a hole in the ceiling and rotated. In this case, the hook falls into the central bend. It is pulled out and threaded into the hole of the decorative plug.
After installing the chandelier mount, power is supplied to this place. To prevent the cable from interfering with the installation of the stretch ceiling, the ends are secured to a hook.
Then the film is stretched. When the canvas is installed, a thermal ring is glued in the place where the chandelier will be attached. It will prevent the material from dispersing and will further protect against overheating. The size is selected so that the diameter is smaller than the decorative lampshade.
Take Cosmofen CA-12 glue and carefully coat the tread ring, leaving no empty spaces. The thermal ring is applied to the ceiling and pressed lightly.
When the glue sets, use a stationery knife to cut out the film inside the ring. They pull out the wire and connect the device, and then hang it on a hook; it will be hidden by a decorative lampshade.
Useful tips
- Before starting work on fixing the lamp, all easily damaged and breakable decorative elements must be dismantled, leaving one frame.
- The dimensions of the mounting hook should allow the decorative cap to completely hide it after installing the chandelier, which needs to be thought out in advance - before purchasing it.
- When hanging a heavy chandelier, you need the help of a partner, and use anchor bolts to secure it.
- The diameter of the hole in the ceiling for installing anchors and dowels should be comparable, so that the fasteners can be installed as smoothly as possible.
- If the chandelier does not turn on after installation is complete, it means the wires have been mixed up. Reconnecting can change the situation - you need to swap two wires.
Attaching the chandelier to the mounting plate
Before stretching the canvas onto the ceiling, a mortgage is installed, to which the plank is subsequently attached. Ready-made platforms of several types are produced: round, oval, square, cross-shaped. The product is selected depending on the size of the base of the lighting fixture. The platforms are made of high-strength plastic and have holes for self-tapping screws for convenient fastening of the plank and hangers.
You can also make a mortgage with your own hands. To do this, use timber or plywood according to the size of the base of the chandelier. The edges are carefully polished so that there are no burrs that could damage the blade.
Let's consider the option of mounting a chandelier with a small longitudinal strip using a universal round platform. Such platforms are suitable for devices of relatively light weight, up to 10-12 kg.
Before installation, determine the mounting location of the chandelier and apply markings to the ceiling. Next, you need to screw flexible steel hangers or punched tape to the platform. Small “bug” self-tapping screws (3.5x9.5 mm) are used as fasteners. For a small chandelier, four pendants are enough. The legs are then slightly bent into an accordion shape so that the height of the support can be adjusted.
Holes are drilled in the ceiling, plastic dowels are hammered in and the mortgage is secured with long self-tapping screws (5x50 mm). The platform should be on the same level as the suspended ceiling frame. This can be checked by pulling a thread attached to baguettes on opposite walls. Then the electrical cable is connected. The ends are inserted into the terminal block and fixed on the site so that they do not interfere with further installation.
When the canvas is stretched, find the location of the mortgage. A tread ring is glued in the center and the internal space is cut out.
In places where the chandelier strip will be attached to the mortgage, you need to strengthen the film so that it does not come apart. To do this, reinforced tape or small tread rings for self-tapping screws are glued to it.
Then screw the bar to the platform. After which the chandelier is connected to the wiring. It is more convenient when a second person holds it. If there is no assistant, the device is suspended on a rope. The final stage is to attach the chandelier to a metal strip, install shades and screw in the light bulbs.
Note! Large lighting devices with a cross-shaped strip and a base of about 40-50 cm are mounted on a cross-shaped mortgage. The principle remains the same, but 8 hangers are required to attach the platform.
What and how to attach to a plasterboard sheet
The ceiling chandelier is attached to the gypsum board using anchors or collet pins, which are used for the heaviest products. Such fasteners must be fixed to the base ceiling. A threaded hook and spring dowel are used for lighter models.
Required materials and tools
To mount a chandelier on a gypsum board, you need to prepare a hammer drill, screwdrivers, wrenches, and a hammer. In addition, you will need pliers, electrical tape, terminal blocks, a knife, a stepladder, and selected fasteners.
Instructions for installing the lamp on a plasterboard ceiling
If you bought a heavy lighting structure, then attach it to an anchor suspension:
- Drill a hole (30 - 60 mm) in the gypsum board.
- Make a hole in the base for the hook, taking into account its diameter.
- Loosen the nut a little, pull out the stud, and insert the fastener.
- Tighten the nut.
If necessary, this mount can be extended using a metal rod.
The lamp is installed using the same principle using a threaded hook and a spring dowel.
A lightweight lamp (up to 3 kg) is mounted on plasterboard, reinforced with a profile frame:
The profile frame relieves the load on the plasterboard ceiling.
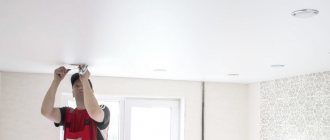
How to “drown” a chandelier in a suspended ceiling
Some lamp models have a large base diameter (40-60 cm) and a high side that covers the transformer. Such a chandelier looks more aesthetically pleasing if you “recess” it a little into the ceiling.
For installation you will need a large diameter tread ring to match the size of the base. But such thermal rings are not sold in stores, so you will have to make them yourself. You will need a PVC sheet about 2 cm thick. This is an inexpensive material that is sold in many construction stores. A ring with a diameter slightly larger than the base of the chandelier is cut out of the panel. Then they place the lamp on the ceiling and trace it around with a marker. A homemade ring is glued to this outline. To make it smoother, you can apply the composition not immediately to the entire surface. First, opposite points are glued, then between them, etc.
Note! In this case, you can attach the embedding platform after stretching the canvas, since the hole will be quite large. The installation procedure is the same as in the previous method. But the platform must be located above the ceiling level so that the side of the chandelier is completely hidden behind the canvas.
When the ring is fixed, the film inside is cut out and removed. But not flush with the tread, but leave about 2 cm. Then the inner edge of the canvas is cut, folded inward and glued to the ring. Next, a plank is screwed to the mortgage and a chandelier is attached to it, but the base will be recessed into the plane of the ceiling. Thus, thanks to homemade protection, the PVC film will not be damaged.
Main conclusions
There are several ways to install a chandelier in a house or apartment on a concrete ceiling:
- On the hook.
- On the bracket.
- Directly through the body.
Using a mounting hook-anchor, heavy chandeliers weighing more than 5 kg are installed. A lamp weighing more than 1 kg can be mounted on the dowel hook. A lightweight device weighing less than one kilogram can be fixed through the body using self-tapping screws. During the work, it is necessary to strictly observe electrical safety rules, having first turned off the power to the entire network.
It is traditionally believed that connecting a chandelier is a complex task that must be performed by a professional electrician. But, there is nothing difficult in connecting two or four wires, so any man can easily hang a new chandelier in his home with his own hands.
How to hang a chandelier if the ceiling is already stretched
There will be no problems with the hook; it can be installed through a hole in the canvas; the decorative lampshade will still cover the hole. But in order to hang the chandelier on the bar, you will need to attach a mortgage, and for this you need to remove and re-tension the ceiling. Dismantling and subsequent installation is expensive and inconvenient, so let’s consider another method.
Place the plank against the ceiling and mark where the attachment points are. Thermal rings are glued around them and in the center. The film inside is cut out and holes are drilled through the rings in the ceiling. To secure a chandelier to a suspended ceiling without a mortgage, select self-tapping screws or dowels of sufficient length.
To prevent the bar from wobbling after installation, take a plastic pipe (smaller in diameter than the rings). It is inserted into the hole, resting against the ceiling, the required length is measured and cut off. The distance to the ceiling will differ at different points, so it is better to sign the pieces. The bar is fixed through tubes inserted into the holes. The base will rest against the ceiling through the pipes, so it will become more stable. Then the lighting fixture is screwed to the bar. A connection to the network is first made.
In this way, it is possible to attach the chandelier to the suspended ceiling after its installation. In this case, the device is installed without a mortgage. But this method has its own nuances and difficulties. It is better to think about lighting before installing a stretch ceiling.
Connecting electrical wiring
Before attaching a chandelier to the ceiling, you need to connect all the wires of the house's power supply system to it. Before doing this, be sure to de-energize the wiring. After this, check that there is no voltage on the wires.
Rules for connecting a chandelier to the electrical network:
- If you install a one-button switch, then the ceiling chandelier is connected with three wires - phase, neutral and ground (not always present). The latter type of wire largely depends on the time of construction of the house, since grounding was not provided for in Soviet-type buildings (about