Design ideas within your own home are sometimes realized due to your own imagination, skill and original ideas of execution. The special character of the room is ensured by the use of stylistic details in the design, small and medium-sized decorative elements, textiles in several applications and, of course, lighting fixtures play an important role in the overall mood of the room: wall, ceiling, floor and free-standing. The best way to provide your own home with an individual character and a touch of exclusivity is to use in decorating the space lighting fixtures and chandeliers made exclusively on your own, through your own efforts and with your own hands. Making such decorative elements is sometimes not as difficult as it seems at first glance.
By and large, even if you haven’t been able to do something with your own hands before, then by enlisting advice, an action plan that contains step-by-step instructions, you can successfully implement your own idea and, as a result, get something from the category that has been fashionable for a long time now. several years hand-made.
Many handmade products, made by ordinary people and ordinary people, and far from professional designers, can easily be considered real masterpieces of design art. Such items for decorating rooms, spaces of various categories and functions fit perfectly into the interior of a country house, and into the design of city apartments of various layouts and sizes. That is why the thread lamp, so beloved by a wide audience, never ceases to be relevant for several years, regardless of the season. Such a beautiful and stylish interior accent will add coziness and comfort to any home.
Lampshade for chandelier made of threads
What kind of interior would this lamp be suitable for?
A chandelier made of threads can harmoniously fit into any interior of the room. It all depends on the design and material:
- for the corridor, kitchen, the ideal option is made of dense threads or strong rope;
- for a nursery and a high-tech room - made of thin threads in the shape of a ball;
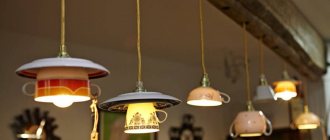
- for the bedroom, kitchen, living room - from knitted napkins.
The chandelier is good for Provence and country style. In this case, it is worth choosing threads of white, brown, yellow, orange, and beige colors. You can decorate the lampshade with butterflies, birds, fruits, leaves - made of thick paper, plastic bottles, foil. Then this lamp will perfectly decorate a country house.
Paper lamps
Despite the fact that paper is not considered the most reliable basis for lampshades, the ease of working with it and its noticeable low cost have made this material very attractive among handicrafts. In addition, with its help you can update your interior at least every month, creating new crafts.
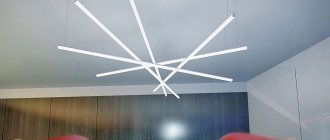
Origami lampshades
Who wasn’t interested in origami as a child, designing little animals or complex modular paper products? Now you can use your skills for more practical purposes. However, even people who have encountered this activity for the first time can also easily master it and make origami lampshades for a chandelier with their own hands.
These are laconic designs of different geometric shapes that will fit perfectly into a modern interior. It is not recommended to use very strong paper, as it does not transmit light well.
Figured products
However, lovers of more varied decor can create lampshades of a wide variety of shapes from paper. For example, surround the lamp with paper houses, butterflies or envelopes.
The appearance of such a lampshade also depends on the surface - plain, patterned, newspaper, and so on. By combining these materials, completely different effects can be achieved.
Chinese lanterns
If you have paper lanterns at home, do not rush to use them as an independent lamp, because this is an excellent basis for other experiments.
It can be covered with anything you like, but to avoid a homemade look, we suggest decorating the ball with small paper flakes or long “feathers” that will gracefully hang down to the bottom.
Tools and materials
Before starting creative work on a future chandelier, you need to prepare everything you need. You will need metal wire, threads of the required thickness, fabric, as well as auxiliary tools:
- scissors;
- gloves – medical, rubber, rubber;
- a good quality balloon or other base;
- vegetable oil, Vaseline or fatty cream;
- felt-tip pen;
- a couple of electrical sockets in case you can’t make the correct connection the first time;
- PVC or wallpaper glue;
- light bulb – better LED;
- container for glue.
The selection of materials depends on the specific model of the lamp.
Shabby chic chandelier
To create spectacular lighting in a room, you can also make a chandelier from fabric or beads. The result will be a kind of candelabra or lampshade in the “shabby chic” style.
Materials:
- a ready-made metal or wooden frame (or it can be made from an old hoop, garden basket, thick wire);
- socket and lamp;
- chains and threads for decoration;
- all kinds of beads and seed beads.
Working on such a lampshade is not difficult, but it is a very painstaking task. Such chandeliers usually consist of two or three levels of rings, which are located on top of each other. It all depends on the size of the chosen bases. If you take rings of the same diameter, the finished product will be made in the “modern” style.
One of the important points is that before you start decorating the chandelier, you need to paint and wrap the frames with decorative materials!
The approximate consumption of beads is:
- For the lower part of the lampshade - 16 mm beads, about 15-17 pieces per thread;
- For the upper part of the lampshade - 12 mm beads, about 35 pieces per thread.
Naturally, when stringing beads on a thread, you can increase or decrease their number or the degree of thread tension. But it is still advisable to stock up on materials in excess of the norm.
The essence of the work is to hang threads with beads in a “waterfall” or “cascade” so that they flow downward along the structure.
In order to create the effect of “muting” the light, you can sheathe the frame with thick fabric.
A DIY chandelier will definitely add a fresh touch, originality and beauty to your interior. You will immediately notice how the room will sparkle with new colors, and your guests will sincerely admire your creativity, hard work and original taste!
Where to get the base
The threads themselves cannot hold their shape until they become strong with glue. Therefore, the shape of the lamp must be created using a solid base. The basis can be:
- frame from old lamps;
- balloon;
- plastic bottle;
- glass jar, bottle;
- silicone beach ball;
- frame made of metal wire.
The shape of the lampshade will depend on the chosen base. The foundation can be temporary or permanent. If you use metal wire, then in this case it can either remain or be removed after drying the thread dipped in glue.
Attention! For beginners, it is better to use an old frame from a former lamp. Such a product will look more aesthetically pleasing, even if the craftsman has little experience.
Which lamps to choose
For chandeliers made of threads, ordinary incandescent lamps are not very suitable. They can heat the frame, and this is a fire hazard. It is better to choose energy-saving ones. LEDs are preferable. They are more expensive than usual, but do not heat up and do not burn out quickly. Their service life is up to 3 years.
If the choice falls on a regular light bulb, the diameter of the lampshade must be large enough. The distance from the lamp to the wall of the lamp should be at least 7 cm. If even at this distance the lampshade starts to heat up, you will have to replace the light bulb with a less powerful one. In any case, even an ordinary incandescent lamp cannot be more powerful than 100 W if we are talking about a lampshade made of thread or fabric.
How to make a chandelier from threads: making a lampshade with your own hands
You can make a chandelier from threads with your own hands, either using a permanent frame or a temporary one. A permanent frame can be a metal wire, which has been given the appropriate shape, a frame from an old floor lamp. A temporary one is a balloon, a ball, a plastic pot, a jar, a plastic bottle, on which a thread is wound and given rigidity by means of glue.
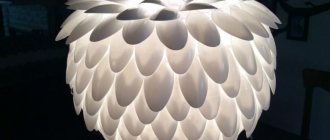
Ball of thread or yarn
A great idea is to make a lampshade in the shape of a ball. You can make a completely closed ball or a half-open one. You can decorate such a lamp by weaving threads in the macrame style, as well as gluing pre-woven flowers and circles. You can use multiple colors to create a intricate web of patterns. To work you need:
- inflate the balloon to the desired size;
- tie tightly with strong thread;
- Apply vegetable oil or cream over the entire surface of the ball;
- soak the yarn in wallpaper glue (dilute it thicker than according to instructions) or PVC glue (proportion of water to glue 1:3);
- Using a felt-tip pen, draw a circle about 70 mm in diameter on the base of the ball - the entrance for the lamp socket;
- draw a circle for the hole opposite to the cartridge, if this is in the plans;
- secure the end of the thread with glue and begin to wrap the ball without touching the areas marked with a felt-tip pen;
- After winding, secure the end in an inconspicuous place and seal with glue.
You need to wrap it beautifully, evenly and not tightly to get a pattern. When the winding is completed, you can carefully untie the ball and blow air into it. This will allow the threads to stretch better. Once again coat the threads on the ball with glue. And then you need to hang the ball until the yarn dries completely. About a day or two, it all depends on the quality of the threads and the room temperature. Then pierce the ball and remove it through the hole for the lamp. To make the product shine, you can coat it with varnish and let it dry.
Attention! Be sure to lubricate the ball with oil or cream before winding. This will allow you to easily separate the lampshade frame from the ball. If the threads stick to the ball, all your efforts will be in vain.
Knitted lampshade
For such a lampshade you will need several crocheted or knitted napkins of round, oval, square shape and different sizes. Finished napkins should be ironed. Having prepared them for work, you can begin to create a mini-masterpiece. Algorithm of actions:
- inflate the balloon to the required size;
- coat it with rich cream or vegetable oil;
- we place the largest napkin on top, where the entrance of the socket with the light bulb will be;
- We glue the remaining napkins in a circle with a slight overlap.
For this lamp, you can knit napkins of different colors or the same color, from thin threads or from large woolen yarn. There is a lot of room for imagination. It is important to think about their location in advance. Such a lamp can be open or closed in the form of a ball. We must remember that when open, more light will enter the room. The closed one perfectly diffuses light and creates a special play of light.
Glass and paper
The easiest thing to make with your own hands is a glass lamp. This is a portable table lamp that is very quick and easy to make. To make such a lighting device you will need:
- a thin sheet of paper (you can print a specific pattern on it);
- round and tall glasses;
- wire with a thickness of 1-2 mm;
- candles-tablets.
The tools you will need are:
- scissors;
- PVA glue;
- pliers;
- stationery knife;
- scotch.
The algorithm of actions here is as follows:
Bent wire
bend the wire using pliers so that it takes on the appearance shown in the photo. A candle-tablet will be placed on its lower part. The length of the wire should ultimately be slightly greater than the height of the glass. This will make it much more convenient to remove the candle from the container;
The glass itself should be decorated with a sheet of paper on which the pattern you like is applied. Carefully glue the sheet to the glass. The top of the container can be decorated using plaster or polymer clay.
Ready glass
As you can see, this requires a minimum of effort and time, and as a result you will get a beautiful lamp, perfect for a romantic dinner or just a quiet, relaxing evening of relaxation.
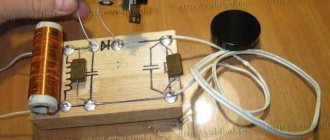
Assembling the lamp: step-by-step instructions
Once the lampshade is ready, assembling and hanging the lamp is not difficult. We do the following step by step:
- Pull the lamp socket through the hole.
- Pass the fishing line along the edges of the hole for the lamp with the socket and tighten it to the diameter of the socket.
- Check that the lampshade is securely attached to the socket.
- Hang it from the ceiling, connecting the phase, grounding, and neutral wire.
- Connect the wires to the floor lamp if we are talking about a floor or table chandelier.
Now let's check how it works. We flip the switch and see if everything was done correctly. You can buy the necessary set in the store - a wire, a socket and a plug for a socket, which are already connected together.
If stranded wires are connected, the conductor insulation should be cleared by about 4 cm. Each conductor is untwisted by 2 cm. If you have a soldering iron, the wires can be connected by soldering. The wires must be tinned before connecting.
Chandelier assembly
Then everything is very simple:
- Take a pre-prepared plastic jar. A hole is cut in the center.
- The workpiece is painted in a suitable color.
- The cartridge is connected to electrical wires, passed through a hole in the can, and suspended from the ceiling base.
- Next, the selected light bulb is screwed into the socket, and a hand-made lampshade made from yarn is hung from the socket.
- The lighting device is ready!
Expert opinion
Ivan Zaitsev
Lighting specialist, consultant in the building materials department of a large chain of stores
For your information! To free yourself from all these additional operations, a ready-made base for a ceiling chandelier can be purchased at a store of lighting equipment and accessories for it.