Electrical systems are the safest equipment, thanks to which you can create a comfortable temperature in the room during the winter. The efficiency of an electric heating boiler is quite high, especially since in order for it to operate normally and stably for a long time, you do not have to waste free space for laying flammable material.
Electric boilers completely lack a mechanical component, making their use much easier and also reducing the likelihood of a malfunction or serious breakdown.
The design of an electric boiler implies temperature regulation. Due to this, the system can respond in a timely manner to any changes in temperature in the environment. The boiler either increases or decreases the heating temperature of the coolant if necessary.
Many boilers are economical; for example, to heat 30 cubic meters of space you need to spend only 4 kW per day. The use of such boilers makes it possible to heat rooms of much larger volumes than with other types of boilers.
During operation, the boiler does not emit any harmful or toxic substances such as carbon dioxide or carbon dioxide. In this regard, they can be installed directly in residential premises and used to heat bedrooms and children's rooms. Another advantage is that during installation you will not have to obtain any permissions from the relevant authorities.
Electric boilers can either be used as an additional source of heating or the structure can be made the center of the heating system. This boiler is powered from an ordinary electrical network with a voltage of 220 V. The average weight of the boiler is 22 kg, its dimensions are also not too large, but it is capable of heating a volume of air up to 400 cubic meters.
device
What tools will you need?
To assemble homemade electric heating and encounter a minimum of difficulties, you must have high-quality tools at your disposal.
To work you will need:
- welding machine - it is most convenient to work with an inverter model;
- cutter – if you don’t know how to use a gas cutter, it’s better to use a plasma cutter;
- grinder - you will even need 2 models - a large one for a disk with a cross-section of 230 mm and a small one for a disk with a cross-section of 125 mm;
- electric drill;
- hammer;
- core;
- tape measure and compass.
Conclusion
Each of the boilers I presented has been tested many times and is guaranteed to work; which one you choose is up to you. The video in this article has many recommendations and also shows the intricacies of the process. If you have your own ideas or have any questions, write in the comments, I will try to help.
A small homemade electric boiler can heat a medium-sized private house.
Electric boiler on heating elements
The do-it-yourself electric boiler circuit with a heater is the easiest to implement and has been known for quite a long time.
Operating principle of a heating element boiler
The design of all household appliances in which heating elements (heating elements) are installed is the same. When the power is turned on, voltage is applied to the heating element, which gradually heats up and transfers thermal energy to the liquid located around it.
The advantages of such devices:
- a wide range of heating elements of various shapes and power;
- Possibility of use in any heating system with liquid coolants;
- insulation is installed on the boiler body, so that voltage is supplied exclusively to the heating element;
- do not require complex maintenance;
- The heating level is very easy to control, even with a minimal set of automatic controls.
Among the disadvantages of a homemade electric boiler of this type are:
- “gluttony” in electricity consumption, since heating 10 m2 of area requires 1 kW of power;
- impurities in the coolant accumulate on the heating element in the form of scale, so it needs to be cleaned approximately once a year;
- The heating element can only function in the presence of liquid; it is recommended to install an idle speed sensor with it.
Main structural elements
In general, an electric boiler consists of the following components:
- Heat exchanger: This is a reservoir connected to the heating system in which the working medium flowing through it receives thermal energy.
- Heater: An element in a heat exchanger in which electrical energy is converted into thermal energy through resistance.
- Electrical circuit: a set of parts due to which electric current appears in the heater.
- Automation unit: monitors the temperature of the coolant using sensors and, if necessary, turns on or off the electric boiler.
All of the above is placed in a steel box with thermal insulation - the housing.
The procedure for assembling a boiler with heating elements with its own rivers
Before you make an electric boiler with your own hands, you should make sure that you have a reliable power supply line. Only equipment with a power of no more than 6 kW can be connected to ordinary networks with a voltage of 220 V and a frequency of 50 Hz. If a more powerful boiler is required, it needs a three-phase wiring and a separate input.
So, we begin assembling a homemade electric heating boiler from a pipe with a cross-section of 159 mm and a wall thickness of 10 mm. This pipe will serve as the boiler body. It will require either a factory-made hemisphere with a cross-section of 159 mm and a thickness of 10 mm, or sheet metal with a thickness of 8 mm or more of a similar section.
The boiler roof, into which the heating elements will subsequently be embedded, can be made from an 8 mm thick channel.
We cut a ¾-inch coupling into the boiler dome. We will screw the drain valve into this coupling. In addition, you will need 2 pipes with a cross-section of 1 inch for inflow and return. The threads on the pipes can be made both internal and external. It all depends on which one you are more comfortable working with.
To relieve excess pressure, you need to prepare a pipe for inserting the bypass channel. You will also need 3 adapters, each of which will have a heating element for the electric boiler screwed into it. Another adapter will be needed for the temperature sensor. In addition, you will need holders for automation.
Please note that it is advisable to cut the threads on the pipes and adapters immediately.
Prepared pipes with threads, the same as on heating elements, must be immediately screwed into the adapters. This is necessary so that the threads are not damaged during welding to the arch. To mark the insertion points of the heating elements, the outer diameter of the pipe must be divided into 6 equal sectors according to the radius size. Then we draw three identical sectors strictly at an angle of 120°.
The next step is to start cutting. Having finished with the markings, using a plasma cutter we cut out holes for the pipes for the heating elements. They should be cut only along the outer contour. With all other pipes this is not of fundamental importance.
Let's start welding work. First we intercept the pipes at several points so that they do not lead. Then we check the accuracy of the location, if necessary, lightly tap with a hammer, and then make a continuous seam. It is important that the adapters for heating elements in an electric boiler for heating with your own hands protrude 1 cm above the surface of the boiler roof.
Next, you need to make sure that the heating elements fit completely inside the body of the electric boiler. Therefore, after applying a continuous seam, it is necessary to screw the heating elements into the adapters.
Let's start cutting out the vault from the channel. In its center we make a hole for the air valve pipe, after which we weld the pipe itself. We make a hole on the side for the temperature sensor and also weld a pipe under it.
All protrusions, burrs and welding residues must be thoroughly cleaned using a grinder. The inner surface of the arch platform must be perfectly flat. The pipes for installing heating elements will protrude only 1 cm from the outside.
We got a fairly powerful electric boiler with our own hands with 3 heating elements. If you need a simpler unit, using the same principle it can be assembled using 1 or 2 heating elements.
Necessary materials
The list of materials will depend on the chosen design, the number of heating elements and the principle of operation. If the body is made of sheet metal, a metal sheet of at least 3 mm will be required, otherwise a pipe Ф219х3.
One heating element requires approximately 10 cm in diameter, i.e. for pipe F 219 it is possible to install only 2 heating elements. The length of the housing should be 500 mm longer than the electrodes.
Auxiliary materials will require welding electrodes, sealing material, thermal paint, valves, safety valve, thermometer, pressure gauge.
Electrical equipment is calculated strictly according to the boiler power, with a power of more than 5 kW, a special permit from Energonadzor and independent power supply to the electric boiler through an individual protection system will be required, and each heating element must be equipped with its own automatic circuit breaker.
With three-phase power supply at home, each heating element is installed on a separate phase. A general set of materials for connecting the boiler: cable, circuit breakers, starter and contact blocks.
Assembling a heating boiler on electrodes
Devices of this type have become actively used only in the last 10-15 years. These are more technologically advanced devices compared to heating elements.
Design
In electronic electric boilers, the liquid plays the role of a heating element. A self-assembled electric boiler of this type is a metal casing, inside of which there is an insulated steel electrode.
0 is supplied to the housing, and phase is supplied to the electrode. When voltage is applied, water ions begin to vibrate with a frequency of 50 hertz. In this case, the liquid gradually heats up. Due to this property, such boilers are also called ion boilers.
The dimensions of electrode boilers are small. They can be made from a pipe with a cross-section of up to 320 mm and a length of up to 60 cm. However, an electric boiler for heating a house with your own hands can be made much smaller.
Advantages:
- small dimensions, thanks to which the ion boiler can be placed even in a small apartment;
- the absence of the so-called “dry running”, which guarantees the serviceability of the boiler, since without liquid inside it will not work;
- resistance to voltage surges;
- high heating and cooling speed, which means ease of adjustment;
- efficiency in energy consumption compared to devices using heating elements.
Among the disadvantages of such boilers are the following:
- An important condition for the effective functioning of an electrode boiler is the level of thermal conductivity and the quality of the coolant;
- the device must be reliably grounded, since there is a high risk of electric shock;
- It is important to exclude the possibility of air getting inside the system, otherwise the electrodes will become unusable due to corrosion.
Scheme
In general, the electric boiler is connected through a starting relay, which is activated by a thermostat circuit. In fact, it is called automation. Such blocks are produced separately today and can be easily found on sale.
It is necessary to purchase the most inexpensive option, which takes into account only the temperature of the coolant, because our electric boiler will only insure the main heat generator in case of failure, preventing the system from freezing.
Electric heating boiler design
Heaters with a power of up to 7 kW can be connected using a single-phase circuit. It is better to make or purchase more powerful ones in a three-phase version (at Energosbyt you will need to arrange for a 3-phase metering connection).
A separate cable must be laid from the input distribution device to the electric boiler with a mandatory connection through a circuit breaker and an RCD.
Instructions for assembling a homemade electrode boiler
As a body for an electric heating boiler with our own hands, we use a pipe with an internal cross-section of about 50 mm and a length of 40 cm. In addition, you will need a solid rod with a diameter of 20 mm and a length of 30 cm, as well as two adapters with cut internal threads. At the end of the rod we drill a blind hole with a thread for a Ø10 mm bolt.
We prepare the pipes. We will weld 1 at the end of the pipe, and the other at the side. To ensure that the side pipe fits perfectly to the pipe, it is trimmed with a grinder and then sanded with a round file.
We cut holes for the pipes. If you don’t have a cutter, you can drill many small holes around the circumference. The work is brought to perfection with a needle file and a round file. The hole for the side pipe must be located 10-15 mm from the edge of the pipe.
The next step is to weld the pipes to the pipe. To prevent them from being led away, they first make spot welding in several places, and then apply a continuous seam.
We prepare the platform for the electric boiler. To do this, you can take a sheet of fiberglass 2 cm thick and cut a piece of 120x120 mm using a hacksaw. Then in this platform you need to drill one hole in the center, and four around the perimeter. The cross-section of the holes should be 10-12 mm.
Fastenings of the boiler body will be passed through the holes along the perimeter, and the central hole is intended for fixing the steel electrode.
We proceed to fixing the casing for the boiler to the platform. To ensure a secure fit, four Ø12 mm nuts can be welded on the body on 4 sides. Bolts Ø10 mm will easily pass through them.
Such nuts need to be welded with a slight indentation from the platform. To ensure this, you need to screw nuts of appropriate size onto the bolts, thread them into the wide nuts, and secure them from below again with smaller ones. This will make welding work easier.
At the last stage we perform the final assembly of the boiler. To do this, cut out a rubber gasket with a cross-section slightly larger than the outer diameter of the boiler. We make a hole in its central part and thread an electrode through it. Then we install the body on the platform and screw it on.
Installation and connection of equipment
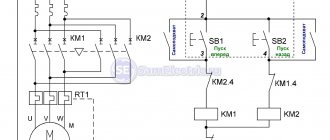
connection diagram
The most difficult thing is to connect the structure to the electrical network. Since we have to deal with heating devices, we will have to install the input on 3 phases.
A number of systems will need to be installed directly in the electrical panel itself:
- machine;
- relay;
- toggle switch;
- fuse;
- temperature sensor;
- various control buttons;
- magnetic starters and a number of other elements, if necessary;
It is mandatory to make a grounding loop. To do this, you need to take a metal pin or reinforcement, the diameter of which should be approximately 15-20 mm, and attach a metal bolt to it. This structure is placed under the floor of a residential building and a wire coming from the electrical panel is passed to it.
Working principle of electric induction boiler
If we omit the details, then the operation of an induction boiler is based on heating the coolant through a magnetic field.
Among the advantages of such units:
- high efficiency;
- safety;
- possibility of using any coolant;
- no scale.
Disadvantages can be considered:
- high cost of factory boilers;
- complexity of the structure of the automatic control unit. Without preparation it will be difficult to assemble it.
Useful tips
In order for systems with electric boilers to operate efficiently and have high efficiency, pumping equipment is installed in them to circulate the coolant.
Thanks to good circulation, the coolant will warm up evenly. It is recommended to install the circulation pump on the bypass so that you can switch to natural circulation of water in the system. When installing circuits with a gravitational carrier current, the return pipeline is laid with a slope towards the heating boiler. Thanks to this, the cooled liquid will quickly flow into the boiler.
How to make it yourself
To make a homemade boiler with a tubular electric heater, you need to purchase its main element, a heating element, sold in broiler spare parts stores. Then a piece of pipe suitable for free placement of the heating element is selected. At the lower and upper ends, pipes for the inlet and outlet of the coolant are welded to the side. One end is welded tightly, a metal plate with a nut located in the center is welded to the other. The heating element is screwed into the nut - and the boiler is ready! The heating element is connected to the electrical network through a grounded socket, and the boiler is connected to the pipeline heating system through pipes.
Important! You cannot turn on the heating element boiler if there is no coolant in it, this leads to immediate burnout of the heating elements; it is worth considering
The body of the induction boiler is a half-meter piece of polypropylene pipe. Its ends are covered with a mesh, chopped metal wire is poured inside, heated by eddy currents. Ninety turns of wire are wound onto the outer surface of the pipe. The terminals of the coil made in this way are connected to the inverter from the welding machine. All that remains is to install the fittings for installation in the pipeline network - and the job is done!
Reference. Induction boilers are efficient in operation, since the coolant circulates through the pipe, which is the heating element. The influence of eddy currents prevents the formation of scale on its walls. To make an electrode boiler, one end of a pipe of a suitable diameter is closed tightly, and a plug with electrodes is installed in the other. Fittings are welded on the side near the ends for connection to the pipeline heating system. The electrodes are connected to the network and heat the working fluid.