4.6/5 — (11 votes)
The assembly of an electrical panel and its installation for a private house or apartment to order is the most important part of electrical installation work. The electrical panel serves to receive and distribute electricity to consumers.
It is very important to take the process of assembling and installing the electrical panel with full responsibility. The main task of the distribution board is to protect electrical appliances (household appliances, cable lines, etc.) and our lives.
A
lot of fires occur due to faults in electrical wiring , and most likely this percentage will only increase, because the condition of electrical wiring in old houses is getting worse and worse, and apartment owners are in no hurry to change it.
There is old aluminum electrical wiring, there are ancient “packages” and switches in the floor panels, and they don’t even think about RCDs and automatic circuit breakers. Electrical panel assembly is free !!! The difference in retail and wholesale prices at which I purchase components from the largest supplier of electrical goods “ETM” is on average 15-20% , and this is the approximate cost of assembling an electrical panel. Those. At the retail price in “ETM” you get both components for the shield and its assembly.
And if replacing electrical wiring, connecting cables, installing sockets and switches can be done independently, then assembling an electrical panel is a job for professionals, who are called electricians.
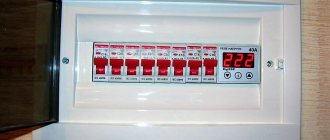
Examples of electrical panels assembly, as well as approximate prices.
It is important to understand that electricians usually work at speed, i.e. time is money. The wiring is hidden in grooves, corrugation, under suspended ceilings, in floor screeds, and no one has seen how it was installed. Junction boxes and socket boxes are also often not visible, and the assembled electrical panel is covered with plastrons (panels). And not every customer will climb inside to check how the electrical panel was assembled, unless after the first accident or tripping of the RCD (search for current leakage).
Electricians work for the final result, because... assembling an electrical panel is their only direction. In the first place are: the build quality and appearance of the electrical panel without plastrons. Often in teams of electricians, there is a person who is specifically involved in assembling panels, or they turn to familiar electricians. For example, I collaborate with several companies for whom I design and assemble electrical panels.
Assembling a custom electrical panel consists of several stages, each of which is important.
Switchboard components
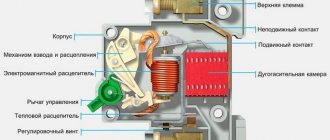
There is an automatic circuit breaker at the input to protect the wiring from short circuits; it de-energizes further circuits during overloads. In emergency situations, the cables overheat, which leads to a fire. Input circuit breakers are installed first in the electrical panel. Assembling an electrical panel involves placing a minimum of switching devices related to a separate housing or floor.
Standard set of modules:
- meter to determine the electricity used;
- An RCD with an automatic device or a difavtomatic device, sometimes several such devices;
- switching terminals, buses, combs, etc.;
- fuses and equipment for control and protection;
- line surge relay;
- sometimes they install low-current networks, for example, LAN or cable television.
A DIN rail is provided for mounting automatic breakers, while there are places on the metal strip where these devices are placed using special clamps.
How to create a diagram
Before starting the layout, they draw up a plan for supplying the house with electricity, taking into account all the individual lines and powerful units, which are assembled into groups.
- Powerful users consuming more than two kilowatts are grouped. An automatic machine that can withstand the specified loads is installed on each line.
- Dishwashers, washing machines, and air conditioners that require little power are connected to circuit breakers rated at 16 A. Choose a cable with a cross-section of 2.5 mm².
- High-power units will require 25 A circuit breakers; the cross-section of the power cable is increased to 4.6 mm². Such lines are carried out with one whole wire.
- For sockets, circuits are drawn for each room, a three-core wire with a cross-section of 2.5 mm² is designed. Individual branches are placed on the socket in distribution boxes.
Lighting devices are divided into groups, connected to one 1.5 mm² cable, the line will require a machine with an input of 10 A.
Design requirements
No categorical standards have been developed regarding filling the shield with modules, but there are some rules. It is logical to place the input switch in the top row , at the beginning, in front of other breakers.
Design Rules:
- In residential buildings, the installation of an electrical panel involves continuous enclosing devices to cover live parts. In rooms for special personnel, cabinet doors are installed with mesh or with holes. In any case, the common panels on the sites are equipped with locks.
- After the switch, according to the instructions, general measuring settings are installed. From left to right, RCDs of the group category are installed, for example, in the kitchen, bathroom, for lighting, sockets.
- Next, automatic breakers are designed in order: lighting circuit, common sockets, dedicated lines for the washing machine, electric boiler, water heater and others.
Regulatory documents and technical specifications for the design of electrical panels in residential buildings are found in the text SP 31.110 - 2003.
Calculation of the number of seats in the panel
The size of the housing must accommodate all the provided modules and fit into the wall niche. Dimensions are selected after determining the list of devices, and it is advisable to leave room for reserve.
Consider the following:
- standard single machine - 17.5 mm, double - 35 mm, triple - 52.6 mm;
- two-module RCD for 1 phase - 35 mm;
- four-module RCD for 3 phases - 70 mm;
- two-module difavtomat for 1 phase - 70 mm;
- terminal block on DIN rail - 17.5 mm per 1 module;
- counter 105 – 140 mm;
- three-module voltage relay - 52.5 mm;
- socket on DIN rail - 52.5 mm.
Valera
The voice of the construction guru
Ask a Question
The devices are attached to a DIN rail, the standard width of which is 35 mm. The socket and relay are optional modules. If it is not possible to increase the size of the box, they can be neglected. If, for example, you have 20 required modules, choose a panel in which you can assemble up to 24 devices.
Scheme for several groups
Electricity supplied to the house is evenly distributed among consumers. Three-phase input is divided into groups of units according to power.
There are several standard schemes:
- Scheme No. 1. A double circuit breaker is installed at the input, and its rating is no more than the input current. Switches are placed after the machine, grouped from left to right. The first to fix the breakers for powerful consumers, then the control mechanisms for sockets, and the last to install the lighting machines.
- Scheme No. 2. To protect against electric shock, an RCD is provided. If there is only one protective device, it is located after the general switch.
- Scheme No. 3. A perfect system when each bundle is connected to its own RCD and separated from the others. So each circuit has its own machine, but the size of the cabinet should be larger.
- Scheme No. 4. The optimal scheme, it provides 2 DIN rails, since all rooms and circuits are connected to their own RCD and automatic circuit breaker. All RCDs are installed on the top bus, and circuit breakers are installed on the bottom bus.
Range of electrical panels
| Appearance | Name | Overall dimensions, mm | Number of modules | Number of rows | Weight, kg | Color | Catalog number | ||||
| IN | Sh | G | a | b | |||||||
| ShchRV-12 | 280 | 330 | 120 | 46 | 220 | 12 | 1 | 2,7 | RAL 7035 | 30101 | |
| ShchRV-18 | 430 | 330 | 120 | 46 | 220 | 18 | 2 | 3,5 | RAL 7035 | 30104 | |
| ShchRV-24 | 430 | 330 | 120 | 46 | 220 | 24 | 2 | 3,6 | RAL 7035 | 30102 | |
| ShchRV-36 | 550 | 330 | 120 | 46 | 220 | 36 | 3 | 5,8 | RAL 7035 | 30103 | |
| ShchRN-9 | 250 | 250 | 120 | 46 | 220 | 9 | 1 | 3,3 | RAL 7035 | 30201 | |
| ShchRN-12 | 250 | 300 | 120 | 46 | 220 | 12 | 1 | 3,3 | RAL 7035 | 30202 | |
| ShchRN-15 | 250 | 350 | 120 | 46 | 270 | 15 | 1 | 3,4 | RAL 7035 | 30206 | |
| ShchRN-18 | 400 | 250 | 120 | 46 | 220 | 18 | 2 | 3,9 | RAL 7035 | 30207 | |
| ShchRN-24 | 400 | 300 | 120 | 46 | 220 | 24 | 2 | 4,2 | RAL 7035 | 30203 | |
| ShchRN-36 | 520 | 300 | 120 | 46 | 220 | 36 | 3 | 6,5 | RAL 7035 | 30204 | |
| ShchRN-45 | 520 | 350 | 120 | 46 | 270 | 45 | 3 | 7,3 | RAL 7035 | 30205 | |
| ShchRN-60 | 680 | 350 | 120 | 46 | 220 | 60 | 4 | 8,6 | RAL 7035 | 30208 | |
| ShchRN-90 | 520 | 685 | 120 | 46 | 270 | 90 | 2+3 | 12,0 | RAL 7035 | 30209 | |
Types of protective automation
Three types of devices are used in an electrical panel:
- circuit breakers;
- RCD;
- difavtomats.
The machine can operate in manual mode or be triggered when a short circuit occurs in the line. The switching device can be electronic or mechanical; it turns the electric current on and off when an abnormal current indicator occurs.
RCD is a protective device for breaking the circuit when a person touches live parts. The device monitors the leakage current that appears in this case. Protects against fire that occurs when electric current leaks through a faulty wire sheath.
The difavtomat combines an RCD device and a circuit breaker in a box, saving space in the distribution panel. The joint kit is more expensive and does not allow you to see the reason for the automatic blackout. There are models with a flag indicating the cause of the malfunction.
Choice for home and apartment
Based on the number of phases, an RCD is selected depending on the type of line - for single-phase they install the appropriate device, for 380 V they buy a three-phase one.
They produce RCDs with rated current values of 16, 25, 40, 63 A. Such indicators indicate the amount of current that the module will pass without turning off. The RCD is not equipped with overcurrent protection (overload, short circuit), so it is combined with a circuit breaker. The parameter is indicated on the back of the instrument housing.
Material of manufacture
When choosing an electrical panel, special attention should be paid to the material from which it will be made - plastic or metal. A plastic shield is much more beautiful, so it is recommended to choose it for an apartment, private home or office.
The metal body is more durable, strong and reliable. This type of electrical panel is best chosen for a production facility, garage or street.
We draw your attention to the fact that if you decide to choose a plastic electrical panel, be sure to buy a product from a reliable manufacturer. Cheap Chinese electrical panels quickly turn yellow and, moreover, are famous for the fact that they break quite easily.
Preparing tools
Installation of the shield is not complete without power tools. The wires in the walls are laid in grooves, to form which they take a wall chaser or a grinder with a circle on the stone. Small volumes are made with a chisel and hammer.
The cabinet is attached to a concrete or brick wall with dowels, so you will need a hammer drill and drills with pobedit tips. On wooden surfaces, a drill is used, and the screws are tightened with a screwdriver.
Electrician's special tools:
- soldering iron, screwdriver sets;
- probe screwdriver;
- portable welding;
- pliers, side cutters;
- current clamps.
A multimeter is needed to determine the electrical parameters of the network and individual devices. They measure electric current, DC and AC voltage, and resistance. A multimeter is used to test fuses, input devices and other devices.
Installation method
The first thing you need to decide is which electrical panel design to choose - outdoor installation or built-in. If you have plasterboard walls in your apartment or house, it is better to choose a built-in electrical panel that does not spoil the interior of the room so much. However, if the walls are concrete and it is not possible to make a niche, it is permissible to install an overhead electrical panel.
At the dacha you also need to look at the circumstances. For example, in a wooden house or in a bathhouse it is better to install a safer overhead shield.
As for the garage or industrial premises, you don’t have to worry and install a mounted electrical panel on the wall, which is much easier to install.
Electrical panel assembly
When assembling it yourself, take into account that the machine at the entrance and the electricity meter are sealed by representatives of energy sales . If this is not possible, the entire shield will be sealed or acceptance will be refused. Inside the common electrical panel, a box is assembled into several places (depending on the type of machine), a switch is placed in it, which is sealed. The case is installed on the wall, and a DIN rail is fixed in it.
Step-by-step procedure for assembling the shield:
- fixing elements on the DIN rail according to the diagram;
- connecting modules to the input machine using a comb;
- connecting the phase wire with cables with lugs;
- installation of a zero bus;
- checking fasteners with a screwdriver;
- connecting current, checking operation;
- checking network indicators with a multimeter.
Before operation, make sure that all system elements (sockets, switches, distribution sockets, etc.) are installed and connected.
Connecting components
The shields have a place for cable entry, equipped with a cover. This is important when installing the housing in a niche, when the water supply is difficult. More often this is a group of perforated holes, the size of which is changed by removing the jumpers.
The cable is inserted into a corrugated pipe with a diameter of 16 - 20 mm. The mobility of wires in a pipe can be reduced by using plugs and gland plates. The wires are immediately marked, and the length in the box is left at double the height of the housing.
For connections, jumpers made of wire or bus are used; the first option is suitable for small boxes.
Tires are used in large cabinets , they compare favorably:
- good contact;
- reliability;
- neat look.
Valera
The voice of the construction guru
Ask a Question
Tires for the phase are gray, for zeros are blue, there are universal two-color ones that are used for two options. The working zero from the supply wire enters the zero bus, and then it is removed to circuits going to different rooms.
Connecting protective devices
RCDs and automatic devices are pressed against the DIN rail until a click appears. The wires are connected in accordance with the type of switch (single or double). After installing the devices, their inputs are connected. This is done with jumpers or combs.
Jumper installation:
- cut off pieces of wire of the required length, expose the edges, bend them in an arc, place 2 conductors in the terminal, tighten them;
- long wires are stripped of insulation by 1.5 cm every 5 cm, and the exposed areas are bent with pliers to obtain united arcs;
- areas without insulation are inserted into the sockets and tightened.
Along the phase line, the RCD is connected by dividing the wire into lighting circuit breakers, sockets, and powerful groups. The neutral line is connected after the fire protection. The neutral wire is fixed to a common neutral bus, then from it it is connected to all mounted RCDs and automatic circuit breakers.
Testing and commissioning
After installation, they coordinate the operation of the electrical panel, check that the circuit breakers turn off when overloaded, and the RCD turns off when a leakage current appears. First, draw the contacts with a certain force.
Further work order:
- disconnect the load in the circuits (lights, sockets, household appliances);
- use a multimeter to determine that there is no short circuit in the network;
- the device checks the resistance of insulating shells to breakdown;
- check the ability to operate switching modules (diffautomatic devices, RCDs);
- Voltage is supplied to the switchboard and all circuit breakers and protective devices are turned on.
Valera
The voice of the construction guru
Ask a Question
To check, use the “test” key on RCD devices. The protective switches must be disabled, otherwise they must be replaced with serviceable ones. The test is carried out after pulling the mating contacts, since a weak connection may show a false insulation failure during the test.
Safety precautions
The shield is operated by trained workers . Emergency work is carried out by field operatives. Repairs begin only after de-energizing the switchgear. They put up warning signs about the work prohibiting turning on switches.
In the panel under each switch there are clear markings and inscriptions indicating that the device belongs to a specific circuit . They use adhesive stickers on which short informative messages are written.
If the cable is damaged, it cannot be repaired, it can only be replaced.
Work is performed on a rubber mat or in current-insulating shoes. Wear rubberized gloves, and the tool handles should be insulated.
Manufacturer
Well, the last selection criterion is the manufacturer of the product. If you don’t know which company to choose an electrical panel, we recommend giving preference to the following manufacturers:
- ABB;
- I.E.K.;
- Makel.
These three panel companies are most often used in electrical work. ABB electrical panels are the highest quality, IEK and Makel are slightly inferior to their competitors, but will also be cheaper in price.
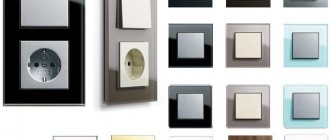
If you want to choose a beautiful and at the same time reliable electrical panel for your home or apartment, give preference to the Greek manufacturer FOTKA. You can see the range of products for yourself in the photo example:
We recommend watching a video that clearly demonstrates a comparison of electrical panels from different companies:
Comparing manufacturers