The wind has incredible energy capabilities. Failure to use its powerful potential must be boldly recognized as unreasonable waste. But you can easily build a vertical wind generator with your own hands and receive virtually free energy to cover your household needs. This is quite real, don’t you agree?
This article will help you understand in detail a complex technical issue. Systematized, accessible information covers in great detail the principle of operation of popular systems that convert the energy of air masses into electricity.
Without a doubt, you will be carried away by the idea of creating a windmill, the specifics of its assembly are described in the article. We examined in detail the different types of vertical wind generators, touching on their differences, advantages and disadvantages. The text part of the material is perfectly complemented by photos and video instructions.
Advantages and principle of operation of wind turbines
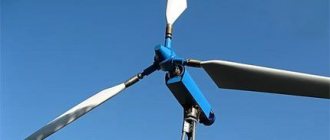
A modern vertical generator is one of the alternative energy options for the home. The unit is capable of converting gusts of wind into an energy resource. For correct operation, it does not require additional devices that determine the direction of the wind.
A rotary wind generator is very easy to make with your own hands. Of course, he won’t be able to completely take on the responsibility of providing energy to a large private cottage, but he will do an excellent job of lighting outbuildings, garden paths and local areas.
The vertical type device operates at a low height. Its maintenance does not require various devices to ensure safe high-altitude repair and maintenance work.
A minimum of moving parts makes the wind turbine more reliable and operationally stable. The optimal profile of the blades and the original shape of the rotor provide the unit with a high level of efficiency, regardless of which direction the wind is blowing at any given moment.
Small household models consist of three or more light blades, instantly catch the weakest gust and begin to rotate as soon as the wind force exceeds 1.5 m/s. Thanks to this ability, their efficiency often exceeds that of larger installations requiring higher winds.
The generator operates absolutely silently, does not disturb owners and neighbors, does not create harmful emissions into the atmosphere and reliably serves for many years, carefully supplying energy to living quarters.
A vertical wind generator operates on the principle of magnetic levitation. As turbines rotate, impulse and lift forces are generated, as well as actual braking forces. The first two cause the blades of the unit to rotate. This action activates the rotor and it creates a magnetic field that produces electricity.
A wind turbine with a vertical axis of rotation is not inferior in efficiency to its horizontal counterparts. In addition, it makes no claims to the territorial location and works fully in almost any place convenient for homeowners
The device functions completely independently and does not require the owner’s intervention in the process.
How to make a wind generator with a vertical axis of rotation with your own hands
Components:
- An axial mast is a supporting structure in the shape of a pyramid, tripod or pole about five meters high. The blades and the generator are mounted on it.
- The blades catch the wind currents.
- The stator contains the phases from the coils.
- The rotor is the moving part of the windmill.
- The controller turns on the wind generator to slow down when it develops power above its base metrics.
- The inverter provides alternating current.
- The battery stores the generated energy.
Preparing elements
To make blades for a vertical wind generator, you will need high-quality plastic and/or tin. For example, a blade structure can be made from plastic pipes. Then semicircular tin fragments are attached to each side of the pipe. The height and radius of rotation should reach 70 cm. Or you can make a blade structure from spare parts.
The rotor requires 2 ferrite disks with a diameter of 32 cm, 6 neodymium magnets and glue. The rotor system consists of two discs. The diagram of each disk is as follows: you need to arrange the magnets so that their polarity alternates, the angle between them is 60 degrees, and the placement diameter is 16.5 cm. After correct placement, the magnets are filled with glue.
For the stator, you need to make nine coils with 60 turns of copper wire with a diameter of 0.1 cm. To make three phases, the coils must be soldered together in the following order:
- For the first phase, we connect the beginning of the 1st coil with the end of the 4th, and the beginning of the 4th with the end of the 7th;
- For the second phase we do the same, but start with the 2nd coil;
- To make the third phase, we start with the 3rd coil.
The mold for the coils is made of plywood and lined with fiberglass. After placing the phases, they need to be filled with glue and left to dry for several days.
Installation of the structure
When the manufacturing of the component elements is finished, you can begin to connect them together. First you need to connect the rotor and stator:
- Make holes in the upper rotor disk for four studs.
- Make holes in the stator for mounting to the stand.
- Place the lower rotor disk on the stand with the magnets facing up.
- Place the stator on the lower rotor and rest the studs against the aluminum plate.
- Cover the structure with the second rotor disk (the magnets are located at the bottom).
- By rotating the pins, achieve uniform convergence of the upper and lower rotor disks, after which the pins and plate are carefully removed.
- Secure the generator with nuts.
Screw the finished generator to the axial mast. After this, the blade structure can be attached to the generator. Your windmill is now ready for installation! To install a windmill, prepare a reinforced foundation and secure the structure with a brace.
Lastly, the electrical network is connected in the following order: energy from the generator goes to the controller, then is collected on the battery, and then converted into alternating current using an inverter.
Choosing a location for a wind generator
Choosing the right location for installing a wind generator is an important step. It is best to place the device at the highest open point and carefully ensure that it is not below the level of adjacent residential and outbuildings. Otherwise, buildings will become an obstacle to air flow and the efficiency of the unit will greatly decrease.
If the site faces a river or lake, the windmill is placed on the shore, where the winds blow especially often. Elevations on the property or large empty spaces where there are no artificial or natural barriers to air flow are ideal for locating the generator.
When residential real estate (house, cottage, apartment, etc.) is located within the city or is located outside the city, but in densely built areas, a wind energy complex is installed on the roof.
To place a generator on the roof of an apartment building, the written consent of the neighbors is taken and official permission is obtained from the relevant authorities.
When installing a vertical generator on the roof of an apartment building, you should remember that the unit operates quite noisily and can cause inconvenience to both the owners and other residents. Therefore, the device must be placed closer to the center of the roof so that apartment owners on the upper floors do not suffer from the loud hum emitted by the windmill during operation
In a private house with a large garden plot, choosing a suitable location is much easier. The main thing is to take into account that the structure is located at a distance of 15-25 meters from residential premises. Then the sound effects from the rotating blades will not bother anyone.
Electrical diagram
Let's take a closer look at the electrical circuit. It is clear that the wind can stop at any moment. Therefore, wind generators are not connected directly to household appliances, but are first charged from them to batteries, to ensure the safety of which a charge controller is used. Further, taking into account the fact that batteries provide low-voltage direct current, while almost all household appliances consume alternating current with a voltage of 220 volts, a voltage converter is installed or, as it is also called, an inverter, and only then all consumers are connected.
In order for the wind generator to ensure the operation of a personal computer, TV, alarm system and several energy-saving lamps, it is enough to install a battery with a capacity of 75 ampere/hour, a voltage converter (inverter) with a power of 1.0 kW, plus a generator of appropriate power. What else do you need when you are relaxing at the dacha?
Maintenance of a vertical device
In order for a vertical wind generator to work efficiently, accurately and as efficiently as possible, all moving parts of the structure must be lubricated. This procedure is carried out at least 2 times during the entire calendar year.
At the same time, during maintenance, nuts that have become loose as a result of operation are tightened, electrical connections are strengthened, mechanical components are checked for corrosion, loose tension cables are tightened and the blades are carefully inspected for rupture or damage.
In winter, vertical installations require special care. During periods of frost, the blades become covered with a crust of ice and it must be cleaned in a timely manner so that the torque speed is maintained at the proper level.
Parts are painted as needed and once a year a complete inspection of the entire structure is carried out to identify faults. Such care ensures the correct operation of the wind turbine and extends its service life.
Classification of wind power generators
Of the entire fleet of independently constructed wind turbines, 2 main types with different axis of rotation are used:
- horizontal (wing);
- vertical (carousel).
Each has its own characteristics, among which there are differences in:
- number of blades (two-, three-, multi-blade);
- characteristics of the material of the blades (metal, fiberglass, sail);
- screw pitch (fixed, variable).
At home, it is preferable to make a vertical-axis wind generator with your own hands. Its main advantage is considered to be insensitivity to wind. In addition, the design simplicity does not require the creation of a wind orientation mechanism, so there is no need for rotating devices.
By generator location: horizontal or vertical
Many associate a wind power unit (APU) with a classic type of diagram—horizontal. In this type, the axis of rotation runs parallel to the ground, and the blades are arranged perpendicularly. Such a design necessarily requires a weather vane, operating on the principle of a tail unit. This promotes an advantageous position of the rotation plane perpendicular to the wind flow.
The horizontal position of the axis corresponds to the wind direction. There is a problem with the electrical connection. Without an electronic directional control, the housing wraps around an axis, causing wire breaks. To prevent this situation, a full rotation limiter is installed.
Making a vertical wind generator with your own hands is much easier. The located axis of rotation does not depend on the side of the air flow. An additional advantage of the rotary propeller is that the maintenance units are located at the bottom and there is no need to go upstairs.
According to the generated voltage rating
To get maximum savings, craftsmen install homemade wind generators for the home with the highest power. The design made for 12-14 volts is more popular. An old car generator is best for this. After changing it, the voltage converter will give 12-14 volts at the output.
A 220-volt DIY wind generator is considered a direct-use installation. It does not require a voltage converter. But since the operation of a windmill is subject to the force of the air flow, a stabilizer is required at the output. Depending on the speed, it acts as a regulator.
Assessment of the feasibility of installation
Before starting to manufacture a vertical wind generator, they study the weather situation in their region and try to determine whether the unit can provide the required amount of resource.
Experts recommend evaluating the following parameters:
- number of windy days - take the average value for the year when the gust exceeds 3 m/s;
- the amount of electricity consumed per day by a household;
- a suitable place on your own site for wind equipment.
The first indicator is learned from data obtained at the nearest weather station or found on the Internet on the relevant portals. Additionally, they check with printed geographical publications and create a complete picture of the wind situation in their region.
Statistics are taken not for one year, but for 15-20 years, only then the average figures will be as correct as possible and will show whether the generator will be able to fully satisfy the household’s need for electricity or whether its power will only be enough to power individual household needs.
If the owner has a large plot of land located on a slope, near a river bank or in open space, there will be no problems with installation.
When the house is located in the depths of a populated area, and the yard has compact dimensions and is closely adjacent to neighboring buildings, it will not be easy to install a vertical model of a windmill with your own hands. The structure will have to be raised 3-5 m above the ground and further strengthened so that it does not fall in the event of a strong gust.
All this information needs to be taken into account at the planning stage to make it clear whether the wind generator can take over the full energy supply or its role will remain as an auxiliary energy source. It is advisable to first calculate the windmill.
Assembly of an axial wind turbine on neodymium magnets
Since neodymium magnets appeared in Russia relatively recently, axial wind generators with iron-free stators began to be made not so long ago.
The appearance of magnets caused a rush of demand, but gradually the market became saturated, and the cost of this product began to decline. It became available to craftsmen, who immediately adapted it to their various needs.
Axial wind turbine on neodymium magnets with a horizontal axis of rotation is a more complex design that requires not only skill, but also certain knowledge
If you have a hub from an old car with brake discs, then we will take it as the basis for the future axial generator.
It is assumed that this part is not new, but has already been used. In this case, it is necessary to disassemble it, check and lubricate the bearings, thoroughly clean away sedimentary deposits and all rust. Don't forget to paint the finished generator.
The hub with brake discs, as a rule, goes to craftsmen as one of the components of an old car that has been scrapped, and therefore needs thorough cleaning
Distributing and securing magnets
Neodymium magnets must be glued to the rotor disks. For our work, we will take 20 magnets 25x8mm.
Of course, you can use a different number of poles, but the following rules must be observed: the number of magnets and poles in a single-phase generator must match, but if we are talking about a three-phase model, then the ratio of poles to coils should be 2/3 or 4/3 .
When placing magnets, the poles alternate. It's important not to make a mistake. If you are not sure that you will place the elements correctly, make a hint template or apply the sectors directly to the disk itself.
If you have a choice, buy rectangular rather than round magnets. In rectangular models, the magnetic field is concentrated along the entire length, and in round ones - in the center.
Opposing magnets must have different poles. You won't confuse anything if you use a marker to mark them with minus or plus signs. To determine the poles, take magnets and bring them close to each other.
If the surfaces attract, put a plus on them, if they repel, then mark them with minuses. When placing magnets on disks, alternate poles.
The magnets are installed in compliance with the rule of alternating policies, plasticine sides are located along the outer and inner perimeters: the product is ready to be filled with epoxy resin
To securely fasten the magnet, you need to use high-quality and as strong glue as possible.
To enhance the reliability of fixation, you can use epoxy resin. It should be diluted as indicated in the instructions and filled with it on the disc. The resin should cover the entire disc, but not run off it. You can prevent the possibility of dripping if you wrap the disk with tape or make temporary plasticine barriers made of a polymer strip around its perimeter.
Single-phase and three-phase generators
If we compare single-phase and three-phase stators, the latter will be better. A single-phase generator vibrates when loaded. The cause of vibration is the difference in the amplitude of the current, which arises due to its inconsistent output at a time.
The three-phase model does not have such a disadvantage. It is characterized by constant power due to phases that compensate each other: when the current increases in one, it decreases in the other.
According to the testing results, the output of the three-phase model is almost 50% greater than that of the single-phase model. Another advantage of this model is that in the absence of unnecessary vibration, acoustic comfort increases when the device operates under load.
That is, a three-phase generator practically does not hum during its operation. When vibration is reduced, the service life of the device logically increases.
In the fight between three-phase and single-phase devices, three-phase invariably wins, because it does not hum so much during operation and lasts longer than single-phase
Rules for winding a reel
If you ask a specialist, he will say that before winding the coils, you need to perform a careful calculation. A practitioner in this matter will rely on his intuition.
We chose a generator that was not very fast. Our charging procedure for a twelve-volt battery should begin at 100-150 rpm. Such initial data require that the total number of turns of all coils be 1000-1200 pieces. We just have to divide this figure between all the coils and determine how many turns there will be on each.
A windmill at low speeds can be more powerful if the number of poles increases. The frequency of current oscillations in the coils will increase. If you use a larger cross-sectional wire to wind the coils, the resistance will decrease and the current will increase. Don't lose sight of the fact that higher voltage can "eat up" current due to winding resistance.
The winding process can be made easier and more efficient if you use a special machine for this purpose.
It is not at all necessary to do such a routine process as winding coils by hand. A little ingenuity and an excellent machine that can easily cope with winding are already there
The performance characteristics of homemade generators are greatly influenced by the thickness and number of magnets that are located on the disks. The total total power can be calculated by winding one coil and then spinning it in a generator. The future power of the generator is determined by measuring the voltage at specific speeds without load.
Let's give an example. With a resistance of 3 ohms and 200 rpm, 30 volts comes out. If you subtract 12 volts of battery voltage from this result, you get 18 volts. Divide this result by 3 ohms and get 6 amperes. The volume is 6 amperes and will go to the battery. Of course, in the calculation we did not take into account the losses in the wires and on the diode bridge: the actual result will be less than the calculated one.
Usually the coils are made round. But, if you stretch them out a little, you will get more copper in the sector and the turns will be straighter. If you compare the size of the magnet and the diameter of the inner hole of the coils, then they should match each other or the size of the magnet may be slightly smaller.
The thickness of the stator we make must be correctly related to the thickness of the magnets. If the stator is made larger by increasing the number of turns in the coils, the interdisk space will increase and the magnetic flux will decrease. The result may turn out to be this: the same voltage is generated, but due to the increased resistance of the coils, we will receive less current.
Plywood is used to make the stator mold. However, sectors for coils can be marked on paper using plasticine as borders.
If you place fiberglass fabric on top of the coils at the bottom of the mold, the strength of the product will increase. Before applying epoxy resin, you need to lubricate the mold with Vaseline or wax, then the resin will not stick to the mold. Some people use tape or film instead of lubricant.
The coils are fixed to each other. In this case, the ends of the phases are brought out. The six wires brought out should be connected in a star or triangle. By rotating the assembled generator by hand, it is tested. If the voltage is 40 V, then the current will be approximately 10 amperes.
Final assembly of the device
The length of the finished mast should be approximately 6-12 meters. With such parameters, its base must be concreted. The windmill itself will be fixed to the top of the mast.
In order to be able to reach it in the event of a breakdown, it is necessary to provide a special mount at the base of the mast, which will allow the pipe to be raised and lowered using a hand winch.
The mast with a wind generator attached to it rises high, but the prudent craftsman made a special device that allows the structure to be lowered to the ground if necessary
To make a screw, you can use a PVC pipe with a diameter of 160 mm. It will be used to cut a two-meter propeller consisting of six blades from its surface. It is better to develop the shape of the blades yourself experimentally. The goal is to increase torque at low rpm.
The propeller should be protected from excessive wind. To solve this problem, use a folding tail. The generated energy is stored in batteries.
We have provided our readers with two options for self-made 220 V wind generators, which enjoy increased attention not only from country property owners, but also from ordinary summer residents.
Both wind turbine models are effective in their own way. These devices can demonstrate especially good results in steppe areas with frequent and strong winds. They are efficient enough to be used in organizing alternative home heating and supplying electricity. And they are not so difficult to build with your own hands.
Manufacturing options
Over the long period of existence of alternative energy, electric generators of various designs have been created. You can make them yourself. Most people think that it is difficult because it requires a certain amount of knowledge, various expensive materials, etc. In this case, the generators will have very low productivity due to a large number of miscalculations. It is these thoughts that make those who want to give up the idea of making a windmill with their own hands. But all statements are absolutely wrong, and now we will show this. Craftsmen most often create electric generators for windmills using two methods:
- From the hub;
- The finished engine is converted into a generator.
Let's look at these options in more detail.
Winding the reel
Having chosen a not very high-speed option, charging the 12V battery begins at 100-150 rpm. The number of turns for this should correspond to 1000-1200. Dividing the turns into all coils, we get their number for one.
If a large cross-section wire is used for turns, the resistance decreases and the current increases.
The characteristics of wind generators assembled by yourself are influenced by the thickness of the magnets on the disk and their number.
Coils, as a rule, are made in a round shape, but by slightly stretching them, you will be able to straighten the turns. When finished, the coils should be equal to or slightly larger than the magnets. The thickness of the stator should also correlate with the magnets.
If the latter is larger due to more turns, the space between the disks increases and the magnetic flux decreases.
But greater resistance of the coils will lead to a decrease in current. Plywood is suitable for the stator shape. To increase the strength of the product, fiberglass is placed on top of the coils (at the bottom of the mold). Before applying epoxy resin, the mold is treated with Vaseline or wax, or tape is used.
The generator is tested by turning it by hand. For a voltage of 40V, the current reaches 10 A.
Legal side of the issue
A homemade wind generator for the home is not prohibited; its manufacture and use does not entail administrative or criminal penalties. If the power of a wind generator does not exceed 5 kW, it is classified as a household appliance and does not require any approval from the local energy company. Moreover, you are not required to pay any taxes if you do not make a profit when selling electricity. In addition, a homemade generating windmill, even with such productivity, requires complex engineering solutions: it’s easy to make it. Therefore, the power of a homemade product rarely exceeds 2 kW. Actually, this power is usually enough to power a private home (of course, if you do not have a boiler and a powerful air conditioner).
In this case, we are talking about federal legislation. Therefore, before making a decision to make a windmill with your own hands, it would be a good idea to check the presence (absence) of regional and municipal regulations that may impose some restrictions and prohibitions. For example, if your house is located in a specially protected natural area, the use of wind energy (which is a natural resource) may require additional approvals.
Problems with the law can arise if you have troublesome neighbors. Windmills for home are classified as individual buildings, so they are also subject to some restrictions:
- The height of the mast (even if the wind generator does not have blades) cannot exceed the standards established in your region. In addition, restrictions may apply based on the location of your site. For example, the landing glide path to the nearest airfield may be passing above you. Or there is a power line in the immediate vicinity of your property. If dropped, the structure may damage poles or wires. General limits under normal wind load are 15 meters in height (some homemade windmills soar up to 30 meters). If the mast and body of the device have a large cross-sectional area, neighbors may make claims against you on whose property the shadow falls. It is clear that such complaints usually arise “out of harm”, but there is a legal basis.
- Noise from the blades. The main source of problems with neighbors. When operating in a classic horizontal design, the windmill produces infrasound. This is not just an unpleasant noise; when it reaches a certain level, wave vibrations in the air have an adverse effect on both the human body and domestic animals. A homemade generator for a windmill, as a rule, is not a “masterpiece” of engineering, and in itself can make a lot of noise. It is highly advisable to officially test your device with regulatory authorities (for example, the SES), and obtain a written conclusion that the established noise standards are not exceeded.
- Electromagnetic radiation.
Any electrical device emits ethereal interference. Take, for example, a windmill from a car generator. To reduce the level of interference from a car receiver, capacitor filters are installed in the car. When developing a project, be sure to take this point into account. Claims can be made not only from neighbors who have problems receiving television and radio signals. If industrial or military reception centers are located nearby, it would be a good idea to check the level of interference with an electronic interference control (EW) unit. - Ecology. It sounds paradoxical: it would seem that you are using an environmentally friendly unit, what problems could there be? A propeller located at a height of 15 meters or higher can become an obstacle to the migration of birds. The rotating blades are invisible to birds and they are easily hit.