Despite the dominance of computers, mobile phones and televisions in our lives, radio broadcasting still has its fans. Radio signals are received using a radio receiver, it is convenient to use in the background, during a long journey in a car, long runs and sports.
Radios are still a part of our lives
High-quality reproduced sound and normal volume of the radio signal can only be obtained by connecting the receiver to the antenna. At its core, this is a very simple design, so any technically competent person can make an antenna with their own hands.
Features of radio wave propagation
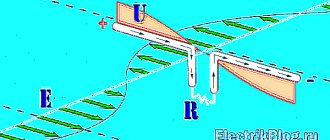
Before turning to step-by-step instructions on how to make an antenna yourself, it is necessary to clarify the features of radio signal transmission in the VHF and FM bands.
This will help you better understand the principle and design of the antenna. Important to remember:
- reception of a high-quality signal is possible only within visibility (for example, when a television and radio tower is visible from the window of a house);
- capturing a signal at a great distance from the broadcasting object in the evening and at night is problematic;
- precipitation weakens or completely interrupts signal transmission.
Types of antennas
Any device that receives radio waves has a sensitivity threshold. If the received signal is lower than this, the sound volume and quality will be poor. The radio wave weakens when moving far away from the transmitting station or due to deteriorating weather. This is especially true for the FM and VHF bands due to the characteristics of wave transmission. To overcome these difficulties, strengthen and improve the signal quality, any radio needs an antenna. Their design features and dimensions are determined by the range of the receiver: there are multi-kilogram antennas with coverage of thousands of square meters. km and simple homemade crafts in the form of wire above the ground.
The whole variety of antennas for radio stations is divided into directional and non-directional, as well as mobile and stationary. Directional ones work on the principle of connecting point to point or point to many points within 50-100 meters. Non-directional ones have coverage over the entire area around them.
There are also such radio antennas as:
- Rod - in the form of a regular rod or a rounded shape;
- Wire – curved in various required positions;
- On once fashionable boomboxes and music centers you can find telescopic antennas - folding structures made of metal rods, reminiscent of telescopes;
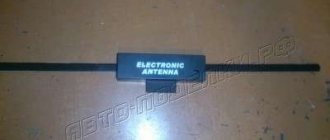
Telescopic antenna
- A retractable antenna is available on almost every car; its advantage is that such a retractable structure can be installed anywhere in the car (roof, fender, etc.), the receiving element is a removable rod with anti-noise winding, which allows you to make the radio sound clear and loud even at high driving speeds. The rod goes into a plastic casing, where there is a stainless steel spring, which retracts the antenna into place when it is deflected in the direction of travel.
Regardless of the type or type of radio antenna, their operating principles are the same.
Note! Quite often, the quality of a radio signal does not depend on the type and condition of the antenna for a radio receiver or music center, but on the technical capabilities of these devices themselves with their receiving chips.
Antenna options
All types of radio antennas can be divided into mobile and stationary, they can also be directional and non-directional.
Directional ones are characterized by orientation to a specific point (signal source) in space; they operate over short distances (50-100 m). Omnidirectional are focused on the signal over the entire surrounding area.
The antenna can also be rod, wire or telescopic. The latter is a folding structure reminiscent of a multi-legged fishing rod. Such models are often found on tape recorders, stereo systems, and cars.
Whatever the type of antenna, the principle of operation of the devices is the same.
FM antenna design for receiver
Such antennas are designed to convert radio waves in the FM range into electrical signals perceived by the receiver. The simplest designs are a vibrator, half the size of a wave. Such antennas do not have directional properties and perceive too much interference radiation from the surrounding space. If the FM receiver is mobile, you can, by making some movements, find the best direction of the signal. For stationary receiving radio devices, a wave channel tuned to the broadcast receiving beam is more suitable, while the best sound quality will be on a couple of channels (mostly radio stations of this type broadcast in a range of about 10 megahertz).
Additional Information . If it is necessary to expand the radio broadcast beam, you can connect 2-3 half-wave vibrators in parallel in a vertical position and solder them onto round cylinders.
The required 50 ohm resistance is not always achieved; such an FM antenna must be amplified with devices for matching. Thus, vibrators can be mounted on cone-shaped guides, representing a fan, “opened” from the center to the borders.
FM antenna fanning out
When using steel and sheet metal in construction, it is possible to obtain even 300 ohms. Thus, it turns out to receive a fairly large number of FM channels. To further expand reception in this range, it is sometimes necessary to assemble and connect an antenna array.
Quarter-wave vibrator for radio reception
IPhone requires 50 ohm resistance. We'll have to make a quarter-wave vibrator at a frequency from the RK-50 cable. Theoretically, it's impossible, some of the power is lost, but let's try:
- The braid and insulation 37.5 cm long are removed from the RA-50 cable.
- Equip the other end with a docking connector, solder the structure to the required contacts.
Homemade radio antenna is ready! You will make antennas for the FM range and digital television. The cut length of the braid and insulation is determined by the channel frequency. Predominantly no matching device will be needed. To catch radio broadcasts, the wire hangs vertically; TV broadcasting – horizontally. Predetermined by the type of linear polarization of waves.
Antenna connection
The antenna for the radio receiver is connected in several ways:
- Direct: the antenna (usually telescopic antennas) is an integral part of the receiving radio device, while the “ground” phase is its body itself. The (active) resistance with such a connection reaches thirty ohms, and the reactive one is removed by altering the resonance circuit. Such antennas are not symmetrical. The grounding must be reliable (the length of the bare wire must exceed 1/10 wavelength), otherwise interference due to loop radiation is possible;
- With non-resonant power supply: a transmission line is used for directional transmission of radio waves, and its characteristic impedance must be equivalent to the antenna impedance. This connection allows you to get rid of losses and provide the best radio signal level;
Important! The excess cable between the FM antenna and the radio receiver should be cut, because each additional meter greatly reduces the receiver's sensitivity. After matching the resistance, bringing it closer to 50 Ohms, radio signal reception improves significantly.
- With the resonant type of power supply of communication lines, the ease of passage of radio waves directly depends on the length of the wave itself. For such antennas, feeders of half the wavelength (or multiples) are chosen, and the wave resistance is no longer so important, the antenna is matched. The frequency that an FM antenna perceives is the carrier frequency, quite often these are sine waves with a leading frequency of 50 hertz (harmonics).
How to make a radio antenna
If you have a technical mind and skillful hands, you can assemble a completely working radio antenna with your own hands. To do this you will need the following simple tools:
- a small coil of purified copper wire or metal foil;
- sharpened knife;
- pliers/cutters.
In the easiest case, you can take a ready-made television antenna and simply solder the connectors for the TV to those needed for the radio.
A homemade antenna for the VHF and FM bands can be constructed from the most ordinary foil or a piece of wire, only the sizes will vary.
The simplest indoor wire radio antenna
A homemade FM antenna is constructed on a dried board 15 by 15 centimeters using a sheet of foil 13 by 13 centimeters, thickness 15 mm (can be made up of several “shreds”). The algorithm of actions is as follows:
- on the foil we cut a square with a side of 1 decimeter, we get a frame;
- a 3 mm thin rectangle is separated from below;
- glue the resulting square frame onto plywood or a board to give the future antenna strength;
- to connect a shielded cable (its resistance is from 50 to 75 ohms), attach the central core of the antenna with a soldering iron to the bottom right;
- the screen is attached in the central part, shifted to the left by 2.5 cm.
For antennas in the VHF range, a plate is taken with a side of at least 18 centimeters, a foil square with a side of 15 and a half centimeters, and a frame thickness of 1.8 centimeters.
Not all FM radio signals have full coverage, which can be picked up by the built-in antenna. Signal amplifiers for an existing or self-made radio antenna come to the rescue. Sometimes it is enough to simply wrap a standard antenna with copper wire and bring its end out into the window. This tactic helps make the radio signal a little stronger, but does not improve the sound quality. In this case, the end of the wire must be carefully cleaned with a knife. Some radio enthusiasts insert their additional wire antenna into the socket on the rear panel of the music center, but this can damage the receiver and even short circuit the home network.
If the wire turns out to be powerless, you can design a rod-type antenna, which, being highly directional, better resists urban radio noise. The antenna-pin is made up of an arrow that acts as a power element, a pair of passive receiving devices (directors), a loop-type vibrator and a reflector-reflector. The dimensions of such a directional antenna are determined by the range to which the radio receiver will be tuned.
The whip antenna is assembled according to the following plan:
- a power structure is mounted on the façade of the building;
- into a pre-prepared socket on the radio/music receiver. a wire is inserted in the center;
- The found radio transmitting stations are configured.
More complex amplifiers of FM radio signals require solid knowledge and skills. Despite such efforts, waves can sometimes disappear at night (due to the lack of long-range perception of radio waves) and under unfavorable environmental conditions (rain, strong wind, heavy snow).
DIY pipe antenna
The main supporting element of this radio antenna is heating or water pipes. Required materials for creation:
- used transformer core (from an old TV);
- electrical tape, tape, office glue;
- foil made of thin copper or brass;
- one and a half meters of copper wire (diameter ¼ sq. mm);
- connecting pins.
For winding, the first layer is a ferrite core, a couple of layers of electrical tape on top, followed by a single foil layer. Exactly 25 turns of wire are wound onto such a screen blank with an overlap of 1 centimeter for better contact insulation. You should remember about the mandatory taps on turns No. 7, 12 and 25. The circuit is connected to other parts, and the ends of the wire are inserted into the pins. The tap from the 7th turn is inserted into the grounding socket, and the remaining two are connected to the antenna terminals.
The final stage is setting up the radio signal reception; this is done by simply selecting the connection of the winding to the connected circuit. Such homemade radio antennas reliably receive a signal even in a severe thunderstorm, thanks to reliable grounding.
If the radio receiver is located in an area where the reception is very weak and of poor quality, you can assemble an omnidirectional antenna yourself using a coaxial cable. For this you need:
- wooden slats;
- one and a half meters of cable (television cable is best);
- one and a half meters of PVC pipe (section diameter 2 cm).
Homemade antenna from coaxial cable
Constructing such an antenna is quite simple. A cut is made on the wire to remove the insulating layer (but the braid must remain intact, this is important!). Having loosened and slightly stretched the braid, the screen is turned out to the place of the cut. The final stage is to install and securely fasten the antenna inside the plastic tube and mount it on a wooden rail. The adjustment to search for a radio station signal is made in the vertical direction, and not by rotating the homemade antenna 360 degrees.
In dachas, in cars, even in urban built-up areas, those who like to listen to the radio are well aware of the problem of a weak signal and quiet sound of radio transmissions, especially in the FM range. Antennas for radios of various types and types of signal reception help correct the situation. They can be purchased in special stores, or you can make them yourself; fortunately, the technology is simple, and the parts can be bought at any radio market.
Coaxial cable braid
The braided magnetic frame provides greater efficiency than copper tubes and a thicker conductor diameter. Models with a black plastic shell are not suitable for home experiments, because... it contains a large amount of soot. During operation, metal parts, when the shell is heated, emit chemical compounds harmful to humans. In addition, this feature reduces the transmission signal.
Coaxial cable SAT-50M made in Italy
This type of coaxial cable is only suitable for large antennas because... their conductor radiation resistance completely compensates for the input resistance.
Antennas for a radio station: general manufacturing principles and instructions
If the receiver does not work fully with the existing built-in antenna, then a homemade indoor radio antenna that amplifies the signal can be the solution. The device is placed at the maximum height to avoid possible interference with operation.
Before you make your own antenna for a car radio or other equipment, you need to take into account an important fact: to receive a radio wave, its polarization is important. Devices for FM signals should be positioned vertically, following the type of wave itself.
A do-it-yourself FM radio antenna is quick and easy to make if you prepare all the necessary tools and parts in advance. The simplest option is a pin one. To do this, take any material that conducts current and install it vertically. The lower part is connected to the receiver.
The amplifier allows you to receive even the weakest signal When creating an antenna, you should strive to ensure silent operation
conclusions
We have brought to your attention popular types of radio antennas that you can make yourself. Most of these solutions are simple enough to make at home, and their ease of setup will allow you to easily cope with the most complex problems.
Did you like the instructions? Share it on social networks and on the pages of your websites. Leave your notes and tips for our users in the comments.
Antenna for the receiver: what materials are required for work
To make a good FM receiver, you need to think in advance about what it will be made of.
A do-it-yourself car radio antenna is assembled from the following components:
- tube with heat shrink function;
- high voltage wire;
- PVA glue;
- ruler;
- compass;
- wire for unwinding - PEV.
The antenna must be assembled strictly according to the instructions in order for it to catch the signal well.
Simple, affordable materials are used to make the antenna
It is recommended to choose an aluminum bracket
FM antenna amplifier
An FM antenna for a music center can be made with your own hands in a few hours if suitable parts are selected in advance. In addition, you should definitely understand the principles of operation of the equipment, only then the design will be working.
Outside the city, communication is much worse than within a populated area, but you can improve its quality by installing an antenna for a VHF radio receiver with your own hands.
To compensate for losses when receiving a signal, you need to raise the device as high as possible. The antenna amplifier most often works even in the most hopeless cases. Signals below 60 Hz are filtered out and only high signals are received.
To make such an amplifier, you need to use two coils. They are wound using a PEL wire to the antenna. To ensure operation of the device, it is necessary to connect a current of at least 12 A. All connections are secured using a shielded cable.
If after installing the antenna the signal on the device is very weak, you can raise the amplifier higher
It is necessary to provide amplification on the VHF band
FM indoor antenna: linear
To get a good signal you need an FM radio antenna, which is not always easy to buy. If the model you need is not on sale or you don’t want to spend extra money from the family budget, you can make a device for receiving the signal yourself from scrap materials.
| Illustration | Description of action |
| Take a simple TV cable | |
| Carefully remove the top layer - insulation. It is important not to damage the shielded cable. | |
| Tightly twist the central wire and the silver layer | |
| We retreat 22 cm from the beginning of the bare layer | |
| Cut out a small piece of the top layer and the shielded part. We try not to damage the inner layer | |
| We retreat another 22 cm from the treated area. | |
| We remove only the outer insulation, leaving the shielded part intact | |
| Take the end of the bare wire and bend it, winding it to the center | |
| You should get a round antenna with a “tail” | |
| We take a wooden or cardboard blank that follows the shape of the wire, and wrap the structure with electrical tape | |
| We place the antenna with the wire to the window, and, if necessary, raise it higher so that the signal can be transmitted |
TV cable can be purchased at any radio store. If you need a telescopic antenna for a radio receiver, it is also not always possible to buy it, so it is better to use the instructions for making the device yourself.
Antenna for radio in car
A simple VHF antenna amplifier for a car can be made in ten minutes. The telescopic flexible antenna is made from special materials and radio components. Homemade devices can break down just as quickly as store-bought ones, so before you install an antenna in your car for the radio, you need to choose a suitable location for it.
It is also possible to manufacture a solid antenna, which will require: copper wire, cable, metal pin for mounting the structure, tools for working with metal, soldering iron and insulators.
When choosing a metal pin, you need to pay attention to the thread - it must fit the size of the bracket. It is best to use ready-made anchor bolts, which can easily secure any structure.
The next step is to prepare the space inside the car. The casing is removed where the antenna will be installed, then the cable is laid and secured. You must act carefully so as not to break the holders and clips.
If the dimensions of the head unit and antenna do not match, it is recommended to resolder the connector, but you can use an adapter. The operation of the receiver is checked, after which the structure can be assembled and the panel closed. If a homemade antenna is assembled correctly, it will work well, regardless of external circumstances.
Antenna with copper wire
To connect TV or radio, you need to ensure that the wave frequency is sufficient. For this, both purchased and homemade antennas are used. One option is a device assembled from copper wire. To do it, you need to follow the instructions.
| Illustration | Description of action |
| To work, we take a small coil of copper wire, wire cutters, a plug from a regular television antenna, scissors and a cable | |
| Straighten and smooth the piece of copper wire so that there are no extra folds left | |
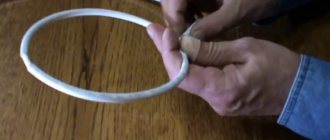
| We round the wire so that we get a perfect, even circle. | |
| Take a soldering iron and solder one piece of cable to another | |
| We solder the other end of the wire to the second section of the cable so that the shape of the circle of the future antenna is preserved | |
| To prevent the sealed areas from coming off, cover them with electrical tape. We bend one end of the wire, after which the entire area with exposed wires is wrapped | |
| Connect the plug to the second end of the television cable | |
| We press the braid well with pliers so that it does not jump off | |
| We throw the antenna out the window, and connect the plug to the TV, after which we try to turn on digital channels |
Making a digital TV antenna from copper wire is very simple, but you need to make sure that all the given steps are followed correctly. If the device does not work, then it may not be assembled correctly, or it may simply need to be raised higher.
Installation of a radio signal catcher
Installation of an outdoor horizontal antenna begins with the selection of supporting structures. You will subsequently attach insulators to them with your own hands. One of the supports must be installed on the roof of the house. It needs to be reinforced with guy wires. A tree of suitable height can be used as a second support. Insulators can be installed on construction sites using steel cables.
You must attach the outer part of the FM antenna to the insulators with your own hands. It does not need to be subjected to great tension. The wire shrinks if the air temperature is low enough and may lose integrity at low temperatures. Roller blocks will eliminate unnecessary vibrations. To use them, place a small weight on the other end of the wire. It will be connected to the FM antenna if you throw it through the insulator and block.
Support installation diagram
The receiving part of the antenna must consist of one piece of homogeneous material. If you do not have a homogeneous wire, it is better to construct an FM antenna from separate identical elements. They need to be cleaned and soldered with tin. Equipment for vertical descent of the antenna does not present any serious difficulties. Please note that the wire should not be connected to foreign elements. You need to fix the antenna wire with your own hands on a special pull-out stand. This will prevent it from being in the wrong position in windy weather.
If the space for installing an FM antenna with your own hands is limited, you need to use a different design. These are several pieces of wire that look like a “broom”. They will be securely connected by a cable at their lower ends. The ends of the wires can be tightly filled with molten tin. You must cover the soldering area with reliable insulation in the form of bitumen or similar material.
A DIY indoor antenna will be the best option to replace an external catcher. Insulators must be fixed indoors. Their location closer to the ceiling will give an advantage in the quality of signal reception. The wire should be stretched horizontally or rolled into a spiral.
Tools and materials
It should be said that there are a huge number of options for creating antennas. They are made from copper wire, and from a tube of capacitors, and from wire, and even from a television cable. And this is not a complete list of materials from which an antenna can generally be made. If we talk about materials, then to create an antenna you will need to have the following elements on hand:
- heat-shrink tubing;
- winding cable type PEV-2 0.2–0.5 mm;
- high-voltage wire or coaxial cable;
- ruler;
- nest;
- calipers;
- glue for plastic.
This is a rough list of materials and may vary depending on the materials you have on hand. In addition, it will not be superfluous if before this you develop a diagram of the device that you will make. Device drawings allow you not only to determine what dimensions are needed to receive a particular wave range, but also make it possible to correctly calculate the necessary parameters of the device itself - type, length, width, some design features. In addition, you can immediately roughly determine the place where to solder the socket, if necessary.
Voice radio in the country: ways to strengthen the signal
In a suburban area, receiving radio broadcasts and music is good entertainment, including during gardening work. Unfortunately, in practice, many are faced with the fact that the receiver produces a large amount of interference. Sometimes the signal is completely lost, and it is simply impossible to find your favorite radio station by setting the slider to the desired wavelength range. All this indicates poor reception, which can be improved in simple ways.
Build up your antenna
No matter how you receive a radio signal, it requires an antenna. If we are talking about a receiver with a folding pin that is hidden in the case, then its size is often not enough, especially if we are talking about a place far from the city, where the reliable reception zone disappears. In this case, you need to make the antenna longer and raise it higher. In a private house, this is done very simply - a pole is fixed on the roof with a piece of wire, stripped of insulation, tied to it. The material for receiving the signal is not important - it can be either copper or steel.
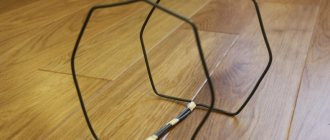
Make a reverb
The simplest device that amplifies a radio signal is nothing complicated. It should be made in the form of a frame, usually triangular or square, made of three meters of copper wire stripped of insulation. In some cases, it can provide stable reception at a distance of 150 km from the city. One end is connected to ground, the other to the central output of the antenna socket.
Connect amplifier
This device is usually a box that is connected to the antenna frame. Inside the case there is an amplifier chip with active power supply. In order for the circuit to work, you need to plug in an adapter that produces 12 V DC. A cable comes from the amplifier, which connects to the FV receiver. This method is most widely used for receiving television signals, but where television broadcasts are received, the radio will be heard just fine.
The listed methods do not exhaust the possible recipes for amplifying a radio signal under various conditions. Radio amateurs on forums willingly share their inventions, and not all of them are difficult to manufacture.
Step-by-step instruction
Here are a few instructions for creating antennas, each of which will help you make a really high-quality FM module for receiving radio waves. So, to make such a device, you must adhere to a certain algorithm of actions.
- Take any high frequency coaxial cable. We dismantle its braid and remove the outer insulation. You can also use high-voltage wires from transformers of the same name, which are used in monitors and televisions equipped with a cathode ray tube. They have greater rigidity and will be an excellent option for receiver antennas.
- Now you need to cut a piece measuring 72 or 74 millimeters from the prepared wire. Moreover, accuracy must be maintained down to the millimeter. Using a soldering iron, we solder a small piece of wire to the cable, from which a coil will later be wound from a suitable piece of plastic. The wires will need to be wound about 45 turns. In this case, a piece of internal insulation with a length of 1.8 centimeters will be used. If desired, you can recalculate the coil for a different diameter. But you need to observe 2 points:
- the length of the coil will be 18 millimeters;
- the inductance should be 1.3–1.4 μH.
- Now we carefully wind 45 turns. Once this is done, you can see the gaps on its end sides. You will need to pour a little glue into them to make the structure stronger.
- At the next stage of antenna assembly, you need to put a heat-shrink tube on the resulting structure. It should be heated by some convenient method. But it is best to do this using a closed fire, or you can use a hair dryer.
- If you need a loop antenna, then its special feature is the presence of an aluminum hoop. Its diameter is 77 centimeters, and the internal diameter should measure 17 millimeters. You can easily find such an element in any sports store. You should also have a copper tube on hand. If such an antenna is required, then the central core, braid, and also a small piece of coaxial type wire should be soldered to the contacts of the variable capacitor. We solder the second end of the wire, the central core and the braid to the above-mentioned aluminum hoop. You can also use car clamps, which should be thoroughly cleaned first. Their diameter should be from 1.6 to 2.6 centimeters. You should also do a good cleaning of the contact area.
- The ratio of the circumference of the frame to the circumference of the communication loop should be 1: 5. In addition, 1 centimeter of insulation should be removed from the tip of the cable and from the central core. And also from the middle of the cable for the FM antenna, you should mark 5 millimeters in both directions and remove the external insulation. After this, we remove the cable braid to break it.
- Now you should check the range of the antenna and make sure that the frame has resonance in the range of 5–22 MHz. If the capacitance of the capacitor is different, then these parameters can be changed. If you need low-frequency ranges, then it is better to take a frame with a larger diameter - one or one and a half meters. If we are talking about high frequencies, then a frame of 0.7 meters will be enough. This completes the creation of the loop antenna.
2
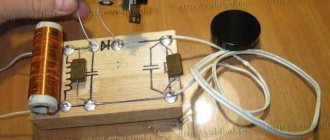
A rather interesting option would be a pipe or magnetic antenna. By the way, it can be not only internal, but also external.
The main load-bearing part of such a device will be a heating pipe or water pipe. To make an antenna of this type, you will need to have on hand the following elements:
- a used transformer core that can be removed from some old TV;
- insulating tape;
- glue;
- scotch;
- foil made of thin brass or copper;
- about 150 centimeters of copper wire with a diameter of a quarter square millimeter;
- pins for connection.
First, to wrap the first layer, a core made of ferrite is laid, and on top there are 2 layers of electrical tape, followed by a single layer of foil. Now 25 turns of cable with a 1-centimeter overlap should be wound onto this screen blank so that the contact insulation is the best. And also we should not forget that it is necessary to make mandatory taps on the 7th, 12th and 25th turns. The circuit should be connected to other parts, and the ends of the wire should be inserted into the pins. The tap from the seventh turn should be inserted into the grounding socket, and the other 2 should be connected to the antenna terminals.
The final stage of work will be to set up radio signal reception. In this case, it will be carried out by the usual selection of a winding connection to a connected circuit.
Another fairly common and simple option for creating an antenna of this type is a device made of foil. To create it you will need the following materials:
- wire cutters or pliers;
- knife;
- a roll of foil or copper wire;
- dry board in the form of a square that has a side measuring 15 centimeters.
There is nothing difficult in creating such a device. To make it, you will need to follow several steps.
- First, cut a square out of foil. It should measure 13 centimeters on the outside, and the width of the foil strip should be 1.5 centimeters. A 3mm rectangle should be cut out at the bottom center to allow the frame to open.
- The cut piece of foil should be glued to the board. Now you need to solder the inner rod of the shielded wire on the right and the braid on the left to the square of foil. This must be done with a slight shift to the right from the central slot - about 2.5 millimeters. By the way, the distance between the shielded wire and the braid should be the same. Here it must be said that if the antenna is used to operate in the VHF range, then the size of the square should be increased to 15 centimeters, and the width of the foil strip in this case will be about 18 millimeters.
Important! If you need to amplify the signal for this type of antenna, you can wrap it with a piece of copper wire. Its free end should be led out into the window.
In addition, there is a very simple option for creating a simple radio antenna. We will need to have the following materials and tools on hand:
- soldering iron;
- a plug to connect the antenna to the radio;
- roller blocks that allow you to fix the antenna in the desired position;
- steel wire;
- copper wire;
- switch;
- ceramic insulators.
Everything here will be extremely simple - just connect the wires, plug and rollers with a soldering iron. And the joints will need to be wrapped with electrical tape to strengthen the structure and maintain its integrity. In addition, to make such an antenna look as aesthetically pleasing as possible, it can be installed on a special stand, previously made of wood. As you can see, there are a considerable number of antenna models, each of which can provide a high-quality radio signal in different conditions.
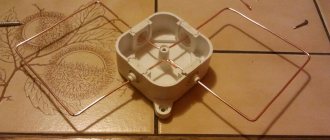
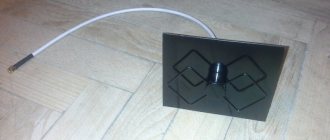
Triple square
The triple square, also known as the Sotnikov antenna (non-standard radio devices are usually named after the name of the inventor or popularizer), consists of three square frames of variable perimeter:
- directors;
- vibrator - it is from it that the received signal is removed;
- reflector.
This antenna is a development of the principles inherent in the design of the wave channel, but it is much simpler to manufacture. Outwardly, it looks like three squares gradually decreasing in size, mounted on common crossbars so that their axis faces in the direction of the signal source.
In short, it is assembled from steel or copper wire as follows:
- Three main squares and jumpers between them are bent. If necessary, you can immediately bend the entire zigzag assembly according to the attached drawing.
- The joints are soldered together.
- The stripped end of a 75 Ohm coaxial cable is soldered into the split of the vibrator (where the wire ends are connected).
Advantages:
- High sensitivity. This is a good long-range device for receiving a weak signal from a long distance.
- Manufacturability. If you bend it from a single piece of wire, then soldering will only be needed to connect the cable and joints.
- It is possible to connect an amplifier, which turns the structure into an active antenna, ideal for a summer house or country house.
Flaws:
- Not the best radiation pattern. Even a slight bend in the wire leads to losses in the received signal power.
- Extremely narrow focus. A triple square covers no more than 10 channels according to the old layout, so if the multiplexes differ greatly in frequency, you will either have to make two antennas (and solve matching problems) or sacrifice sensitivity.
- To get all the benefits from the range of this antenna, you need an accurate calculation (ideally down to the millimeter).
Recommendations
If we talk about recommendations for the creation and use of such antennas, then first of all we should note several.
- There should not be any metallic foreign objects near such a device. Otherwise, they may interfere with the reception of the signal or reflect it, which will also negatively affect the quality of its reception.
- Care should be taken to protect the antenna from exposure to natural factors. Otherwise, its parts may rust and sooner or later the device will simply fail.
- In most cases, it is necessary to make drawings before starting work, where you need to describe in detail the dimensions and dimensions of the device, its type, as well as the algorithm of actions for its creation. This will make it possible to quickly and accurately implement one or another idea and obtain a high-quality antenna for receiving a stable FM signal.
How to make a radio antenna with your own hands in 15 minutes, see below.
Sources
- https://electrikexpert.ru/kak-sdelat-antennu-dlya-radio-fm-svoimi-rukami/
- https://amperof.ru/elektropribory/antenna-dlya-radio.html
- https://homius.ru/antenna-dlja-radio-svoimi-rukami.html
- https://stroy-podskazka.ru/radiopriemniki/antenna-svoimi-rukami/