A hair dryer can be used for many different purposes, but one of its main purposes is to dry your hair. Hair dryers come in different designs and price ranges. It is clear that a good device cannot be cheap. And if it breaks, and even at the wrong time, this is a reason for disappointment. But don’t throw away your device and run to the store for a new device. Most problems can be fixed on your own. Any person can easily cope with this if he knows how to disassemble a hair dryer, its features, what breakdowns occur most often and how to fix them yourself.
Internal organization
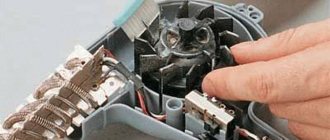
Before you start disassembling the device, it would be a good idea to find out what’s inside and what it generally consists of. In principle, this is a fairly simple device and there are not so many basic elements in it. Any hair dryer consists of:
- Electrical cord;
- Switch/mode switch;
- Motor;
- Impellers;
- Heating element;
Now you can clearly see that the device is designed quite simply. Self-repair is quite possible. Below we'll take a closer look at the main reasons why a hair dryer isn't working and what you can do to fix them.
For this simple job you need to prepare in advance:
- Multimeter;
- Screwdriver with replaceable bits;
- Electric soldering iron.
Final Tips
Repairing professional hair dryers is more complex. Design elements are often complemented by smooth controls and additional options such as the Care button. Spirals are made from special alloys that, when heated, create negative ions that have a beneficial effect on hair. The technique remains the same:
- cord;
- switches and buttons;
- dust removal;
- spirals;
- motor;
- visual inspection of capacitors and resistors.
Before repairing, it is advisable to get a schematic diagram.
Industrial models are not much different from household ones. But drying your hair is not recommended. Such products are distinguished by increased resistance to dust, shock, vibration, humidity, and other climatic factors. Home restoration of industrial hair dryers will not end well.
Electrical radio products used in household models are not suitable for use in harsh conditions. Requirements apply to wires, power cord, motor and coils.
How to disassemble a hair dryer
Now the tools are prepared, the desire to repair the device has not disappeared, but how to disassemble this device without damaging the fragile plastic?
But disassembling the case can be a problem, since the manufacturer is confident in the reliable operation of its device and is not at all concerned about quickly and safely disassembling its device.
The case can simply be held on by latches. And if you know where they are located, you can simply squeeze them out to open the patient.
The outer parts of the housing can also be connected using screws. But not ordinary ones, but non-standard ones, which can have several types of contact edges on the head:
- Plus.
- Star.
- Fork.
- Triangle.
There may be just one self-tapping screw, covered with a decorative sticker, and then both parts of the body are connected with latches.
You must be very careful and careful not to accidentally break off the latches. And it's very easy to do. It is enough not to notice the self-tapping screw or screw hidden under a sticker or decorative plug.
There are also hair dryers in which the handle rotates to several positions. This is where you need to be extremely careful and remember the order in which all elements are disassembled. Otherwise, reassembly may not be possible.
If all the screws are unscrewed and the latches are released, both halves of the device will be in your hands. Now you can begin to “treat the patient.”
Electrical circuit of a hair dryer
The simplest model can simply dry your hair with hot air.
More complex specimens have three airflow options:
- warm;
- hot;
- cold.
There is also a “more/less” fan speed control.
The heating element in a simple version is a nichrome spiral thread.
If you look at the diagram:
It is clearly seen that after the current passes through the spiral, which has its own resistance, it loses its strength. Now he needs to get to the electric motor. But first it is straightened through a diode bridge and only then goes to the electric motor.
The motor is connected to the impeller. It is she who supplies outside air to the hair dryer body. Passing through a hot spiral, the supplied air warms up and exits this hair dryer through a nozzle.
The entire device is controlled by an external switch, which allows you to:
- Turn on/off the device.
- Adjust the air flow speed.
- Select heating or fan mode.
Modern models are equipped with protection that will not supply voltage to the heating element if the motor is not turned on.
There may also be a thermostat - it prevents the coil from overheating too much and will turn off the power supply in time.
If there is an electrical circuit for the device, we will repair your home hair dryer together, but in order to understand what is wrong, we will turn to possible malfunctions.
Briefly about the design
Before you want to repair a hair dryer at home, you need to at least become familiar with its structure. So, a modern technology model may consist of the following elements:
- electrical cord for connecting to an outlet;
- switch or speed switch;
- fan;
- heating element (spiral);
- engine.
As you can see, the design of the device is not at all complicated, so if you want to repair the hair dryer yourself, there should not be any difficulties with the repair. Next, we will look at all the main breakdowns that can occur, and under each fault we will tell you how to fix it. From the tools you will need a multimeter, a screwdriver (or an asterisk) and, possibly, a soldering iron.
Possible faults
Despite its apparent simplicity, the hair dryer has some things to break:
- The power cord may have an internal break or short.
- The thermal fuse has failed.
- The resistor has burnt out.
- A breakdown of the diode bridge has occurred.
- The capacitor has burnt out.
- The mode switch itself is broken.
- The cold air switch is broken.
- The motor shaft is jammed due to hair being wrapped around it.
- The motor shaft bearing is jammed.
- The engine itself burned out.
- Broken nichrome spiral.
- Closing the heating coil.
- Carbon deposits on a spiral.
- The fan blade broke off.
This is the entire list of possible faults.
We will focus only on typical breakdowns that we can fix ourselves.
Characteristic signs of a faulty device:
- The device does not turn on;
- The device turns on, but the fan does not spin or gain speed;
- When running, the engine sparks and smells burnt;
- The hairdryer only blows cold air.
Lack of power.
Lack of power can often cause a hair dryer to break down. What is this connected with?
Firstly, with the condition of the power cord. Therefore, if it heats up during operation or you find creases and swelling on it, you need to take a few simple steps:
- First, you need to find the damaged area and cut it out;
- Secondly, you need to solder the ends of the cable;
- Thirdly, you should not forget about safety. Therefore, after soldering, you need to wrap this area with electrical tape;
Also, the lack of power may be due to poor contacts inside the case. To do this you need:
- Disassemble the body;
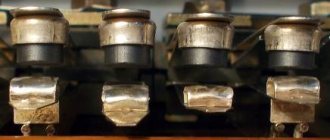
- Next, use a voltage indicator to check the power contacts of the hair dryer (Fig. 2).
- If you find bad contacts inside the case, they must be cleaned with sandpaper;
Most often, these actions are enough to get the device working again.
Hair dryer contacts (Fig. 2)
You can watch this breakdown in detail in this video: https://www.youtube.com/watch?v=xgg5jaiIDZo
We begin inspection and repairs
As we have already said, it is quite possible to disassemble the device yourself if you are extremely careful and follow the procedure.
Device repair is also subject to its own logic, which we will discuss below.
Cord
If the hair dryer does not turn on, the most logical first step is to check if there is current in this outlet?
If everything is in order with the outlet, proceed to checking the power cord. Kinks and twists are common causes of power cord failure. When the hair dryer is disassembled, the contact points of the wire to the mode switches are also carefully inspected. To carry out this procedure you will need a tester.
If the wire is damaged, there is no point in repairing it. It is necessary to replace the entire wire and plug.
Attention! The most common place for a wire to break is at the entrance to the hair dryer body.
After such a technical inspection, we connect the device to the network and check the result of the work performed.
Switch and switch
We also check the power button itself. It should turn on smoothly and without jamming. There should be no traces of carbon deposits or melting on the switch contacts.
The three-position switch will be checked by turning on each mode separately. Before checking the switch, it is worth marking all the wires so as not to confuse the reverse connection locations.
Clean damaged areas with fine sandpaper and resolder with a soldering iron.
If the switch itself fails, the best option is to replace it with a new one. But if it is not possible to find a new switch, another option is to bypass it and connect the power wire bypassing the broken switch. Since there will no longer be a power button, the device will turn on immediately after connecting the device to the outlet.
Fan
The fan is responsible for generating air flow. On the back side of the case there are special openings for air intake. The fan impeller is made of lightweight but durable plastic and rotates on a metal rod. This metal axis, on one side, is a continuation of the electric motor, and on the other hand, it rests on a special hole in the device body, which acts as a support sleeve. It is the impeller that takes in outside air through the holes in the hair dryer body and drives this flow towards the nozzle.
The most likely cause of reduced fan performance:
- clogged holes in the housing;
- hair is wrapped around the impeller shaft;
- One of the impeller blades broke off.
There are two options for solving the problem of a clogged air duct:
- If the device is equipped with a replaceable filter, you need to remove it and try to clean it thoroughly.
- If dust and debris have accumulated in the air intake cracks, everything can be successfully removed with a toothbrush.
If hair is wound around the fan shaft, it is better to remove the impeller and carefully remove the obstacle so that it rotates freely.
Attention! When cleaning the fan shaft, do not use excessive force to avoid damaging the shaft or impeller.
Spirals
Let us repeat once again, the material from which this heating element is made is nichrome. As soon as current is supplied to the nichrome spiral, it begins to heat up and makes the air passing through it hot. In normal mode, the hot air temperature is between 50–60 °C.
More advanced models have several such spirals that provide different air heating modes.
Typical manifestations of heating element failure:
- There may be a burning smell when the device is running;
- The air coming out of the nozzle is either too hot or completely cold.
These signs indicate that the heating element is faulty. All these breakdowns can be eliminated if the hair dryer is carefully disassembled, inspected and tried to detect the source of the malfunction.
If, after the device has been disassembled, you need to carefully inspect the heating element for integrity.
If burnt areas of the thread are found, it can either be soldered or two opposite ends twisted. Alternatively, crimp both ends of the spiral with a thin copper tube.
But we must warn you that, based on the experience of using nichrome spirals, such repairs can extend the life of the hair dryer, but not for long.
If possible, it is best to replace the burnt out spiral with a new one.
Important! You need to understand why the part failed in order to eliminate the cause of this problem in the future.
Engine
Electric motors on hair dryers can be in different versions - 12, 24, 36 volts.
A special additional electronic circuit reduces the voltage of 220 V. Thus, the level of danger of electric shock is reduced.
If the engine stops working, there are two main reasons for this malfunction:
- The supply wire is broken;
- The electric motor itself has failed.
We have already written above how to repair the supply cable with a plug, and the following symptoms indicate a malfunction of the electric motor:
- After turning on the engine, you can hear a slight crackling sound;
- The motor is unstable;
- There is a smell of burnt wiring;
- The fan does not rotate and a slight hum is heard.
If you suspect that the electric motor has burned out, the chances of repairing it yourself are zero. You can try to disassemble the motor, but where will you find the necessary part later?
Give it to a workshop? This is also not an option - repairing the device may turn out to be unprofitable. It’s easier and more profitable to buy a new hair dryer.
Chip
In professional hair dryers, operating modes are controlled using microcircuits. Everything is a little more complicated here. If you have skills in working with electrical circuits, you can try to find the cause of the problem yourself and fix it:
- The getinax substrate may crack and break the contact track. If a gap is found, it can be repaired using a soldering iron.
- A characteristic swelling can be seen on a faulty capacitor. When burned out, the resistor may darken. If a burnt part is detected, the fault is eliminated by replacing it with a new one.
Thermostat
This part protects the entire device from overheating.
If there is a thermal fuse, it can also cause poor operation of the coil. Its performance can also be checked with a multimeter. If it shows an open circuit, the fuse must be replaced - it cannot be repaired.
But there is an option to repair the device by excluding the temperature sensor from the general circuit, bypassing the wires past it. The device can be used for some time if it is not overloaded.
Little tricks
There are standard requirements for the safe operation of an electric hair dryer, which can push the boundaries of trouble-free operation of the device, without contacting service centers:
- There is no need to wrap the electrical wire around the handle of the device and generally try to avoid twists and loops on the wire;
- Use only those attachments that were supplied with the device;
- Do not use the device in rooms with high humidity to prevent water from entering the hair dryer body;
- If the distance to the outlet is too large, only factory extension cords can be used;
- It would be a good idea to protect the air intake area with a fine-mesh filter to prevent dust particles and hair from getting inside the device;
- Do not carry the hair dryer, holding it suspended by holding it with your hand by the cord;
- If even minor interruptions occur, further operation of the device is prohibited;
- Avoid excessive overheating of the product;
- After work, you need to let the device cool down and only then put it away for storage;
- The electric hair dryer must be stored in a dry and ventilated area;
- Follow basic safety rules when repairing electrical appliances;
- Repairing a hair dryer requires electrical skills. If they are not there, it is better to entrust the work to professionals in specialized workshops.
Let us repeat once again - independent repairs are possible if all work is carried out especially carefully. This is always true for electrical appliances.
