It got dark outside and the lamp turned on by itself. In the morning at sunrise I switched off.
It can also be used to power advertising banners and signs on the facades of houses and shops.
Some people use time relays or timer sockets in this business. However, due to the constant change in the length of daylight hours, such devices will have to be constantly reconfigured.
Therefore, they cannot be considered a full-fledged alternative to light sensors.
Device and principle of operation
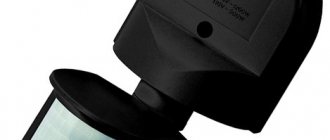
This device has many names. The most common is a photo relay, but they are also called photocell, light and twilight sensor, photosensor, photosensor, twilight or light-control switch, light sensor or day-night. In general, there are many names, but the essence does not change - the device allows you to automatically turn on the light at dusk and turn it off at dawn.
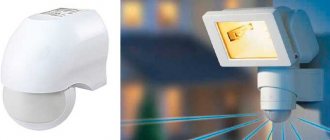
Photo relay circuit for street lighting using a photoresistor
The operation of the device is based on the ability of some elements to change their parameters under the influence of sunlight. The most commonly used are photoresistors, phototransistors and photodiodes. In the evening, as the illumination decreases, the parameters of the photosensitive elements begin to change. When the changes reach a certain value, the relay contacts close, supplying power to the connected load. At dawn, the changes go in the opposite direction, the contacts open, the light goes out.
Scope of application
The use of photo relays is not limited to street lighting. With a little imagination, it can be used in other places, here are some examples:
- Garage. It is very convenient when, when you open the garage door from the outside, the light will turn on automatically and you do not need to feel for the switch. True, this is more relevant in city garages, where the light outside is constantly on. For country houses, this scheme will only work during the day.
- Irrigation control. Another interesting application of a photo relay is the activation of drip irrigation at night. An excellent solution for summer cottages and private houses, which will significantly save your time during the daytime. Whether it’s a lawn or flower beds, everything will be thoroughly moistened overnight without your intervention. But here you need to monitor the weather and turn off the system on rainy days.
Recently, a system called “Smart Home”, where complete automation reigns, has become increasingly popular. So, the photo relay occupies an important place in it, being used in conjunction with motion sensors and other “smart” devices.
Characteristics and selection
First of all, choose the voltage with which the light sensor will work: 220 V or 12 V. The next parameter is the protection class. Since the device is installed outdoors, it must be at least IP44 (the numbers can be higher, but lower is undesirable). This means that objects larger than 1 mm cannot get inside the device, and also that it is not afraid of water splashes. The second thing you should pay attention to is the operating temperature. Look for options that exceed the average in your region in terms of both positive and negative temperatures.
It is also necessary to select a photorelay model based on the power of the lamps connected to it (output power) and load current. It, of course, can “pull” the load a little more, but this can cause problems. So it’s better to take it even with some reserve. These were the mandatory parameters by which you need to choose a photo relay for street lighting. There are a few more additional ones.
Example of characteristics of a photo relay for street lighting
In some models, it is possible to adjust the response threshold - to make the photosensor more or less sensitive. It is worth reducing the sensitivity when snow falls. In this case, the light reflected from the snow can be perceived as dawn. As a result, the light will turn on and off. This performance is unlikely to please.
Pay attention to the sensitivity adjustment limits. They may be larger or smaller. For example, for the Belarusian-made AWZ-30 photo relay this parameter is 2-100 Lux, for the P02 photocell the adjustment range is 10-100 Lux.
Response delay. Why is the delay needed? To avoid false switching on/off of light. For example, at night the photo relay was hit by the headlights of a passing car. If the response delay is short, the light will turn off. If it is sufficient - at least 5-10 seconds, then this will not happen.
On a note
When choosing a street light detector, it is worth considering some points:
- dimensions of the local area;
- For suburban areas, relays with an adjustment function for triggering are recommended. Such light sensors are easy to configure yourself;
- adjustment will require time and minimal skills;
- a light sensor with a timer will allow you to more accurately adjust the on/off by programming the response time;
- It is better to equip an outdoor photo sensor with a limiter to protect it from light from window and lampposts. You can make such a light visor yourself, for example, from a piece of plastic pipe of a suitable diameter;
- For street lighting, it is better to use LED or fluorescent lamps rather than ordinary incandescent lamps. This way you can save on your electricity bills. In addition, the sensor itself can be selected with a lower throughput, and therefore cheaper;
- Select the installation location according to the attached instructions.
Before purchasing a device, it is important to choose the viewing angle in the horizontal plane. If the lighting area can be approached from any course of movement, relays with a viewing angle from 180° to 360° are needed:
- Wall mounted with a visibility angle of 180°.
- Pole with a 360° visibility angle.
The installation height is also important. The main condition when a photo relay works is that there are no “dead zones”. Household appliances are characterized by a narrow vertical detection zone - from 15° to 20°.
In order for motion sensors to work without breakdowns, you need to know that they are designed for a certain load. Just before purchasing, calculate the total power of the connected lamps that such a device will control.
Choosing an installation location
For the photo relay to work correctly, it is important to choose its location correctly. Several factors need to be taken into account:
- Sunlight should fall on it, that is, it should be in the open air.
- The nearest sources of artificial light (windows, lamps, lanterns, etc.) should be located as far away as possible.
- It is not advisable for headlights to shine on it.
- It is advisable to place it not very high - for ease of maintenance (you must periodically wipe the surface from dust and brush off snow).
In order for photosensitive machines to work correctly, you need to choose the right location
As you can see, when organizing automatic lighting on the street, choosing a place to install a photo relay is not the easiest task. Sometimes you have to move it several times until you find an acceptable position. Often, if a light sensor is used to turn on a lamp on a pole, they try to place the photo relay there. This is completely unnecessary and very inconvenient - you have to clear off dust or snow quite often and climbing a pole every time is not very fun. The photo relay itself can be placed on the wall of the house, for example, and the power cable can be connected to the lamp. This is the most convenient option.
A little about prices
The cost of a photo relay is actually not that high. Here is an example of price tags for the most popular models:
- FR-601 from 200 to 300 rub.
- FR-602from 300 to 400 rub.
- LXP-01 from 240 rub.
- LXP-02 from 350 rub.
- LXP-03 from 420 rub.
Prices for motion sensors:
- IEK from 400 rub.
- CAMELION from 350 rub.
- TDM from 400 rub.
- REV RITTER from 550 rub.
These are average prices in Russia; for different regions the cost may vary slightly. If you are interested in automating your home, then you can easily implement the idea and not go broke too much.
Connection diagrams
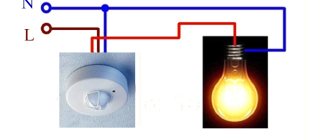
The connection diagram of a photo relay for street lighting is simple: a phase and a zero are supplied to the input of the device, from the output the phase is supplied to the load (lights), and the zero (minus) to the load comes from the machine or from the bus.
Connection diagram for photo relay for lighting (lantern)
If you do everything according to the rules, the connection of wires must be done in a distribution box (junction box). Choose a sealed model for outdoor location and install it in an accessible place. How to connect a photo relay to street lighting in this case is shown in the diagram below.
Connecting a photosensor via a junction box
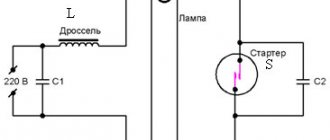
If you need to turn on/off a powerful lamp on a pole, the design of which has a choke, it is better to add a starter (contactor) to the circuit. It is designed for frequent switching on and off and can withstand inrush currents normally.
Connection diagram of a day-night sensor with a starter
If the light should be turned on only while a person is there (in an outdoor toilet, near a gate), a motion sensor is added to the photo relay. In such a combination, it is better to first install a light-sensitive switch, and after it a motion sensor. With this design, the motion sensor will only trigger in the dark.
Connection diagram for photo relay with motion sensor
As you can see, the schemes are simple, you can easily do it yourself.
The light sensor works in reverse
What if for some reason you need the relay to operate in reverse mode? Voltage was applied and turned the load on during the day and turned off at night.
For example, for lighting in an animal stall where there are no windows. What to do in this case?
Then go to the nearest store and buy an intermediate relay, in which one of the contacts closes and the other opens when triggered.
All you need to do is connect this intermediate relay after the light sensor according to the diagram below.
A starter with additional contacts can also act as a relay.
Features of connecting wires
A photo relay from any manufacturer has three wires. One is red, another is blue (can be dark green) and the third can be any color, but usually black or brown. When connecting, remember:
- the red wire always goes to the lamps:
- the zero (neutral) from the power cable is connected to blue (green);
- a phase is supplied to black or brown.
If you look at all the diagrams above, you will see that they are drawn in compliance with these rules. That's it, no more difficulties. By connecting the wires this way (don’t forget that the neutral wire must also be connected to the lamp) you will get a working circuit.
How to set up a photo relay for street lighting
It is necessary to configure the light sensor after installation and connection to the network. To adjust the response limits, there is a small plastic rotary disk at the bottom of the case. Its rotation sets the sensitivity.
Find a similar regulator on the body - it adjusts the sensitivity of the photo relay
A little higher on the body there are arrows that indicate which direction to turn to increase and decrease the sensitivity of the photo relay (to the left - decrease, to the right - to increase).
To begin with, set the lowest sensitivity - push the regulator to the extreme right position. In the evening, when the lighting is such that you decide that you should turn on the light, you begin to adjust. You need to smoothly turn the control to the left until the light turns on. At this point we can assume that the setup of the photo relay for street lighting is complete.
Astro timer
An astronomical timer (astro timer) is another way to automate street lighting. The principle of its operation differs from the photo relay, but it also turns on the light in the evening and turns it off in the morning. Light control on the street occurs according to time. This device contains data about what time it gets dark/light in each region in each season/day. When setting up the astro timer, the GPS coordinates of its installation are entered, the date and current time are set. The device works according to the programmed program.
Astro timer - the second way to automate the light on the site
Why is it more convenient?
- It does not depend on the weather. In the case of installing a photo relay, there is a high probability of false alarms - in cloudy weather, the light may turn on in the early evening. If the photo relay is exposed to light, it may turn off the light in the middle of the night.
- You can install the astro timer in your home, in a control panel, or anywhere. He doesn't need light.
- It is possible to shift the on/off time by 120-240 minutes (depending on the model) relative to the specified time. That is, you can set the time yourself as convenient for you.
The disadvantage is the high price. In any case, the models that are available in the retail chain cost quite a lot of money. But you can buy it in China much cheaper, although how it will work is a question.
Disadvantages of Twilight Switches
Along with the undeniable advantages, photo relays also have a number of significant disadvantages, which are also worth mentioning in this article.
Unlike a motion sensor, light sensors are not able to illuminate a specific place at the right time. The light comes on on all lighting fixtures at once, and the lighting occurs in a not entirely rational way. Only one lamp can work or all at once.
These devices are very sensitive to external influences and weather conditions. They especially often react negatively to ordinary dust. Also, the device may not respond quite adequately when there is a sudden change in the weather, for example, when dark clouds come in, it may “think” that night has fallen and turn on the lights.
Photo relays with adjustable lighting levels are distinguished by their high price tag compared to their analogues.