Sconces with a cord switch are often used in apartments. They are convenient for use in the bedroom near the beds, in children's rooms, in the relaxation area in the living room or kitchen, for illuminating pictures and mirrors. They easily attach to any flat surface. The light from such devices is soft and diffused, after which the eyes do not get tired. Such lighting devices are inexpensive and have two modes - on and off. You can connect a sconce with a cord yourself, you just need to understand the design features of the product.
Description of sconce with cord
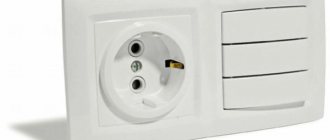
Rope Switch Wall Sconce
Rope switch wall sconces are a popular type of lighting fixture. They are often used to illuminate a specific area - for example, a reading area, a bedside area.
Main advantages:
- Possibility of adjusting the level of general lighting. There are also models in which the luminous flux is adjustable.
- Compact, light weight.
- Low power consumption.
- Possibility of reliable installation even on walls made of fragile materials, ease of connection.
Classification is carried out according to various indicators. According to the form they are distinguished:
- Closed sconces. Products from this category have a solid shade, which is made of frosted or glossy glass. Also classified as closed are hemispherical lampshades.
- Decorative. There are various forms - from classic, strict ones to lamps in the form of toys or flowers. They are made from different materials, which are matched to the style of the lamp.
- Elite. These include lamps that are used as the main light source. They are distinguished by great power and functional features.
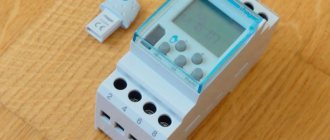
LED sconce with plug and dimmer switch Novotech Night Light 357324
By design we can distinguish:
- Stationary. They do not rotate, they are attached in one place.
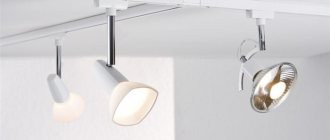
- Rotary. The light can be directed in any direction depending on the capabilities of the sconce.
Based on the number of light bulbs, single-lamp and multi-lamp sconces are distinguished.
If possible, adjust the light level:
- Constant light.
- Models with dimmer.
By type of switch:
- With a button. It can be located on the lamp itself or on a separate box. Connects to electrical wiring.
- On a key or button on an electrical wire. Similar to the previous type, but the connection is made through an outlet.
- Sensory. It is turned on in different ways - with the help of claps, movement.
- With cord switch.
The cord can be a chain, rope or other device.
Safety considerations when installing switches
The first rule is that the power of the switch must exceed the design load by at least one and a half times. The contact group can withstand a certain current. If it is exceeded, the metal will burn and the resistance will increase. In addition to the blinking light, the owner can expect more serious problems. Constant sparking in the housing can lead to melting of the switch, and even to its fire.
The quality of workmanship also matters. You should not choose products from little-known brands or switches made according to specifications. The packaging must be certified in accordance with GOST R 50345–2010 (IEC 60898–1), preferably ISO-9000. Cheap counterfeits use low-quality contacts that quickly wear out even under acceptable load.
The following criteria are not mandatory, but they also affect the safety of use:
- robust housing
- reliable fixation of the keys (they should not warp or fall out when switching)
- high quality wall mounting
Let's take a closer look at the last point. Almost all owners of old apartments have seen sockets falling out of the walls and switches dangling in boxes. At best, such “freedom of movement” could lead to contacts closing on the metal installation box, and at worst, in the dark you could get an electric shock.
Steel boxes were installed earlier, if you have an old apartment, for safety reasons you need to replace them with plastic ones. The problem is this: on any indoor switch there are two mounting options. Either with expansion anchors or using self-tapping screws. The first option was used in metal mounting boxes. Over time, the elasticity of the anchors is lost, and the stops do not hold the switching device in place.
The concrete walls of panel houses already have cylindrical seats for boxes. Sometimes unscrupulous electricians ignore the installation of mounting boxes, securing switches to spacer anchors. This is a violation of safe installation. On concrete or any other walls, first a mounting box is installed using a building mixture, then a switch is attached to it.
There are boxes for drywall and SIP panels. In any case, the body of the built-in switch is attached to the box using self-tapping screws.
The next important issue is the correct connection of the disconnecting conductor. On the one hand, in 220 volt alternating voltage networks there is no polarity. Any electrical appliance will work regardless of which contacts are connected to zero or phase (we are talking about a single-phase household network). And if this issue is not relevant for the outlet, connecting the light switch is strictly regulated.
Let's consider a typical installation of a single-key switch. Two wires are supplied to the lamp socket: zero and phase. Let's say you open the neutral wire using a switch. The light will go out, but there will always be a dangerous potential of 220 volts on one of the cartridge contacts. If you touch this contact while replacing the lamp, you will receive an electric shock. And this is with the device turned off!
In addition, when using fluorescent lamps (so-called “housekeepers”), a parasitic glow will be observed in the dark, which interferes with sleep. The same phenomenon is observed on some LED lamps. Therefore, the neutral wire always goes directly to the light source, and the phase wire passes through the switch contacts.
In this regard, there is a positive “side effect” when choosing a switch installation diagram with a “zero” and a “phase” inserted into the housing. Thanks to the “high competence” of electricians, it is possible to change the neutral and phase input to your home. You can change the so-called "polarity" on the input without changing the entire wiring configuration.
Selecting a location
When sconces are used to illuminate corridors, they must be installed at a distance of approximately 2 m from the floor.
For comfortable use of the lamp, you should choose the best installation location. The lamp must be accessible and at such a height that all family members can turn it on. This task is especially relevant when installing paired sconces, which should be located on the same line.
The sconce can be the main source of light in the corridor. In long hallways, several lamps are hung symmetrically on each wall.
The sconce can also be hung in the bathroom. Since this room has a special difficult microclimate, you should buy waterproof models.
To choose the right location, you need to make calculations in advance. The optimal installation height is 1.5 meters. For models with a plug, there must be a socket nearby so that the lamp can be connected to the mains.
Connecting a switch with light bulbs connected in parallel
This connection of the light bulb is different in that when you press the button, another light source turns on. A definite advantage is that if one of the lamps burns out, the other remains operational. The sequential connection of light bulbs to the switch does not allow one to determine by visual inspection which of them needs to be replaced. Therefore, this parallel connection option is considered the best. It makes sense to use different colored wires. Choose red if you want to extend the “phase”.
To safely connect the light bulb, use certified sockets with special connectors equipped with screw terminals. The essence of the circuit is connecting the power core to the open contact of the switch, which is then pulled to two lamps, and after that the (now, say, white) cable returns to the distribution box through the “zero” connection of the switch. Thus, in the “OFF” position the phase is opened.
What tools are needed to connect?
The choice of drill for the job depends on the material of the walls.
Connecting a sconce with a chain for one lamp to the mains is not difficult. To do this, you will need a minimum set of tools that every home craftsman has. To connect you need:
- screwdrivers: Phillips, indicator, flat;
- wire cutters, pliers;
- ruler, pencil;
- insulating tape;
- electric drill with drills, the choice of drill depends on the material of the walls;
- a knife or device for stripping insulation from cores;
- stepladder if the lamp will hang high.
The sconce comes with an installation diagram. It shows in the pictures how to connect the lamp to the electrical wiring.
Before starting installation, you need to clarify a few nuances:
- Availability of a suitable degree of IP protection. When used in the kitchen or bathroom, protection should be increased.
- Type of light bulbs and their power. The load of lamps must not be exceeded; it should not be higher than that stated in the lamp’s passport.
- Supply voltage. If the lamp requires a voltage of 12-24 V, you should select a step-down transformer and connect it to the circuit.
Then you can proceed to installation. It will differ depending on the type of sconce.
Keyboard models - how to connect a sconce lamp with a switch?
An alternative to a lighting device with a rope-type switch are sconces, which can be turned on/off using a key on the wall. Often, the design of such products, instead of a chain, only requires the presence of contacts that you need to connect yourself.
As you can see in the diagram, connecting such a wall lamp-sconce is almost as simple as the previous type of model. Most importantly, remember the following points:
- the introductory phase must go to the switch;
- the phase from the switch must go back to the lighting fixture;
- In this situation, connect zero and ground directly.
Important! Be careful, in most products from China and some other sconce models, all wires may be covered with insulating material of the same color. To avoid confusion and ensure your safety during repair work or maintenance of lighting equipment, mark all contacts using multi-colored electrical tape or cambrics
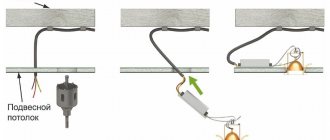
Connecting the rope model to the electrical wiring
Before starting any electrical work, the room must be de-energized. To do this, you need to find the corresponding switch in the distribution panel. It is prohibited to turn on the electricity until the work is completed.
Using an indicator screwdriver, you need to make sure that there is no voltage on the wires. The tester is applied to each core in turn and checked to see if the indicator lights up.
You need to take the back cover of the sconce and attach it to the wall. You should mark the places with a pencil where the holes for installation will be made. Then holes are drilled with a drill, into which the locking mechanisms will then be installed.
The next step is connecting the wires. All electrical wiring in the house has at least two wires - zero and phase. They can be distinguished either by markings or using a tester. The corresponding wires must be connected to each other. The ends of the cables must be stripped using a sharp knife or a special insulation stripper. The contacts are stripped to approximately 5 mm. After this, the cores can be connected according to the diagram given in the instructions for the sconce. Most luminaires use the same connection algorithm.
If the house does not use grounding, the corresponding conductor must be reliably insulated. In this case, only two wires will be used for connection - brown and blue. If there is a ground, it must be connected to the corresponding conductor on the electrical wiring. The wire color should be yellow-green.
The blue one should be connected directly to the lamp to the corresponding core, usually it has the same color. You can connect the wires using electrical terminals, soldering, and then apply an insulating layer.
The brown wire goes to the black wire on the switch cord. The second end must be connected to the brown wire on the sconce.
In addition to direct connection through electrical wiring, the sconce can be powered through an outlet. This is convenient if the lamp is used infrequently.
You can install the lamp in place and screw it to the wall. Next, the lampshade is attached and the light bulb is inserted. At the end, you need to apply voltage and test the assembled system. Using a rope switch, you need to turn the lamp on and off. The lamp should not blink, and the contact points of the wires should not spark if the circuit is assembled correctly. Otherwise, you need to disassemble the assembled system and check the correctness of the connection.
Practical installation
First of all, it is necessary to de-energize the room. Then we connect the wires according to the diagram. Of course, we clean the contacts from insulation in advance. Next, we fix the lamp body to the wall using self-tapping screws. We attach the lampshade to its original place and screw in the light bulbs.
All that remains is to check how the system works and, if everything is fine, you can restore order in the workplace.
The sconce is ready for everyday use!
Polls
Read further:
How to connect a sconce through a switch
How to connect two lights to a double switch
How to connect a double pass-through switch
How to connect 2 pass-through switches
How to connect multiple light bulbs to one switch
Connecting a sconce with a cord and plug
Installation work must be carried out when the network is de-energized.
Such devices are convenient to use if it is not possible to cut walls and draw a new line to the electrical wiring. If desired, the sconce with the plug can be moved to any other place where there is an outlet nearby.
To connect a sconce to a switch from an outlet, you do not need to connect wires. All you need to do is select the installation location, drill holes for the mounting system and hang the lamp. The plug must be plugged into the outlet. You can use a lanyard to check the functionality.
The algorithm for connecting a wall sconce with several lamps is similar, only there will be a larger number of wires. All phases, neutrals and groundings from all lamps are connected to the same conductors.
Some tips
The luminaires provide for connection with a three-wire wire (phase, neutral, ground). When the same wiring is installed in the room, it is easy to connect an electric lamp.
But if there are two electrical cords in the room (phase, zero), then you need to act differently. The connection is made through a phase interrupted by a switch and zero. In this case, you need to follow the markings.
If the bed is large, then it is advisable to install two electric candles. For installation in a child's room, a place is provided where direct light into the child's eyes is excluded.
In bathrooms, installation is recommended on two opposite sides or on both sides of the mirror.
During installation, it is necessary to take accurate measurements and draw the places where the wires will be laid. When connecting two devices, they must be installed at the same level. Neglecting these tips will result in the installation being carried out inaccurately, which will affect the beauty and interior of the room.
Scheme
In practice, there are 2 types of electrical wiring used to connect lamps (sconces): with two or three wires.
In any case, the first wire is “zero”, the second is “phase”. The neutral wire is usually blue and should be connected to the “N” terminal of the switch. The phase is connected to the “L” terminal.
If the electrical wiring has 3 wires (an option for increased reliability and electrical safety), grounding is added to the neutral wire and phase (indicated as “PE”).
Please note that as you increase the number of bulbs on a wall light, the number of wires will also increase. They must all be connected in parallel
Contact wear
Frequent use of keys leads to wear of the contacting pins, which causes the device to malfunction. Wear is expressed in the destruction of the surface of the terminals, changes in size, shape, and decreased mobility. The following types of wear are distinguished:
- Mechanical deformation when pressure or shock is applied to the switch contacts. The action is transmitted to the disconnecting elements in the electrical network without load. In this case, the ends of the plates are flattened, abraded and crushed. To reduce the harmful effects, the contacts are equipped with shock-absorbing springs, which eliminate additional vibration.
- Electrical wear is the destruction of a contact under the influence of electrical force. Constant current load leads to electrical erosion of the terminals. Under such a load, the conductors lose weight and decrease in volume.
- The double shape is a consequence of the simultaneous influence of mechanical and electrical forces. Wear of the leads leads to the formation of harmful chemicals and films on the contact area. When the circuit is turned on, altered contacts can sometimes show a discharge that develops into a high-power electric arc, which is dangerous for humans.
No tags for this post.
Types of lamps for home use
Tube progress keeps pace with switches. Their diversity is also impressive.
When purchasing an energy-saving light bulb, you should focus on well-known brands - after all, it should not only be efficient, but also last as long as possible
But here, too, some more popular types are defined:
- Incandescent light bulbs are established home light sources in a round glass bulb with a vacuum and a tungsten filament inside.
- Halogen lamps are the same incandescent lamps filled with a special gas. It increases service life and minimizes the size of their flasks. Disadvantage: When installing, you cannot touch the glass of the flask with your hands.
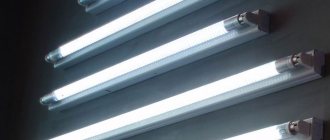
- Fluorescent fluorescent lamps are not very common at home, but they are also traditional lighting devices (hereinafter simply “fluorescent lamps”).
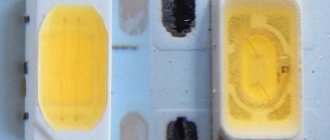
- Energy-saving LED lamps, as the name suggests, use the glow of groups of LEDs. They can be fixed into ordinary screw-in sockets (hereinafter simply “LED lamps”).
Energy-saving fluorescent light bulbs are increasingly replacing the usual ones. The operating principle is similar to fluorescent lamps. They are screwed in like incandescent lamps (hereinafter simply “energy-saving lamps”).
Fundamental decision
An increasing number of our compatriots are deciding to purchase wall-mounted lamps. Many people have to solve a difficult problem, not knowing how to connect a sconce with a switch with a cord
. This on/off option is especially popular, as it eliminates the need to insert the plug into the socket every time and remove it when the light goes out. In addition, you can attach any decoration to the cord, complementing the interior with pleasant, cute little things.
Some owners, without trying to figure out how to
You can
connect the lamp with a switch with a cord,
decide to call a master electrician. This is a simple solution, but it will require additional financial costs. At the same time, it is quite possible to do without outside help and install the sconce yourself, while observing all established safety and health rules.
How to remove chandeliers
How to remove a chandelier from the ceiling, if necessary? All described fastening methods allow dismantling in the reverse order of installation.
In the first place, again, safety precautions: turn off the switch, turn off or unscrew the plugs. Then we remove all fragile parts from the chandelier: crystal pendants, etc. Next, we disconnect the wires, insulate their bare ends, and only after that we proceed to disassemble the mount.
With a suspended suspended or plasterboard ceiling, we remove only the chandelier itself. We do not touch pillows, butterflies, collets and other auxiliary parts. This is especially true for collets and butterflies: these are disposable parts and are not designed for re-installation.
Light bulb as a light source
Among the several types of lamps available today, preference should be given to LED ones.
LED lamps are economical and durable
Prices for LED lamps
LED bulbs
Although they are more expensive than others, they have several tangible advantages.
- Economical. LEDs last for decades without requiring replacement and consuming a negligible amount of electricity.
- Safety. Such lamps are usually produced in a plastic case, so they do not break when dropped.
- Low heat. The light bulbs hardly heat up during operation. This is a big plus for bedside lamps, which are very close to a person - even if you accidentally touch them, it is impossible to get burned on them. In addition, insignificant thermal radiation allows you to use any lampshades, even paper and textile ones - they will not light up or melt if they are close to the light bulb.
Retro Edison lamps
An alternative to conventional light bulbs can be LED strip. Or rather, a lamp equipped with it.
LED lamp
LED Wall Light
Prices for wall lamps
Wall lamp
Another nuance when choosing a lamp is the color of the glow. It is desirable that it be natural or warm, but not cold. Cold light is too bright and uncomfortable for the bedroom.
Warm and cold light
For the same reason, “daylight” fluorescent lamps are not suitable for the bedroom.
REcessed CEILING LIGHTS
The widespread use of suspended ceilings made of plasterboard, Armstrong systems, suspended ceilings, as well as fiberboard and PVC panels for finishing ceiling structures has led to the emergence of new forms of lighting fixtures - built-in structures.
The main elements are located inside the technological niche between the decorative suspended ceiling and the interfloor ceiling structure.
The body of a ceiling light used for suspended ceilings can have varying degrees of protection from IP20 (the body has conditional protection against penetration by hands) to IP44 (almost completely sealed, used in rooms with high humidity: bathroom, kitchen, etc.).
The elements through which recessed ceiling lights are installed are quite varied and depend on the type of suspended ceiling:
- strips, crosses or hooks, with the help of which fastening to the load-bearing elements of interfloor ceilings is carried out;
- flat latches with springs are used mainly for spotlights built into Armstrong, drywall or other materials with sufficient rigidity;
- The elements of the supporting frame of the suspended ceiling act as fasteners.
Lamps for suspended ceilings have a number of advantages compared to other lighting devices:
- a wide range of models made in various styles that can be used in interiors of a wide variety of designs;
- convenient replacement of lamps or reflective elements;
- the possibility of installation not only on the ceiling surface, but other elements of building structures that have sufficient strength (floor beams, lower elements of staircases, furniture, etc.).
The presence of one or several light sources in one lighting device makes it possible to adjust the intensity of the light flux over a wide range, zoning the space of the room and using directional light. At the same time, the useful height of the room practically does not decrease.
There are also certain technical limitations of ceiling lights built into plasterboard, fiberboard or other suspended ceiling elements:
1. It is necessary to carefully select the installation location, since after completing the installation procedure it will be impossible to move the lighting fixtures to another part of the room without significant work to seal the technological hole in the suspended ceiling.
An exception is Armstrong suspension systems where a recessed lamp, as a rule, occupies the entire cell of the ceiling panel.
2. It is advisable not to use incandescent lamps, especially in suspended ceiling systems made of polymer materials. Heat will spread quickly into the ceiling space and can cause significant thermal distortion.
3. To illuminate rooms of a large area that have a small height, a large number of recessed spotlights are required.
* * *
2014-2020 All rights reserved. The site materials are for informational purposes only and cannot be used as guidelines or regulatory documents.
Comments:
Vector
The article is good, but one detail is missing. The wall lamp must be mounted at a minimum height convenient for its use. If it is installed near a chair and is intended for ease of reading on it, then it should be installed 5-10 cm above the level of the seated person’s head. If above the bed, then 50-70 cm above your head
Semen
The lamp near the chair works well in combination with a motion sensor. My dad likes to sleep in a chair, and when he falls asleep, the light turns off.
Zakhar
A wall lamp near the chair is an inconvenient and unjustified solution, in my opinion. What if you decide to move the chair to a different location? Isn't it better to use a floor lamp in this case?
Kilowatt
Zakhar, then you shouldn’t use a stationary lamp above the bed either. What if you decide to rearrange the bed? Kitchen? Move the bath to another room? Not all people move furniture, some leave it in its place
Step by step instructions
Installation and connection should be carried out in stages:
- decide on the lighting task that is assigned to the lighting fixture;
- buy the appropriate device;
- make precise markings of the source installation and cable routing;
- select a connection scheme;
- carry out the electrical wiring;
- install a lamp;
- connect the electrical wiring;
- perform a test run.
In some cases, it is necessary to groove the wall and install a switch.
Instead of difficult internal wiring, it is possible to lay the electrical cord in an open way. In this case, the wire is placed in a closed box. This method involves installing the switch externally.
We recommend watching the video:
Installation steps:
- The power supply is turned off in the panel. They check on switches and electrical appliances, but the most reliable way is to test the wires themselves using an indicator screwdriver.
- The back cover or mounting strip of the sconce is applied to the wall surface. Mark the locations of future fasteners.
- The cover is attached using self-tapping screws or screws with dowels.
- If necessary, the power cable is cut (10–12 cm is left). The wires are stripped (5–8 mm) and connected in pairs, which will be described in more detail below. Next, securely insulate the connection!
- The housing is placed and usually secured with decorative nuts, which are included in the kit.
- The light bulb is installed.
- The lampshade (shade) is fixed.
- The electricity is turned on and the operation of the device is checked.
How to identify wires?
All connection diagrams presented below will only work when the wiring is correctly defined. This is usually easy to do due to the different colors that traditionally mark different conductors:
- Phase, L, is usually black, brown, white. There are, however, gray and even red, orange, purple and turquoise.
- Zero, N, is usually blue or light blue in color.
- Grounding, PE, is green, yellow or yellow-green.
Although this type of marking is a good aid for the electrician, there are a few complications. Firstly, manufacturers sometimes still differ greatly in assigning colors to conductors (and there is also an old standard that was in force in our country in the last century, and a new one). Secondly, the craftsmen who laid the wiring may not have cared about compliance.
Therefore, the most reliable methods of determination are to use an indicator screwdriver (especially if there are only two conductors: the probe will work on the phase) and, if there is a ground wire, to use a multimeter.
You also need to understand that if a lamp has more than one light bulb, there will also be more wires.
Connecting a sconce with a cord
Such models are also called “rope type”.
You can connect the device to the wiring so that turning the light on and off will be done only with the cord that comes with the lamp. This installation is simple.
It is necessary to bring the wires to the installation location on the wall, and then compare them with those available on the sconce. There should be three of them, as already indicated: phase (L), neutral (N) and ground (PE), the latter may be absent.
The corresponding wires are connected in pairs, L to L and so on. If there is no grounding in the house wiring, the corresponding sconce conductor is insulated.
As a rule, the sconce has a built-in terminal block, which simplifies the process.
Using the rocker switch
In this case, it will play the same role as the lace. The connection goes according to this scheme:
- The phase goes to the switch.
- Next - on the lamp.
- “Zero” and ground are connected directly.
Connection via cord and plug
In this case, you may not even have a question about how to connect the sconce - everything is done directly.
However, this method can be improved if the device is equipped with a cord. Then the plug can be in the socket almost all the time, and to turn the light on and off, it will be enough to pull the rope. After studying the instructions and choosing the appropriate connection diagram, it’s easy to hang both the chandelier and the sconce with your own hands. Experienced friends and relatives can also help you with advice.
You can choose the lighting fixtures themselves from our catalog. We present many models of different designs, with descriptions of technical characteristics and photos. Make your apartment or house more attractive and comfortable with us!