Electric boilers are the easiest to install and connect; they do not require a chimney, supply and exhaust ventilation, or a separate room for the boiler room. Since standard heating element models already contain all the necessary elements and components (circulation pump, expansion tank, safety group, etc.), when organizing a simple heating system, communications around the electric boiler are minimal.
All these factors allow you, having basic skills and knowledge, to install and connect an electric boiler yourself, without the involvement of specialists. But please note that the condition for providing a warranty from most manufacturers is that installation is carried out by a specialized service organization. However, the ease of installation also has a positive effect on the cost of the work of the craftsmen.
Selection of the optimal heating scheme
To heat a home, the following schemes are most often used on how to install a heating boiler in a private house:
- Single-pipe. One manifold supplies all radiators. It plays the role of both supply and return, as it is laid in a closed loop next to all the batteries.
- Two-pipe. In this case, separate return and supply are used.
To choose the most optimal installation scheme for a heating boiler in a private home, it is recommended to consult a specialist. However, in any case, a two-pipe system is a more progressive solution to the question of which heating scheme is better for a private home. Although at first glance it may seem that a single-pipe system allows you to save on material, practice shows that such systems are both more expensive and more complex.
It is important to understand that inside a single-pipe system, water cools much faster: as a result, radiators further away have to be equipped with a larger number of sections. Also, the distribution manifold must have a sufficient diameter that exceeds the two-pipe distribution lines
In addition, in this scheme there is a serious difficulty in organizing automatic control due to the influence of the radiators on each other.
Small buildings such as dachas, where the number of radiators does not exceed 5, can be safely equipped with a single-pipe horizontal heating system for a private house with your own hands (it is also called “Leningradka”). If the number of batteries is increased, there will be malfunctions in its functioning. Another application of such an interchange is single-pipe vertical risers in two-story cottages. Such schemes are quite common and work without failure.
The two-pipe decoupling ensures that the coolant is delivered to all batteries at the same temperature. This allows you to avoid building up sections. The presence of supply and return pipes creates optimal conditions for the implementation of automatic control of radiators, for which thermostatic valves are used. In this case, you can take pipes of smaller diameter and simpler designs.
What are the heating schemes for a private two-pipe type house:
- Dead-end. In this case, the pipeline consists of separate branches, inside of which counter movement of the coolant is used.
- Associated two-pipe. Here the return serves as a continuation of the supply, which ensures an annular movement of the coolant inside the circuit.
- Radiation. The most expensive schemes are those where each radiator has a separately laid hidden line (in the floor) from the collector.
If, when laying horizontal pipelines of large diameter, a slope of 3-5 mm/m is used, then a gravitational method of operation of the system will be achieved, and circulation pumps may not be used. Thanks to this, complete energy independence of the system is achieved. This principle can be applied to both one-pipe and two-pipe schemes: the main thing is to create conditions for gravity circulation of the coolant.
In open heating systems, an expansion tank will be required at the highest point: this approach is mandatory when arranging gravity circuits. However, the return pipe next to the boiler can be equipped with a membrane expander, which will make the system closed, operating under overpressure conditions. This approach is considered more modern and is most often used in forced-type systems.
Warm floors deserve special mention when researching which heating scheme to choose for a private home. Such a system is quite expensive, since it requires laying several hundred meters of pipeline in a screed: this makes it possible to provide each room with a separate heating water circuit. The pipes are connected to a distribution manifold, which has a mixing unit and its own circulation pump. As a result, the rooms are heated very evenly and economically, in a manner that is comfortable for people. This type of heating can be used in various residential areas.
What can be the layout of water heating pipes?
There are two options for installing the water circuit:
- single-pipe;
- two-pipe.
Each of these types of pipe systems has its own disadvantages and advantages; they must be taken into account when deciding how to arrange heating pipes in the house.
A single-pipe system involves one pipe leaving the boiler, which sequentially passes through all the heating batteries, and only then returns back to the boiler.
This installation results in significant pipe savings, but there are also disadvantages:
- The batteries that are closer to the boiler are hotter. The latter are almost always cold. The only way out that will work here is to increase the number of radiators in the distant rooms and reduce them in those close to the boiler room.
- If bypasses are not installed during installation, then when replacing radiators you will have to turn off the heating and drain all the coolant.
In a two-pipe distribution, heating devices are connected in parallel to two pipes - one of them goes to the inlet, the other to the outlet of the cooled coolant.
There is only one drawback here - increased pipe consumption. In this case, the heating level of all radiators is the same; you can install temperature regulators on each device.
How to make plastic heating in a house to save on expensive metal pipes? It is necessary to take into account all the requirements for the quality of the pipeline, remembering that plastic has the ability to expand at high temperatures.
The types of two-pipe systems are as follows:
- Dead end - you need a few pipes, but even with a long water circuit, the last radiators will be cold. Therefore, it is advisable to make such a system with a maximum of seven radiators.
- A type of two-pipe system called the Tichelman scheme. You need a lot of pipes, but with a large number of radiators, and especially in two-story private houses, it is very effective. Many people do not like the appearance of such a system, which spoils the design of the rooms. Sometimes you have to bend the pipe around the outline of the door and install an air vent there.
- Beam (collector) type of system. Expensive installation, as you need a lot of pipes and a manifold. Separate lines (supply and return) are connected to the radiators. But the advantage is that you can control the heat transfer in each radiator.
Most water heating systems are based on bottom supply of coolant. In multi-storey private houses, top supply systems are also made, as they are more economical.
The water system requires the installation of an expansion tank, since water has the ability to change its volume depending on the temperature. There are two types of tanks: open (regular containers) and closed (membrane). Therefore, in the first case the system is called open, in the second - closed.
A simple tank is installed in the attic. It's cheap, but you have to constantly add water because it evaporates.
In order not to monitor the coolant level, you can install an automatic float device that will control the amount of coolant in the system. However, only water can act as a coolant here.
Antifreeze does not need to be added to open systems, if only for the reason that the fumes from it are often toxic.
An open type expansion tank is installed in a heating system with natural coolant circulation. The membrane tank works ideally with the forced circulation option.
Advantages of pump heating
Not so long ago, almost all private houses were equipped with steam heating, which was powered by a gas boiler or a conventional wood stove. The coolant in such systems circulated inside the pipes and batteries by gravity. Only centralized heat supply systems were equipped with pumps for pumping water. After the appearance of more compact devices, they also began to be used in private housing construction.
This solution provided a number of advantages:
- The coolant circulation rate has increased. The water heated in the boilers was able to flow much faster into the radiators and heat the rooms.
- The time it takes to heat homes has been significantly reduced.
- An increase in flow rate entailed an increase in the circuit capacity. This means that smaller pipes can be used to deliver the same amount of heat to its destination. On average, the pipelines were reduced by half, which was facilitated by the forced circulation of water from an embedded pump. This made the systems cheaper and more practical.
- In this case, to lay highways, you can use a minimum slope without fear of complex and extended water heating schemes. The main thing is to choose the right pump power so that it can create optimal pressure in the circuit.
- Thanks to household circulation pumps, it has become possible to use heated floors and closed systems of high efficiency, the operation of which requires increased pressure.
- The new approach made it possible to get rid of many pipes and risers, which did not always fit harmoniously into the interior. Forced circulation opens up possibilities for laying circuits inside walls, under floors and above suspended ceiling structures.
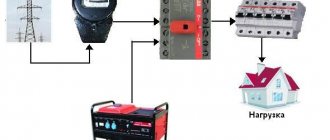
A minimum slope of 2-3 mm per 1 m of pipeline is necessary so that in the event of repairs, the network can be drained by gravity. In classic systems with natural circulation, this figure reaches 5 or more mm/m. As for the disadvantages of forced systems, the most significant of them is the dependence on electrical energy. Therefore, in areas with unstable electricity supplies, it is necessary to use uninterruptible power supplies or an electric generator when installing a circulation pump.
You should also be prepared for an increase in bills for consumed energy (with the correct selection of the power of the unit, costs can be minimized). In addition, leading manufacturers of equipment for heating systems have developed modern modifications of circulation pumps that can operate in increased economy mode. For example, the Alpfa2 model from Grundfos automatically adjusts its performance depending on the needs of the heating system. Such equipment is quite expensive.
Features of parallel connection
Let's take a closer look at what a standard parallel connection diagram for gas and electric boilers looks like:
- Each unit has coolant supply circuits. They join the common line.
- It is imperative that there are safety groups and shut-off valves.
- The return lines, also equipped with shut-off valves, are connected to the other line.
- A circulation pump is installed on the return line (or supply), in front of the unit for combining the piping circuits.
- The lines of both heating units are connected to the collectors.
- An expansion tank is installed on one of the distribution manifolds. A make-up circuit is also connected to its pipe, equipped with a check valve and shut-off valves.
- From the distribution manifolds there are main branches to the heated floor, radiators, boiler, each with circulation pumps and valves for draining the coolant from the system.
This is not a schematic diagram, but only its main features. It gives a general idea of how best to connect an additional electric boiler to the main gas boiler. The assembly option can be complicated and improved, for example, with an automation system and a servo drive.
With a parallel connection, you can also install a hydraulic arrow and an automation unit, but before doing this, carefully consider this decision; installing them is not always advisable
Required Tools
The quality and speed of work completion depend on proper preparation.
For installation you will need:
- A drill with different attachments for making holes for fasteners.
- Level for mounting equipment.
- Fastening elements capable of withstanding the load created on them by the mass of the electric boiler.
- Pipes for highways.
- Cable for laying the power line from the mains.
Additionally, you will need to purchase circuit breakers and RCDs.
Choosing a boiler
Let us repeat: the main component of any heating system, and a closed type in particular, is the boiler. In order for the installation work to be carried out successfully, it must first be selected, and correctly.
To begin with, we note that from the boiler the heated coolant moves through the pipeline to the heating devices, which, in turn, transfer thermal energy to the room.
First of all, you should calculate the required power of such a boiler. To do this, it is necessary to take into account the individual characteristics of a particular building. These features include the area of the heated room, the thickness and height of the walls, the material from which they are made, and a number of other parameters.
To at least approximately calculate the required boiler power, you can use the generally accepted approximate thermal power consumption per 10 square meters - it is 1 kilowatt. Let us repeat, this is only an approximate formula, therefore, when calculating, you should use a correction factor relating to the heat loss of all enclosing structures. If the power of the heating boiler is calculated correctly, you will thereby create the most comfortable living conditions in your house/apartment during the cold season. Moreover, it will help you save significantly on electricity and reduce your heating costs.
You can find out how to calculate heating costs in an apartment here
So, let’s draw some conclusions regarding the installation of a closed-type system.
- When designing it, you must calculate the required power of the heating boiler.
- Find out what materials and in what quantities you will need.
- Determine how many radiators are needed. (for more information on calculating the number of heating radiator sections, see here)
- Take into account all the features of building structures.
- Choose the most suitable place to install heating equipment.
Creating an efficient and, most importantly, high-performance heating system requires carefully planned preparatory work.
As a conclusion
As we can see, there are many types of heating systems, and a closed heating system is perhaps the best option. Regardless of what wiring you choose or what material for the pipeline, installation must be taken with great responsibility. If you feel that you cannot cope on your own, then contact a specialist. Yes, it will cost more, but you will be protected from all possible troubles in the future.
Power calculation
Before connecting the electric boiler, you need to select it correctly. To do this, it is necessary to calculate the power of the heating system. The required power of a specific electric boiler model is determined by the formula: W = S×Wsp, where:
- W – required power (kW);
- S – total area of cottage rooms (m2)
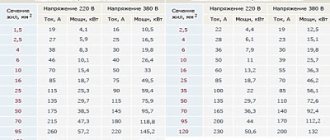
- Wsp - specific power coefficient (kW/m2). The average statistical indicator, which is selected from SNiPs. For the European part of the territory of the Russian Federation it is one, for the southern part it is 0.8-0.9, for the Far East it is 1.1-1.2, for the regions of the far north it is up to 1.6.
As practice shows, for most of the territory of Russia the following statement is true: per 10 m2 of house area it is necessary to provide 1 kW of heat source power. Rounding is done upward. The indicator is usually overestimated by 10-15% of the calculated value. This is done to ensure that the boiler does not operate at extreme conditions.
Connection diagram of an electric boiler to the network
Before connecting an electric heating boiler, please note that the electric boiler must be connected to the network using copper wiring. The cross-section of the wire must be no smaller than that specified in the document that came with the device. Electrical connections of the external type device must be made through special cable terminals. These pins should be located in the lower left corner. There should also be a brass grounding terminal with an M6 bolt.
Power cable connection diagram
When inserting an electric boiler into the heating system and installing grounding, you need to ensure that good and reliable contact is ensured between the metal body of the device and the brass bolt. Before connecting the bolt to the frame of the device, you need to thoroughly clean the connection area.
If electric heating is planned to be organized for a building with a large area, then when purchasing equipment you need to choose one that provides the possibility of installing a cascade. In order for the devices to operate normally in a cascade, the terminals of the control device must be connected to the unit that is being controlled. If the system installation is controlled using a room-type regulator, then the control contacts must be connected to the terminals of the control device.
Diagram of the electrical heating system of a two-story house
The device must be inspected visually and make sure that it is in the correct position, the water pressure in the system is normal, and all communications are connected. All this is defined in the unit documentation.
After this, the installation diagram for an electric heating boiler involves the following steps:
- It is necessary to check the serviceability of the pipeline fittings located in front of the unit. To do this, you need to switch it from the “closed” to “open” position, and vice versa.
- All pipeline fittings of the electric heat generator are moved to the “closed” position. It is also necessary to move the pipeline fittings of the water supply and heating systems to this position.
- On those pipelines that supply cold water to the unit, you need to open the shut-off valves. If you use an electric heating system, it is not recommended to use antifreeze liquids for it. This is because they have properties that can affect the operation of equipment in a negative way. Antifreeze fluids have a composition that can cause aging or rapid wear of rubber components.
- It is necessary to install a sump filter or filter before entering the unit on the return pipeline. You can install both of these elements.
- After the heating system is completely filled with water, you need to check how tight it is.
When the installation of an electric boiler with heating radiators is completed, you need to check how efficient the system sensors are. These include sensors such as: temperature controller, water pressure sensor, signal and control components of the unit, emergency temperature sensor.
During repairs to the heating unit or during unfavorable installation conditions, an electric heating unit can be connected using rubber hoses.
For the heating system it is necessary to use water with a minimum hardness level. Then the service life of the heating elements can be significantly extended.
Video description
Video review of the electric boiler piping device:
- Preparing the site. For the floor model, a foundation is created, if necessary, a boiler room is equipped, and finishing is done with non-combustible materials.
- Installation of the unit. The equipment is mounted on a wall or base and secured. The pipeline is connected with piping, and grounding is connected.
- Power connection. The supply line is supplied directly via a separate branch - through the switchboard.
- Installation of protective equipment. Modern electric boilers require protection against voltage surges. Therefore, power must be supplied to them through an automatic circuit breaker, an RCD and a voltage stabilizer.
- Launch. Before starting, the system is checked for integrity at all connection points - both the pipeline and electrical wiring must be in good condition. Before turning on the unit, all necessary connected valves are opened.
Note! Connecting a 3-phase electric boiler is only possible if the home network is rated at 380 V. Otherwise, the wiring will be overloaded and the equipment will not produce the declared power.
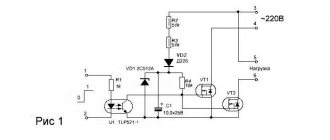
Homemade electrode boiler: manufacturing features
Electric boiler diagram.
Most often, in order to make a homemade electric heating boiler, an electrode boiler circuit is chosen.
The design feature involves the use of a large diameter pipeline; it depends on the size of the heating element you choose. As an option, a scheme with a removable pipe can be used. Although this design is more complex to manufacture, it allows you to make the equipment universal and, if it is necessary to replace or repair the heating element, do it quickly and simply, without dismantling the heating system.
Advantages of an electric boiler:
- the main argument for installing such equipment is that electricity is the most affordable source of energy, which cannot be said about gas or, for example, wood;
- its work is easy to control and automate;
- there is no noise during operation;
- there is no need to install and maintain the chimney;
- simpler registration compared to registration of gas equipment;
- the use of temperature regulators does not allow the boiler to overheat;
- affordable price;
- small overall dimensions;
- high level of reliability and the ability to work around the clock.
Electrode boiler diagram.
Usually they take a heating element whose power does not exceed 5 kW, but here it all depends on what area you plan to heat. The heating element usually operates from a 220 V network, so there are no difficulties with its connection.
When choosing the shape of the housing for the heating element, there are no special requirements; it can be of any shape. Its size should not be very large, otherwise the heat exchange between hot water and air will take place in the boiler itself, and not in the heating radiators.
You need to know that as the heating chamber increases, the efficiency of the equipment will decrease. Depending on the chosen design, the heating element can be installed directly into the pipe; in this case, the boiler is simply absent. Do not forget to provide for the possibility of simple and affordable replacement of the heating element.
In order to set the temperature, the heating system uses a potentiometer, which is installed near the thermostat or in another convenient place in the heating main. In the case when the temperature at the boiler outlet is low, it is necessary to reduce the speed of the circulation pump.
Types of electric boilers, their advantages and disadvantages
The demand for electric heating boilers has given impetus to the development of new types, which are radically different in their operating principle.
heating elements new
The first type of electric boiler. Heating of the coolant is carried out by one or several heating elements. The heating element consists of the following elements:
- Outer shell: steel, titanium, copper or aluminum alloys;
- The internal heating element is nichrome wire.
- Dielectric (ceramic granules or quartz sand) – separates the spiral from the shell.
The device very quickly reaches its rated power, the coolant is heated within 10-15 minutes. The coolant is moved through the system forcibly using circulation pumps. Most models with a power of up to 12 kW are made in a wall-mounted version from a single-phase household power supply. More powerful devices are floor-mounted and require three-phase power supply.
Advantages. The heating elements of the heating element do not have direct contact with the coolant. They are separated from it by a thick layer of dielectric and a durable outer shell. This minimizes the chance of a short circuit. Modern models have a multi-stage safety system that protects equipment from overheating and coolant leakage.
Flaws. By analogy with a boiler on heating elements, as a result of operation, scale is formed, which significantly reduces the heating efficiency. To reduce the intensity of plaque formation, distilled water or special antifreeze is used.
Electrode
The operating principle of an electrode (ionization) boiler is as follows. Two electrodes are brought into the ionization chamber, creating a potential difference. An electrolyte with a high content of salt impurities is used as a coolant. It is in conjunction with such a coolant that you need to connect the electric boiler to the heating. Having high resistance, the coolant quickly heats up under the influence of electric current. It only takes a few minutes for the boiler to reach its rated power. The coolant can only be moved by force, using a circulation pump.
Advantages. High degree of automation, using external sensors, you can control not only the temperature of the coolant, but also the air in the heated room. High reliability is one of the key advantages of ionization boilers. They have a minimum number of parts that practically do not break. If there is a coolant leak, the electrically conductive medium disappears and the device simply turns off. It is recommended to install such boilers in areas with unstable electrical voltage, as they can operate successfully even at 180V.
Flaws. The high cost of the coolant and the need for its careful preparation, preferably before each heating season.
Carrying out installation work
Every homeowner wonders how to properly heat the house. Do-it-yourself installation of a heating system in a private house is carried out in several stages:
First, they arrange the room where the boiler will be installed. The interior decoration of this part of the house should be made of fire-resistant materials. You should also ensure good ventilation. When installing the boiler, remember that the equipment should not stand tightly on the floor, press against the wall or reach the ceiling. All measurements must maintain a slight indentation
In addition, it is important to ensure free access to the boiler. After installing the boiler, you can connect a circulation pump to the system or install a collector. The actions depend on the type of heating system selected. Next, the necessary control sensors and metering devices are mounted and secured, as well as elements that allow regulating the operation of the entire system or a specific section of it. At the next stage, installation of main pipelines is carried out
To fix the pipe elements, holes are made in the walls using a hammer drill. During the work, you should adhere to the basic rule for installing a heating system: for each linear meter, make a slope of 5 mm. Neglecting this rule can reduce the efficiency of the entire heating system, so you need to approach this stage responsibly. The completion of installation work can be called the installation of radiators. To fix them on the wall, make marks with a pencil or marker and use a puncher to punch holes into which the brackets are inserted. When making markings, adhere to the following: the distance from the floor to the lower level of the radiator should be 10 cm, from the wall to the rear surface - 2 cm, from the window sill - 10 cm. The inlet and outlet of each radiator is equipped with a valve for easier replacement or repair. After installing all system elements, a check is performed. When installing a gas boiler, the presence of a gas service representative is required.
From all of the above, we can conclude that installing heating systems in a private house is not a complicated process, which allows you to do most of the work yourself. The main condition is compliance with the rules and leisurely installation. However, this is possible if you have a lot of free time. If the time frame for completing installation work is short, then you can entrust some stages to specialists. In some situations, this can save both time and money.
In order for the heating system to function flawlessly for a sufficiently long period of time, it is necessary to purchase only high quality materials. By purchasing high-quality radiators, you can achieve maximum efficiency of the heating system and reduce fuel costs.
How to make grounding
Laying a grounding loop near a private house is a simple matter and very useful from the point of view of electrical safety. For installation, find 3 steel rods Ø16 mm 2 m long and a strip with a cross-section of 40 x 5 mm.
Stepping 3 m away from the wall of the building, arrange grounding according to the step-by-step instructions:
- Mark a triangle with sides of 2 m on the ground and dig a pit to a depth of 50 cm.
- Sharpen the ends of the rods with sandpaper or a grinder, install them at the vertices of the triangle and drive them into the ground to their full length. A bunch of grounding conductors (on the left in the photo) and laying a busbar into the house (on the right)
- In the pit, securely connect the protruding ends of the rods with a strip by welding.
- Make a supply bus from a strip, welding it to the circuit and securing it to the base. Grab a bolt to it, screw on the copper busbar and conduct the grounding conductor inside the house, connecting it to the metal body of the electrical panel.
Upon completion, treat the welding seams and the above-ground section of the strip with bitumen and bury the hole. For more information about the grounding device for an electric boiler and home appliances, watch the video:
DIY installation and connection
Before you begin installing the equipment, you need to familiarize yourself with its design features. As a rule, these are wall-mounted single-circuit models that do not have a separate tank to provide hot water supply. In such cases, a flow-through or capacitive-type water heater is additionally installed.
You should read the documentation supplied with the equipment in detail and take into account a number of general rules:
- The equipment must be located in an accessible area, with space on the sides for maintenance or repairs.
- Before installing attachments, make sure that the wall surface can withstand the load being applied.
- The work must be carried out primarily by a specialist. If this is not possible, he must inspect the assembled system before putting it into operation.
Installation introductory video
Main working steps
Installation of electric boilers is much simpler than those using traditional energy sources. There is no need to store solid or liquid fuel, install a chimney, etc.
The work is divided into the following stages:
- First, the boiler is hung on a wall surface or installed on a designated area (for wall-mounted and floor-mounted equipment, respectively)
- It is necessary to make sure that the installation is located in the desired place without distortion
- Reliable grounding is being considered
- The boiler and heating system are connected
- Commissioning works
The installations offered on the market are not always equipped with a boiler and circulation pump. In this case, they are installed separately at the stage of connecting the heating system.
Commissioning work means the following operations: testing in various modes, removing air trapped in the system, checking tightness, checking grounding, etc.
Other installation features
Despite the simplicity of the work performed, the installation of electric boilers for heating a house has its own characteristics. To ensure that the equipment does not cause trouble, certain rules must be taken into account:
- The installation location must be selected in such a way that access to the equipment is always free
- The surrounding surfaces must be made of non-combustible material and can withstand the applied load.
Most models support operation from a 220 V network, however, for more powerful equipment a three-phase connection is required. When connecting to the electrical network, it is necessary to consider grounding using a copper wire with a diameter of 4 mm and install machines of the required ratings, RCD For electrode models, it is recommended to equip the heating circuit with a pressure gauge, reverse safety valve and air vent
The only fundamental difference between wall-mounted and floor-mounted equipment is the installation location. Connection and connection to pipelines occurs in exactly the same way.
How to connect 2 boilers in the system?
You can’t just randomly connect 2 devices, the system will either not work or will work incorrectly. It is necessary to use carefully designed and competently designed ones from an engineering point of view.
There are two main connection schemes, these are:
- Sequential, when all elements are connected to each other without additional nodes. In this case, one device will heat the coolant, and the second will reheat it;
- Parallel, in which the devices included in the circuit have 2 connection points and the boilers operate independently of each other.
The sequential system is more suitable for low-power boiler installations and is rarely used.
Serial connection is considered impractical, if only because it is impossible to remove one boiler without affecting the second. In fact, the problem is solved by installing bypasses and shut-off valves, but still parallel connection is preferable
Meanwhile, parallel connection in a single system of gas and electric boilers has many advantages. Therefore, it is used most often, despite the fact that this arrangement requires more materials and is considered more expensive.
In such a device, you can turn off one of the devices at any time and even remove it for replacement or repair, while the second one will continue to operate as normal.