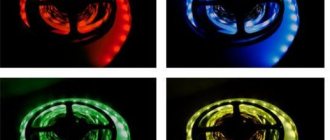
LED strips are used in the design of premises, residential buildings and other buildings. For example, lighting of the ceiling, floor, room perimeters, furniture, building facades, swimming pools. Especially widespread in the advertising business. For example, for external illumination of shopping centers. In this article we will look at connecting an RGB strip for home use.
What you need to connect
We will need:
- LED strip.
- Power unit.
- RGB controller included with remote control (optional).
- RGB amplifier (in some cases).
First of all, choose a power supply. Connecting a line of LEDs directly to a 220V network is unacceptable, it will immediately burn out. They are designed for 12 and 24 volts and direct current. The power supply converts the current in the network (it is usually alternating) into direct current and reduces the voltage. The characteristics of the tape are written on the label.
We recommend choosing a power supply with at least a 30% margin. If the characteristics of the tape coincide, the block will begin to wear out and its service life will be reduced.
The RGB controller is connected in the circuit between the power supply and the LEDs. It adjusts the brightness and color of the LEDs.
If the controller is not needed, you can connect it to the power supply directly. Then you need to connect the “+” tape wires to the “+” contact of the block (some types of power supplies are called drivers). And there are three color wires to the “-” driver.
In some cases, in order to properly connect the rgb tape, it is necessary to add an amplifier to the circuit. More on this below.
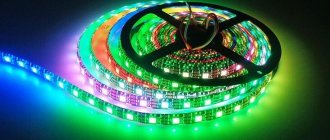
Types of tapes
RGB products can be of two types: analog, digital. The first type of strips has parallel LEDs. That is, one color spreads along the entire length of the glow chain; adjustment of an individual element is impossible. Installation and connection is a simple process, the cost of materials is low.
RGB LED-3528-60
Digital models have a complex mechanism and are more expensive than analogue ones. But they are superior to the ability to control any LED, because a microcircuit is installed on each one.
RGB 5050-48 IC IP67 waterproof
There are also tapes that are moisture resistant. Their peculiarity is that they are coated with silicone or a plastic tube.
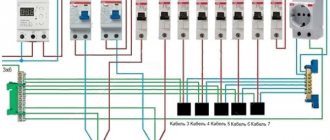
Connection diagram without amplifier
This rgb tape connection diagram is INCORRECT.
because sections of the tape every 5 meters should only be connected in parallel.
This is due to the fact that, firstly, when connected in series, the diodes will fade at the end of the section due to losses. Secondly, the conductive paths of the LED line are not designed for a long length; they will overheat.
With amplifier
When the RGB power is too high for the controller, we add an amplifier to the circuit. The connection sequence is as follows: power supply, controller, 1st section of tape, amplifier, 2nd section.
If the total power of the controller and amplifier is not higher than that of the power supply, we use the following circuit:
If the power is exceeded, add another power supply and assemble it according to the following scheme:
To power supply
When the user does not need multi-mode control, the RGB strip can be connected directly to the power supply. We connect two or more sections in parallel:
High-power LEDs are connected differently. We connect to the power supply at both ends, as shown below:
How to connect to the controller
Beginning radio amateurs often ask this question.
When purchasing a controller, first of all pay attention to the compatibility of the characteristics with your LED strip. It is written in the instructions and on the label.
Required Items
The abbreviation RGB means the three main colors of the diodes used to obtain the gamma:
- R – means red (in English red);
- G – means green (in the English version green);
- B – stands for blue (blue in English).
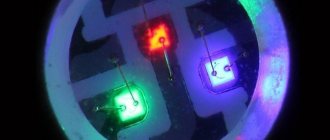
A crystal is responsible for each color, for the power supply of which its own track is supplied, because of this, 4 or 5 wires are used to power multi-color RGB strips.
Rice. 1: example of powering RGB strip crystals
Therefore, full power supply of the lighting source requires the installation of additional equipment that converts the parameters of electric current and voltage from the network.
RGB controller
This block is designed to separate an electrical signal into three or four colors. The number of controller outputs is selected depending on the tape parameters. The RGB controller allows you to control the color or shade of the glow. Based on the control method, they are divided into wired and wireless. The last option is the most convenient and popular; it can be controlled by:
- Wi-Fi – controlled both from a standard remote control and using a mobile application that is linked to the controller via a gadget;
- Infrared input - the controller in such devices must be located in the field of view so that the beam from the remote control can be directed in its direction;
- Radio channel – controlled via a radio signal, in this case you can switch LED devices from anywhere in the house.
When connecting to the control unit, it is important to observe the color coding of the terminals:
Rice. 2: Controller terminal markings
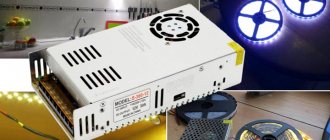
power unit
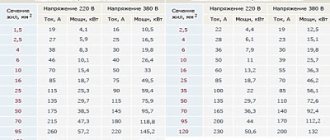
Due to the fact that multi-color diode strips do not use standard power from the electrical network, but a lower voltage level, you will need to install a power supply. To supply power to RGB tapes, a voltage of 12 V is used, and in some situations a nominal value of 24 V can be used. Depending on the type of tape selected, the output voltage of the unit is also selected.
The second determining parameter for a power supply is the nominal power, which is also determined in accordance with the power of the RGB LED strip. As a rule, power is indicated per linear meter. For example, you have a strip with a power of 15 W/m, respectively, to power a strip 5 m long you will need 15 × 5 = 75 W. In addition, it is necessary to make a power reserve of 20 - 30%, that is, (75×30)/100 = 22.5 W, so the resulting power must be at least 75 + 22.5 = 97.5 W, you can take a model for 100 W, and in the absence of one, 120 W.
In addition, power supplies for RGB strips differ in the degree of protection from external factors. For bedrooms, halls, hallways, the degree of resistance to moisture and dust IP20 will be sufficient. For rooms with high humidity, for example, baths, kitchens, laundry rooms, it is necessary to use models with a degree of IP67 or IP69. When connecting, be sure to follow the order of connecting the terminals
Rice. 3: location of power supply terminals
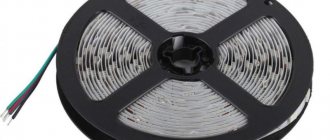
RGB tape
This is a flexible design with LED modules located on it. Each of the RGB strip modules in the standard version contains three crystals (one each for blue, red and green glow colors). To power such a strip, four pins are used, of which three are used to supply a color signal, and the fourth is a common plus. The disadvantage of such strips is the lack of a pure white glow from LEDs, since the result obtained from combining three primary colors differs significantly from classic monochrome models.
But for everyone who wants to get a pure white glow, LED RGB strips with four crystals in each block come to the rescue. They received the RGB W marking, since the fourth crystal produces pure white color. Due to the presence of an additional crystal, power is supplied via a five-wire system. Accordingly, controllers with five pins are used to supply power to such RGB strips.
It should be noted that when choosing an RGB strip, it is preferable to use models assembled from newer SMD 5050 LEDs, since they are capable of changing the color glow of the crystal, unlike the older versions of SMD 2835 and SMD 3528, in which each crystal glowed in one color.
Amplifier
An RGB amplifier is used to power strips longer than 5m, where due to power loss and voltage drop, the brightness of the glow will be significantly reduced. The standard length of one coil may not be enough to illuminate the perimeter you need, so you will have to use several coils or add a piece of tape. The signal amplifier is designed to increase the supply voltage and provide an additional power limit.
The amplifier is selected according to the power of the section exceeding 5 m of total length. If the total length contains several sections of 5 m, then after the first, each of them requires its own amplifier. If the power supply unit has sufficient power, the amplifier can be powered from the same unit as the first section of the tape. If this is not enough, then each amplifier must be connected to a separate unit.
If the space to place the amplifier is limited (a niche in a box, a distribution box, etc.), you can use a microamplifier. It is significantly smaller than standard devices, but allows you to perform the same functions.
Typical connection errors
We have collected the TOP mistakes when assembling an RGB LED strip:
- Choosing a weak power supply, with “butt” power. The fact is that the power consumed by LEDs fluctuates during operation, sometimes positive, sometimes negative. We recommend a BP reserve of 30% or more.
- Installation without heat sink. With a power of more than 25 watts/meter, LEDs get very hot, so they need heat-dissipating material. In this case, an aluminum profile is suitable. Otherwise, the diodes will gradually lose power and then fail.
- Incorrect connection sequence. We remind you: power supply - controller - tape - amplifier - tape. All other circuits (without controller and/or amplifier) see above.
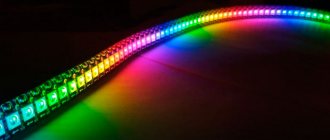
RGB technology
Multicolor tape was invented in the course of numerous scientific studies in which scientists tried to create a white glow from LEDs. Initially, blue phosphor diodes with a special white coating were used to produce it. Later, for these purposes, they began to use a strip with three LEDs - red, green and blue. All three are installed in one cell, and the emitted light is perceived by humans as white - this is RGBW technology.
By changing the brightness of a particular LED, you can get other colors and their shades. The number of the latter exceeds several hundred thousand. This is the main advantage of RGB technology over phosphor LED strips.
Why do this
The era of table lamps seems to have already crossed the equator of its life cycle. You can illuminate the space near the monitor or keyboard using an LED strip - this option will be much cheaper both in terms of capital costs and energy consumption, and the end result will at least be no worse.
In what cases is such illumination used? There are several options:
- to illuminate the workspace in the computer work area. Here the main emphasis should be on ensuring that the tape is mounted as high as possible;
- for soft illumination of the workplace to quickly find your way in the dark. If the monitor is located on the wall, the tape can be mounted in its rear part; it is advisable to use LEDs of the same color;
- for illuminating the system unit. Today, a designer computer is no longer exotic; there are system units with a transparent side cover so that you can see the insides of the PC. In the dark, the lighting function can be assigned to RGB lighting installed around the perimeter of the wall;
- to illuminate the keyboard if you stay at the computer late into the night. Typically, monitor radiation is not enough for these purposes;
- Finally, the LED strip can be used for decorative lighting of the desk, which is your workplace. There are a lot of options for its location - for example, at the end of the tabletop, under it or on the wall. Such lighting will allow you to do many things without having to turn on the general lighting of the room.
An important advantage of using an LED strip is the lack of need for additional wiring - there are always a lot of wires coming from the computer and peripherals. And you won’t need a separate outlet, which is also where problems often arise. Such lighting can operate for up to 10 years without noticeable deterioration in performance.
Step-by-step installation instructions
The first thing you need to do is degrease the surface to install the RGB strip. The metal base must be covered with a material that provides electrical insulation.
Sequencing:
- checking the integrity of the strip and compliance of its power with the voltage of the power source;
- gluing to the base (in order not to harm the system, the radius of bends should not exceed 2 cm);
- selection of the location of the control device and the power supply available for maintenance (if control is based on infrared rays, the controller must be visible during operation);
- cutting sections (if necessary) along the lines specified by the manufacturer, connecting and insulating;
- removing the protection from the adhesive layer, gluing the segments to the base;
- connecting the tape to the controller, the regulator to the power supply (polarity must be observed);
- supply voltage.
The segments are connected to each other using wires with a cross-section of 0.75 m2.
A red wire is connected to “R” on the controller, a green wire to “G”, and a blue wire to “B”. The fourth wire (can be of any color) is connected to “V+”. To connect power to the controller, the red wire is connected to “V+”, the black wire to “V-”. The system is connected to the household electrical network using a regular plug with a wire connected to the “L+” and “N-” connectors.
Important! If an additional section is connected, the cross-section of the wires should be from 1.5 mm2.