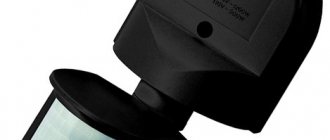
Motion sensors are lighting system control devices that respond by turning on the power supply to the movement of objects in their “sector of responsibility.” Not so long ago, such devices were used only in security systems of various organizations. But now it is a technology accessible to everyone. They perform well in lighting local areas. Motion sensors are widely used in residential buildings, private and multi-apartment buildings, significantly increasing the operating comfort of lighting systems. In addition, thanks to such improvements, significant savings in energy consumption can be achieved.
How to connect a motion sensor to an LED floodlight
The assortment of stores offers many lighting devices already equipped with a motion sensor. Installing them is, of course, easier. But often there is a need to separate the lighting device and the sensor over a certain distance. In principle, this shouldn’t cause any difficulties either. In this article we will look at how to connect a motion sensor to an LED floodlight, used, for example, to illuminate a yard.
Three-wire motion sensor connection diagram
Three terminal sensors are typically used in IR sensor type designs.
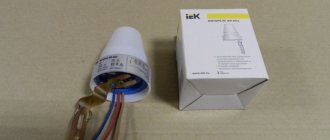
A fairly common manufacturer of inexpensive infrared motion sensors is IEK. You can find good products on Aliexpress without any problems. More expensive products are made according to a similar principle; the connection diagram for a lamp with a sensor is similar for a sensor model from any manufacturer. Devices must have a degree of protection IP44 against penetration of solid objects greater than 1 mm and drops of moisture. If the motion sensor needs to be moved outside the house, then installation is only possible under a canopy.
If you want to protect the device from rain and snow, look for a model with IP65 dust and moisture protection and a temperature rating for your climate. Most IR sensors can only operate down to minus 20 degrees Celsius.
To connect a three-wire IR motion sensor, a full phase and zero are started. For correct placement you will need the same basic 4 elements:
- Circuit breaker (which is in the switchboard).
- Distribution box (in which the main installation).
- Sensor (a wire from the junction box is connected to it).
- Lamp (second wire from the junction box).
The sensor is connected with three wires to the factory in the distribution box of three cables:
- There are three wires from the machine: L (phase), N (working zero), protective zero or ground (PE).
- There are three wires per lamp if the body of the lighting fixture is made of metal.
- Three wires per sensor.
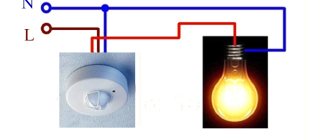
How to connect a motion sensor to a light bulb using three wires is discussed in detail in the diagram.
The zeros (N) are collected at one point (as in the case of the previous diagram). The ground from the circuit breaker is also connected to the luminaire ground (zero drive or PE). The motion sensor with three terminals is now supplied with phase-zero:
- Two input ones are for 220V power supply, usually labeled as L (phase) and N (zero).
- One output is designated by the letter A.
Installation
To install a three-wire motion sensor:
- Unscrew the two screws in the housing. The terminals are located under the back cover.
- Some models are already led out of the housing by three wires of different colors. By color you can determine what it means: ground (A) red, zero (N) blue, phase (L) brown. But if the cover opens without much effort, it is recommended to verify the correctness of certain markings in person by looking at the inscriptions next to the terminals.
- A simplified diagram of connecting a motion sensor to a light bulb looks like this:
- A little clarity in this picture.
- You can do without a junction box for connecting wires and run all the wires directly into the sensor box, if the inside is spacious enough and has its own terminal block. Phase-zero was supplied from one cable, and phase-zero was removed from the other.
- The result is a simplified, but the same three-wire circuit, only without a junction box.
Setting and adjusting sensitivity
After successfully connecting a lamp with a motion sensor, you need to set its parameters correctly:
- On the back of the case, find the main controls. LUX with the positions of the month and the sun is responsible for triggering depending on the illumination. Do you need the sensor to turn on in a room with a window only when it is cloudy or the sun goes down? Turn the regulator towards the moon.
- Use the second regulator to set the shutdown time. The delay can be set from a few seconds to 5-10 minutes.
- The rotation angle of the entire sphere allows you to adjust the detection of animals.
Advantages and nuances of use
To prevent the sensor from reacting to animals, do not turn the sensor head down towards the floor. Position it so that it captures the movements at the level of the head (shoulders) of all residents of the house. Typically, animal capture does not occur at this level.
If you need the sensor to temporarily not work, then point its head at the ceiling. Therefore, motion capture is not possible. The sensor's motion capture depends on the angle of inclination. In reality, the maximum distance reaches 9 meters. But according to the passport it may be higher.
The sensor uses infrared rays for detection. If you move from beam to beam, the device notices activity and reacts. When you walk directly into the beam, the sensitivity of the sensor is minimal and the device may not immediately respond to you.
For this reason, motion sensors are installed not directly above the doorway, but slightly to the side. For example, in the corner of the room.
Flaws
The disadvantage of the three-wire circuit for connecting the motion sensor to the lamp is that the light does not turn on forcibly. If the sensor malfunctions for some reason, problems will begin with its correct operation. To avoid this, it is recommended to add a switch to the circuit.
A visual step-by-step process of connecting a flashlight to a photo relay on a regular stand
The connection diagram for a light sensor for street lighting in a small area will be described below. To do this, we need a lamp, previously screwed into the socket, and the photo relay itself.
For greater clarity, we will install it on a stand. To do this, we attach a light sensor and a lamp in a socket next to each other, which will symbolize the lamp.
Next, you should connect the zero and input phases to the light sensor itself (as a rule, the connection points are marked on the body).
By inserting special rubberized plugs into these holes, you can connect the wires. These rubber plugs provide good protection from dust and other harmful external influences.
Before connecting, we clean the ends of the wires well (about 1 cm).
Next, connect the wires to the sensor in the following sequence:
- input phase;
- zero phase;
- protective phase (grounding).
The wires are connected to the lighting fixture itself in a similar way. We connect the input and zero phases to the socket, and the grounding phase is connected to the body of the device for lighting.
The last step will be to adjust the sensitivity of the regulator of our photosensor. This completes the installation process; all that remains is to replace the protective cover and tighten the bolts.
This is what the entire procedure for connecting a light sensor and lighting device to an electrical circuit looks like. It is not anything complicated, you just need to follow the correct order of connecting the wires. Otherwise, you can get negative consequences, including a short circuit or even a fire.
The procedure for connecting a photo relay for street lighting to diode light sources or spotlights is similar to that described above and is not particularly difficult.
Device Specifications
The technical characteristics of wireless models also include the frequency at which they operate and the type of batteries
Technical characteristics are indicated in the technical documentation (in the passport), which accompanies any technical product, otherwise it is unlikely that it will be possible to select the necessary device.
Viewing angle
There are products with different viewing angles, both in the vertical and horizontal planes. If it is necessary to protect an object from different sides, then sensors with a viewing angle of up to 360 degrees are used. If the sensor is mounted on a wall, a device with a viewing angle of 180 degrees is sufficient. If you plan to install the sensor on a pole, then it is better to give preference to a viewing angle of 360 degrees. In this case, it all depends on what area and what object or group of objects is planned to be protected. When installed in an apartment, to protect individual rooms, sensors with a smaller viewing angle, about 90 degrees, are chosen.
Depending on the installation location and the required detection zone, select the viewing radius
If there is one entrance to the room, it is enough to install a sensor with a narrow viewing angle, otherwise you have to install several sensors with a narrow viewing angle or one sensor with a wide viewing angle. It should be remembered that such sensors are not cheap, so you should always focus on economic feasibility.
There is also such a thing as vertical viewing angle. In simple, inexpensive models, this figure is no more than 20 degrees. For more expensive models, this figure is much higher and can be all 180 degrees. Such devices are used in security systems where such costs are justified. In lighting systems, the simplest and cheapest device is sufficient. The main thing is that the sensor is installed at the desired height and turns on the lighting under certain conditions.
Radius of action
The range should be selected with reserve
The choice of motion sensor based on its range depends on where it will be installed: outdoors or indoors. For indoor use, devices with a range of about 5-7 meters are sufficient. If the sensor is installed in a yard or other location, certain factors must be taken into account, otherwise false alarms may occur. Sensors with a long range can be triggered when people move along the street, when a neighbor appears in their yard, etc. Therefore, in such cases, it is better to opt for devices with a minimum range.
Power of connected lighting sources
The sensor power should be calculated with a reserve
Each sensor is designed for a certain load power, which it can turn on/off without emergency modes. Otherwise, the device will simply fail because the controls will not withstand it.
Recently, this indicator is not so critical, since people are switching to more economical lamps, such as energy-saving or diode.
Mounting method and choice of installation location
Most often, sensors are mounted on the wall.
Motion sensors may also differ in the method of attachment. Therefore there are:
- Case products, in the form of a small box with a bracket. Such models are attached:
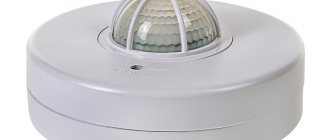
- On the ceiling.
- On the wall.
- Built-in models designed for hidden installation.
Such models are distinguished by the fact that they are small in size, which allows them to be installed unnoticed by others.
If you just need to turn on/off the lighting in the right place, then you can get by with cheaper cabinet-mounted devices. Miniature built-in sensors are more suitable for security systems, especially since they are also expensive.
Additional features
Some models, depending on the purpose and operating conditions, have additional functions. These functions include:
- Sensitivity threshold. It is implemented using a light sensor, in the form of a photo relay. This sensor is especially useful when installing the device outdoors. This function is necessary to ensure that the device turns on the lighting only at night.
- Protection from animals. Naturally, in every private yard there are cats and dogs. The function is necessary in order to reduce the number of false alarms when animals move. If there is a large dog in the yard, this function may not work.
- Shutdown delay. There are different devices, both with and without delay. In most cases this function is adjustable. It is quite inconvenient if a person often moves within the sensor’s coverage area, but also often leaves it, and the motion sensor also often turns the lighting on and off.
Safety precautions and operating recommendations
When working with electrical equipment, it is imperative to follow safety precautions and monitor operating conditions.
Primary requirements:
- do not wet your hands before work, do not work with street lighting when damp;
- disconnect the circuit from the current source;
- do not use devices with a low degree of protection from moisture and dust outdoors or in unsuitable premises;
- work with tools with insulated handles;
- do not install near low-power devices;
- before installation, it is necessary to measure the voltage; deviations of no more than 10% are permissible;
- do not use chemicals near the diode device;
- if interruptions in the operation of the LED spotlight are detected, it is necessary to turn it off from the power supply;
- periodically wipe the product and care for it;
- if the device is used as a flashlight, you must choose a device in a powerful, protected case;
- a lamp that is used to illuminate the area around the house is best placed under the roof for additional protection from rain.
How to install devices correctly
When installing a floodlight with a sensor, some points should be taken into account:
- The device must be secured in such a way that the sensitive sensors are directed strictly at the controlled area;
- The sensor should not be placed near obvious heat sources. Heat may interfere with the infrared sensor, causing the floodlight to turn on and off randomly;
- The equipment must be placed at a height inaccessible to intruders;
- The area of the territory must correspond to the range of the sensor;
- It is necessary to think through the power supply scheme in advance.
The operating algorithm of the spotlight depends on why the light should be turned on: in case of penetration or to illuminate an area when passing in the dark.
In the first situation, the spotlight lights up when a moving object appears in the area of effect. If the spotlight acts as a lighting device, then the light comes on when 2 conditions are met:
- lighting level is insufficient;
- a person appears in the sensor's range of action.
The characteristics and settings of the sensor depend on this algorithm.
Any sensor is accompanied by instructions that outline all the circuits, but understanding this documentation is not very easy. Therefore, setting up the sensor operation needs to be considered in more detail. In order to adjust the operation of the sensor, use:
- The SENS button, which means sensitivity, makes it possible to set the size of the object to which the spotlight should respond and the range;
- TIME regulator (operating time) – is necessary to set the operating time of the lamp. If the sensor is triggered again during this period, the countdown will begin again. The time period is usually from 5 seconds to 5 minutes. By turning the knob, you can achieve the required value;
- DAY LIGHT lever – makes it possible to set the day-night mode, when the spotlight will only work at a certain level of illumination. To operate the equipment only at night, turn the potentiometer all the way to the left. For day-night mode, the knob is turned all the way to the left.
Typically, the coverage area of a sensor can vary and depends on the location of the sensor and its design.
It is necessary to connect the motion sensor to the spotlight in such a way that the equipment works flawlessly and fully copes with the assigned tasks. But not all sensors are equipped with adjustment of movement sensitivity, the ability to set the time and different lighting modes. On some models, these options are limited to factory settings. This should also be taken into account when choosing a sensor.
Setup steps
It should be noted that attaching a spotlight to the surface and connecting a motion sensor to it is not enough. It also needs to be adjusted correctly and efficiently so that it does its job as efficiently as possible. The following parameters can be adjusted:
- light level;
- delay mode;
- mounting angle;
- sensitivity level.
Most often, there are floodlight models with three regulators, which are responsible for adjusting the above criteria, with the exception of the mounting angle. Although it often happens that one of the regulators is missing. But in some cases, you can find alternative solutions when setting this or that parameter.
Adjusting these parameters should not be neglected, because if you configure these characteristics correctly, you can save up to half of the electricity consumed by the device. Let's look at each of the mentioned indicators in more detail.
Installation angle
The first important point regarding the installation angle is to properly adjust the detection area. Sensors usually have hinge-type mounts, which makes it possible to set the required angle. The device should be positioned so that the coverage area is as large as possible. Here, not only the angle indicator will be important, but also the height level where the sensor will be located.
Often all these recommendations can be found in the instructions for the device. Their parameters will depend on the vertical viewing indicator, as well as the device model
In addition, it will be important to take into account the direction of movement and in what plane it occurs. Taking these two criteria into account will minimize the possibility of false alarms, as well as the formation of so-called dead zones
Sensitivity
The sensitivity parameter, which is often designated as Sens in different models, is the most difficult to configure. To regulate it, there is a variable resistor from the minimum to maximum value. The essence of this setting is the impossibility of reacting sensory equipment to any movements other than the appearance of a person.
It will be especially difficult for owners of their own homes or areas where there are domestic or service dogs to adjust sensitivity. Most likely, the sensor will trigger on such animals due to the size of the animals. Therefore, the sensor will in any case think that this is an object to which it needs to react.
Illumination
Another parameter that can be adjusted is brightness. Usually designated Lux or “day-night”. It must be adjusted so that the light turns on at night. If this parameter is not configured, the spotlight will turn on constantly. It is best to set up the device after it gets dark outside. It’s better to start from the maximum value to see when the device will work.
Sometimes it happens that the device does not have the ability to configure this indicator. Then it becomes necessary to additionally include a light sensor in the system circuit. This will allow you to use the spotlight only at night, which will save you a lot of money.
Delay period
The delay period on the device is usually marked Time on the case. This characteristic indicates how long the spotlight will provide light from the moment the motion sensor is turned off, that is, from the time when there is no movement in the sensor’s coverage area until the light turns off.
To avoid blinking of the lighting fixture, it is better simply not to set any minimum value. And the setting itself varies in the range from 5 seconds to 10 minutes. A specific indicator must be selected based on personal needs and the characteristics of the illuminated area.
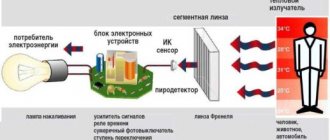
How the motion sensor works
Motion sensors are installed not only to illuminate the local area, but also inside the house itself. For example, a device installed on a staircase will turn on the lights only when it is really necessary - if someone is going up or down it.
Each sensor is designed for a specific sector located in its field of view. The principle of operation is simple - if movement of objects is detected in this area, then a circuit is closed that supplies power to the lighting fixtures. Therefore, the efficiency of the system is determined by the correct choice of installation location, that is, the creation of a “view” of the controlled area necessary under specific conditions.
Each motion sensor has its own characteristics of the radius and angle of the response sector
Lighting devices connected to the sensor can be turned on only while the object is moving in the sector, or with a subsequent turn-off delay from several seconds to 10÷15 minutes. This parameter is preset by the user.
Where are they used?
Devices such as LED sensor floodlight are very popular today due to their wide range of applications
Operating efficiency with fairly compact dimensions, relatively low power, efficiency of diode lamps, it is also important that the connection diagram includes the installation of a motion sensor - these are the main factors that allow the use of this kind of lighting devices to illuminate large areas for any purpose
Thus, lighting based on LED floodlights is organized in the border areas of the country, industrial facilities, warehouses, car parks and even in home areas. Street lighting can be organized not only using functional floodlights, but also using decorative lighting (directed or diffused light on the facade of the building).
Connecting a floodlight with a motion sensor
The explanatory dictionary interprets the word spotlight as a device for lighting. It consists of lenses and mirrors used to obtain light output at a certain angle.
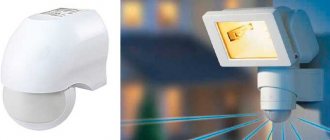
Floodlight with motion sensor
The floodlight is not used to illuminate the entrances to the house or parking areas, as it is very blinding. In theory, it should turn off even before the high beam headlights reach it.
At the moment, floodlights are also called those lighting devices that illuminate streets at a large angle. The power of such spotlights is completely different - from 10 to 100 watts. They are equipped with motion and light sensors.
In fact, the buyer only needs to connect the cable to the spotlight, and the whole system will work, but the manufacturer reserves the right to set up the user.
Many people do not know how to connect a floodlight with a motion sensor. Below is an installation diagram.
Advice
The spotlight has a housing, inside of which a block with terminals is mounted and connected to the general circuit. There are 4 chains in the diagram.
The diagram for connecting the spotlight to the circuit is shown below:
- The phase wire is connected to the sensor.
- The neutral wire from the block goes to the sensor and spotlight.
- The protection conductor is connected to the housing.
- The wire with phase A is connected to the lamp through the block.
Connecting a motion sensor to a spotlight
To connect the spotlight, you need to apply voltage to it through the phase wire, and also connect the neutral wire and grounding. After connecting the power, zero and phase will go to the power supplies of the motion and light sensor. When the necessary conditions for the sensor to operate arise, the contact will operate and close phase A and thereby turn on the spotlight.
The spotlight automatically turns off when natural light returns to normal. The zero used for protection is needed to eliminate possible current losses at the site of an insulation break inside the spotlight.
It turns out that connecting an LED spotlight is easier than it seems. It is enough to connect three wires - phase, neutral and ground. This lamp is perfect for use in the country.
Installation of floodlights
The LED spotlight is installed using special structures (not plastic), the sensors are directed to the controlled point.
Connecting a motion sensor to a spotlight
Lamps do not always satisfy needs, so more powerful spotlights are used. They are mainly used at protected sites or companies
Such lamps are supplied separately, without sensors. It is extremely important to know how to connect a motion sensor to a floodlight
Connecting an LED spotlight
If you connect a sensor directly to such a spotlight, the connections will burn out, unable to withstand the temperature. To prevent such breakdowns, contactors are used. They remove part of the load from the output contacts of the sensor.
When you include at least one starter in the circuit that copies the operation of the sensor output contact, you can control very powerful lamps.
This connection diagram is universal, as it allows you to turn on several spotlights at once.
Installation of floodlights with photo relays (sensory).
LED floodlight with motion sensor
The flashlight with sensor is extremely convenient to use, as it works fully automatically. The scheme works on a very simple principle. The photo relay is triggered when darkness sets in, voltage is applied to it, and when a person is detected in the observation area, the sensor closes the circuit on itself, causing the lamp to turn on.
Configuring and adjusting motion sensors
Often, motion sensors are adjusted in two parameters - vertical and horizontal. The parameters allow you to adjust the detection range, and most importantly, the detection angle relative to the stationary body. Setting the parameters will allow you to change the area of direct control.
Lamp with adjustable knobs
The possibility of adjustment must be clarified when installing the lamp and try to direct it in the right direction. Adjustment after installation is carried out using two or three knobs.
There will definitely be a DayLight and Time knob. DayLight is designed to adjust the sensor's response time when motion is detected. No other devices are provided. If the knob is turned to the far left position, the sensor will turn on only at night, and if it is turned to the far right position, it will work even on a clear day.
Time – adjusts the time during which the spotlight will remain on after the sensor is triggered. The switching range is different everywhere, but ranges from 5 seconds to 20 minutes.
Video description
The video shows how to connect a motion sensor:
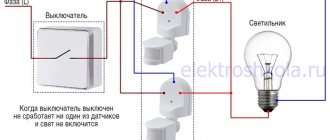
Connection diagram with switch
It should be noted right away that the motion sensor and the switch in the circuit are connected in parallel to each other. Therefore, in addition to the fact that all wires, namely ground and zero, are connected in exactly the same way as in the previous case, the connection of phase conductors is carried out like this:
- the wire from the machine is connected to the incoming core of the sensor;
- the same wire from the machine is connected to the switch;
- the output wire from the motion device is connected to the lamp;
- A wire is laid from it to the switch.
This circuit will allow you to turn on the lighting using a switch, regardless of the time of day, and also regardless of whether the motion sensor is working or is broken.
Connection diagram of a sensor with a switch Source elektromontagy.ru
Which sensors are suitable for LED lamps?
When choosing a sensor, you need to pay attention to the permissible minimum load. It is indicated in the product characteristics; if there is a minimum load threshold, then it is necessary to take into account the load of the connected lamp. If the luminaire load is less than the minimum load on the sensor, then it is better to use another sensor
All three-wire BEG sensors operate even without load and can switch any LED lamps. Only two-wire sensors have restrictions; the minimum connected load must be more than 40 W, but not more than 300 W
If the luminaire load is less than the minimum load on the sensor, then it is better to use another sensor. All three-wire BEG sensors operate even without load and can switch any LED lamps. Only two-wire sensors have restrictions; the minimum connected load must be more than 40 W, but not more than 300 W.
When choosing a sensor, you should also pay attention to other parameters
- Installation type.
The sensor can be installed on a wall or ceiling. Overhead and hidden models are available - the appropriate type is selected in accordance with the chosen installation location. In surface-mounting, the sensor is mounted on a hard, flat surface, such as a ceiling or wall. The SM socket is immediately attached, after which the sensor is screwed to it. After this, a ring cover is mounted on the sensor. When installing in an FM box, a mounting plate is attached to it, a sensor is attached to the plate, then a ring cover is installed. For fastening to a suspended ceiling, a hole of the required diameter is made at the installation site. The protective cover is then placed over the sensor, the mounting springs are compressed and inserted into place. At the end, a ring cover is mounted. - Viewing angle.
This indicator determines the space in which the sensor for turning on the LED lamps can accurately detect a person. This parameter is measured in degrees. It varies from 120° to 360°. Ceiling motion sensors have the maximum value; they can see the entire room. Smaller angle for wall sensors. Their range is from 120 to 280 degrees. - Range.
The characteristic indicates the maximum distance at which the sensor can detect a moving object. Ceiling motion sensors for LED lamps have the maximum value; they see the entire room. Wall sensors have a shorter range. For large rooms without partitions and narrow spaces, a sensor with a long range is suitable. For small rooms or rooms with many small areas, a sensor with a standard range of 4, 6 and 10 meters is suitable. - Level of moisture and dust protection, as well as operating temperature.
The possibility of installing the sensor outdoors or in rooms with high humidity levels depends on these indicators. The devices can function without interference or failure at temperatures from -25 to +50 degrees. This characteristic is the same for all BEG sensors. The degree of protection (IP) is indicated by 2 digits: the first means protection against the penetration of small particles and dust, the second means protection from water. The degree of protection of BEG sensors varies from IP20 to IP54 (for example, model RC-plus next 130 / black).
What is a photo relay, device and principle of operation
If we consider a photo relay as a “black box”, then its structure and operating principle are simple:
- on the input side there is a sensing element where the light enters;
- at the output – a signaling device;
- on the body there is a tuning organ.
When light hits (or stops hitting) the sensitive sensor, the device produces a signal that can be used to control actuators and lights (directly or through a repeater relay).
Light relay as a “black box”.
You can send a signal to the control panel or initiate an alarm. The signal can be in the form:
- changes in voltage level (logical level);
- “dry contact” relay;
- changes in the state of the electronic switch (open collector transistor), etc.
The light detector can be built into the device body, or it can be remote. Then it can be installed in any convenient place. The setting element allows you to adjust the level of operation - you can make the relay turn on the light earlier or later.
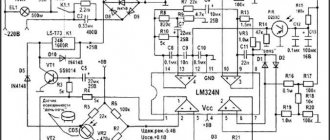
In fact, the photo relay device is more complex.
Block diagram of a photo relay.
In general, the device contains:
- light-sensitive element (photoresistor, photodiode, etc.);
- conversion device (converts a change in sensor state into a change in electrical voltage);
- buffer amplifier;
- threshold device – compares the voltage from the sensor with a specified level;
- timer – limits the operating time of the lighting;
- output signal conditioner.
Devices from different manufacturers have different circuit designs. Some elements may be combined, some may be missing. Some devices have a fixed response level and do not have an adjustment element.
Connect to the power supply
Inventory and materials are being prepared:
- screwdriver;
- pliers;
- sharp knife;
- insulating tape;
- soldering iron;
- wires.
The wire for the LED is also thin (0.5 - 1.5 mm2).
In addition, it is better to select a wire of the same metal as on the device.
If you purchased an inexpensive device, it is better to unwind it and inspect it before using it. Often, wires may not be connected to them (grounding, for example), or there may not be enough thermal paste (it may be dry, coated unevenly and not ensure reliable contact of the board with the heatsink).
The wire is disassembled into cores. The corresponding contacts are selected by color.
The colored shell on both contacts is trimmed with a knife to about 2 - 3 cm.
If wires of similar metal are connected (copper to copper, for example), they are twisted a little and soldered. If for some reason you have to use a wire made of another metal (copper with aluminum, for example), then they need to be connected using special screw terminals.
The connection points of the wires are carefully wrapped with electrical tape.
Conclusion
LEDs will sooner or later displace ineffective analogues from the market. They illuminate better than halogen or fluorescent versions, and consume much less energy. A floodlight with a photocell and a motion sensor is an excellent purchase for a private home, corporate lighting, and even for street lamps!
How to adjust smart lighting?
To set up the device for effective operation, some skills will be required, since this procedure is considered important. The connection steps include: turning on the light-off delay, adjusting the light threshold and setting the device sensitivity parameter
We work with a shutdown delay (TIME)
Thanks to this function, it becomes possible to adjust the time during which the switched-on lighting will work from the moment the signal is sent to the sensor. Each model provides different parameters. The general range of possible settings is from 1 to 500 seconds.
You can also set the lighting activation time from the moment the device reacts to movement.
Motion sensor with regulators
Influence of lighting level (LUX): setting
It is necessary to set the optimal values for the operation of the device at a time when the level of illumination in the area is high, that is, it is necessary to adjust the motion sensor for operation during the daytime.
Place the regulator so that at the moment of twilight, the slightest movement triggers the device.
Setting the sensitivity of the device (SENS)
It is recommended to set different sensitivity limits for summer and winter time. If the device triggers too often and falsely, try reducing the “SENS” level. Of course, if the device does not respond to your presence, you will have to increase the sensitivity.
Be sure to fully configure the monitored area. For this purpose, you need to set the correct tilt of the motion sensor for lighting.
Adjusting the IR Sensor
Modern motion sensors have two or three controls.
The first one, “SENS,” is designed to control the sensitivity of the device. By changing the position, you can set the size of the object to which the sensor will react, and the distance to the object.
The second - “TIME” determines the duration of the lamp after the machine is triggered. You can set it for a few seconds. Experts advise setting it for 1-2 minutes to prevent the device from constantly triggering.
The third - “DAY LIGHT” adjusts the operating time of the sensor depending on the daylight hours. It is possible to turn on the device only in the dark, or at any time of the day.
The user determines the position of the regulators empirically. The sensors themselves can move up and down, left and right, depending on the model. This allows you to determine the optimal angle of inclination and coverage area of the device.
Types of photo relay
As already mentioned, there is a photo relay with a built-in and remote light sensor. In addition, you can find the following varieties:
- With built-in motion sensor. Such devices are installed in places where light is needed only when a person is nearby - near the toilet, in the backyard, etc.
- With timer. If you don't want the light to be on all the time at night and go out, for example, at midnight, you need such a model. You set the timer for the desired time, it turns off the lighting. A photo relay with a timer can be placed on a circuit that powers decorative lighting in a yard or garden.
- Astro timer. This is no longer a photo relay, but a more serious device, the memory of which contains the times of sunset and sunrise of different climatic zones. When setting up, you set the time zone and the device itself turns on/off the lighting depending on the stored data. An astro timer costs much more than a photo relay, but there is no hassle with it, neither with the installation location nor with illumination.
If you need one of the functions described above, it is not at all necessary to buy a photo relay with a motion sensor or timer. You can install a regular sensor and, in series with it, connect the desired device (motion sensor or timer). The functions will be the same, and repairs and replacement will cost less. If one of the parts in a photo relay with additional functions fails, you will have to change the device completely, and this option costs more than its “no frills” counterpart.
How to convert a chandelier designed for a single switch into a double switch
If your chandelier is designed for a single switch, that is, only two wires come out of the base of the chandelier, and there are several lamps, and your electrical wiring allows it, you can try to convert the chandelier to a double switch. The process is labor-intensive, but the result is worth it.
Read also: Float system for water storage tank
In a chandelier of this design, all wiring from the lamps (shades) comes into one combination of phase and neutral wires. You need to find this place and divide the lampshades into two sections, each of which will be turned on by the corresponding switch key.
After we have found the connection point, do the following:
- The neutral wires remain connected to each other and do not need to be touched.
- We divide the phase wires into two groups of wires instead of one. The division scheme is at your discretion, depending on the number of shades and your personal preferences.
- Connect the common (neutral) wire with the neutral wire coming from the junction box.
- To connect the phase wires from the resulting sections of the lampshades of the sections, you need to run another additional wire from the chandelier to the place where the chandelier is connected to the electrical wiring from the double switch.
Thus, it is quite easy to transform an ordinary chandelier into a three-mode one.