First of all, grounding the roof in a private house is done to protect against lightning discharge entering the roof. A lightning discharge is an electrical spark with enormous potentials and currents. A discharge occurs between surfaces that have opposite charges. It does not matter whether the surface is conductive or not. In this article we will describe all the stages of grounding installation, the advantages and disadvantages of different types.
Since materials such as slate and soft roofing are used for roofs, their grounding should be given no less attention than roofs covered with metal tiles or other metal coverings. In dry and hot weather, insulating coverings on the roof can accumulate significant static potential, so there is a high probability of being struck by lightning.
Types of lightning protection for private houses
The metal roof does not burn, but is mounted on a supporting structure made of wood, including elements of hydro- and thermal insulation, which are an excellent combustible material. A lightning strike on the roof of a house is fraught not with an electric shock, but with fires arising as a result of exposure to high temperature, which always accompanies a lightning discharge.
To protect against direct lightning strikes, lightning rods are used, which are connected to grounding. It has been noticed that lightning, under equal conditions, strikes the tallest objects (for example, single standing trees). To increase the likelihood of lightning hitting the lightning rod instead of the roof, the latter should be several meters higher than the maximum point of the building. The main elements of lightning protection are a lightning rod, a connecting bus - a down conductor and grounding.
Three types of lightning rods are predominantly widespread:
- Pin;
- Cable;
- Net.
The need for grounding
If we consider this issue from the perspective of theoretical electrical engineering, metal roofs are a capacitor that has the ability to accumulate static electricity. In addition, as waterproofing under the metal roofing parts, roofing felt or roofing felt is used, which are dielectrics and insulate the metal tiles from the ground. As a result of the combination of these factors, the surface of the slopes concentrates an electric charge of varying strengths, which leads to the following consequences:
- Fire. If other metal elements are used in the structure of the house, a high-temperature electric arc occurs between them and the metal roof. This effect produces a spark that is sufficient to start a fire.
- Injuries. If a person standing on the ground touches a metal roof that is not grounded, an electrical circuit is created to discharge. Depending on the amount of accumulated current, this can lead to discomfort, injury or even death.
- Malfunctions of electrical appliances. The electric charge accumulated by the roof and metal tile covering affects the operation of electrical appliances in the house. Depending on the strength of the charge, they can act up or fail completely.
Lightning protection scheme for a metal roof
Important! According to experienced craftsmen, it is definitely necessary to ground the roof if it is covered with metal tiles, especially since this task can be done with your own hands without large financial investments. According to modern rules for laying electrical networks, it is recommended to use a three-core cable for wiring, one of the wires of which is connected to grounding; however, backbone networks often do not meet these standards, so the metal roof must be grounded separately.
Ground loop: purpose and installation
Equally important for grounding the roof is the ground loop. There are many sources on circuit design issues, but they are all based on the Electrical Installation Rules (ELR). Carrying out a grounding loop in accordance with the Rules requires large material and labor costs. An equally reliable, but less labor-intensive device can be made with minimal material costs.
Ground loop device.
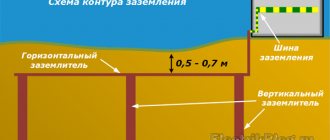
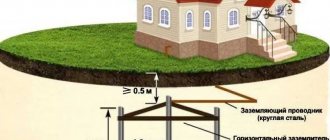
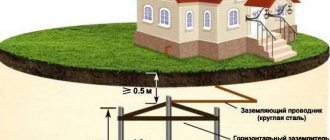
At the site where the contour is made, markings are made on the ground and a trench is dug in the shape of the future grounding. The trench width is 0.3–0.5 m and the depth is 0.4–0.8 m. In the corners of the triangle (in the case of a triangular distribution of ground electrodes) or along one line at equal intervals, metal pins are driven into the ground so that the upper ends rise 0.2 m above the bottom of the trench. The protruding ends are connected to each other by a steel strip by welding. The distance between the nearest ground electrode and the wall of the house should be from 1 to 6 m.
Trench for ground loop.
Tip #2. In order for the pins to enter the ground more easily and not warp when deepened, the lower ends need to be sharpened (for example, with a grinder).
When making a grounding loop, instead of pins, you can use pieces of pipes or angles in accordance with the table.
| Material | Product cross-section profile | Diameter, mm | Cross-sectional area, mm2 | Wall thickness, mm |
| Regular steel | Round | 16 | — | — |
| Rectangular | — | 100 | 4 | |
| Angular | — | 100 | 4 | |
| Pipe | 32 | — | 3,5 | |
| Cink Steel | Round | 12 | — | — |
| Rectangular | — | 75 | 3 | |
| Pipe | 25 | — | 2 |
How to do it right
First, let's look at the shape of the ground electrode. The most popular is in the form of an equilateral triangle with pins hammered into the vertices. There is also a linear arrangement (the same three pieces, only in a line) and in the form of a contour - the pins are driven around the house in increments of about 1 meter (for houses with an area of more than 100 sq. m). The pins are connected to each other by metal strips - metal bonding.
The most popular ground electrode model
Procedure
From the edge of the blind area of the house to the installation site of the pin there must be at least 1.5 meters. In the selected area, they dig a trench in the form of an equilateral triangle with a side of 3 m. The depth of the trench is 70 cm, the width is 50-60 cm - so that it is convenient to cook. One of the peaks, usually located closer to the house, is connected to the house by a trench with a depth of at least 50 cm.
Digging a trench
At the vertices of the triangle, pins are hammered (a round rod or corner 3 m long). Leave about 10 cm above the bottom of the pit
Please note that the ground electrode is not brought to the surface of the earth. It is located 50-60 cm below ground level
A metal bond is welded to the protruding parts of the rods/corners - a strip of 40 * 4 mm. The created ground electrode is connected to the house with a metal strip (40*4 mm) or a round conductor (cross-section 10-16 mm2). The strip with the created metal triangle is also welded. When everything is ready, the welding areas are cleaned of slag and coated with an anti-corrosion compound (not paint).
Welded strip
After checking the grounding resistance (in general, it should not exceed 4 Ohms), the trenches are covered with earth. There should be no large stones or construction debris in the ground; the earth is compacted layer by layer.
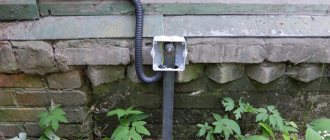
At the entrance to the house, a bolt is welded to the metal strip from the ground electrode, to which a copper conductor in insulation is attached (traditionally the color of the ground wires is yellow with a green stripe) with a core cross-section of at least 4 mm2.
Grounding outlet near the wall of the house with a bolt welded at the end
In the electrical panel, the grounding is connected to a special bus. Moreover, only on a special platform, polished to a shine and lubricated with grease. From this bus, the “ground” is connected to each line that is distributed throughout the house. Moreover, wiring the “ground” with a separate conductor according to the PUE is unacceptable - only as part of a common cable. This means that if you have two-wire wiring, you will have to completely change it.
Why you can’t make separate groundings
Rewiring the entire house is, of course, time-consuming and expensive, but if you want to operate modern electrical appliances and household appliances without problems, it is necessary. Separately grounding certain outlets is ineffective and even dangerous. And that's why. The presence of two or more such devices sooner or later leads to the output of the equipment plugged into these sockets. The thing is that the resistance of the circuits depends on the condition of the soil in each specific place. In some situation, a potential difference occurs between two grounding devices, which leads to equipment failure or electrical injury.
Down conductor for connecting the circuit to the lightning rod
The lightning rod and the grounding circuit are connected to each other by means of a down conductor, which is made in the form of a steel strip or wire with a diameter of 6 mm. The length of the down conductor should be as short as possible; therefore, the location of the down conductor and the ground loop must be determined in advance.
Each lightning rod requires a separate grounding loop. In the case of a mesh or cable design, two ground loops are usually installed on opposite sides of the building. When laying a down conductor along the wall of a building, remember that the distance from windows and doors must be at least 0.5 m. The down conductor is attached to a wall made of flammable materials (wood, OSB) through insulating pads 10-15 cm thick.
The down conductor is attached to the lightning rod elements using a bolted connection. The down conductor between the lightning rod and the grounding loop can be made of a copper conductor in the form of a flexible cord with a total cross-section of at least 35 mm2. Steel elements in places of bolted connections with a copper conductor should not have a zinc coating in order to avoid the formation of a galvanic couple and electrochemical corrosion of the elements.
Tip #3. When grounding the roof of a house, you should try to make do with a minimum number of connections, since they are the “weak link” in any structure. Welding is used where possible.
Important! Never, under any circumstances, carry out work on the roof, especially related to the installation and repair of grounding, when a thunderstorm is approaching, especially during it! Also, during a thunderstorm, you must not be near lightning protection and grounding elements or touch them.
Types of protection
According to RD 34.21.122-87 clause 1.1, the need for lightning protection and its category is determined by the purpose of buildings and structures. The type of protection zone when using rod and cable lightning rods is determined according to the same instructions in Table 1, depending on the average annual duration of thunderstorms at the location of the building or structure, as well as on the expected number of lightning strikes per year. A lightning protection device is mandatory if the conditions written in columns 3 and 4 of Table 1 are simultaneously met.
There are several ways to ground the roof of a residential building:
- The natural way. It consists of metal parts of the building structure. They are located in the ground and act as a down conductor. For example, this could be a reinforced concrete foundation or water supply pipes. But this method is practically not used, since modern polymer materials are used when laying communications.
- Artificial way. It is used purposefully when it is necessary to ground the roof in order to discharge static electricity. A roof with grounding will protect human life in the event of a thunderstorm.
Read our article about how to properly ground a private house!
Frequently asked questions from newbies
Question No. 1. Is it possible to use nearby tall trees to attach lightning rods?
Yes, it is possible if the height of the lightning rod is higher than the highest point of the roof and the distance from the tree to the roof is no more than a few meters.
Question No. 2. Why can’t a grounding tap be laid parallel to existing electrical wiring or various communications?
When high currents pass through parallel conductors, a self-inductive emf will be induced, which can damage household appliances.
Grounding for a soft roof
Roofs made of soft roofing materials are very popular. This is due to the fact that they are quite easy to install and at the same time have high performance characteristics. In addition, they boast an aesthetic appearance. As mentioned earlier, they also need protection from lightning.
The peculiarity of installing grounding on a soft-roof roof is that only a mesh can be used as a lightning rod. In addition, grounding should be done not after the roof is completely ready, but during its installation. Otherwise, the integrity of the roof will have to be compromised.
Thus, we can draw a conclusion that grounding for roofs with soft roofs needs to be designed initially. For roofs made of other materials, this condition is not of primary importance. A lightning rod system can be installed on them later.
Common mistakes when installing grounding
Errors during grounding installation can lead to catastrophic consequences, so you should not neglect the recommendations of specialized sources and, especially, “reinvent the wheel.” Below are the most common mistakes:
- Connecting the grounding tap to the building fittings. No one knows how the building reinforcement contacts the ground, to what depth the ground electrodes are laid and, most importantly, whether there is no contact between the reinforcement and internal elements in the premises.
- Use as grounding for water supply or sewerage systems. Firstly, the water supply or sewerage pipe is filled with water and has access to the room; secondly, the pipeline may be corroded by corrosion in any part of it or have a non-conductive insert (plastic, ceramic or asbestos-cement pipe).
- Coating of grounding electrodes with paint to protect against corrosion. Very often, in order to prevent destruction of grounding electrodes, they are painted along their entire length, thereby covering them with an insulating layer. Only those parts of the electrodes that are located at ground level and have welded joints need to be painted.
- Making a ground electrode from sheet metal. Sheet metal, despite its advantages (large contact area), tends to deform; therefore, voids can form under it, which negate the advantages. In addition, the sheet material is highly susceptible to corrosion and every year the efficiency of grounding tends to zero. This type of grounding was common in the days of the first radio receivers, when in addition to the antenna, grounding was also required for their operation. The grounding currents there are negligible.
- Making connections of grounding elements with aluminum wire. Aluminum wire is used due to its lightness and flexibility. This is where its advantages end. Among all conductive materials used in electrical energy applications, it has the lowest strength and melting point.
- Use as a lightning discharge receiver and a current conductor for metal roof elements. Since the sheets of metal tiles do not have reliable electrical contact with each other, the current passing through the joints will cause their local heating up to the point of melting the metal and igniting the load-bearing structures.
What is the danger
What consequences will this disaster bring? This could be a failure of electrical appliances, electric shock to people in a private home, and even a fire in the ceilings. In order to protect your home, the roof must be grounded.
Roofing made of metal and lightweight rolled materials is especially at risk. It is best to ground them first. This is explained by the following reasons: metal is capable of attracting an electric charge, and soft materials easily ignite if struck by a spark. The consequences of the lack of lightning protection are visible in the photo:
Therefore, installing a lightning rod is a necessary procedure for any building, especially a wooden house. But before you start installing the system, you need to study all the nuances. After all, the grounding itself depends on the material of the roof.
