5 tips, or how to connect a motion sensor to a light, 2 basic diagrams and 2 ways to install a motion sensor, 3 main rules for setting up lighting.
Motion sensors (MS) are smart electronics that are used at home, in the office, in hotels. This modern switching device has much more functionality than traditional light switches. For example, a motion sensor with automatic lighting function provides a person with more comfort and freedom than a conventional key switch. In everyday life, this equipment is most often used to automatically turn on lighting in residential premises and entrances.
TEST:
Mini test to determine user erudition
- What kind of alternating current is used in residential premises?
a) three-phase;
b) single-phase.
- When connecting several sensors in parallel to each other, which connection is correct?
a) a separate phase for each device;
b) one phase for all devices.
- Is it possible to build a DD into a concrete ceiling?
a) yes;
b) no.
Answers:
The correct answer to question 1: single-phase alternating current. Three-phase is produced on an industrial scale.
The correct answer to question 2: when connecting several devices in one chain, all devices must be connected to the same phase.
The correct answer to question 3: no, built-in device models are suitable for installation only in suspended ceilings.
A motion sensor is electronic equipment that helps identify an intruder during unauthorized entry into a controlled area.
There are 3 types of DD:
- 2-wire;
- 3-wire;
- With 4 wires.
There are 5 types of detectors based on their response method:
- Ultrasonic, react to high-frequency sound waves;
- Microwave, triggered by high-frequency radio waves;
- Infrared, operate when detecting thermal radiation;
- Active, operate in the presence of a transmitter and receiver of infrared radiation;
- Passive, do not use a transmitter.
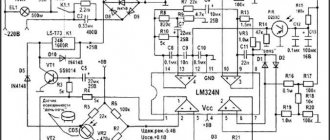
Infrared sensor with 3 wires
The most popular devices are those with infrared radiation. Its operating principle is very simple. The DD sensor begins to work when it is exposed to infrared radiation emanating from living objects. To do this, the device is equipped with pyrodetectors directed in different directions, dividing the controlled space into narrow segments. This separation is carried out by a Fresnel lens.
In the photo: Diagram of the infrared sensor operation
When a person moves into the area of responsibility of the device, an alarm is triggered and changes occur in the operation of the sensors. The electronic circuit records these changes and generates a signal for the output relay.
There are three terminals inside the sensor:
- L - for phase connection;
- N – for connection to zero;
- A – for connecting to the load.
If you don’t know how to connect an infrared DD to a lamp, then everything can be understood by understanding the wires. The phase and neutral wires connected to terminals L and N supply power to the device. The output relay is connected between phase L and the load cable. The light bulb is connected between terminal A and zero.
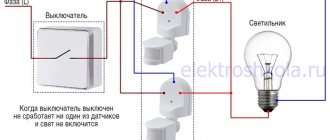
How to install DD to turn on the light: 2 main schemes
It is recommended to install the sensor-lamp system separately from general lighting. In order for the DD to turn on the light to work instead of a switch, a separate line is installed where only the device and the lamp will work. But often it becomes necessary to include a switch in this circuit. This will allow you to turn off the lighting if necessary.
In the photo: a) connecting the sensor without a switch; b) connection with a switch.
Connection diagrams: 4 examples
If you decide to connect the DD to the light and purchased it in a store, then you need to install it according to the diagram indicated on the package. But there are advanced connection diagrams that add functionality to the device.
In the photo: 1 – connecting the device without a switch; 2 – connection with a switch; 3 — connection of several devices; 4 – viewing angle.
If there is a need for the light to be on, but the motion sensor does not function, then a parallel switch is used when connecting. An additional device is installed when there is a need for voltage to be constantly supplied to the lamp, regardless of the presence of a person in the controlled area. When the switch is triggered, the lamp will go out immediately or when the sensor turns off.
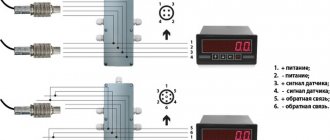
There are situations when one DD does not cover the entire premises with a controlled zone. In this case, they resort to connecting two or more devices in parallel. Each sensor is separately supplied with a phase with zero, and then all outputs are connected to the lamp. The PUE requires that a phase wire be inserted into the gap.
Connection diagram to two motion sensor modules
Important: With this installation, all sensors are connected from one phase, otherwise a phase-to-phase short circuit is possible.
If the layout of the room is such that the viewing angle does not allow you to control important areas, then it is recommended to connect several light sources to the DD. But to prevent the load power from damaging the equipment, they use a magnetic starter by connecting it to the lighting system.
How to connect a motion sensor and switch
Connection diagram for D. movement for lighting without a switch: 2 installation methods
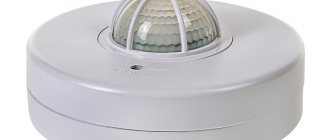
Manufacturers now offer users two types of DD: ceiling and wall. Their operating principle is similar, but the model must be selected individually, taking into account the installation location.
Ceiling devices are capable of covering an area within a 360° radius and their protected area in the diagram looks like a cone, where the rays diverge by 120°. When a person enters the sensor’s visibility range, he crosses the multi-beam barrier, which is detected automatically, and puts the sensor into alarm mode.
Ceiling devices are installed at a height of 2.5 to 3 meters. They are capable of covering an area in the lower part of the room with a diameter of up to 20 meters. It is advisable to install such equipment in small rooms in order to simultaneously monitor all aspects of the room.
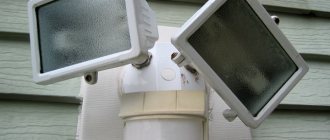
Wall sensors can cover a large area of space. The device is used not only indoors, but also outdoors. It also completes the electrical circuit when a person crosses the multi-beam barrier. The equipment is installed at a height of 2 to 2.5 meters. It is recommended to mount the sensor in a corner of the room. In this position, the opening of the rays is most effective.
DD for turning on the light with 1st switch: connection diagram
The connection process is not complicated and resembles installing a regular switch. But if we compare these two electrical installation devices, we will see significant differences:
- When installing a motion sensor, it is strictly forbidden to swap the pins. This is not prohibited in a traditional switch.
- Both devices break the phase conductor when the system is turned on, but a neutral wire must also be connected to the DD.
- The switch is triggered by manual control, the sensor reacts to movement in the work area.
- The switch disconnects the system immediately, and in the case of a detector, after a set time.
Connection diagram with switch
Description
A motion sensor switch is an electronic device that responds to the presence or movement of objects within its reach. When motion is detected, it closes the power supply circuit of the lighting devices, turning them on.
The operating principle of the device is simple: movement in its coverage area is detected by an infrared (ultrasonic, microwave) sensor, automatically closing the power supply circuit for the lamps connected to it. The circuit opens after the time set on the timer has passed and there are no moving objects. The device continuously monitors a certain range, reacting if changes occur in it.
How to connect a DD via a switch: 3 types of devices
Variety 1 - regular switch
Installation begins with connecting the cable to the sensor. There are two types of cable entry into the detector: from the back or from the side. The rear connection is most often used for hidden wiring, and the side connection is used for external laying of the power cable.
At the next stage, we connect the cable conductors to the terminals of the device. Then we attach the device directly to the ceiling or wall. The connection to the switch occurs through the phase to the wire located between the light bulb and the DD.
You can also use an existing switch. In this case, we replace the existing single switch with a double one, in which the free contact will supply power to the sensor. If there is a double switch in use, then it needs to be changed to a triple one.
It is also important to know 3 installation recommendations
- Manufacturers do not recommend connecting DDs to energy-saving lamps due to the fact that their service life is significantly reduced;
- Trees and shrubs should not be in the field of view of a device installed outdoors; they can emit heat, which negatively affects the operation of the equipment;
- You need to direct the beam of action in the direction where there is a need to turn on the lighting when a moving object is detected.
Variety 2 - DD with smooth switching on and off of lighting
The infrared detector independently controls the level of illumination, but special equipment is required for smooth switching on and off. The microcontroller, having received a signal from the sensor, is able to slowly increase the brightness of the lamp, and when the signal disappears, gradually reduce the brightness to zero. The smoothness is adjustable within wide limits, and the process lasts several minutes.
Type 3 - automatic light switch with DD
Such equipment is capable of turning on and off lighting fixtures without pressing. The device reacts to the movement of objects and independently controls manipulations. The device is capable of monitoring an area at a distance of up to 8 meters.
Operating principle and classification
The operating principle of the device is based on detecting movement at a certain distance from the sensor. The device evaluates the light level in the room. If the indicator is below the set value, the light turns on. The light sensor allows you to avoid turning on the device during daylight hours when artificial light is not needed.
A standard device includes elements such as a sensor, photocells and lenses. Switches are usually classified according to a number of criteria: by control method, type of installation, operating principle of sensors, and functional tasks.
According to the control method, switches are divided into 2 types:
- automatic;
- with remote control.
Classification by type of installation includes the following devices:
- ceiling;
- invoices;
- built-in
Models are divided according to the operating principle of the sensors:
- ultrasonic;
- microwave;
- infrared (most common).
Based on their functional characteristics, the following devices are distinguished:
- with a sensor that can be switched off manually;
- with connection by timer and shutdown at a given light level;
- with the function of manual control over the time of light supply;
- with shutdown by a timer signal, regardless of the light level.
Products differ in coverage area, signal transmission range, viewing angle (90, 180 or 360 degrees). Switches vary in the class of protection of the housing and the number of simultaneously switched on lighting devices.
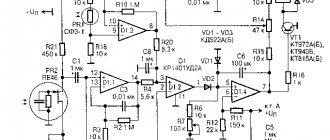
Motion sensor for turning on the light with your own hands: 3 elements
It’s easier to make a homemade DD with an infrared or ultrasonic sensor. Such a device consists of a transmitter, receiver and power supply. The power supply can be any 12 V. The transmitter is assembled using an NE 555 microcircuit, and the transmitting element is an LD 274 diode with a viewing angle of 10°.
The BPW40 phototransistor acts as the sensitive element of the receiver and controls the entire BS-115C relay. When installing, you need to take into account that the viewing angle of the phototransistor is 20°. With this assembly, the distance between the transmitter and receiver will be 5 meters.
DD to turn on the light: how to make 3 mistakes
The most suitable place for installing equipment in apartments is the hallway, where all the interior doors lead. The installation location is determined on the apartment diagram, taking into account the diagram of the sensor beams.
In rooms where the action of wall-mounted DD alone is ineffective, combined installation of both ceiling and wall equipment is used.
To connect the light switching device, no special knowledge or skills in the field of electronics are required. Manufacturers include instructions with each DD with recommendations on how to install correctly. The user needs to connect the cable and DD wires correctly.
But a situation occurs when one detector cannot cope with the assigned tasks and does not cover the entire area of the room. Then you need to install additional equipment that is connected according to the following diagram.
Connection diagram for additional device
The sequence of connecting an additional DD is the same as the main one. A phase and a zero are connected to the sensor, the phase passes through the detector and is connected to the lamp, and the second end from the lamp goes to zero.
Preparatory actions
Before work, you need to prepare your tools. For installation you will need:
- Electrical tape and other materials for insulating connections
- Stripper (tool for stripping wires)
- Wire cutters
- Screwdriver
- Screwdriver voltage indicator
First you need to find the phase - determine which wire is responsible for what. The color designation of wires in the CIS countries is diametrically opposite to the European one. For Chinese manufacturers it can be anything. The connection diagram is included in the instructions for the product; it must be studied before starting work. Some manufacturers draw it directly on the inside of the device body. The phase is determined with a special tester. If, when it touches the wire, the light comes on, there is current; if not, this wire is “zero”. If the tester cannot determine the phase, there may be a break in the wiring. After choosing the connection method, perform the following actions:
- Turn off the electricity at the switchboard
- The old switch is disconnected. Carefully pry up the key with a sharp object and remove it, unscrew the bolt under it with a screwdriver - the clamps loosen and the device is easily pulled out of the socket. Next, unscrew the clamps that hold the wires and finally disconnect
- Turn on the electricity on the panel and determine the phase using a tester screwdriver
- After determining the phase, the current is turned off and a new product is connected according to the diagram and instructions
- On the panel they turn on the electricity and test the device
The terminal box is located under the cover at the back. There are also three wires of different colors located there. They come from a box. The wires are connected to the clamps on the terminals. When using multi-core wires, it is convenient to use special NShVI lugs instead of simple twisting, but if they are not available, then connect them without them - this will not particularly affect the result.
How to avoid 3 installation mistakes
- Installation location. The device must be installed in the location that is most suitable according to the technical conditions. There are cases when a ceiling detector is mounted on a wall, which leads to incorrect operation.
- Installation of lens masks. These curtains are included in the DD kit and are intended to adjust the coverage area. If they are not removed after adjustment, the device will not detect movement.
- Incorrect switch position. If you install a switch before the sensor, the power will turn off and the operation of the device will become impossible.
General recommendations
The infrared switch needs to be adjusted after purchase. To do this you need to do the following:
- adjust the sensitivity of the sensor;
- set the operating time in the on state;
- If the device is equipped with a microphone, this should also be adjusted.
Many switches are equipped with an LED indicator that changes the frequency of flashing when activated. This property can be used when configuring the sensor.
An infrared switch is a device designed to make the user’s life easier and more comfortable. The device is equipped with an IR sensor that responds to human heat. When an action begins within the sensor's visibility radius, the lamp turns on. The switch can also be operated from a remote control.
How to set up DD for lighting? 3 main rules
Correct operation of the sensor depends both on the correct connection diagram and on the correct choice of its placement. But to avoid false alarms of the device, you need to follow the rules:
- There should be no heating devices or devices with electromagnetic radiation in the controlled area;
- The device must not be exposed to air flow from an air conditioning system or fan;
- Avoid exposure of the housing to direct sunlight.
But there are other reasons for equipment failure. For example, if there is an animal in the family, then every time it crosses the device’s coverage area, the light will turn on. In this case, the sensitivity of the sensor is adjusted and the minimum value for alarm is set, or another model is purchased that has the function of ignoring objects weighing less than 25 kg.
Setting up 3 main parameters
Modern DDs regulate sensitivity, viewing angle, illumination and light-off delay time. Correctly configured parameters significantly save energy costs. In older devices, it is possible to adjust only two parameters: switch-off time and sensitivity or switch-off time and illumination.
Setting up the equipment should begin with adjusting the viewing angle. Modern models are equipped with special detectors mounted on hinges. These elements must be installed so that the direction of the infrared rays covers the largest area of the room. This takes into account not only the installation angle, but also the height of the device.
Next, sensitivity is adjusted. On the case it is indicated by the “SENS” key. Regulation occurs in the range from minimum to maximum. This is the most difficult stage in setting up the device - you need to adjust the operation of the sensor so that it does not work on animals, but turns on the light when a person appears.
The next step is to set the light threshold. The “LUX” key adjusts the DD to turn on the light when it gets dark. It is recommended to set the key to the maximum position and adjust the sensor in the evening.
The final step is to adjust the turn-on delay. The time is adjusted using the “TIME” key, which operates in the range from 5 to 10 seconds. Settings are carried out individually for each user, taking into account his wishes.
How to adjust the motion sensor for lighting in the entrance: 15/30
The installation diagram and rules for adjusting the operation of DD installed in the entrance are the same as for devices intended for residential premises. The only difference is that a large area of the landing may not be completely covered by the equipment signal reception area. In this case, it will be necessary to install additional sensors connected directly to the phase and zero. The light bulb is connected to the phase through a wire.
A correctly configured motion sensor installed in the entrance has a range of 6 - 8 meters. The viewing angle is set taking into account the size of the landing, but most often it is 15° vertically and up to 30° horizontally.
How to check DD for lighting: goal - 0 false signals
During operation of the device, owners may encounter situations where the equipment does not operate correctly or false alarms occur.
To configure the necessary parameters, you need to wait for the intensity of natural light at which the sensor will trigger and turn on the light. By turning the LUX knob, we find the position at which the light will turn on.
If the device does not respond to the presence of a person in the controlled area, then you need to increase the sensitivity level. And in the event of a false light switching on without detecting a person, the sensitivity threshold must be lowered.
Additional options
A modern infrared switch operates from a remote control.
To do this, the device is programmed for a specific type of remote control, and certain actions are assigned to the buttons. You can use a regular TV remote control for control. The switch can be equipped with a photo relay. Such devices are used for street lighting when there is no need to waste energy.
The gadget can be equipped with protection against pets. The sensors react to the warmth of pets, so for your home it is recommended to purchase a model that reacts to large objects.
Shutdown delay. An important function, because if there is no movement, the light will go out. The parameter is user configurable.