The weaker version (20 A / 4.4 kW) is equipped with a measuring shunt with a resistance of 3 mOhm, and the stronger one (100 A / 22 kW) has an external current transformer with a ratio of 2000:1 (or 50 A / 25 mA). The transformer itself, according to the manufacturer, is adapted to measure current with an intensity not exceeding 150 A.
Meter Specifications
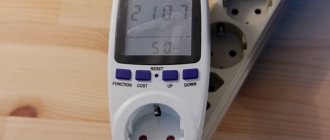
- Model: P06S-20 6 in 1 LCD AC Power Meter
- Measured frequency value: 50~60Hz
- Power measurement range: 0.01~5000W
- Electricity measurement range (5 digits): 0.01 kWh ~ 99999 kWh
- Current measurement range: 0.0~20A
- Power Factor: Range: 0~1 PF, Display Format: PF0.00 ~ 1.00
- Rated power: 4400 W
- Maximum power: 5000 W
- Power consumption: < 1 W
- Resolution: 1 V, 0.01 A, 0.01 W, 0.01 kWh
- Maximum current: 20 Amps
- Operating voltage: 110~250V
- Voltage error: ±1%
- Current control error: ±2%
- Power error: ±2%
- Size: 8.5 x 4.7 x 2.8 cm
information about order
| Marketplace | Aliexpress |
| Cost at time of purchase | 15$ (539 rubles) |
| Delivery method | China Post Air Mail |
| From the moment of payment until the goods are shipped | 3.64 days |
| From the moment of departure until arrival in the city | 16.6 days |
| Product Name | Euro Plug Power Energy Meter Power Electricity Usage Monitor |
| Links | Product Seller |
Instructions for controlling the P06S wattmeter
Below are instructions for one control button:
- Press the button to turn the backlight on or off.
- Hold for 3 seconds to set the power alarm threshold. 2.1. Let's get to the power alarm setting (the factory default is set to 4.4 kW). 2.2. The 1st digit of the highest digit will begin to blink; pressing once will add one; hold the button for 2 seconds to move to the next digit (digit); the maximum value that can be set is 99.9 kW. 2.3. If you do not press the button for 5 seconds, you will exit the settings and save the current data.
- Hold the button for 5 seconds - the system will reset to default settings: the electricity meter will be cleared and the power alarm will be reset to the factory setting.
When the power alarm threshold is exceeded, the device starts flashing its backlight.
The power consumption of the meter is less than 1 W. The meter is equipped with one button with which we can turn the backlight on or off, set an overload alarm and reset the energy meter. The function is selected by changing the time the button is held. It is worth noting that the device retains its indication even after the power is turned off.
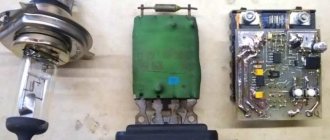
In the box, in addition to the meter and transformer (for the powerful model), there is a modest instruction manual printed on one sheet. On the one hand there is an English version, on the other there is a Chinese version.
Both meters are based on the same PCB, differing only in the resistor configuration. In the 20 A version there are two 6 mOhm resistors - they are connected in parallel in size 2512, forming a measuring shunt, and in the 100 A version (equipped with a transformer) a 1 Ohm resistor of size 0603.
At a maximum current of 20 A, there is a 60 mV drop across the shunt, which would give 0.6 W per resistor (resistors of this size can dissipate 1 W).
In the transformer version, at a maximum current of 100 A, a current of 50 mA will flow through the shunt, which will correspond to a voltage drop of 50 mV and a power of 2.5 mW, which a resistor size 0603 should easily cope with.
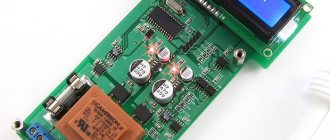
The basis of the circuit is a specialized microcontroller HT5019. This is a chip for building single-phase power meters based on the M0 core with 128 KB flash memory. The second integrated circuit present on the board is the LCD driver (32x4) VK1621B. A transformerless power supply consisting of a capacitor and resistor is responsible for powering the electronics. There is no decent protection for this power supply (other than a resistor).
Varieties
The main criterion is the type of current - constant or alternating. Universal household appliances allow you to work with any consumer.
You need to insert the wattmeter into the socket, and into the device itself - the equipment whose parameters you want to set. Wattmeters are used when testing and repairing an electrical network or to calculate which device is taking too much energy.
How measuring devices differ from each other:
- accuracy - most devices are quite accurate, but information about the class (percentage of error) can be found in the product passport;
- measurement ranges – what power consumers are the measuring devices designed for. Simple cotton washing machine or large machine;
- additional functions - screen backlight, remote control and programming capabilities, built-in memory.
If you need to take measurements outdoors, you should find out at what air temperature the wattmeter is allowed to operate.
Why is it necessary in everyday life?
You will need to use a wattmeter to optimize energy costs. This is especially important for large apartments and country houses. A large number of consumers will not allow you to accurately determine which of them are too gluttonous and require replacement.
Smart wattmeters with additional functions will allow you not only to take measurements, but also to control a specific device. For example, an electric boiler. This can be done remotely or by programming the measuring device.
Expert opinion
Torsunov Pavel Maksimovich
For a more complete diagnosis, it is necessary to take measurements over a long period of time – at least several hours, since a number of consumers “take” different amounts of energy at different times.
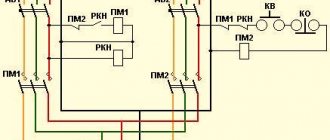
Connection diagram P06S-100 and P06S-20
According to the diagram, the 220 V network input is connected to pins 3 and 4, and the output, that is, the load, is connected to pins 1 and 4.
Useful: Arduino sensor for robot movement along the black line
Connecting both modules is very simple - they are equipped with a durable screw connection, the two terminals of which (labeled L and N) are used to connect the power supply. In the 20 A version, the energy receiver is connected between the L terminal and the “1” terminal (shunt on the N wire). In the case of a version with a transformer (connected to terminals “1” and “2”), the direction of installation of the transformer on the cable is important - there is an arrow on it that should point in the “zero” direction (L -> N).
The button, which is a microswitch protruding through a hole in the housing, is a bit primitive. Another problem is the lack of a CE mark, because without this mark the product cannot be admitted to trade in the EU. It is difficult to say whether this applies to this specimen, but the 20 A version has a clearly worse display - it has very small viewing angles, and when the backlight is turned on, it becomes almost illegible. In the P06S-100 version, the display has excellent readability, both without backlight and with backlight:
The device does not have certificates, and the manufacturer in some models does not even indicate the accuracy of measurements. Here are the parameters:
- Display resolution: voltage: 1 V, power: 0.01 W (up to 100 W), current: 0.01 A (up to 10 A),
- Power factor: 0.01 (1%),
- Measured energy: 0.01 kW/h (up to 1000 W).
- Data update rate: 1 Hz
The values in parentheses are the limit of the lowest measurement range; higher values can be measured but with reduced resolution.
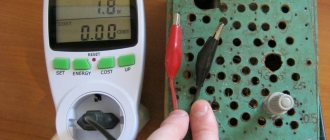
Power measurement
I do not have special certified equipment to check the measurement accuracy of this Chinese wattmeter, so I will compare the power of the devices with that declared by the manufacturer.
Energy saving lamp 11 W
Surprisingly correct: 11 W, the lamp says 11 W.
Energy saving lamp 13 W
Everything is accurate, it shows 13 W, the lamp indicates 13 W.
Incandescent lamp 60 W
Due to the fact that the voltage in the network was not 220 Volts, but slightly higher, the power of the incandescent lamp accordingly differs from the nominal one.
Microwave printing 1150 W
Set the maximum power. The wattmeter showed from 1043.5 to 1058.5 W.
I will provide a table with the results of measuring the power of other devices.
| Device | Measured power (average) | Stated |
| Smartphone charger 2A | 11 W | ? |
| 2.4 A Tablet Charger | 13.5 W | ? |
| CRT TV 29′ | 2.5 W in stand-by mode 74 W during operation | ? |
| System unit (I5-3570K, GTX670, HDD+SSD)+monitor | 94 W (no load) 298 W (load) 5 W (sleep) | ? |
| Laser printer | Off - 0.5 W In standby mode - 3 W When heating the stove - 625 W When printing - 248 W | Standby - 2.8 W Printing - up to 270 W |
| LCD monitor 24′ | Standby mode - 0.5 W Brightness 100% - 24.5 W Brightness 50% - 18 W Brightness 10% - 13 W | Standby - up to 0.2 W Operating - 23 W |
| Hairdryer noname | 580.5 W | ? |
| Fan heater | 1886 W | 2000 W |
| Vacuum cleaner | 1021.5 W | 1500 W |
| Split system | 868 W | 980 W |
| Washing machine INDESIT WI84X | Average - 200-400 W Maximum - 2042 W | Up to 1850 W |
The cost of one hour of operating my PC in normal mode (browser, media) costs about 34 kopecks. When loaded, the cost increases to 1 ruble. One hour of operation of a CRT TV costs 28 kopecks. To charge a tablet with a battery capacity of ~11000 mAh once - 21 kopecks. It only costs 7 kopecks to heat up lunch in the microwave. An hour of operation of a split system costs 3 rubles, one wash costs 2.6 rubles. 
Testing a digital wattmeter
The next test was a 0.5 kW laboratory power supply loaded with a 150 W active load.
As you can see, the devices differ slightly in their readings, but in principle such discrepancies are acceptable.
Finally, a couple more power factor measurements with current and voltage waves:
Lamp: PF = 0.99; = 8°
Transformer soldering iron: PF = 0.90; = 346°
As you can see, it looks like the power factor is calculated correctly.
Smart plug
Electronic socket with a timer
The first examples of so-called “smart” or smart sockets appeared among owners of private country farms, who were forced to monitor the condition of the equipment used in the house. Modern smart meters, the main function of which is to record electricity consumption, allow you to:
- Program the turn-on and turn-off times for household appliances.
- Automatically launch important processes before the owner returns from work, saving on energy consumption.
- Turn off appliances that were accidentally left on, and also protect the house from entry by unauthorized persons.
These devices are used in areas where protection against forgetfulness and taking necessary measures in the absence of the owner are in demand. To do this, they provide an option that allows you to control home equipment via a smartphone with a special application installed on it.
Another option for remote control involves sending short SMS messages to a specific number. After sending the appropriate command, a music center or similar equipment is automatically turned on, creating the impression of the owner’s presence in the house. Modern models of household wattmeters represent a further development of the principle of a smart socket, since they have all its features.
Measuring unit based on P06S-100
And here is a simple homemade measuring unit based on the P06S module. Some time ago we ordered the P06S-100 measuring module. It sat in the nightstand for a while until I wanted to check how much current and power the 3D printer consumes. And at the same time other consumer electronics.
Everything was assembled in a housing made of plastic ventilation duct. Parts used:
- module P06S-100,
- ventilation duct,
- automatic switch Legrand B6,
- 2 connectors with grounding,
- 2 illuminated switches,
- 2 connection lines,
- computer socket with coils and capacitors,
- fuse.
Internal connections were made with a 2.5 mm2 cable, which was left over after installing the electrical network.
At the end, sockets were made and a 6 A automatic fuse was connected. At prices in a local electrical goods store, it cost 2,000 rubles.
There is also a socket with a light bulb for checking devices. The device works correctly, regardless of how it is connected to zero and phase: L and N.
The network noise voltage will accumulate across the measuring resistor and will always have the same value for the measuring circuit, regardless of whether it is on the L or N bus.
To summarize, both wattmeters work correctly and are suitable for long-term monitoring of a device's power consumption. However, keep in mind that the device has not been tested by any reputable laboratory and has virtually no security features. Yes, there is an isolation slot between terminals L and N, and a VDR 10D471K varistor is connected in parallel to these terminals. However, there is no fuse that will blow once the varistor is activated.
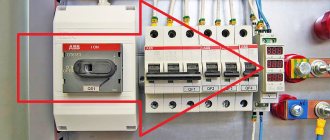
But despite these shortcomings, we have been successfully using such a meter, built into the electrical panel, for 4 years now to control the energy consumption of external consumers in our personal plot. The switchgear is located on the wall of the building, and the multifunctional digital wattmeter has survived the second winter and works flawlessly. You just have to remember that this is not an exact laboratory instrument and its readings should be considered as estimates.
conclusions
It is clear that this wattmeter is not an accurate certified device, like most others for the same money, but it is enough for household needs: you can estimate the power of household electrical appliances, the cost of operation over a certain time, measure network parameters and much more. There are many similar wattmeters, they differ in appearance and functionality. Instead of batteries, a built-in battery of approximately 20 mAh can be used. $15 is the average cost for such devices. Although in some Russian online stores they are sold for 1000-1400 rubles. During operation, no problems were noticed. No glitches, freezes or “left” readings.
pros
- The readings are similar to real ones, sufficient for household measurements
- High quality case
- Possibility to set two tariffs
Minuses
- The display is constantly on when batteries are inserted, there is no auto shutdown
- No display backlight
For those who want to return 7% of the cost of the goods on Aliexpress
For those who will buy on Aliexpress, I can offer to save money with a cashback service, for example, epn.bz, which I personally tested. You will receive 7% of the cost of the product, although there are subtleties: you need to follow a special link, do not use the discount from the Ali mobile application, etc. If you have any questions, write in the comments or via feedback.
Setting mode
Setting electricity prices. After pressing the button for more than 3 seconds (on the third line of the system default LCD display, eg 0.00 cost/kWh), the displayed content begins to flash, which means that the device has entered setting mode. Then press the function button to change the selection and use the up/down buttons to set what you want. After setting all the data, press return - the parameters will be saved.