Home Communications Electrical
After the construction of an individual residential country house is completed, a long period of its arrangement begins. Interior finishing processes have a beginning, but such improvements have no end! At the same time, it is important to correctly create the sequence of work to be performed so that you do not have to redo the finished results later. Any educated builder-finisher (who is “in the know”) will clearly determine priorities and sequence, in the first place of which will always be intra-house communications and the installation of stationary power-consuming appliances. Particular attention should be paid to the stove, whether it is gas or electric.
The fact is that this particular household appliance consumes a lot of energy - its power consumption is high relative to other appliances. If traditional light bulbs consume a maximum of 240 W, and soon will not be more powerful than 50 W, then the lowest wattage stove burner has a power of 500 W, and the most common size is 1 kW. However, if the stove is gas, then a specialized, usually state technical service will be responsible for its safe installation. But you can install an electric stove yourself, it is only important to install the communications correctly.
Now there are various options for installing wiring in the house: in accessible cable channels, in grooves (closed version), under baseboards and under wall panels (if they are made, for example, of plasterboard). A feature of the power supply device for a kitchen stove is that the wiring must support an increased load. And this requires a lot: firstly, it must have a larger cross-section; secondly, it is better for it to be made of copper; thirdly, for fire safety reasons, it is necessary to have permanent access to the wiring along its entire length. However, this is only one aspect of what you need to pay close attention to when independently connecting high-consumption household electrical appliances, such as a stove. Let's take a closer look.
Independent connection of an electric stove to a 220 V, 380 V network
Electricity is a serious and dangerous matter, but many jobs do not require high qualifications and can be done independently without the involvement of specialists. For example, you can connect an electric stove with only a vague understanding of electricity. Especially if the outlet is already installed. All that remains is to install a plug on the cord and connect it correctly to the connectors of the stove. The situation is worse if it is necessary to pull the line from the shield, but even here you can cope without help. Just remember that all work is carried out with the power supply turned off.
Analysis of real reviews on the panel
After using cork insulation, homeowners discovered, in addition to the main pleasant aspects, several disadvantages of the solution.
Restoring the structure after even slight creasing takes a very long time, and under the pressure of furniture, dents cannot be restored.
Spectacular-looking thin materials provide almost no protection from sound, but do a good job of thermal insulation. When exposed to direct sunlight, the surface quickly fades, irreversibly losing its external parameters.
The glued tiles set on the wall too quickly, and minor defects can no longer be eliminated. Compared to other types of sound insulation, this method is more financially expensive.
Apartment owners and their neighbors need isolation from extraneous sounds. Residents of private houses perform similar actions to reduce environmental noise, but traffic jam is not suitable for this. It is better if soundproofing materials are installed in several layers, either inside the house or outside.
You can clearly see the process of covering the ceiling in the following video:
Types of power points for electric stoves
The installation of a new stove, especially an electric one, is necessarily accompanied by a connection procedure. Sometimes an electrician is invited to do this type of work, but more often they do it on their own.
To ensure that new equipment lasts a long time and that problems do not arise during operation, you should carefully consider the technical standards for its installation.
Particular attention should be paid to the selection and installation of the appropriate power connector. The opinion that for an electric stove it is enough to install the most ordinary socket is wrong.
It will not be able to withstand high loads and, at best, will simply melt. For powerful electrical appliances, special sockets are used that can withstand 7 kW or more.
Power sockets on the market differ in color, material, shape, installation method and load capacity. When purchasing this device, you must immediately buy the corresponding plug. Often, manufacturers of electric stoves equip their equipment with a power plug and socket - all that remains is to install them correctly.
Based on the material used, power sockets are made of carbolite and high-quality plastic. The first option is black, they are usually cheaper. Plastic ones are mainly available in white. They are more expensive, are of high quality and have a higher level of wear resistance.
According to the installation method, power sockets are distinguished:
- for open installation;
- hidden installation.
If it is to be installed behind a stove that sits tightly against the wall, then it is better to choose hidden installation models, the working mechanism of which is hidden in the wall.
Among high-power sockets you can find both options with a grounding contact and without grounding. For an electric stove, you should buy a grounded outlet.
The power supply in the house can be single-phase, three-phase and rarely two-phase. Based on this feature, you need to select a socket that has the necessary contacts and lay the appropriate power cable.
In order to choose the right power connector suitable for the electrical network entering the house, you need to find out in advance from the electricians servicing the site, the type of network and the presence of grounding. Their answers should be unambiguous and clear. Only after this can you begin to purchase and further install a power outlet yourself.
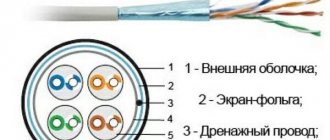
Information about wire and cable brands PVS and KG
The most optimal heat-resistant wires for electric stoves are cables of the PVS and KG brands. The sheath and insulation of the cores of the KG cable are made of high-quality rubber. The advantage of this material is its wide operating temperature range, which ranges from -40 to +50 degrees, as well as its resistance to sunlight. The abbreviation stands for the following: K – cable, G – flexible.
In various industries it is used to connect moving mechanisms, for example, hoists, beam cranes, etc.
The abbreviation PVS stands for the following: P – wire, B – vinyl insulation of conductive cores and sheath, C – connecting. Thus, PVA is a cable, not a wire. However, it is often used for wiring in apartments and country houses. Its main purpose is to be used in areas of the household network where increased flexibility is required. Extension cords and power cords are made from it. The operating temperature range ranges from -25 to +40 degrees. The advantage of the material is its resistance to combustion; it does not spread fire because it simply melts.
Wiring Requirements
Most homes do not have separate lines and outlets for high-power electric stoves. The sockets installed in the kitchen are connected to one circuit, which is designed for a certain load. If you use a modern hob, you cannot turn on consumers such as an electric kettle, oven and microwave until it is finished working. This is not entirely convenient if you need to cook a lot and on several devices.
Houses built in the last century have aluminum wiring that can withstand a maximum load of up to 3.5 kW. Houses of modern series are equipped with cables with 2.5 mm² copper conductors, rated at 4.6 kW. This is quite enough for a medium-power device. If there are more consumers, it is better to change the wiring to avoid overheating. It is advisable to purchase a cable with 3.0 mm² (6.2 kW) or 3.5 mm² (8.0 kW) cores. When making a choice, you need to focus on the peak value of electricity consumption.
The optimal solution is a cable with copper conductors. This metal is characterized by high conductivity, flexibility and elasticity. The problem of corrosion can be solved easily and quickly by treating the contacts with tin.
OUR COMPANY ALSO PRODUCES:
INSTALLATION AND CONNECTION OF AN ELECTRIC HOB
INSTALLATION AND CONNECTION OF AN ELECTRIC OVEN
INSTALLATION AND CONNECTION OF DEPENDENT ELECTRIC STOVE
Along with household electric stoves, our company installs and connects industrial electric stoves.
- The cost of installing and connecting an industrial electric stove is 3,000 rubles (excluding the cost of additional work and materials).
- Dismantling an industrial electric stove costs 2,000 rubles.
- The Master’s visit to Moscow is free.
- Travel outside the Moscow Ring Road - 30 rubles. km (up to 3 km - 100 rub.)
Stages of connecting the stove
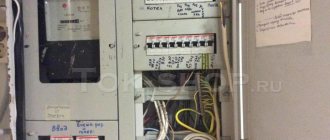
- Turn off the power supply to the apartment in the panel.
- Determine the location of the stove. Install a socket with a grounding contact on the wall on the side where the device is located. The socket current indicator should be within 32-40 A. A single-phase socket has 3 contacts, a two- or three-phase socket has five.
- Install a circuit breaker in the electrical panel. For a single-phase circuit, a single-lane switch (25-32 A) is suitable; for a two- or three-phase circuit, a three-lane switch (16 A).
- Stretch a cable from the electrical panel to the socket (single-phase circuit - 3x4 VVGng brand; three-phase - 5x2.5 VVGng brand).
- Connect the wire to the outlet according to the diagram.
- Connect the plug to the cable coming out of the electric stove. When performing work, pay attention to the markings.
- If the flexible wire is not connected to the stove, do it in the same way as the socket. Before installation, you need to tin the ends into the terminal clamps.
- Connect the power cable to the machine, having previously cleaned the contacts. Connect a separate core (usually yellow-green) to the grounding bars that are equipped with modern electrical panel systems. If there are none, then you should check with the management company whether the apartment’s switchboard is grounded. In the absence of protection, you need to think through possible options for its arrangement.
Which cable is better to use in an apartment?
There is no clear answer to the question of what wire is needed for an electric stove in an apartment. The choice should be based on network loads and design power. Experts recommend using a flexible cable with parameters of 3 by 4 millimeters square.
Also, one of the frequently asked questions from those wishing to acquire an electric stove is how long the cable should be so that the equipment can be easily connected and moved. Here, craftsmen with many years of experience recommend measuring the distance between your stove, sockets and electrical panel. Having received the number, add another 1-1.5 meters to it. It is very important to take a cord with a small margin.
As for connecting the oven, you need to understand the condition of the current cable and measure its cross-section. The cross-section of a modern oven cable is about 2.5 millimeters.
Connecting an electric stove
As we have already said, there is one thing - both three-phase electric stoves and their connection, of course, are different. In addition, we will consider the issue of connecting electric stoves without an outlet, directly from the group’s introductory machine.
Connecting a single-phase electric stove
Let's start with the simpler and more common single-phase connection. It requires three wires. One of which will be phase, the second zero and the third protective. In order to make the connection task easier, we advise you to follow clause 1.1.30 of the PUE, which regulates the color designation of each wire.
- Any connection begins with removing the voltage from the supply wires. Therefore, we turn off the power supply of the electric stove and check that there is no voltage.
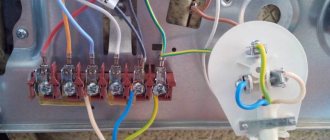
- At the next stage, a socket for the electric stove is taken and the connection is made only in agreement with the connection of the plug. The fact is that for an electric oven it is important to coordinate the phase and neutral contacts on the socket and plug.
- To determine this, we find the contact part in the back of the electric stove. The phase wire is connected to terminals “1”, “2” and “3” or “L1”, “L2” and “L3”, as shown in the video. And these terminals must be connected by a jumper. The neutral wire is connected to terminals “4” and “5” or “N1” and “N2”, and they must also be connected with a jumper. Terminal “6” or “PE” is intended for connecting protective grounding.
- Accordingly, the phase wire should be connected to the socket so that it is connected to the phase wire of the plug. The same applies to the neutral and protective wires.
Note! The question often arises: is it possible to connect an electric stove to a regular outlet? The answer to this lies precisely in the requirements for matching the phase and neutral wires on the plug and socket. A regular plug and socket allow connections to be made in the wrong order. As a result, the oven will work normally, but even when the heating elements are turned off, they will be energized, which creates an additional danger.
- If you decide to connect an electric furnace without an outlet, then it is better to do it without additional connections. To do this, disconnect the oven wire directly at the contacts of the device.
- After this, we install the power cable from the machine in accordance with the previously given diagram. That is, the phase wire is connected to terminals “1”, “2” and “3”, the neutral wire is connected to terminals “4” and “5”, and the protective wire is connected to terminal “6”.
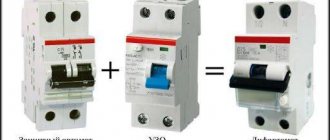
RCD as a key aspect of safety
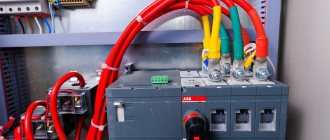
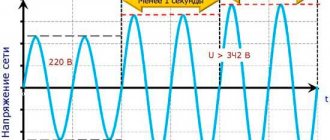
Where does electrical safety in the home begin? From the installation of residual current devices (RCDs) in the switchboard. They are ordinary automatic switches, which everyone has long been accustomed to seeing in panels. However, over time, they have already managed to evolve and acquire valuable functions, namely, monitoring the parameters of the currents passing through them, and breaking the circuit in the event of an emergency.
The rules for installing electrical equipment (PEU) (clause 7.1.79) surprisingly do not oblige the installation of RCDs for stationary electrical appliances, which include an electric stove. However, what else are RCDs created for, except not to ensure safety, but an electric current with a voltage of 380 Volts will be more dangerous than the power for room circuits (both literally and figuratively). It is strongly recommended to install an RCD in the power supply circuit of the electric stove (in series, as usual). After all, the safety of electrical wiring in the house is paramount.
You can also watch a video on the topic of connecting an electric stove:
Connecting the socket
In general, connecting a power outlet for an electric stove in a sequence of operations is no different from installing a regular household one. The most important feature is the strictly defined connection of contacts. If for a household outlet there is no difference in how to connect phase and zero, then mixing up the contacts of the power ones, under the hob or for the oven, is fraught with a short circuit or the appearance of a phase on the metal parts of the device, regardless of whether the device is connected to a single or three-phase device. Power sockets are made in such a way that it is impossible to insert the plug into them incorrectly, but you must be careful when connecting.
Single phase sockets
It would seem that the only important thing in them is how to connect the grounding wire - the rest are ordinary phase and zero. In practice, the hob and oven are connected to certain contacts, since many models are designed to operate from one or three phases - you just need to remove or install a special jumper in the right place.
In order not to confuse what and where to connect, there are marks on the body on the inside of the socket and often on its cover indicating which contact should have a phase, where is zero and ground. All you have to do is watch carefully so that each installed wire is in its place.
Three-phase sockets
It is necessary to install and connect a three-phase outlet in the same way as a single-phase one, with the difference that there are some liberties with connecting the phases. If the neutral and ground wires must be installed strictly in their place, then the phases can be attached to the remaining contacts in any order - there is no difference.
Cable and its parameters
Before connecting an electric stove, be sure to check which cable is connected to the installation location of the device. There are increased requirements for supply wires and grounding, as a powerful electric current can burn through weak wiring and cause a fire.
What cable is needed to connect an electric stove? To connect the device to the network, two types are used: a three-core cable with a cross-section of 4 sq. mm from the machine to the power outlet and a flexible cable with a cross-section of 3 by 4 mm (PVS or KG) from the outlet to the stove.
When connecting contacts, the ends of the cable are protected from oxidation by tinning them with a soldering iron and cutting off the excess after giving the desired shape. Instead of tinning, crimping with brass sleeves is also used.
Reference. According to GOST, soldering of wires is used when such a connection is provided for by regulatory documentation. If the RCD and machine terminals are made in the form of sockets, the ends of the wire are not soldered - they are securely crimped.
Instead of soldering, crimping is also used. A stranded flexible wire must first be tinned, then inserted into the machine or crimped, and then inserted.
The power cord from the outlet to the stove is placed in free access at a distance of no more than 2 m from the stove. The wire must be double insulated.
In the case of a three-phase connection, a five-core cable is used (three phases: L1, L2, L3, zero - N and grounding - PE) of 2.5 sq mm cross-section for copper.
Thus, when choosing a cable cross-section for an electric stove with an oven, the cable is guided by the power of the device and the type of connection.
What cross-section of wire is needed for an electric stove with an oven power of 9 kW? The cross-section must be sufficient for the power consumed by the device - 5 * 4 sq. mm of five cores with a cross section of 4 sq. mm each. In a single-phase network, a 3 * 6 sq. cable is used. mm with three cores, each with a cross-section of 6 sq. mm.
How to connect an induction hob: algorithm of actions
Connecting an induction hob resembles a similar process involving an electrical panel.
However, there are some nuances that require consideration. First of all, you need to prepare the tools and materials necessary to install the device. Connecting an induction device begins with wiring an independent power line from the junction box. Next, you should install the socket box. Correct selection of height is very important here.
The next step in connecting an induction hob is connecting the cable from the device to the panel. The connection is made to a separate circuit breaker. Do not also forget about the grounding loop, which is very important in this case.
To seal, you need to glue the seal supplied by the manufacturer
After the socket box is installed, it is necessary to strip the ends of the cables. Next, they need to be inserted into the socket terminals and secured in this position using special clamps. Then you need to install the power socket for the hob in the socket box. The plug of the integrated brewing unit is connected using a similar method.
For a single-phase network, the voltage of which is only 220 V, copper jumpers are used. As an alternative, parts made of brass are suitable. Before connecting the device, it is recommended to draw your own diagram that meets specific conditions. Maintaining paired cables is a mandatory rule when connecting an induction hob. How is the connection process completed?
The three phase lines are connected to each other. The same must be done with the two wires corresponding to zero. Once all cables are connected, you can close the terminal box
It is very important to check the device after finishing work