In a private house, apartment, country house, that is, in domestic conditions, the most common standard single-phase voltage is 220 Volts, which is obtained by connecting the consumer to one phase and a neutral conductor. This voltage is called phase voltage; its generator is mainly a 6 kV/380 V power transformer installed at the distribution substation that supplies the given consumer. Sometimes, especially in a private home, it becomes necessary to start and operate an asynchronous three-phase motor designed for 380 Volts. There are schemes that make it possible to connect this motor to a single-phase 220 V network, but in this case the power of the electrical asynchronous machine is greatly lost. Accordingly, the question arises of how to get 380 Volts from 220 at home, for efficient operation of the electric motor.
How to make 380 V from 220 Volts?
Almost all household electrical appliances are designed for a voltage of 220 V. We, without hesitation, plug them into the outlet and enjoy the operation of the devices.
But sometimes you need to connect an asynchronous motor designed for 380 V. To start it, you can use a special circuit that allows you to connect the electric motor to a single-phase network, but you will have to put up with a loss of power. Is it possible to turn a single-phase network into a three-phase one and how to make 380 from 220 Volts? It turns out there is such a possibility. There are several ways to get 380V from a single-phase network. Below we will show how to do this, but first we will understand how a single-phase network differs from a three-phase one.
Using a special inverter
Modern semiconductor devices make it possible to create high-frequency inverters. There are already many models of welding machines and mini-power plants with a capacity of several kilowatts or more. For such electronic circuits that have a built-in rectifier, it does not matter which output signals are generated. And with the highest quality. Therefore, the simplest option, albeit with a price of approximately $130/kW, is to purchase a special inverter converter.
One of the models of converter of single-phase voltage 220 V to three-phase voltage 380 V
There are many different models of single-phase to three-phase voltage converters on the market. Their price for the same power depends on:
- quality of the output voltage sinusoid;
- the presence of various protections (for example, against load loss in one of the phases, overload of input voltage, output current, over temperature);
- the possibility of smooth acceleration of an asynchronous engine;
- control the speed and direction of rotation of the electric motor shaft;
- remote control capabilities;
- sensor, filters, auxiliary units and accessories.
Which of the listed methods is optimal for the reader is determined by their comparison in specific conditions. The information provided is quite sufficient for this.
Theory
At industrial power plants, generators generate three-phase current and increase its voltage to tens and even hundreds of kilovolts. Electricity is supplied to consumers through power lines. But before this, the current enters the power transformer, which lowers the voltage to 380 V. From the distribution substation, the electricity enters the consumer network.
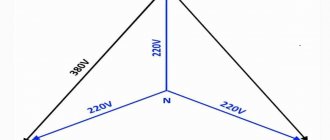
In a three-phase network, the current is supplied in such a way that all three are shifted relative to each other by 120 degrees. The voltage between phases is 380 V, and between phase and neutral 220 V (see Fig. 1). It is this voltage that is supplied to each apartment.
Rice. 1. Three-phase current structure
Since our goal is to obtain 380 V from a single-phase network, we will move on to methods of converting 220 V to 380.
Methods for obtaining 380 Volts from 220
Let's look at the main ways to convert 220 volts into full three-phase current, 380 V:
- using an electronic voltage converter;
- by using a transformer;
- using three phases;
- using a three-phase motor as a generator;
- using a capacitor circuit.
Voltage transformer
The easiest and most reliable way to convert 220 V to 380 is to buy an electronic voltage converter. (see Fig. 2). This device is often called an inverter. The gadget is easy to operate and generates high-quality three-phase current. True, the power of inverters is not very large, but, as a rule, it is enough for most three-phase household appliances.
Rice. 2. Voltage converter
The converter is also good because it has a built-in overload and short circuit protection function. This means that the electric motor will not overheat and will not fail as a result of a short circuit.
High quality current is achieved thanks to the operating principle of the device. The inverter first rectifies single-phase alternating current and then generates three-phase voltage at a given frequency and with a standard phase shift. In this case, the number of phases can be more than 3 (with a corresponding shift angle).
Using a transformer
Using a step-up transformer, you can get any voltage, including 380 V. However, if you are interested in three-phase voltage, then you need a special three-phase transformer. converting single-phase current into three-phase. Such transformers are commercially available.
The transformer windings are connected in star or delta. Single-phase network voltage is supplied to two primary windings directly, and to the third through a capacitor. In this case, the capacitor capacity is selected at the rate of 7 μF for every 100 W of power.
Please note that the rated voltage of the capacitor should not be lower than 400 V. Such a device cannot be turned on without a load.
Although we will obtain the necessary 380 V in this way, there will still be a decrease in the power of the electric motor (if you plan to connect it to a transformer). Accordingly, the engine efficiency will also drop.
Using 3 phases
If you live in an apartment building, then 3 phases are already connected to it, which, in order to optimally distribute the loads, are separated into individual apartments. On each floor there are distribution boards, from where you can bring the missing two phases into the apartment. But this will require permission.
If you wish, you can obtain permission from the energy supply company or coordinate with Energonadzor the installation of three-phase power in your apartment. In this case, you will need to install a three-phase electricity meter.
Using an electric motor
You probably know that the rotor of a conventional three-phase motor, after starting, continues to rotate after one phase is disconnected. It turns out that there is an EMF between the terminal of the disconnected winding and the activated terminals.
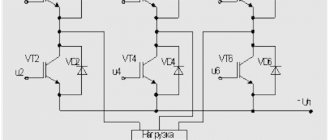
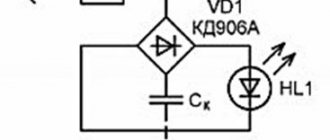
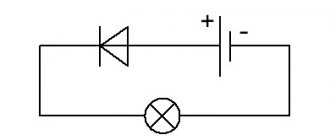
The phase shift between the stator windings depends only on their location. In a three-phase motor, these coils are located at an angle of 120º, which means they provide the same phase shift angle. This circumstance suggests that an asynchronous three-phase motor can be used to obtain 380 volts from a conventional single-phase network. A simple diagram for connecting an electric motor is shown in Figure 3. The capacitor in the diagram is needed only to start the engine. Once launched, you can disable it. We take the capacitor type MBGO, MBGP, MBGT or K42-4, the operating voltage of which must be at least 600 V. You can use the capacitor K42-19, with an operating voltage of at least 250 V.
Security measures
Basic safety rules for energy conversion:
- It is necessary to work only with tested and technically sound devices to avoid short circuit or fire;
- The minimum power in devices must be more than 400 W for correct voltage conversion;
- During the conversion process, you must use a multimeter in order to monitor the result;
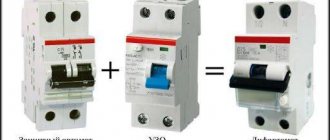
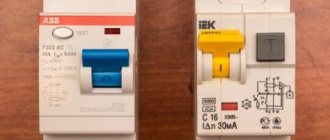
- It is necessary to install a residual current device in the panel so that household appliances do not fail during power surges;
- When working on the connection, all rooms must be de-energized and the panel turned off;
- If there are twists on the wires, they must be replaced so that they do not short out during operation;
- There should be no exposed insulation in the wires, as contact may result in a short circuit or electrical injury.
DIY 220 to 380 converter with capacitor
Attention! Safety rules must not be neglected, otherwise this can lead not only to failure of household appliances, but also to fire, damage to wiring and equipment panels. Such work should only be carried out by an experienced electrician or a person with sufficient knowledge of electrical engineering.
To understand how to take 220 from 380, you need to study the principle of operation of all energy conversion devices. Experienced craftsmen recommend using only transformers or motors with capacitors. Even a beginner can handle these devices, provided all safety rules are followed.
Such work should only be carried out by an experienced electrician or a person with sufficient knowledge of electrical engineering. To understand how to take 220 from 380, you need to study the principle of operation of all energy conversion devices. Experienced craftsmen recommend using only transformers or motors with capacitors. Even a beginner can handle these devices, provided all safety rules are followed.
Residual current device
So, several current conversion techniques were considered. In conclusion, it should be noted that this process is quite complex. In some cases, special permission and permission to work is required. Poorly performed work can lead to short circuits and fires, and damage to the integrity of the insulation. It is believed that 220 V is sufficient to connect standard electrical appliances in apartments.
conclusions
It is possible to obtain 380 volts from a 220 V network in several ways. The most effective way to use an electronic inverter is:
- stable current parameters;
- safe operation;
- ensuring the declared output power;
- compact installation.
All of the above methods of converting 220 Volts to 380 work, therefore they have the right to exist. But you must be prepared for power loss and difficulties in achieving other current parameters, including its frequency characteristics.
Advantages of frequency converter
Universal power frequency converters innovert idd from single-phase current 220 volts to three-phase 380 volts are made on the basis of a simple three-phase electric motor and have a number of advantages:
- Can produce three-phase current 380 volts of voltage.
- An asynchronous motor does not lose power.
- It is used for different types of motors with any characteristics (limited only by network, power no more than 7 kilowatts).
- It has a simple design. People with secondary education can easily do it in a couple of hours. You will need a three-phase asynchronous motor with a power of 4 kilowatts, a capacity of 50 microfarads, pieces of wire, three phases. The electric motor does not need to be rebuilt.
- Power consumption from the network is small. A 4 kW engine takes about 200 watts from the network at idle.
Connecting an electric motor 380V to 220V
The 380V to 220V electric motor is connected via a capacitor. For such a connection, it is necessary to use paper (or starting) capacitors , and it is IMPORTANT that the rated voltage of the capacitor is greater than or equal to the mains voltage . The following brands (types) of capacitors can be used:
MBGO, MBGCh, MBGP, MBGT, MBGV, KBG, BGT, OMBG, K42-4, K42-19, etc.
The capacitance of the capacitor can be determined using the formulas given below, or using an online capacitance calculation.
The first thing you need to do is to correctly connect the leads of the motor windings. As is already known from the article: connection diagrams for electric motor windings electric motor windings can be connected according to a “star” circuit (denoted by Y) or by a “delta” circuit (denoted by Δ), while, as a rule, a “triangle” circuit is used to connect a 220V electric motor "In order to determine the winding connection diagram, you need to look at the passport data of the electric motor on the nameplate attached to it:
The entry: “Δ/ Y 220/380V” means that to connect this electric motor to 220V, you need to connect its windings in a delta , and to connect to 380V, in a star ; read how to do this here .
The second thing you need to decide is how the electric motor will be started, under load (when at the moment of starting the electric motor a load is applied to its shaft and it cannot rotate freely) or without load (when the electric motor shaft rotates freely at the moment of starting, for example, emery , fan, circular saw, etc.).
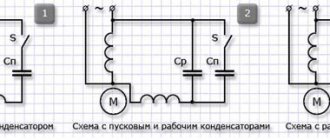
When starting the engine without load, 1 capacitor is used, which is called a working capacitor, and if it is necessary to start the engine under load, in addition to the working one, a second capacitor is additionally used in the circuit, which is called a starting capacitor, it is turned on only at the moment of starting.
Let's look at the connection diagrams for a 380 by 220 electric motor for both cases:
Materials, equipment
Electrical wiring is made closed or open. The first, hidden in the wall, is protected from moisture and mechanical influences, but requires significant physical effort. The second one is laid “without noise and dust,” so the work goes very quickly. Plus - the ability to easily replace elements or modify the circuit.
More often, garage owners choose the second option. It is better for owners of premises in suburban areas to give preference to closed electrical wiring. All electrical equipment is protected using corrugated pipes and cable ducts. The latter are long and narrow plastic trays whose lids snap on.
Cable
For electrical wiring in the garage, choose the following types of cables:
Since, in addition to the cross-section, an important characteristic is the number of conductors, preference is given to VVG products having from 1 to 5 conductors. Their other advantages are a wide temperature range (from -50 to +50°), strength, and moisture resistance.
It is not recommended to use aluminum products: regardless of its cross-section, the cable may break, and in this case the wiring will have to be completely changed sooner or later. With an open installation method, you will need to calculate the number of corrugated pipes or cable ducts, fasteners necessary to fix the wiring.
Automatic protection devices
To prevent overcurrent and short circuits, circuit breakers are installed in the lines. To eliminate the possibility of electric shock to people, special devices are used - RCDs. When developing a wiring diagram for a garage, you must:
How to connect a 380v to 220v electric motor
It happens that a three-phase electric motor falls into your hands. It is from such engines that homemade circular saws, emery machines and various types of shredders are made. In general, a good owner knows what can be done with it. But the trouble is, a three-phase network in private homes is very rare, and it is not always possible to install it. But there are several ways to connect such a motor to a 220V network.
It should be understood that the engine power with such a connection, no matter how hard you try, will drop noticeably. Thus, a delta connection uses only 70% of the engine power, and a star connection uses even less - only 50%.
In this regard, it is desirable to have a more powerful engine.
So, in any connection scheme, capacitors are used. In essence, they act as the third phase. Thanks to it, the phase to which one terminal of the capacitor is connected shifts exactly as much as necessary to simulate the third phase. Moreover, to operate the engine, one capacity is used (working), and for starting, another (starting) is used in parallel with the working one. Although this is not always necessary.
For example, for a lawn mower with a blade in the form of a sharpened blade, a 1 kW unit and only working capacitors will be sufficient, without the need for containers for starting. This is due to the fact that the engine is idling when starting and it has enough energy to spin the shaft.
If you take a circular saw, a hood or another device that puts an initial load on the shaft, then you cannot do without additional banks of capacitors for starting. Someone may say: “why not connect the maximum capacity so that there is not enough?” But it's not that simple. With such a connection, the motor will overheat and may fail. Don't risk your equipment.
Features of garage electrification
The wiring diagram in a garage is not much different from the wiring in an apartment or private house. Therefore, any owner can independently electrify the premises; this task is quite within their capabilities. However, failure to follow the rules during such work is always a potential threat: any electrical wiring must be not only functional, but also absolutely safe.
The most basic option is a new garage, built on a site where there is already a fully landscaped house and, of course, electricity. In this case, the owner will need a minimum of effort: all that remains is to run the cable from the building's distribution board to the garage, and then make the wiring.
If the building is located far away, then two methods need to be considered: connecting from the building or from a power line that is located nearby. The second task is more difficult, since you will have to pull the cable either by air or underground. Both options involve additional costs and the need to install a separate distribution panel.
The electrical wiring diagram in the garage must take into account all possible devices and features of the room itself.
Let's first consider how a three-phase motor is connected to a 380V network.
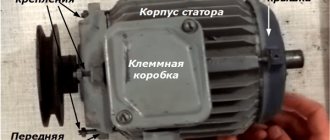
Three-phase motors come with either three terminals - for connection to a star only - or with six connections, with the ability to select a circuit - star or delta. The classic scheme can be seen in the figure. Here in the picture on the left there is a star connection. The photo on the right shows how it looks on a real engine frame.
It can be seen that for this it is necessary to install special jumpers on the required pins. These jumpers come with the motor. In the case where there are only 3 terminals, the star connection is already made inside the motor housing. In this case, it is simply impossible to change the winding connection diagram.
Installation of electrical wiring according to the diagram
Once the electrical wiring diagram in the garage is ready and everything you need has been purchased, you can begin installation. The entire operation can be divided into three stages: preparation, work in the external area and installation of electrical wiring indoors.
Preparation
Before starting work, it is traditional to prepare a set of electrician’s tools. It includes:
You will also need a pencil (painting pad, paint/brush) for marking surfaces, electrical tape and rubber gloves. The handles of all tools must be protected.
Preparatory work largely relates to the premises. This includes marking walls and/or ceilings, cutting channels, drilling holes for sockets, distribution panels. The nests are made with a hammer drill and a diamond bit. Grooves - with a hammer drill, grinder, or a simple "old-fashioned" set - a chisel and a hammer.
All these tools are far from the best choice: it is better to buy or find (rent) a “pro” - a wall chaser, which guarantees speed of work, evenness of the channels, and the absence of menacing clouds of dust in the garage. The depth and width of the grooves, as a rule, does not exceed 20 mm.
The electrical wiring diagram in the garage, when it comes to lighting, is implemented on the ceiling. When the floor is reinforced concrete slabs, the cable is simply laid between them and then covered with a sand-cement mixture or ready-made plaster. In the case of a monolith, the wiring is pulled into a corrugated sleeve. It is fixed with clamps “seated” on self-tapping screws.
Connection diagram for a 3-phase motor in a 220V network connected by a star.
As you can see, the 220V voltage is distributed over two series-connected windings, where each is designed for such a voltage. Therefore, the power is lost almost twice, but such an engine can be used in many low-power devices.
The maximum power of a 380V motor in a 220V network can only be achieved using a delta connection. In addition to minimal power losses, the engine speed also remains unchanged. Here, each winding is used for its own operating voltage, hence the power. The connection diagram for such an electric motor is shown in Figure 1.
Fig. 2 shows a terminal with a 6-pin terminal for delta connection. The three resulting outputs are supplied with: phase, zero and one terminal of the capacitor. The direction of rotation of the electric motor depends on where the second terminal of the capacitor is connected - phase or zero.
In the photo: an electric motor with only working capacitors and no capacitors for starting.
If there is an initial load on the shaft, it is necessary to use capacitors for starting. They are connected in parallel with the workers using a button or switch at the time of switching on. As soon as the engine reaches maximum speed, the starting tanks should be disconnected from the workers. If it is a button, we simply release it, and if it is a switch, then we turn it off. Then the engine uses only working capacitors. Such a connection is shown in the photo.
How to select capacitors for a three-phase motor using it in a 220V network.
The first thing you need to know is that the capacitors must be non-polar, that is, not electrolytic. It is best to use containers of the brand ― MBGO. They were successfully used in the USSR and in our time. They perfectly withstand voltage, current surges and the damaging effects of the environment.
They also have mounting eyes that help you easily place them at any point on the device’s body. Unfortunately, getting them now is problematic, but there are many other modern capacitors that are no worse than the first ones. The main thing is that, as mentioned above, their operating voltage is not less than 400V.
Calculation of capacitors. Working capacitor capacity.
In order not to resort to long formulas and torture your brain, there is a simple way to calculate a capacitor for a 380V motor. For every 100 W (0.1 kW) 7 µF is taken. For example, if the motor is 1 kW, then we calculate it like this: 7 * 10 = 70 µF. It is extremely difficult to find such a capacity in one jar, and it is also expensive. Therefore, most often the containers are connected in parallel, gaining the required capacity.
Starting capacitor capacity.
This value is taken at the rate of 2-3 times greater than the capacity of the working capacitor. It should be taken into account that this capacity is taken in total with the working capacity, that is, for a 1 kW motor, the working capacity is equal to 70 μF, multiply it by 2 or 3, and get the required value. This is 70-140 µF of additional capacitance - starting. At the moment of switching on, it is connected to the working one and the total is 140-210 µF.
Features of the selection of capacitors.
Capacitors, both working and starting, can be selected using the method from smallest to largest. Having thus selected the average capacity, you can gradually add and monitor the operating mode of the engine so that it does not overheat and has enough power on the shaft. Also, the starting capacitor is selected by adding until it starts smoothly without delays.
In addition to the above type of capacitor - MBGO, you can use the type - MBGCh, MBGP, KGB and the like.