Installing a meter on a pole is a new requirement of electricity suppliers for owners of private houses, summer cottages and gardening partnerships. They justify this by the simplicity of checking evidence, without involving residents. However, to remove the meter from the premises, it is necessary to comply with the established rules for their installation. The cost of the service consists of several components.
Electric company employees cannot force the meter to be forcibly installed on a pole. They can only make recommendations, citing the convenience of checking readings and how to combat electricity theft. The last word remains with the owner.
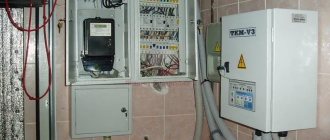
Electric meter on a pole: features of placement and connection
In recent years, the option of installing electric meters on a pole on the street has been very often used.
This is especially convenient for energy supply company employees when taking readings. In a private house, if the meter is located inside, readings can only be taken if its residents are present. When placing the device outdoors, the situation is different. Let's consider some features of the location of the electricity meter on the pole:
- Anyone who has skills in working with electricity has the opportunity to install electricity meters on a street pole. However, the right to connect electricity to the device is limited to representatives of the electricity supplier only.
- If the electricity meter is installed outside the premises, namely on a street pole, by representatives of electrical networks, then there should be no complaints against the consumer. Even before the start of installation work, documents are prepared that indicate the requirements for the installation of a specific metering device and the balance sheet boundary.
- Installation of an electricity meter on a pole is carried out only with the consent of the owner of the meter. In private houses, the balance sheet boundary is not indoors, but outdoors. In this case, the exact location must be determined by the relevant technical documentation.
Installation of the meter on a pole is carried out only if there is consent from the owner of the metering device
Stages of installing meters on a pole: process features
At the first stage of installation, you need to agree on the specific location of the electric meter on a street pole. The main condition is the optimal location of the device from ground level. According to the norm, it should be at a height of 0.8 m to 1.7 m. In some cases, for example, to eliminate the possibility of vandalism, meters are mounted at a height of more than 2.5 m.
This arrangement is not very convenient for the work of power grid employees, since taking readings at the expected height is extremely inconvenient and almost impossible.
The electric meter should be at a height of 0.8 m to 1.7 m
To install the meter on a pole, you must perform the following steps:
- The input line must be de-energized. The organization that supplies the energy agrees to carry out this process.
- Grounding must be provided. This condition is aimed at ensuring that all electrical appliances in the house continue to operate safely.
- Connecting wires. The electrical wires are first connected to the circuit breaker, after which they should be connected to the electric meter.
- Wiring is connected. All wiring in the house is done at the last stage.
- Sealing the device. After installing an electricity meter on a pole, you need to invite energy network workers to seal the device and register it.
Types of electric meters
All electricity meters that are installed to consumers are classified according to the following parameters:
- By connection method;
- By type of measured quantities;
- By type of design.
In apartments and private households, one of the 2 most popular types of electricity meters is now installed, namely:
- Electronic meter – controls consumption at differentiated tariffs (such devices can be monitored from a distance). The popularity of electronic meters is constantly growing.
- Induction meter - measures the electricity consumed by the subscriber using a rotating aluminum disk (this metering device is gradually being forced out of the market, since it is not completely reliable and in some cases allows dishonest subscribers to steal electricity).
Which of the above options is better to install depends both on the characteristics of power consumption by a particular subscriber and on the location of the meter (indoors or outdoors). In this regard, each of the meters has its own advantages and disadvantages.
Electronic meters are becoming increasingly common. The reason for this is their accuracy, as well as ease of use. In addition, if a subscriber wants to take the electricity meter outside, then this can be done with an electronic meter.
When purchasing an electric meter, you should pay attention to the presence of a seal and its integrity (such a seal is installed by the state trustee). Another important point is the timing of the sealing. For a 2-phase meter it should not be more than 2 years, and for a 3-phase meter - 1 year.
Which counter should I choose?
The choice of an electronic or induction meter depends on consumer abilities. First you need to decide on the accuracy class. Class 0.5-1 is much more expensive than 2.0. For domestic needs, accuracy class 2.0 is sufficient. High-class meters are required only in industrial enterprises
To reduce the cost of a metering device, manufacturers install cheaper components, so you should not focus on the cheapest meters, because
Electricity must be metered accurately and without interference.
Popular manufacturers
There are three main manufacturers that produce high-quality electrical energy metering products.
These include:
- Mercury. It produces models such as 201 and 200. Model 200 is intended more for industrial purposes. Mercury earned 9.6 points out of 10 in the rating.
- Energy meter. This manufacturer ranks second with a score of 9.4 out of 10. It produces models 101 and 102. The latest model, 102, is designed for installation in industrial plants.
- Neva. The manufacturer produces model 103 1so, intended for domestic purposes and outdoor installation.
Electronic counter with remote control
When all apartments had induction electric meters, craftsmen invented various ways to change their readings downwards. With the advent of electronic analogs, this became almost impossible.
But on the Internet you can find a large number of offers for the sale of modified meters with remote control. The basic principle of operation of such a meter is that the electricity consumer can independently turn it on and off. At the same time, electricity enters the house, but remains unaccounted for. With such a remote control you can stop the counter completely or slow it down.
Almost any electronic meter can be modified and equipped with a remote control, but in this case the device case is opened, which means the factory seal and sticker with a digital code are broken. Sellers of meters with remote control claim that they are able to restore all this. New seals and stickers do not differ from the factory ones, and a visual check of the meter body before its installation is not able to detect these changes.
Such proposals are especially appealing to those who have moved their electric meter outside. With such a remote control, you can influence its operation. There is an opinion that it is better to place the device outside and stop it as needed from home.
Interfering with the operation of metering devices is illegal. If uncontrolled use of electricity is detected, the supplier company may impose a large fine on the consumer. Therefore, before purchasing meters with remote control, you need to think carefully about everything.
Organizational events
The first step is to conclude an agreement for the supply of electricity to you with a local supplier, with the preparation of documents and an agreement to receive a current account to pay for the energy consumed. The supplying organization issues technical documentation that indicates the type of electric meter, input circuit breaker, cross-section and length of the wire, type or name of the mounting panel or box.
In order for a newly installed electric meter to be allowed into operation, you must write an application yourself at the office of the supplying organization, or send a letter with confirmation of receipt to the address of this company.
The statement states:
- Last name First name Patronymic name of the applicant with whom the contract for the supply of electricity was concluded.
- Number of the contract or personal account opened with the supply company in the name of the applicant.
- The exact address and contact numbers of the applicant.
After installing the electric meter and connecting to the network, commissioning is carried out, which in turn is carried out by drawing up documents by a representative of the electric grid company on the results of inspection and verification of the correctness of the connection diagram. A sample of filling out the act is provided in the photo below:
The act must also indicate:
- meter type and number;
- initial indications;
- number of the installed seal.
From the date specified in the executed documents, payments for consumed electricity will occur. Only representatives of the energy company that supplies you with electricity, with which you have concluded an agreement and opened an account, have the right to draw up a report and seal the electric meter.
This is interesting: How to choose a gasoline motor pump - we outline it in general terms
Recommendations for selection
- Single-phase meters cannot be used for operation in a three-phase voltage network. However, three-phase versions can be connected to a household network, but their high cost makes such a choice economically unprofitable.
- The selection of equipment is always carried out according to the rated frequency and voltage. As a rule, these indicators are 220 V and 380 V, as well as 50 Hz. Other versions can be purchased for industrial use.
- The accuracy class can vary over a fairly wide range. The smaller the error, the more accurate the measurements. For models that are installed in the house, accuracy class is 2.
- Number of tariffs. If electricity is supplied at a constant tariff, then it is economically profitable to purchase single-tariff options.
- Rated and maximum current at load. Do not forget that the measuring device can only function at a certain current strength. Previously, electricity meters with a rated current of up to 5A were installed, however, today powerful household appliances have become widespread, which significantly increases the load on the network.
- If the device will be installed in a special box, then the dimensions of the structure matter.
- The interval between inspections can be 10-16 years with a service life of less than 30 years. It is recommended to select equipment that requires infrequent maintenance.
- The operating temperature range is a fairly important characteristic, especially if the meter will be installed outside the house. Too low a temperature may cause some models to malfunction.
If desired, you can install induction meters, but gradually their number in operation is significantly reduced.
You should use this service and install the appropriate meter. By using different rates, you can significantly reduce your energy costs.
Features of SIP laying
Before installing the SIP wires, prepare the route by clearing the area for installing supports and rolling out the cable. During the preparation process, the old overhead line is removed or a new one is laid next to it, taking into account the dismantling of the old one. Rolling is performed by tightening the wire onto the supports using a special cable. Fastening the SIP to the pole is done using tools and materials for installing the SIP cable.
Band tensioner
- Install supports.
- Special hooks or brackets are mounted on the supports for mounting SIPs.
- Using equipment, the leader cable is unwound and suspended.
- Stretch the SIP onto the supports and tighten it.
- Attach the cable to supports.
- Arrange linear branches from the main line.
Preparing to roll out the cable
Special rollers are installed on the supporting and supporting supports. To do this, belts are used on the load-bearing ones, and hooks on the supporting ones. At a distance of at least the length of the support, a drum with wire is placed on the side of the outermost supporting column of the span prepared for rolling out. On the other side of the span, a drum with a cable leader is installed, the diameter of which is selected taking into account the method of rolling out: manual or mechanized, and the wire used.
Pulling SIP wire onto supports
Important. Before installing the poles, it is necessary to secure all the necessary brackets and hooks to eliminate unnecessary work on the pole in the future.
Pulling the cable leader
A synthetic rope is lifted onto each support. As soon as the leader cable is tucked into the rollers of all supports, it is connected to the SIP cable using a stocking and a swivel. The swivel will not allow the cable to twist while placing the wire on the supports.
Swivel for connecting cable and SIP
Rolling out
By slowly reeling in the leader cable, they begin to lift the SIP onto the supports. As it moves, the wire smoothly rises to the first and subsequent poles, taking the place of the cable on rollers until it stretches over the entire prepared span. During the stretching process, make sure that the cable does not touch the ground or rub against poles and fasteners. You cannot lift SIP from the ground after first rolling it out or rolling it out while moving. But quite often this is what is done.
Attaching to supports
When the cable, together with the cable leader, passes the last support of the span, the SIP is secured in a clamp on the first anchor pole, leaving enough wire for further connection with another span, the supply to the house. Next, the leader cable is disconnected and during installation the wire is secured to all anchor and intermediate supports. The unrolling rollers are removed during the fixation process.
Intermediate clamps for fastening SIP on a pole
Cable termination
Stretch
The tension is carried out using a hand winch. The end of the load-bearing cable core located on the first anchor support in the span is inserted into a special clamp. Using a hand winch, the wire is pulled up, controlling the tension force using a dynamometer. The recommended readings of the measuring device can be found from the SIP installation project or from a special table. It shows the parameters calculated for wires of certain brands, taking into account the length of the anchor span and temperature.
Sip cable tensioner
Supply to the electrified object
The installation of the SIP cable from the pole to the house is carried out by the personnel servicing the overhead line only after all installation work on laying the SIP along the supports has been completed.
The connection is made from a support located near the house. To secure the wire, anchor clamps are used, which are installed on the overhead line pole and the facade of the object connected to the power source. One end of the SIP is clamped to a support, leaving a part for connection to the line. The other end of the SIP is fixed in a clamp on the house after manual tension of an approximate force.
Fastening the SIP cable to a pole
Fastening for SIP cable to a wooden house with transition to VVGng
Features of mounting on a support
If the supply air line is made using bare wire, then the bracket for fixing the anchor clamp is mounted under the crossbeam with insulators. If the line is laid using SIP, then the bracket is fixed under the linear fastenings. To connect to the line, use special clamps for connecting bare wires or piercing clamps for SIP, depending on the type of overhead line.
Approval procedure
Before calling a service company, check to see if the electrical wiring in your home is in good condition. If there are problems, it is better to fix them yourself. If, during the replacement of an energy meter, gross violations are discovered, a fine cannot be avoided.
Having collected all the necessary documents, you need to contact the management company. In the contract, look at who took the meter on balance; it could be the management company or the owner of the house.
The replacement may be planned or unplanned, but in any case it is registered with the energy company, so it is necessary to follow the procedure.
Electric meter in the panel
The application for the need to replace the electric meter is registered with the company; you will have to wait several days until it is entered into the state register. After this, you need to get a certificate from the energy company, according to which you can buy a new meter, or you can buy it from a service company.
In what cases is it necessary to lay a power cable along the facade?
The most obvious option: if an obstacle in the form of a building appears in the path of an overhead power line. It can be bypassed by organizing a route loop in the power line. But it will cost extra design money, and extra wire, not to mention poles. This is how they used to do it (when power lines were built only on bare wires). And since the Rules for the Construction of Electrical Installations (PUE) allow the laying of SIP along the facade (or any other walls), it is possible to draw a power line directly through the obstacle.
But this applies to energy drinks. We are interested in the applicability of the PUE permit for private houses, in the area of responsibility of the owner of the property.
- If the switchboard in the house is located on one side, and the main power line is on the other, it was necessary to install another pole (the length of the overhead line is limited in length). Often right on the site. A self-supporting insulated wire is laid through the air to the nearest point of the building, and to the switchboard it can go along the wall.
- The mounting point from the pole is too high on the wall, and the shield is located at the surface of the ground. It is necessary to organize the so-called cable lowering. The SIP is attached to the wall before entering the panel.
As an alternative, a transition is made from the aluminum conductors of the self-supporting wire to the copper conductors of the input power.
And then the usual cable is laid along the facade.
It would seem easier to tighten the input wire directly into the shield without buying crimp sleeves or piercing couplings. But connecting the SIP to the metering device (meter) is so problematic that it is easier to make the transition and lay the VVG cable along the wall of the building.
Connection nuances and safety precautions
You cannot replace a double-pole circuit breaker with two single-pole circuit breakers. If there are several load lines installed after the electricity meter that have protection, the installation of a common protection device is not required.
The wires are secured so that the insulation does not fall under the pressure plate. Also, the exposed part should not protrude from under it. If the panel does not have a DIN rail, you can purchase and install it yourself.
When connecting electrical devices yourself, you must follow the following safety rules:
- The meter and machines, as well as all electrical equipment, are connected when the voltage is turned off.
- The input power cable is connected last. First, load devices are connected to the panel.
- The devices are connected according to the diagram, taking into account the colors of the wires.
- The diameter of the wire between the input and load circuit breakers must be larger than that of the input and distribution cables throughout the room.
- In order to ensure good contact, the clamping bar should be screwed tightly.
- Copper and aluminum cables are incompatible with each other, because... have different parameters. They cannot be connected to each other.
- In addition to the electric meter, connecting an RCD is a necessary condition for human protection.
Next, electric current is applied. If connected correctly, all devices should work.
Common mistakes
When installing electrics, you need to be extremely careful. A miscalculation can lead to the device burning out or overheating. Some part of the equipment may not turn on, etc.
Most often this happens for the following reasons:
- low-quality components (sockets, switches, etc.);
- incorrect connection;
- incorrect calculation of cable cross-section and machine power;
- poor contact and use of twisting to connect wires;
- lack of power reserve.
To avoid such shortcomings, you should follow the meter installation diagram exactly, taking into account the color of the wires. It is better to buy components from trusted manufacturers.
To correctly determine the cable cross-section, you need to calculate the power of all connected load devices, multiply it by 0.8 (since not all devices will work at the same time) and use the cable characteristics table:
| Cross-section of cable copper cores, mm² | Permissible load current, A | Rated current of the circuit breaker, A | Maximum current of the circuit breaker, A | Maximum power | Load characteristics |
| 1,5 | 19 | 10 | 16 | 4,1 | lighting |
| 2,5 | 27 | 16 | 25 | 5,9 | sockets |
| 4 | 36 | 25 | 32 | 8,3 | water heaters, air conditioners |
| 6 | 48 | 32 | 40 | 10,1 | electric stoves and ovens |
| 10 | 70 | 50 | 63 | 15,4 | input power lines |
Since the number of connected devices may change over time, it is necessary to reserve power.
After connecting the meter correctly (in compliance with all the rules and regulations of the Electrical Installation Code), you need to call representatives of the energy supply organization to put it into operation and seal it. Only after accepting the shield can you use electricity.
SIP supply to the house
If, according to technical conditions, the electricity meter must be installed indoors, then two options can be used to enter the cable into the house. The first method involves the use of self-supporting insulated wires for laying along the facade of the building and entering inside. The second method involves switching from a self-supporting insulated wire to a VVGng cable before entering the house. The disadvantage of the first option is the relatively low fire resistance of the SIP insulating shell, therefore it is not recommended to insert such a cable into wooden buildings. The disadvantage of the second option is the presence of a transition from a cable of one type to a wire of another type. Representatives of the energy supply organization may prohibit the use of connections to the electricity meter.
The problem is solved in the following ways:
- To increase fire safety, SIPs are introduced into a house using special corrugated hoses, metal or plastic pipes, after pre-treating their surface with a material in the form of paint or paste that is resistant to high temperatures and open fire.
- To avoid direct connection of two cables of different types, protection devices are installed on the facade of the building. An insulated wire is connected to them, and from them another cable is pulled along the facade, brought inside the house and connected to an electricity meter. To protect circuit breakers, a special box is used.
Which option to use is decided on the spot. The advantage of the first method is the absence of a protection device that requires additional protection and maintenance. The advantage of the second method is the provision of a high fire resistance without the need to use additional protective materials, as well as the protection of the cable passage through the wall of the house with an automatic switch. In this case, there is no need to install additional protective equipment upstream of the electricity meter.
>
Expert advice
Before starting work, we obtain permission to carry out installation work. Securely secure the appliance and electrical panel. When purchasing wires, you should take into account the cross-section of the supply wire. For work, the best core material is copper. Ensure correct wiring during installation.
Upon completion of the work, it is imperative to receive and seal the metering device. Until this point, payment is taken for each family member. And this is expensive. The most important rule is to turn off the electricity for the entire duration of operation. Do not carry out any work under voltage.
Let your home always be light and joyful.
Removal to the border of the site
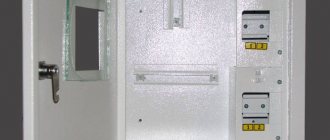
When starting the construction of a cottage or private house, the owner needs electricity. In this case, a metal pole or, as it is also called, a pipe stand, is mounted on the border of the site, on which a sealed box is attached.
A metering device is installed in it. The figure below shows a variant of such a connection.
If it is necessary to connect a constructed building or replace a failed device, then installation can be carried out directly on the fence of a private house. The main condition must be a reliable fence design.
The figure presented above shows an option for placing the box on the fence.
At the same time, the energy sales inspector has the opportunity not only to verify the readings, but also to check the absence of additional connections. If electricity theft is discovered, the owner will face heavy fines.
Removing the old meter
Carefully unscrew the terminals and the meter itself. In this case, you need to be especially careful with the wires coming to the meter if you do not plan to change them. We still have to screw these wires to the new meter.
We see a getinax plate screwed to the wall:
Dismantling the old electricity meter SO-5. The holes are drilled - are they really for ventilation?
Unscrew the plate, carefully pulling out the wires. Before doing this, it is better to mark the wires with a marker, so that later you don’t have to think too much about what comes from where and where. I usually mark the phase in black.
Wires to the electric meter
The wires are a bit short, and we don’t need additional contacts. Therefore, you will need to try to install the meter a few centimeters higher. Under no circumstances do we throw away the old meter (and the seal!); the owner of the apartment will need it when re-issuing documents.
Pole connection
Next, we will consider ways to route the cable from the pole to the home electrical network. The least financially expensive option is to supply electricity by air. According to the requirements of technical regulations, the height at which the cable is inserted into the building should not be lower than 2 meters 75 centimeters.
If this standard is feasible, an RCD (residual current device) is mounted on the wall. A cable is supplied to the RCD from the pole.
If the above height cannot be achieved, a stand made of a metal pipe is installed. The stand can be straight or in the form of a “gander” (curved). Each of the outlets has its own methods of fixation on the wall.
The distance from the pole to the entry point cannot be less than 10 meters. However, if this distance exceeds 11 meters, additional support will be required. In this case, the distance from the support to the power line should be no more than 15 meters.
For lines up to 10 meters long, copper wire with a 4 mm cross-section is used. If the distance is between 10 and 15 meters, a 6 mm section will be needed. For aluminum SIP wires, the diameter must be at least 16 millimeters.
Prices for copper wires are much higher compared to aluminum wires. Usually, in order to save money, aluminum wires are connected from the pole to the house.
The eyeliner procedure can be carried out in two ways. The first option involves tensioning a cable or support wire, to which a conductive cable is then attached. The cable is fixed using clamps.
In the second case, additional supports and fastenings are not used. Protective functions are assigned to insulators made of porcelain, glass or polymers, and to special fittings.
Thanks to the safety margin, the fittings provide reliable cable protection in case of accidents. Under powerful mechanical influences, the reinforcement may be destroyed, but the cable will retain its integrity and continue to perform its function - transporting electricity.
From the building entrance area to the electrical panel, the cable is placed in a metal pipe for safety reasons.
The main disadvantage of the air liner method is its open location, which is associated with the risk of damage. Overhanging wires create difficulties for the access of large vehicles.
Basic rules for connecting a three-phase meter
The meter must be protected from the external environment. To do this, it is placed in a special large metal box. Today the box is made of non-flammable plastic. A prerequisite is tightness and the presence of a window opposite the display so that you can easily control electricity consumption and take readings.
Detailed plan for installing a three-phase meter. Source electroazbuka.ru
The device is fixed at a height of one to one and a half meters. For connection, only copper wiring is used, the cross-section of which must fully correspond to the incoming load.
Small wiring that serves as an adapter from the meter to the switch is chosen with solid, undamaged insulation, straight and without additional branches.
The three-phase meter is installed outdoors. It can be attached to a pole or on the wall of the house. The switches that supply energy to the points of consumption must be placed in another box and located indoors.
See the video for what the meter connection diagram looks like:
Moving meters outside in dacha cooperatives and gardening associations
You can often hear that the chairman of SNT began to demand that electricity meters be moved from houses to the street, citing the fact that this way it is possible to control electricity consumption and fight theft. However, out of the blue the chairman has no right to make such demands.
According to the Federal Law of April 15, 1998 No. 66-FZ, as amended. dated 07/03/2016 “On gardening, gardening and dacha non-profit associations of citizens”, all decisions of this kind are made only by the general meeting. That is, this topic must be put on the agenda in advance, discussed and voted on. If this does not happen, you can safely ignore the requirements. If your neighbors, for the most part, agreed to the demands, you will also have to comply.
How to properly connect a three-phase meter
Three-phase meters differ from single-phase ones in that a larger number of contact wires are connected to them. Each phase and zero has its own input and output, which are placed in pairs. The connection occurs as follows: the first phase has an input numbered 1, the output numbered 2, the second phase 3 and 4 respectively, the third phase 5 and 6, zero 7 and 8.
This is what an installed three-phase meter looks like. Source izhevsk.ru
The connection is carried out in the same way as for a single-phase device, and you should not be confused by a large number of wires. The insulating layer is removed from each wire. The stripped ends are aligned, inserted into the contact recesses and secured with bolts.
After all the wires are connected, a device is installed that automatically protects the estate from short circuits and fires. Both two-core and four-wire cables can be routed from a three-phase meter, so in a private home you can get by with just one control device.
Tips for using the meter
When installing a meter on the street, you need to remember that in this case it may incorrectly indicate the amount of energy consumed. It depends on some factors, namely:
- at low temperature;
- at high humidity;
- when exposed to direct sunlight.
To prevent such errors, you need to choose the right place for installation, place the device in a protective box and be sure to insulate it in the winter.
Meter installed on the street. Source nord-camping.ru
If connected incorrectly, the meter may become self-propelled. To check this, you need to completely turn off all electrical appliances, turn off the lights and machines. Unplug all electrical equipment from outlets. After this, follow the device display. If the counter continues to count and the numbers slowly replace each other, this means that the device is self-propelled. In this case, you must immediately contact the energy supply organization.
To ensure free access for representatives of the energy supply company, it is best to install the control device on the landing. In addition, the company that services your home will be responsible for the safety of the device.
If the question arises which meter is better to choose - single-phase or three-phase, you need to take into account exactly where it will be installed. If this is an apartment, then all the devices that are used easily operate on single-phase power
Accordingly, a single-phase device is installed.
Maintenance of electricity meters. Source grani21.ru
In individual households, three-phase power is often used. But, since a single-phase cable can be run from a three-phase meter, it will be more economical to connect a three-phase device.
About maintenance and malfunctions of the meter in the video:
Which electric meter should I choose for outdoor installation?
There are household electricity meters designed for installation outside the home. They are able to withstand fluctuations in air temperature while maintaining accurate readings.
The devices are single- and multi-tariff, single- or three-phase.
Street meters come in different capacities.
To determine it, you need to calculate the total power of all electrical appliances in the room. If it is below 10 kW, then a 60 A meter is suitable, if more - 100 A. The accuracy class must be at least 2.0.
Devices are now being produced that work well even at low temperatures.
When purchasing an installation box, you need to pay special attention to its tightness. Heating is not required
The moisture-resistant box must have a degree of protection of at least IP53-IP54.
The box should be selected taking into account the design of the meter.
It is necessary to have a window on the door to take readings.
As an outdoor option, a single-phase electric meter is most suitable - for a small house and cottage, or a three-phase one - for a multi-storey cottage with a swimming pool, sauna, etc.
In the latter case, the main thing is to correctly connect the device and evenly distribute the load on the network circuits.
Electric meters have a higher accuracy class than induction meters. The readings remain stable despite temperature changes throughout the entire service life.
When selecting the type of device mounting, it is better to give preference to a DIN rail. It is universal.
Before purchasing, you need to pay attention to the seal and the date of the last verification. Its age should not exceed two years - for single-phase devices and 1 year - for three-phase
Subtleties of the work carried out
When considering how to connect a single-phase electricity meter and automatic machines, it should be taken into account that the measuring equipment must be sealed. If the integrity of the seal is violated, penalties may be imposed. This is due to the fact that when opening the structure of the electric meter, it is possible to change the readings or make a connection directly, bypassing the measuring equipment.
The subtleties of the work carried out include the following points:
- To begin with, select the location where the equipment will be installed. In apartment buildings, as a rule, there is a distribution cabinet on the common staircase landing, where machines with metering meters are installed. Owners of country houses install equipment in a special box, which has high insulating qualities.
- Modular equipment is installed on a DIN rail. If there is no DIN rail, fastening is carried out through other holes in the housing. It is worth considering that the small window intended for reading readings is not designed to withstand serious mechanical stress.
- As a rule, an automatic machine is installed in front of the measuring device. It is intended for carrying out various work with the electrical network indoors, protecting consumers from prolonged overloads and short circuits. Two-pole circuit breakers are suitable for the household power supply network. In addition, other devices designed to distribute electricity and protect people and equipment from short circuits can be installed: circuit breakers, protective shutdown devices.
- When mounted on a DIN rail, all equipment is switched. For this purpose, a wire is used whose diameter corresponds to the calculated maximum load.
- The aluminum wires used are characterized by the fact that they can change their diametrical size at the connection point. This is due to the low melting point and insignificant heating of the core during the passage of electricity. That is why it is recommended that we tighten the screws from time to time. When tightening, do not apply force that could lead to thread breakage.
- After switching all connections, the correctness of the installation work is checked, after which, with the machines turned off, connections are made to the supply network. At this stage, it is not recommended to connect the load to the network.
The final stage is sealing the meter structure.
Installation Rules
In order for the installation of the device on a pole to be correct and of high quality, you must strictly follow the established rules. Remember them so that no troubles arise during the operation of the equipment:
- The meter must be installed in a special cabinet that protects the device from moisture and sudden temperature changes in the off-season.
- The post to which you plan to attach the box must have great strength and rigidity.
- Insulate or secure the cable in areas likely to be damaged.
- Select a type of meter that can be installed outdoors.
- Submit an application to the organization for installation.
On a note! Protecting the meter from weather conditions is extremely important. When moisture gets in or the temperature drops, the device begins to work intermittently. It incorrectly calculates energy consumption, often not in favor of the user.
For each model, temperature conditions for correct operation are indicated in the technical data sheet. A closet is necessary for several reasons:
- protect the device from theft and vandals - choose reliable fastenings and a strong lock;
- moisture protection;
- thermal protection.
When inspecting the pole for equipment installation, check the structure for strength and rigidity. In addition, it must be firmly anchored in the ground.
Procedure
The procedure for replacing an electricity meter has a clear sequence and occurs in several stages.
First you need to fill out an application and call a specialist from the service company. After this, the old device is dismantled and a new device is installed. Then a seal is installed on the meter. At the end, a certificate of replacement of the device is drawn up.
Call a specialist
To initiate the procedure, the owner must contact the company that supplies electricity. To do this you need to fill out an application.
The text of the appeal states the following:
- Name, address of the service company and details of its manager.
- Information about the initiator - last name, first name, patronymic, place of residence, contact phone number, date, month, year of issue, as well as series and passport number, email, if available.
- Reasons for replacing the device.
- Presented technical requirements.
- Installation address.
- List of attached documentation.
- Date of application and signature of the initiator.
When appearing, a person must have with him an identification document, as well as confirmation of the legality of ownership of housing - a certificate of ownership or inheritance, a contract of sale, gift, exchange. The initiator will also have to pay for the work and provide a receipt for the payment of funds.
In practice, the initiator delivers the information package independently. However, the use of a legal representative is permitted. The latter will be required to have a power of attorney in hand, which confirms his authority to complete the transaction. Subsequently, an agreement is concluded between the initiator and the service company to replace the meter. Based on such a document, the parties determine the date for completion of the work.
Installation of the device
At the appointed time, a specialist from the service company must appear at the address where the equipment is installed. He must have a certificate with him, as well as a document confirming the right to carry out this type of work, since the cost of electricity meters is quite high.
The device must be changed using special tools that meet all safety requirements. To begin with, all electricity is turned off and the old meter is dismantled. After this, a new one is installed. Upon completion of the work, the specialist must start it. This is done to ensure that the device is functioning properly.
Sealing
After the device has been installed, it must be sealed.
This is necessary to prevent unauthorized interference in the operation of the meter with the aim of falsifying readings. Only a specialist from the service company can install the seal. This service is provided free of charge. This rule is established by paragraph 8 of the Decree of the Government of the Russian Federation of May 4, 2012 No. 442 “On the functioning of retail electricity markets, complete and (or) partial restrictions on the consumption of electrical energy.”
Drawing up an act
At the end of the procedure, a certificate of replacement of the electric meter is drawn up. The text of the document must indicate:
- Date and place of registration.
- Information about the parties to the transaction - the name of the service company, last name, first name, patronymic of the initiator, addresses of both participants. The details and position of the specialist who performed the replacement are also indicated here.
- Place of installation of the device.
- Technical characteristics of old and new meters.
- The quality of the work performed.
- Functionality check.
- The moment the meter is put into operation.
- Number of the installed seal.
- The customer’s agreement with the indications and performance of the device, as well as responsibility for its safety and integrity.
- Number of copies of the act.
- Signatures of the parties.
As a rule, the act is drawn up in two copies, one for each participant in the transaction and certified by the seal of the service company.
Is it legal to install meters on a pole?
1. Produced, transmitted, consumed energy resources are subject to mandatory accounting using metering devices for energy resources used. The requirements of this article regarding the organization of accounting of energy resources used apply to facilities connected to electrical networks of centralized power supply, and (or) centralized heat supply systems, and (or) centralized water supply systems, and (or) centralized gas supply systems, and (or) other systems of centralized supply of energy resources. If other requirements for the installation sites of metering devices for used energy resources are not established by this Federal Law, other federal laws, other regulatory legal acts of the Russian Federation, compliance with the requirements of this article regarding the organization of metering of used energy resources in relation to facilities connected to centralized supply systems of the relevant energy resource, must ensure accounting of the energy resources used at the points of connection of the specified objects to such systems or in relation to objects used for the transfer of energy resources, at the points of connection of adjacent objects used for the transfer of energy resources and owned by right of ownership or other basis provided for by the legislation of the Russian Federation to different persons. Requirements for the characteristics of metering devices for energy resources used are determined in accordance with the legislation of the Russian Federation. The requirements of this article regarding the organization of accounting of energy resources used do not apply to dilapidated, emergency facilities, facilities subject to demolition or major repairs before January 1, 2013, as well as facilities whose power consumption of electrical energy is less than five kilowatts (in relation to the organization of accounting electrical energy used) or the maximum volume of natural gas consumption of which is less than two cubic meters per hour (in relation to the organization of metering of natural gas used).
In accordance with clause 144 of the Decree of the Government of the Russian Federation dated May 4, 2012 No. 442, metering devices must be installed at the boundaries of the balance sheet of electric power facilities (power receiving devices) of adjacent entities of the retail market - consumers, producers of electrical energy (power) in retail markets, network organizations with the general border of the balance sheet (hereinafter referred to as adjacent entities of the retail market), as well as in other places determined in accordance with this section in compliance with the requirements established by the legislation of the Russian Federation for the installation sites of metering devices.
The boundaries of balance sheet ownership are determined by the act of delimiting the balance sheet ownership of electric networks - a document drawn up in the process of technological connection of energy receiving devices of individuals and legal entities to electric networks.
The limits of responsibility of the parties for the operation of the relevant power receiving devices and power grid facilities are established by the act of delimiting the operational responsibilities of the parties, drawn up by the network organization and the consumer of electric energy transmission services in the process of technological connection of power receiving devices.
Tips and tricks for electricians
It must be remembered that when installing electrical devices and devices that are powered from a 220/380 V network, you must strictly adhere to safety regulations. Under no circumstances should you begin work without first checking that the voltage is turned off and blocking it from turning on without your knowledge. You also need to check whether the insulation of the tool handles is damaged. A thorough visual inspection is sufficient for this. Do not forget to also carefully watch the video clip provided below, which describes in detail all the main points of installing electric meters.
Single-phase meter circuit. Connecting the meter.
The circuit of a single-phase meter is quite simple. In this article I will tell you how to connect a single-phase meter. I have already written before how to choose the right electric meter for a house or apartment. Now, after purchasing a meter, there is a new task - to connect a single-phase meter to the electrical network.
Single-phase meters for houses and apartments are made directly connected, i.e. without additional step-down current transformers.
There is nothing complicated in connecting a single-phase meter; before installing the meter, carefully study the documentation, instructions, examples of connecting single-phase meter circuits, etc. To correctly connect a single-phase meter, we first of all need a single-phase meter circuit, which can be found:
the documentation that comes with the electric meter is a passport, instructions or form for the meter, which indicates all the characteristics, serial number, dates of manufacture and verification of the meter, and of course - the circuit of the single-phase meter itself;
In addition, the set of documents for the meter may also include an operating manual, which will also indicate the diagram of a single-phase meter;
without fail, on the back of the terminal cover of any electric meter, a diagram of a single-phase meter will be printed;
and of course, a diagram of a single-phase meter can be found on the Internet.
Having studied the diagram of a single-phase meter “on paper,” let’s turn directly to the electric meter itself.
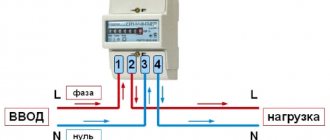
A simple single-phase meter has 4 contacts on the terminal block:
- terminal No. 1 – phase input from an external network (to a house or apartment)
- terminal No. 2 – phase output (inside the house or apartment)
- terminal No. 3 - zero input from an external network (to a house or apartment)
- terminal No. 4 - zero output (inside the house or apartment)
In the same sequence, we connect the wires to the contacts of our single-phase electric meter, not forgetting to turn off the machine, plugs or switch that is installed in front of the single-phase electric meter, if your input cable (wire) immediately goes to the meter, in this case, you need to turn off the line.
When replacing an old single-phase electric meter, if you decide to replace it yourself or call a friend-neighbor who is an electrician, at a minimum, make a call to your network company, management company, HOA and find out what needs to be done to replace the single-phase meter. The main question is who will tear the seal off the old meter.
If you break the seal on an old electric meter and install a new one, and only then notify the power grid, serious problems may arise. You may be accused of stealing electricity (the seal has been broken) and will be subject to a large fine.
How to connect a sip wire from a pole to a house
The beginning of the process of installing a vulture from a pole to a house is to contact Energonadzor, which should issue you specifications. You must measure the required amount of cable yourself and purchase it with a minimum 10% margin.
Cable selection
According to the technical conditions for connecting the sip pipe to the house, you purchase a cable (at the specified value), and for it: a corrugated hose and fastenings. Usually this is SIP-4 (the simplest and inexpensive), you can buy a more expensive wire with a spare cross-section. For a single-phase connection, a 2-core cable is selected, for a three-phase connection, respectively, a 4-wire cable. The phase cross-section must be at least 16 mm² - less is not possible.
Fastenings for SIP
When attaching a vulture to a house by air, there is one golden rule: the distance of the cable from the wall must be at least 6 cm. For fastening, use special hooks (screwed into the wall) or other structures (reinforcement with a curved end, ready-made facade mounting elements). But the main thing when installing a sip cable to the house remains one thing: the distance to the wall. The optimal distance between fastenings on the wall is 60...70 cm. A wedge clamp is installed on the cable section next to the first hook on the wall, which will support the cable. All cables along the wall must be installed in a corrugated hose.
Mounting to a pole (not contacts, but fittings) can be done either by Energonadzor electricians or independently. The mounting kit includes a pole hook, bandage tape and a clamp for it (fixing bracket).
A tension clamp is put on the hook from the pole (they differ in the type of cable being mounted: they can have 2 holes, or they can have 4). The wire is passed into the clamp with a reserve, after which the clamp is tightened. The cable is securely fixed in the structure, after which the clamp is hung on the hook of the pole.
Electricians may need a branch piercing clamp to connect the cable. This node can record the contact between the lead from the main and your input. You do not have the right to install it on the pole yourself.
Meter installation
The meter can be installed on an input pole, on the wall of a house or indoors. The main condition is that there is no break in the supply line: the cable must be solid, twists are not allowed. When installed outdoors, the meter must be placed in a cabinet; the design of the devices must be moisture- and dust-proof.
The best installation option is in the house or on the wall of the house, but only in your yard. Do not agree to install it on a pole: this is more convenient for Energonadzor to check, but then the device is susceptible to vandalism. There is no point in stealing it, but there will always be someone willing to simply open a cabinet or break a device. In this case, you are not responsible, but certain inconveniences will arise in the event of an emergency.
You can connect to the meter yourself, and the Energonadzor inspector is obliged to check it and then seal it.
Summary: what you can do yourself and what you can’t when introducing electricity into the house with a sip wire
Can:
- Attach the sip wire to the wall of the house.
- Install the mounting hardware on the pole.
- Install a cabinet with a meter in your yard or house, and carry out switching in it.
It is prohibited: to connect to the main line yourself.
We connect a single-phase meter
It's time to find out exactly how to install electric meters in the garage with your own hands correctly. Let's start with a single-phase device. First, take a look at the diagram. This shows how to connect the mains voltage directly to the meter terminals. Then the current is distributed to consumers, where it ensures the operation of equipment and lighting fixtures.
As soon as current begins to flow through the wires, the voltage rotates the disk of a mechanical electric meter. The terminal layout is the same, although there are a lot of meter models. The terminals are located on the front panel, at the bottom. The terminals are counted from the left edge, where the very first terminal is located. The input phase wire is connected to the first terminal, and the load wire to the second. He then goes to the RCD with machine guns.
The main machine is installed in front of the meter. It can turn off all devices, regardless of the application. After the electric meter, a common RCD is connected.
Work algorithm
Now let's look at the algorithm for installing and connecting the meter.
First of all, you need to mark the place and install the shield. The optimal height is 1.5 – 1.7 m. The shield must be securely attached to the wall with dowels. The position must be strictly horizontal, which is determined using a level. The meter is mounted in the panel. Automatic machines, buses with fuses, and RCDs are installed nearby. The modules are fixed with special parts. It is advisable to mount the input machine in a special box. Cable and SIP are laid there. The system is then sealed by the electrical service
Note! Only appropriate official structures can perform sealing. This is where you need to go
Otherwise, the seal is considered invalid. Connections are made with insulated copper wire with a minimum diameter of 2.4 mm. It is better to avoid aluminum cable. The ends are trimmed. SIP from the external network is connected to the input machine. True, SIP is carried out by air. If you want to hide the cable underground, you will need VVGng wire. The phase is connected to the upper left contact. Zero is output to the right contact. For modular equipment you need a PV-1 wire. You need special combs for installing jumpers on RCDs and automatic machines. Please note: the terminal in modern models of electric meters has 2 screws. They must be tightened well, since unreliable connections will begin to burn due to stress. Make extra supplies of output and input cables. This will allow you to re-install without problems and additional connections. At the same time, it is impossible to sharply bend the wires, so as not to damage the insulation and the cores themselves.
When the entire circuit is assembled, you need to test it.
Installation procedure
You are allowed to install the meter yourself, but a representative of the resource supplier must connect the device. The work is performed in the following order:
- the input line is de-energized;
- A circuit breaker is installed in front of the device, and an electric meter is connected after it;
- to ensure safe operation of electrical equipment, grounding is installed;
- The home electrical wiring is connected to the output contacts of the product.
When carrying out work, the current regulations must be observed. When the device is mounted and connected, it is subject to sealing and registration.
After installation, a test run is carried out to check that the connection is working properly. Installation and connection are carried out in strict accordance with the requirements of safety regulations.
Is it legal to install an electric meter yourself?
You can handle the installation of an electricity meter on your own without any problems. But before you get down to business, you must obtain permission from the relevant services. To this end, contact your local network provider office and request that you be given a technical assignment to carry out the work. In the same organization you can conclude the necessary agreements.
According to current regulations, a home owner can install electricity meters within the limits of the capacity of his consumer networks. The best location for the electric meter will be a heated distribution meter in the apartment. But in recent years, a requirement has been made that the electric meter be installed only outside the apartment, and representatives of inspection organizations have free access to them.
The local power company may also require that the meter be mounted on an exterior wall of the building. Each of the proposed options can always be discussed individually. Apartment owners are required to place an electricity meter in a common electricity meter on the floor area.
The official version of energy companies, according to which they force home owners to install electricity meters on street poles, is to ensure unhindered access for company employees to the electricity meter for the purpose of taking readings and carrying out routine repairs.
According to the unspoken version, by forcing electricity meters to be installed outside residential premises, energy suppliers are trying by any means to prevent hacking attempts.
It is not necessary to install an electricity meter outside
The chairman of our dacha cooperative demands that the electricity meter be removed from the house and installed on a street pole. This allegedly makes it more convenient for him to check electricity consumption indicators and control unauthorized selection. Is this requirement legal?
The rules for the use of electrical energy for the population, approved by Resolution of the Cabinet of Ministers of Ukraine dated July 26, 1999 No. 1357 (hereinafter referred to as the Rules), do not establish such an obligation. Clause 21 of the Rules determines that meter readings are taken by the consumer, and the energy supplier has the right to control the correctness of meter readings and the execution of payment documents by the consumer. The energy supplier also has the right to independently take readings from the consumer’s metering devices. At the same time, the energy supplier can check the serviceability of metering devices and take readings only in the manner specified in the contract for the supply of electricity (clause 37 of the Rules).
The optionality of installing a meter on the street (or in another place of free access) is evidenced by the fact that the Rules provide for the possibility of installing meters, for example, in apartments, and also by the fact that if there is no access to the meter, a representative of the energy supplier must issue a payment document based on data on actual electricity consumption for the previous period (clause 30 of the Rules).
By the way, it should be noted that according to the Rules, an energy supplier is a participant in the wholesale electricity market of Ukraine, purchasing electricity on this market for the purpose of selling it to consumers, and therefore no garden cooperative can be considered an energy supplier. Accordingly, all the powers of the energy supplier indicated above do not apply to garden cooperatives.
Thus, providing the chairman of the cooperative (or another person) with information about consumed electricity and paying for its consumption through them is a voluntary matter for each member of the cooperative.
In addition, the procedure for installing electricity meters presupposes certain technical conditions. According to clause 10 of the Rules, metering devices must be installed in accordance with the requirements of the rules for the arrangement of electrical installations
The energy supply companies themselves also focus on this in their recommendations on installing meters outside the place of direct consumption of electricity.
Please note that not a single energy supply company has developed a single mandatory act (but only recommendations) on the installation of meters in places where controllers have free access (in particular, on street poles). Thus, according to paragraph
1.5.27 of the Rules for the Arrangement of Electrical Installations, meters must be placed in dry rooms that are easily accessible for maintenance (note - not on the street), in a place sufficiently free for work with a temperature in winter not lower than 00 C. The rules allow the meters to be placed in unheated rooms and corridors , cabinets for external installation (read - on the street), but on the condition that their stationary insulation for the winter period will be provided (insulated cabinets, hoods with heated air inside to ensure positive temperatures, but not higher than +200 C). It is not easy to comply with these restrictions in garden cooperatives. By the way, according to experts, an induction electric meter at negative temperatures inevitably begins, simply put, to “lie.” Moreover, “lying” is not in favor of the subscriber, so the energy company is of little concern about this circumstance, but for the subscriber this is a significant disadvantage
Thus, according to paragraph
1.5.27 of the Rules for the Arrangement of Electrical Installations, meters must be placed in dry rooms that are easily accessible for maintenance (note - not on the street), in a place sufficiently free for work with a temperature in winter not lower than 00 C. The rules allow the meters to be placed in unheated rooms and corridors , cabinets for external installation (read - on the street), but on the condition that their stationary insulation for the winter period will be provided (insulated cabinets, hoods with heated air inside to ensure positive temperatures, but not higher than +200 C)
It is not easy to comply with these restrictions in garden cooperatives. By the way, according to experts, an induction electric meter at negative temperatures inevitably begins, simply put, to “lie.” Moreover, “lying” is not in favor of the subscriber, so the energy company is of little concern about this circumstance, but for the subscriber this is a significant disadvantage.