To watch movies and images, you can create not only a simple projector for your phone with your own hands, advertising logos, but also more complex designs using spare parts from electronics, ready-made control modules. The picture of a primitive homemade product will be a little blurry, but this will be enough for watching feature films. And if you approach the assembly thoroughly and create an LED projector, then in terms of functionality it will be comparable to factory models and at the same time will be several times cheaper.
How the projector works
A projector, like all kinds of sliders and filmoscopes, is based on the laws of optics: when the image carrier interacts with light streams, the rays are refracted, the image is enlarged, and transmitted to the screen.
Methods for making a projector with your own hands can be different, based on the simplest and most basic - passing light through transparent media (magnifying glass, lenses), such devices are called slide projectors. Epiprojectors are based on reflection from opaque objects. Digital multimedia DLP and LCD are of the highest quality, with extremely clear images and accurate color rendition, since they do not use the traditional principle of a magnifying glass. In the first, the flow is reflected from a special chip and created by a logical matrix; in the second, a transparent LCD panel is used, providing a bright, vibrant color range.
It is extremely difficult to assemble a digital multimedia structure on your own - you will need to synchronize the work of mechanics, optics, and digital parts. But it is quite possible to make a projector for a phone (slide projector) or a more complex installation with digital equipment with minimal knowledge of electrical engineering (in the first case it will not be required at all).
How to improve image quality
To increase the quality of the final image, it is necessary to set the maximum settings on the monitor of the product from which the broadcast is carried out, to exclude the penetration of light into the room where the viewing is being organized. The distance to the screen also affects the quality: the closer the homemade projector, the better the quality, but the smaller the picture.
All these parameters are easy to adjust in advance and achieve a quality that will completely satisfy you. There are separate requirements for the screen on which the picture is projected: the canvas must be of high quality, without seams or defects.
Important! If you paint the inside of the box with black paint and eliminate the “leakage” of light through the cracks, the quality of the picture on the screen will significantly improve.
Overhead projector with smartphone
A smartphone and similar gadgets have a small screen. The task is to enlarge its image and broadcast it onto a flat surface. For this purpose, illumination and optics are used: a large magnifying glass, a magnifying glass. In projectors, such elements are called Fresnel lenses. With minor additions, this principle is used in factory products of this type.
What you will need:
- large magnifying glass. The size must correspond to the smartphone screen located at some distance so that the picture is not cropped;
- completely darkened case: cardboard, wooden (plywood) or plastic box. You can make anything out of a box, for example, a shoe box. It’s easy to create an element with internal fasteners (fixing partitions) with your own hands: any material that can be cut and fastened will do;
- if cardboard is used, then the homemade product is assembled using tape, glue, a stationery knife, pencil, ruler, and compass. For wood, you may need a jigsaw, for plastic, it is also a soldering iron or a burning device, the heated tip of which can be used to process the material.
Let's look at the simplest homemade projector from a phone with a cardboard body:
- Place a lens on the front wall of the box and trace it with a pencil. Cut a hole and secure the magnifying glass there with glue; tape can also be used. It is important that these materials do not fall into the gap, which will spoil the image.
- They place the smartphone inside and experimentally correlate the distance to its screen from the lens so that the picture is not cut off by it. At this point, holders - partitions - are glued.
- A hole is made at the back for the charging cable.
- They insert the phone into the seat; first you need to install an application that flips the image 180°, or deactivate auto-rotate and place the smartphone upside down.
- Viewing is organized in a well-shaded place.
Another homemade product
The image translator generally takes five minutes. What you need to make a projector: a battery-powered lamp or flashlight and a magnifying glass for viewing small texts. This is all. The lens is better than the Soviet one and is not very convex.
- How to fix a laptop that won't charge
- Insulated dielectric screwdrivers up to 1000V - tips on how to choose the best manufacturer
Dielectric insulated tool for work - which one is better to choose? Review of manufacturers, photos + video
Hang the screen, as mentioned above, from canvas or whatman paper. Place a stool a couple of meters from the screen.
Place the slides in front of the flashlight; it is advisable that they stand in an inexpensive special stand - it is uncomfortable to hold in your hands. Improve the image quality by moving the stool.
Projector from tablet, laptop
When projecting a device from a laptop, tablet, or even from a small computer monitor (the PC unit itself will stand separately), the image quality will be better, since the screen is larger.
Let's consider a “humane” method in which there is no need to disconnect the matrix with the monitor from the laptop. The inhumane method is the same, but the gadget is disassembled, the specified assembly is pulled out and used as a display, in which case you will need an extension cable to the part with the keyboard (it is sold in electronics stores and on online sites).
You will need the same tools as in the previous case, but you need to take a larger cardboard box or box, for example, from large household appliances. Its front part should fit the size of the matrix, the length should be from 50 cm. The lens should be large. You can buy (Fresnel or regular lenses), remove from a device for reading full-page books or from special lamps that are used in restoration work, in medicine, in laboratories (an illuminated circle with a magnifying glass).
Assembly process step by step:
- For a magnifying glass, make a hole at the end of the box slightly smaller than the lens to securely fasten it.
- Fix the lens with tape, silicone glue, acrylic sealant, epoxy resin. The fit should be tight to prevent light from entering.
- A connector for the laptop screen is cut on the opposite wall. The edges of the cardboard should overlap it for the reason stated above.
- Open the laptop and place it upside down, so that the keyboard is on top of the box and the monitor is placed in the hole for it. Thus, the principle of optical reversal by the lens that we need is simultaneously implemented.
You can adapt the tablet in the same way as described.
Useful tips for craftsmen and subtleties of manufacturing
When creating a projector, everyone thought about its further purpose. It is this factor that should be taken into account when choosing the dimensions of a multimedia device. Check out some helpful tips from users.
- If you plan to often watch movies in semi-darkness and do it with the whole family, you will no longer need a cinema. The only condition is to use not a tablet or a phone, but a larger design, as an option, a laptop.
- To make the projector body, it is better to use decent quality materials, for example, plywood or MDF. Be sure to ensure that the device is stable.
- If you need to broadcast video to a screen located high, it is better to immediately provide a stand. Do not attempt to place books or other objects under the device. Angular radiation must be observed.
- The most effective viewing will be only at night in the absence of artificial lighting.
Dear readers, if you have experience in such operations, be sure to share your ideas.
If you have any questions while reading, ask them in the comments under the article. We always welcome feedback, so we will respond quickly.
Professional projector made of LCD matrix and electronics
Let's make a reservation right away: a homemade LED projector is labor-intensive to assemble, the total cost of parts is approximately $1000, but it is cheaper than factory devices of this level. Spare parts are purchased from well-known Chinese trading platforms.
What you will need:
- LCD monitor (5.98 inches, 2560×1440) with HDMI card ($200). You can take these elements from used devices; any 2K LCD display will do. No backlight module required;
- laser-cut polymer body ($100). Or you can create it yourself with a plywood jigsaw. There are AutoCad drawings online; (https://cdn.instructables.com/ORIG/F4I/A5S0/IN0TKC4U/F4IA5S0IN0TKC4U.zip);
- 2 Fresnel lenses ($50 each): with focal lengths of 120 and 185 mm. The first (F120) is placed between the LED and the LCD matrix, the second (F185) - between it and the projection lens;
- F190 or 200 lens (up to $50);
- one of the following LEDs with a suitable driver (about $50): regular 150 or 128 W with heat sink;
- alternative - 100 W, not particularly bright, but suitable for a dark room;
- the best option, but more expensive (together with the driver $185) is SVT-140 “Luminus Devices”, such elements are used in medical endoscopes;
Next, assembly step by step.
Case design, checking the LCD matrix
The display must be purchased with an HDMI card. Also, for convenience, it is recommended to purchase an FPC extension cable (cable) and a connection board (connector). We check the matrix by pressing and holding the backlight connector. Next, we proceed to constructing the body.
The body is assembled according to the drawings. You will need the usual tools: knife, pencil, ruler, jigsaw, glue. Materials: textolite, plastic, wood. You can adapt an old computer unit, but then you will need tools for working with tin: wire cutters, a hacksaw, a screwdriver and drills for making holes for bolts.
Partitions and holders are made inside. Fresnel lenses are inserted into the seats, then the holder itself is inserted into the clamps of the LCD monitor. In this case, it is necessary to exclude any reflection of light from the partitions, otherwise the image quality will deteriorate. For this purpose, sandpaper the surfaces, making them matte.
Monitor mount
We will dwell on this part in more detail, since careless assembly of the element can ruin the final result. The display is small and has very thin bezels, making it difficult to prevent loss of light output. It is advisable to look at the drawings from the Internet - they take this nuance into account. If we approach this stage without proper care, we will get a picture with noticeable white stripes along the edges.
If you use a standard drawing, it provides for the presence of 3 parts of the holder: 2 for permanent fixation and 1 for temporary fixation. It is advisable not to touch the display while working: the prints will be enlarged in the final image. The problem is eliminated if you perform the assembly wearing medical gloves.
LED Installation
The LED is attached to a heat sink, which is purchased as a kit or separately, and you can also use computer radiators from the processor air cooling system. Next, we build a holder for this structure using the same drawings from the network. The diode is screwed with M3 screws to the radiator, the landing pad is lubricated with thermal paste. Then a condenser lens is installed in front of the light source, usually a mount is included in its kit.
Wiring, cooling
Our example uses a standard drawing that provides mounting locations for fans. We install them there, you can include a rotation speed regulator in the circuit (a 10 kOhm trimming resistor, soldered to one of the wires), there are also boards with it and a temperature sensor: by reducing the speed, the noise of the structure will decrease.
Connection rules:
- voltage from the 220 V home network is supplied to the power supply for the LED, coolers and HDMI chip via USB;
- The power supply produces direct current, it is connected to the diode and the impeller. Separate power supplies can be used. The unit with the USB connector will be connected to the HDMI chip;
- install 2 switches - for the LED, display, coolers - which will allow the device to cool for some time after turning off;
- The LED gets very hot, the matrix gets less hot, but it also gets hot, and the heat generated is intense; black spots may appear on the monitor due to overheating, and it will fail. Therefore, it is necessary to use several fans, at least 2 of different sizes, correctly placing them for blowing and blowing;
- the screen is placed next to the light source (gap 110–130 mm).
Checking the arrangement of elements
Check the wires according to the photos attached to the article. Then analyze how the LED is positioned - with the correct gap between it and the rear lens (F120), the light illuminates the entire active area of the screen. The grooved sides of the two lenses should be facing towards the monitor.
Other combinations of lenses are also used, but the one described is optimal for a 5-6-inch display. You can also take optics with a long focal length - F120/F220 with projection F230 - as the focal length decreases, the image increases. In our case, if we use the CBT-140 diode, the video projector will provide clarity at which you can see the pixels on the projection surface. And focusing will be superior to some factory units.
Recommendations
The distance between the optics is selected by trial and error, tips:
- between the display and the magnifying glass 15–20 mm;
- an excessively small gap can lead to overheating and failure of the LCD matrix;
- if the gap is too large, the picture will be blurry;
- between the rear optics (F120) and the light source the gap is 90% of the focal length of the lens. Move the magnifying glass +/- this amount to find the best ratio;
- between the projection magnifier and the front one (F185) the gap is approximately equal to the focal gap of the first (in this case 190 mm is suitable);
- Focus is adjusted by moving the projection lens closer/farther away. The image is clearer when the LED's emitting area is more focused. Also for this reason, you should not save on cheap such elements; it is better to choose SVT-140.
What is needed for this
First, let's look at the operating principle of such equipment. The main structural elements are lenses and lens. The quality of light flux distribution on a large screen depends on them. The main thing is to set the correct angle. In the absence of initial technical data regarding the lens and lenses, the correct distance between elements can be established by trial and error.
The image source in our case is a liquid crystal matrix. You can use both a part from a monitor and a smartphone. In the first case, the image will be much sharper and better overall because the area of the sensor is critical. The best option is FullHD scanning - 1920 x 1080 pixels.
The brightness of the projection lamp plays a significant role. The brighter it is, the larger the output area it covers. Simply put, it is a measure of the final screen size.
Wi-Fi controlled option
The picture below shows how to assemble an LED projector with your own hands at home and what you will need for this.
The body is created as described above. Let us illustrate further:
How to turn a cardboard box into a cheap homemade smartphone projector.
Smartphones and tablets are great for watching movies and videos when you're away from home, but the screen at home is too small. There are quite a few projectors on the market that work with mobile devices, but they can get expensive. The good news is that it's quite easy to hack your own projector with items you probably already have. This homemade projector is made from a cardboard shoebox, a magnifying glass, a paper clip, and duct tape.
Start by tracing the outline of your magnifying glass at one end of the box. Use a knife to cut the line and then make a small hole at the other end for the power cord.
Next, use electrical tape to secure the magnifying glass to the box. Make sure you get a tight fit so you don't lose any light. Now take a paperclip and bend it into a small phone stand. Here's the tutorial where they got the idea, for reference. You'll have to experiment a bit to figure out the best way to position the stand (this will also depend on the power of your magnifying glass).
Your projector is now complete. To see the image correctly, since it will appear upside down when passing through the lens, you will need to flip the screen.
On an iPhone, you can do this by going to Settings -> General -> Accessibility, then toggle Assistive Touch to ON. Click on the small white circle to open the menu, then go to Device -> Rotate Screen.
Projector from a slide device
If you have a used or unnecessary device for slides, you can use it for a projector. Moreover, in the future it will be possible to assemble it back. No manipulations with the optics are required - everything is already ready. The device displays pictures in A4 format, that is, it is advisable to choose a larger display, from a tablet or laptop.
Actions:
- We disconnect the matrix from the tablet and the board.
- We place the display on the glass, the gap is 4–6 mm.
- We install a small cooler on the side, you can glue it with double-sided tape.
- We connect the tablet to the network.
If you are using a laptop and decide to install the keyboard unit separately (this will make it convenient to operate), then you will need an extension cable. But you can also try the “humane” method: open the gadget and place the screen on the glass of the slidescope, and hang the part with the keyboard to the side or leave it in a horizontal position. But then you can control it without removing the gadget only with a mouse, however, this is quite enough for viewing videos and pictures.
So, let's create something like an F-1 filmoscope
In it you can demonstrate frames from color photographic film, moving from top to bottom with rubber rollers along the edges with a protruding handle from half a spool of thread.
A metal sheet of thin steel is required, since the thing is not done in one session.
Three main parts are cut out of it (see on the website):
Main building. In the horizontal part, place a step-down transformer (12 V) - any small household one - and a switch.
Vertical part. This is a stand on which a box is hung from behind, the front and bottom parts of which are cut off, and the top is hinged on the stand.
In this box, a 12-volt auto lamp with 21 candles is mounted in a socket opposite the frame window (in F-1 there was a six-volt power supply and the transformer was lowered to this level).
Make holes in this cover to allow heat from the lamp to escape, but so that your viewers are not disturbed by random light.
A single-lens tube with a focus of 62.4 mm and a two-lens condenser behind the frame is attached to the front stand. The tube can be installed from a durable cardboard tube with a slot for moving the lens.
The maximum distance to the screen is three meters, the screen is 70x100 mm.
Gobo projector
The principle of a gobo projector is simplistically similar to that of laser pointers. This device is often used to broadcast advertising logos, text and pictures.
Used:
- a regular LED lighting spotlight, a wire with a switch is soldered to it;
- Instead of the protective glass of the light bulb, there is a lens. For experiments, as well as for the lens, you may need several varieties of them. Magnifiers can be bought in specialized optical stores, on the Internet;
- a piece of plastic sewer pipe with a coupling;
- heat-resistant sealant (for convenience, it is drawn into a syringe);
- stencils, you can order them from a printing company or you can make them yourself, print them and cut them out of plain paper.
Assembly:
- The light bulb is removed from the reflector and a 100 W LED is installed in its place.
- A wire with a switch is soldered to the lamp.
- A magnifying glass (thick, convex 10x) is inserted into the reflector, everything is secured with sealant (red mixture in the photo) - this is a condenser. On top is another lens, but thinner, for example, 3 or 4 times.
- One or two lenses are also selected as a lens, for example, 50 mm with 5x magnification (if you use two, the picture will be 2 times larger).
- We make a lens from a coupling and a pipe, selecting the diameter of the latter to match the lenses.
Calculation of parameters and implementation features
To assemble the system, you need to understand the principle of operation of the device. It should be noted right away that it is impossible to make a projector that will be similar in characteristics and capabilities to ready-made models. These are complex devices consisting of many components and providing ideal image quality. But you can get a working system that will give a good picture without any problems.
Most often, a smartphone, tablet or laptop is used as an image source.
All options are suitable, but it is important to understand that the larger the size of the base image, the higher the quality of the image on the wall or screen. It is necessary to determine the type of device used in advance, since the choice of the necessary materials depends on this
You will need the following:
A box of suitable size is used as a base.
It is important that it is durable and does not let light inside. It is best to take a ready-made one made from hard cardboard.
But if you don’t have a suitable solution at hand, you can do it yourself; for this you will need to collect cardboards of a suitable size and assemble a body from them. To enlarge the image in a homemade video projector, a magnifying glass or Fresnel lens is used. The size is selected depending on what will be used to transmit the picture. You can purchase a finished product or use what you have on hand. It is easy to adjust to the size by choosing the distance from the screen to the magnifying glass. If you don't have a magnifying glass, a projector used to show slides will do. Most often they are in A4 format, but can be of other sizes. In this case, you need to select a tablet screen that is comparable in size. You can purchase an inexpensive used model, the main thing is that it has a working screen; the case may be damaged, but you won’t need it anyway. To connect the elements, use any suitable glue. You can also use a glue gun with rods; it is convenient because the glue hardens in seconds, which speeds up the work significantly. You may also need adhesive tape or tape; it is better to have different options on hand, since you will have to choose the optimal one depending on the situation. Sometimes large paper clips or other similar devices are used to install the smartphone and secure it. And for marking and measurements it is better to take a tape measure and a pencil.
Such a simple set is necessary for making a film projector.Enjoy watching!
That's it, now the entire process of assembling and preparing the projector is completed. All that remains is to choose your favorite movie, get together with a friendly group and enjoy the movie. Let the movie show bring you a lot of joy, and let the assembly of a simple device from a shoe box go quickly and efficiently.
For additional information on assembling your own projector, we suggest you watch the following video:
Take it for yourself and tell your friends!
A multimedia projector is a very useful thing. With its help, you can enlarge the image many times from a tablet, laptop or other gadget, watch photos, videos, a movie or a football match.
However, the cost of modern projectors is high enough that everyone can afford to have such a device at home. And for those who do not have enough money, but want to have an interesting and fashionable new product, a life hack comes to the rescue - a master class on how to make a multimedia projector with your own hands. Let's find out how to do this and what is needed for this.
Screen material
When making your own projection screen, you can use a variety of materials, including:
- sheet of plasterboard or foamed PVC;
- Fiberboard or cardboard;
- thick linen fabric;
- vinyl cloth;
- raincoat fabric (raincoat fabric);
- fabric or PVC film for suspended ceilings;
- synthetic material for advertising banners.
Each of these materials has advantages and disadvantages, so the projector owner will have to decide what to make the screen from independently, based on his preferences.
Banner fabric
For making a screen, banner fabric is best suited - a synthetic material with high strength and excellent reflective properties.
PVC film
A good option for projection screens in terms of price/quality ratio is synthetic fabric or PVC film, which are used in the design of suspended ceilings. The only condition is that the material must have a matte texture. Then there will be no glare on the canvas, typical of glossy coatings. In addition, it is desirable to have a lining made of black polyethylene film - this will reduce the transparency of the material.
Raincoat and vinyl fabric
Good screens are made from “raincoat” - a durable material that is not afraid of strong tension. In addition, such a fabric will be characterized by increased moisture resistance and immunity to contamination that occurs when you touch it with your hands.
Screens made from vinyl fabric are not inferior in quality to the above materials.
However, it stretches easily and breaks if handled carelessly.
Thick linen fabric
Often, thick linen fabric, for example, a regular new sheet, is used as a material for making projection screens at home. It is stretched over the frame, and to increase light reflectivity, it is painted with white matte paint and/or supplemented with a backing made of thick black polyethylene film.
Drywall
Cheap structures that can provide minimal projection quality can be made from plasterboard, fiberboard or cardboard. To do this, just cut out a rectangle of the required size, paint it with white matte paint and fix it directly on the wall or on a special frame. These materials are used in cases where it is necessary to quickly organize viewing, and the quality of the image is not particularly important.
History of creation
The overhead projector has a rich history. In the second half of the 20th century, this device became especially popular. Many high-quality models were produced in the USSR. In those days, such an optical-mechanical device was present in almost every home where there were children. Using a similar technique, pictures with inscriptions placed at the bottom were projected onto the wall.
The most advanced devices were supplemented with sound in the form of a gramophone record. The signal for the need to change frames was given by a characteristic squeak, which was recorded on the record.
Over the years, there was an inevitable modernization of this device. Modern overhead projectors differ in many ways from those that were popular during the Soviet era. Today's devices are represented by ultra-thin, narrow and compact models, many of which can easily fit in the palm of your hand. The equipment is designed to synchronize with other multifunctional devices, such as smartphones or laptops.
Method No. 3
The easiest and most affordable way to make a projector with your own hands. Such a device, however, is only suitable for viewing slides. The projector can be constructed using a bright lamp or flashlight and a reading magnifier, preferably not too convex. Magnifying glasses in many houses remain from Soviet times, but the lamp is not a problem at all.
A stool is placed at a distance of two meters from an improvised screen (white sheet or wall). A light source (lamp or flashlight) is placed on it. You need to install slides in front of the flashlight - for this you can come up with a stand or just hold the slides with your hand. A magnifying glass is used to enlarge the picture. In fact, the slides should be between the flashlight and the magnifying glass.
The size and clarity of the picture can be adjusted by changing the distance between the improvised projector and the screen.
Of course, this design will not replace a multimedia projector, but it will allow you to spend time with your children with benefit and interest. Viewing slides with Soviet fairy tales through a homemade projector will leave children with an unforgettable experience.
When deciding how to make a projector with your own hands in the most appropriate way, you need to decide on its subsequent purpose:
- if you want to amuse and surprise children, and at the same time share the basics of knowledge in the field of optics, then the first or third method will do;
- if the task is to obtain a picture that is as close as possible in quality and functionality to a multimedia image, then the choice should be made on the second method.
Having decided on the type of device and having collected all the necessary components, you can safely begin the process of assembling it. By following all the rules and putting in a little effort, you will definitely achieve your goals.
Join the discussion! We would be interested to know your point of view, leave your opinion
Spectroscope
A spectroscope is used to observe spectra.
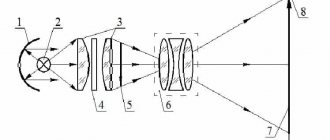
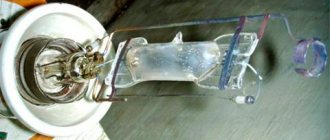
The most common prismatic spectroscope consists of two tubes, between which a triangular prism is placed.
In pipe A, called a collimator, there is a narrow slit, the width of which can be adjusted by turning a screw. A light source is placed in front of the slit, the spectrum of which must be examined. The slit is located in the focal plane of the collimator, and therefore the light rays exit the collimator in the form of a parallel beam. After passing through the prism, the light rays are directed into tube B, through which the spectrum is observed. If a spectroscope is intended for measurements, then an image of a scale with divisions is superimposed on the image of the spectrum using a special device, which allows you to accurately determine the position of the color lines in the spectrum.
When examining a spectrum, it is often more appropriate to photograph it and then study it using a microscope.
A device for photographing spectra is called a spectrograph.
The spectrograph diagram is shown in the figure.
The radiation spectrum is focused using lens L2 onto frosted glass AB, which is replaced with a photographic plate when photographing.
We design on the wall
But the spirit of ancient childhood lives in us, which our children and grandchildren should feel. It is for them and with their help that such pleasant crafts are created. We advise you to look at the examples in the photo of a homemade projector.
And now a mini-excursion into history. At the end of the fifties, when television was just emerging in the USSR, simple and inexpensive devices called slide projectors were on sale.
The best of them - FDG-49 - still evokes nostalgia for many, remaining the most expensive on the Internet.
Why the prefix “dia” was not explained then; today a slide projector is referred to as a slide show with captions. “Dia” is translated from Greek as “movement through” or “from beginning to end.”
They were intended for displaying, on a fairly large space of white cloth or a whitewashed wall, photographic films for sale with frames of fairy tales, something frozen, like a cartoon, with short explanatory texts.
Another way...
For those who do not sit still and want to learn several methods, we offer another option.
So, a DIY floor lamp:
- We form the stand from plaster. For this purpose, we take 3 - 5 kg of dry mixture, depending on the desired size.
- For the leg we choose an aluminum tube.
- We bend the mesh for the frame with a width equivalent to the height of the lampshade. We connect the edges with wire so that the required diameter is obtained.
- In order to create a stronger frame, we run aluminum tape along the entire circumference.
- We design the frame based on our imagination. This can be a macrame technique, or you can add black or silver wire to the frame and you will get a high-tech style lamp.
Tonal Contrast
Colors set the mood and affect the viewer's emotions. But colors alone are not enough to accurately convey the shape of objects and their boundaries. That is why learning to draw begins with working with a simple pencil. And even for painting and color graphics, many sketch in monochrome to maintain tonal contrast (between dark and light) in a full-color image.
Many of the great artists began their work with black and white sketches - for example, Rubens worked this way.
Let's look at the tonal contrast in Titian's painting: on the left is the original, and on the right is an edited version in which the background is lightened.
In the original, the eye is drawn to Magdalene, who is in the center of the composition. Without tonal contrast, the boundaries of the figure are difficult to distinguish, despite the fact that color contrast remains: the cool blue color of the background is combined with the warm shades of skin and clothing.
Impressionist artists deliberately avoided the contrast of light and dark. Due to the color spots similar in tone, a fuzzy, seemingly vibrating image is created.
On the original, due to the colors being similar in tone, air movement is felt. In monochrome, all the charm of impressionism is lost.
This impressionist approach is not suitable for corporate identity design. Firstly, the logo must be readable on black and white documents
Secondly, it is important to highlight the sign so that even at a quick glance it is recognizable. The Magdalene in Titian’s canvas can be seen immediately and from afar, and in the pond in Monet’s painting you have to peer for a long time to see the water lilies
Contrast in tone is essential to creating a good logo, and it's helpful to start with black and white sketches. By the way, any of the well-known brand marks remains clear and recognizable in monochrome.
The images on the right are easily recognizable
If you reduce the contrast between dark and light, it will look like this:
The Tik Tok and Shell logos blur into one blur, while Starbucks and Slack are barely visible against the white background.
Theoretically, the lack of tonal contrast in advertising design can be assumed to be an intentional technique. But the result will most likely be a picture in which nothing will be clear. In this sense, conventional advertisements are structured in much the same way as classical painting.
The compositional center here is light in relation to the background and due to this it immediately catches the eye. The word “advance” is, on the contrary, dark on light and is also easy to read.
In some advertising photographs, the boundaries of light and shadow may be less distinct, but noticeable if you just squint.