An ordinary toaster, which does not have additional functions, can be classified as a household appliance that does not cause much trouble in the kitchen space. It's simple: the frying program can be set with a timer, and the operation of the device will begin from the moment the pieces of bread are dropped into it.
Classic toaster
Bread slices are baked under the influence of infrared radiation until the timer turns off. However, the basic principle of operation does not mean that the toaster will work for many years without breakdowns. Still, many problems can be fixed on your own. The material will discuss options for eliminating simple breakdowns at home, without turning to specialists. By following the steps in the description of disassembling the device, you can repair the toaster yourself.
Toaster design and device
The device for frying bread slices consists of several parts:
- metal or plastic case;
- heating coils fixed from the inside;
- a movable basket with a spring into which pieces of bread are dropped;
- a lever that lowers the compartment with toast and simultaneously turns on the heating;
- an electric magnet that is responsible for holding the basket in the lowered position during cooking.
In addition, the toaster circuit has a circuit breaker responsible for forcing the device to stop. Modern models have additional electronic components - a timer, heating regulator and buttons for switching between modes.
Many toasters have a crumb tray, but pieces of bread still accumulate inside.
Should I fix it myself or call a professional?
If the problem is not crumbs stuck inside the device, you should definitely not tamper with electrical equipment. Firstly, you can unknowingly cause even greater harm to the equipment. Secondly, if you break the device, there is a high risk of causing a short circuit. Electrical appliances should be handled by professionals with appropriate education. True, repairs in service workshops are expensive, and private craftsmen are not responsible for the work performed. The issue of the feasibility of repairs is doubly acute if the toaster has been in use for many years. It is possible that breakdown will follow breakdown, so it is easier and cheaper to buy new equipment.
How does a toaster work?
The algorithm for frying bread in a toaster is as follows:
- the user places the slices in the corresponding compartments of the device and presses the lever;
- the basket is lowered down, at the same time the plastic wedge is brought into working position;
- the spring contacts close under the influence of the wedge and turn on the electromagnet and heaters through the control circuit;
- the timer starts the countdown;
- the device warms up the bread until the electronic mechanism is activated;
- the timer opens the circuit, after which the magnet stops holding the basket;
- the spring returns the bread compartments to the upper position;
- heating coils and control circuit are disabled.
Although the operating principle of a toaster and its design are very simple, any element of the system can fail. In this case, the user will encounter one of the many problems with the operation of the device.
Interruptions in the operation of mechanical parts
Problems with the lifting mechanism
They may be caused by the toast being too thick, which interferes with the movement of the holders. By the way, too thin toasts can also interfere with the movement of the holders. Such toasts can become deformed and jam the mechanism.
The most common cause of failure of mechanical things is the same bread crumbs. They can stick to the guides or directly into the mechanism itself.
To gain access to the mechanical components of the toaster, you will have to disassemble it. There are models in which it is enough to remove the side panels to gain access to the mechanisms, but in some products you can remove the entire body. Therefore, before you begin disassembling, you need to carefully inspect the case and understand how to disassemble it. By the way, the slider handle that controls the movement of the toast holders can be removed either separately or together with the casing, this also applies to the button that gives the command for frying.
Once the interference has been eliminated and the mechanism is working without interruption, the toaster can be assembled.
Possible toaster breakdowns
Toaster malfunctions can be either electronic or mechanical in nature. You can often repair the device yourself, without the help of specialists.
The toaster does not lock in the down position
One of the most common faults is the basket not being secured. In such cases, the toaster works, but the pressure spring does not hold the bread.
Most often, the device can be repaired with simple cleaning. Most likely, bread crumbs got stuck in the grooves of the lever or got on the magnetic plate that holds the basket in the down position. For repair you need:
- unplug the toaster and wait for it to cool down;
- pull out and release the tray designed specifically for collecting crumbs;
- turn the toaster upside down and shake it thoroughly;
- disassemble the unit and manually remove accumulated crumbs from the spaces between the internal parts.
Then they reassemble and put the device back into operation. If the lever is held in the down position, then the device has been repaired.
If the lever does not lock, you can simply lower it and hold it manually as a temporary measure.
The toaster does not turn off automatically
A less common problem is that the toaster does not eject bread. In this case, heating occurs in the usual way, but the lever does not return from the lower position. Frying takes longer than the allotted time, and the slices literally burn to charcoal.
Typically the problem that needs to be fixed is a faulty timer or thermostat. These elements are responsible for the reverse operation of the basket latch at the right time. If the bimetallic plate of the thermostat does not correctly determine the temperature inside the appliance, or the timer does not send a shutdown signal on time, the toaster must be sent for service. It will not be possible to repair it at home without special skills, since the control circuit needs to be repaired.
Advice! If the toaster breaks down and does not turn off, and you cannot urgently take it to service, you can only stop the device manually using the “Stop” button.
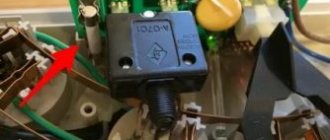
If the toaster does not turn off even through the “Stop” button, the contacts with the electronic board may be broken
Toaster won't turn on
In some cases, the toaster simply refuses to start working. Typically, failure is caused by two reasons:
- The device is not receiving power. Before you try to fix the toaster, you need to make sure that it is basically plugged into the outlet. Then you should inspect its wire and plug for twisted, frayed and darkened areas. If the cable is damaged, it can be repaired by replacing it - to do this, you need to remove the device case and solder a new wire to the control board.
- The contacts on the electronic circuit responsible for putting the device into operation have oxidized or burned. To repair a toaster, you also need to remove the casing and carefully inspect the control board. Darkened elements are carefully cleaned with fine sandpaper.
Attention! Any work on the toaster's electronic board is carried out only after disconnecting the device from the network.
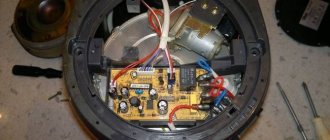
When disassembling a non-working toaster, first of all, inspect the connections and check that they are not broken.
The coil does not heat up
If the spiral malfunctions, the toaster successfully fixes the basket when turned on. But at the same time, the heating elements inside remain cold and do not begin to glow even after several minutes.
If the spirals in the device are of the infrared type, in the form of glass tubes, then you cannot repair them with your own hands. The device must be taken to service so as not to break completely.
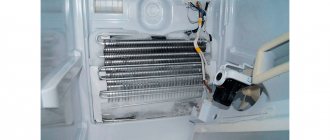
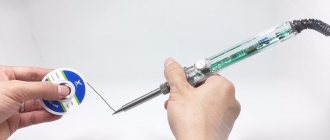
If the heater is wire, then the damage can be repaired at home. To do this you need:
- disassemble the unit, remove the mica plate with the nichrome wire wound on it and visually find the location of the break or short circuit;
- if the heater looks completely fine, use a multimeter and measure the resistance;
- Having identified the problem area, straighten the torn sections of the wire;
- twist the ends and apply a kind of bandage made of thin copper cable, crimping it with side cutters.
Important! It is quite possible to repair a wire heater, but it may soon fail again. In this case, you will need to completely replace the elements.
Burnt-out areas of heating elements can be easily identified by the presence of blackening and deformation
The roasting regulator does not turn on
The frying regulator in the toaster is responsible for the degree of heating of the bread, as well as for automatically turning off the device. The element can be mechanical or electronic:
- The mechanical regulator is a bimetallic plate. When heated, it bends and, after reaching a given temperature, opens the contacts. Most often, the element breaks due to blockage. To repair the regulator, you need to remove the casing and manually free the mechanism from accumulated crumbs.
- An electronic regulator in the form of a resistor is located on the control board of the device and connected to the handle on the body. If the handle does not turn or is too tight, you can dismantle the device casing and clean the chip from bread crumbs.
Attention! A bimetallic plate of a mechanical type may simply bend if the device is used intensively. It cannot be repaired; the toaster must be sent to service to replace the regulator.
If the regulator does not work due to poor contact with the board, to fix it, you need to resolder the wires
The toast is not cooked through
A toaster may work properly, but it may not heat the bread well and not provide a golden crust. The malfunction can be caused by several reasons:
- insufficient heating temperature; to correct the problem, it is enough to set the frying regulator correctly;
- the basket is distorted due to clogging of the internal mechanisms; in order to repair the device, you need to disassemble it and free it from crumbs, returning the holders, springs and levers to free movement.
It happens that the failure is caused by a timer error and the device turns off too early. It is difficult to repair such a toaster; to correct the error, you need to send it for repair, since the electronic board needs to be configured.
Toast may not be cooked through due to the lever not being lowered completely.
The toast is burning
Toaster malfunctions may cause pieces of bread to become overcooked. The main reasons are the same as for insufficient heating of the slices:
- the basket and holders are skewed or stuck; to repair the device, you need to clean it from crumbs from the inside and correct the broken guides;
- the roasting regulator shows too high values - just set the knob to the correct position;
- The timer is faulty - it will not be possible to repair the electronic circuit at home without special knowledge; you will have to send the unit for repair.
In addition, overcooking can occur due to poor heater performance. To repair a toaster with your own hands, you need to disassemble it when it is turned off and inspect the spiral. Malfunctions of mechanical heaters are eliminated by cutting off the problem area and twisting the ends of the wire. If the spiral is infrared, the unit is taken to service.
A short circuit in the toaster oven may cause it to burn brighter than necessary and burn the bread slices.
Poorly prepared toast
Undercooked toast? A breakdown occurred in the operation of the timer. But also the reasons why the toaster does not work include too low a temperature during the cooking process, a misalignment of the basket itself for pieces of bread, and an incorrectly inserted roasting regulator. Accordingly, eliminating the problem lies precisely in correcting the parts: install a new regulator or simply correct its position, adjust the board and straighten the basket guides if there is mechanical damage.
The reason for poor quality cooking may be the operation of the bimetallic switch. You should try turning the frying intensity control knob to the increasing time position.
In the case when the bread is baked on only one side, check the springs that displace the support grids of the basket. The springs may not only be moved, but also broken. You can replace them yourself: remove the casing or outer panels of the housing to open access to the springs, which are located between the hooks on the inner metal island. Visually you need to find those that are broken or out of order.
If you notice a burning smell coming from your toaster, you need to keep in mind that it is most likely a clogged casing due to the use of very soft baked goods. And if the toast begins to burn more than once, it is worth reconsidering the mode in which it is fried. In addition, this is a sure sign that more crumbs have accumulated in the tray than is allowed.
When only one slice is baked. Manufacturers of some device models may initially indicate in the instructions which connector should be used. An incorrectly selected location may cause the latch to operate ahead of schedule.
When the mechanical latch itself operates very early, telltale signs of wear can be found on the surface. Replacement may be too expensive and it may be easier to buy a new appliance.
How to disassemble a toaster with your own hands
To repair a toaster whose handle does not lock, or to solve other problems, the unit must be disassembled. This is not difficult to do; the algorithm looks like this:
- the toaster is disconnected from the network; if it is hot, wait until the device has cooled down completely;
- remove the tray to collect crumbs;
- manually remove the plastic handle from the lever responsible for lowering the basket;
- turn the unit over and unscrew the mounting screws from below, their number and location depend on the model;
- push the walls apart, dismantle the bottom and completely remove the side parts;
- manually or using a screwdriver, press out the petals that hold the metal casing closed;
- remove the plate with heating elements.
After this, all that remains is to carefully examine the unit from the inside and repair it using one of the listed methods. Then the toaster is assembled in the reverse order, to make it easier, you can first write down and sketch the location of its elements.
You need to remove the toaster body without sharp jerks, so as not to break the latches or break the wires.
Repair with passion.
Hello repairmen! Let's talk about the intricate repair of a toaster, in detail about the operating principle of its electrical and electronic fillings, about the interesting power supply of the control board and about the layout of electrical parameters at the control points of the circuit.
toaster (board FTC-208 shch-4 GW12) came to me as a gift, not in working order and without a power cord. Externally, the button and knob were fine. I opened it, washed the plastic case from sticky dirt, examined it with a careful eye, everything was in order. I removed the board, turned it over in my hands - everything was fine too. It was useful to take voltage measurements - it turned out that the power supply did not come to the board when I pressed the main large button-lever.
As usual in toasters, this lever, also known as a button, supplies power to the electrical network for the entire unit. And as usual in toasters, the low-voltage power supply to the board is provided by ATTENTION! …. THE HEATING ELEMENT ITSELF, i.e. part of its turns (you will see in the diagram)! No transformers or AC-DC converters for you!
I personally like this simple and reliable solution!
I had to restore this break without destroying this same contact welding, simply manipulating the tool like a surgeon!
Since a small part of my wire had burned off, the length of the rest was no longer enough to restore contact, and it was not possible to rewind everything at all due to the lack of such a flat heating wire. Therefore, I had to slightly pull and tighten it.
To do this, I cut and deepened the mica base from the opposite side in the slots in two places (these slots hold the wire at turns) and thus the wire was pulled to the rivet with the necessary margin.
Anticipating your sensible exclamations that they say. So it will burn out again later.” – I retort – what could I do, for the above reasons?
Also, to prevent the wire from burning out, the new power cable was deliberately set with a cross-section of 0.75 mm (ShVVP-0.75) in order to reduce the load on the heating element and thereby extend its life.
Instead of a rivet, I installed a regular screw, washers, a screw, a nut and clamped the wire with them.
Before and after restoration of the thermal wire
Turned it on, tested it, it works.
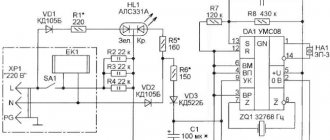
For clarity, I drew a diagram from the board.
Just in case, I checked the capacitors, etc., everything turned out to be normal. I took measurements from control points, current and voltage, and the resistance of the heating elements - maybe some of you, dear ones, will find it useful.
Board diagram with measurements at control points
The scheme is interesting, simple and therefore reliable. As I wrote earlier, the board is powered from a small part of the turns of the heating element, i.e., removing the reduced voltage. The voltage rectified by the diode is supplied to the smoothing capacitor C1 connected in parallel with the resistor R8 that discharges it when the toaster is turned off. R7 lowers the voltage to the required limit to power the timing circuit.
C2, R4, R5, W is actually the timing circuit itself. C2, discharging to the required current level (as is known, bipolar transistors are controlled by current), closes transistor Q1, which closes Q2, which in turn closes Q3, and the latter turns off the relay.
Tips for use
After purchasing a toaster, first read the instructions carefully. Then learn how to use it correctly. Strictly follow the following safety rules:
- Do not place the toaster near items that catch fire quickly (curtains, towels, paper napkins, etc.).
- Do not cover the operating toaster with any objects.
- Unplug the appliance after preparing toast.
- Unplug the cord and allow the unit to cool before cleaning the toaster or removing any stuck pieces of bread.
- Do not make toast from bread coated with icing, fat, vegetable oil or butter.
- Contact of toaster parts with water is strictly prohibited.
Control
The controls of the toaster are not too complicated. There are both mechanical and electronic controls. Mechanical control is carried out using regulators that set the required temperature level.
Electronic control significantly facilitates the process of toasting and other operations performed by the toaster. Using electronic control, you simply set the temperature, and the electronics will do the rest for you. It will calculate the time required for cooking, turn off the toaster itself, give a signal about the end of work, and so on.
In the premium segment of the toaster market, you can find devices equipped with liquid crystal displays, which display useful information and the operating process. They can be equipped with both touch and button controls.
Safety
When performing repairs and maintenance, simple safety precautions must be observed. Before servicing or repairing the toaster, you must turn off the power to it.
It is necessary to constantly check the condition of the cord; it must not come into contact with heating elements or water. Some models have a place in the case for storing the cord and it is advisable to put it there after preparing toast. If there are small children in the house, then after use the device should be put out of reach of them.
By the way, sometimes housewives inadvertently place bread packed in a plastic bag next to this device. Under the influence of temperature, the packaging may melt and spoil the bread, or get on the body of the toaster.
The listed defects are typical for most models of these simple household appliances and correcting them yourself is not such a difficult matter.
Required Tools
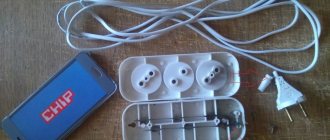
To repair a toaster yourself, with your own hands, you should have at hand:
- a screwdriver for the crosspiece and its slotted counterpart for disassembling and subsequent installation of the housing and internal parts of the structure;
- pliers, which will be needed for the same purposes;
- tweezers to remove the spring and hold the fasteners;
- a multimeter, which will be needed to diagnose the electrical condition.
You can't do without a clean cloth and a brush with medium-hard bristles. They will be needed to clean the internal cavity from crumbs, dust, and other debris.
Useful tips
What is a toaster for? To make crispy toast that, when combined with jam or butter, will be a wonderful addition to a cup of tea or coffee. However, it is not always possible to toast bread perfectly. How to make toast in a toaster so that it turns out delicious the first time?
- To prevent equipment from overheating and electricity from being wasted, load the toaster completely. If it is designed for two slices, then cook two at once, and if for four, then cook four.
- To ensure perfectly cooked toast, the slices must be cut to medium thickness. Thick pieces may not cook, and thin pieces may burn. The bread slices should not touch the metal walls, otherwise the appliance may break.
- For the first time, you should not cook toast at maximum temperature. Without knowing the power of the device, it is easy to make a mistake and end up with a burnt cracker. The regulator should be set to average. If the slice is not cooked through, you can try again.
- Some models are equipped with additional functions that are extremely useful in everyday life. For example, ready-made toast can be reheated. At the same time, they will not begin to cook again, which is why there is a risk of burning, but will simply warm up. The device can also defrost bread and then automatically start toasting.
- To avoid getting burned, remove the finished bread with wooden tongs or use an oven mitt. But, under no circumstances use metal devices.
- It is necessary to remember about regular cleaning of the device and safety precautions. Before turning on the toaster, make sure it is a safe distance from curtains, oven mitts, and towels.