Some time ago, this is exactly how wiring was done - insulators were nailed to the wall, and twisted wires were attached to them. Then the fashion for hidden wiring began. Everyone tried to hide the wires as much as possible, leaving only the frames of sockets and switches outside, and to make them as inconspicuous as possible. But recent fashion trends are again reviving the open type of wiring. It fits perfectly into the loft style and looks great in wooden log houses. In log houses, retro wiring certainly looks better than using plastic cable ducts. And internal wiring in wooden walls is a very complex, almost impossible undertaking.
Retro wiring fits perfectly with some retro styles
What is retro wiring?
Essentially, this is a way of laying power cables in residential areas.
The characteristic features of this method are single-core wires twisted together, which are attached directly to the walls and ceiling using special rollers (insulators). It should be noted that in the time of our grandparents, wiring was installed everywhere in this way. These were nondescript wires and simple insulators. But who then thought about aesthetic appeal, the main thing is that it works. Nowadays, everything has changed dramatically: a variety of wires, insulators, and switches of various colors, shapes and sizes are manufactured. But due to its “novelty,” retro-style electrical wiring is now a symbol of luxury, since prices for components are still “biting.” Next we will take a closer look at these and other nuances.
Accessories for retro wiring.
How to install retro wiring in a house
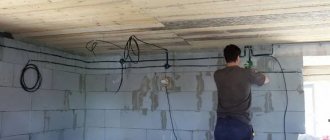
Before starting installation, check the condition of the walls and ceiling. If there are any protrusions or sharp elements on the surfaces, be sure to remove them.
When installing, you need to pay attention to the material from which the walls are made. It is better to attach elements to wooden surfaces using screws. Dowels are suitable for brick and concrete walls.
Prepare the tools: screwdriver, screwdriver, pliers, ruler, fasteners, pencil for marking the walls. Don't forget about the wiring diagram - it should be in front of your eyes at all times.
Step-by-step algorithm for installing vintage wiring:
- Install insulators in the marked areas. It is not necessary to place them on the same line - you can change the direction at an angle of about 45 degrees.
- Place switches, sockets and junction boxes. When placing elements, strictly follow the wiring diagram.
- Stretch the wires, moving sequentially along the line where the insulators are placed.
- Pull the wires, check the resistance.
- Check how the switches work.
Wires should be installed only after they are connected to switches and sockets. If you do the opposite, it will be more difficult to calculate the required cable length and ensure optimal tension. To help novice electrical installers - detailed video instructions for installing vintage wiring.
Twisted wires must be secured with ties to the outer insulators. This will help create good tension and avoid sagging.
Important! Do not twist the wires together. Use special terminals to connect cables. An alternative option is soldering.
Vintage open wiring installation
Preparing for the installation of antique electrical wiring
The preparatory stage is an important part in the implementation of any repair. Before you start wiring, you need to purchase:
- cable of the required cross-section;
- overhead switches and sockets;
- distribution boxes.
Such electrification of the house is carried out only after finishing work on the house is completed. The wiring is mounted on wooden walls, on top of wallpaper or painted walls. The electrical equipment market offers lovers of retro and eco-style a wide variety of switches and sockets, wires with insulation of different colors. The price depends on the color. Gold wires will cost twice as much as brown wires.
How to make a retro electrical wiring diagram
Creating a wiring diagram is a mandatory stage of work. On paper it is necessary to reflect the arrangement of all elements of the scenario: switches, sockets, distribution boxes, lighting fixtures.
In the figure, you need to mark the cable routing routes and indicate the locations of through passages. The more detailed the diagram, the easier it will be to carry out installation in the future.
Some use ready-made diagrams from the Internet. This guide can be used as a basis, but adjustments should be made depending on the specific layout.
Tips for choosing material
First you need to decide on the wires. There are two options for obtaining a cable:
- Budget. If the cost of arranging a power supply is limited, you can make the wires yourself. Take 2 cables, twist them with a drill and you get twisted wiring. The method, to put it mildly, is not very gentle, there is a high risk that you will spit on this idea. But it's cheap and cheerful.
- Classical. Find an online store and order the required material, having previously calculated the quantity. Preference should be given to those stores that can provide certificates of conformity. You don’t want to end up a fire victim due to poor-quality wires.
Now let's talk about insulators:
- Ceramic insulators are the most popular products. They are the most popular type of retro wiring fasteners because they are very reliable during operation and are also inexpensive compared to porcelain ones.
- Porcelain insulators. In principle, porcelain is a type of ceramic, only it is more transparent and durable. Therefore, when you see these two names on a store shelf, choose any, they are both great for open wiring.
As for the quantity, the calculation is made relative to the length of the wire. It is recommended to place insulators every 40–50 cm of cable. For example, you calculated that all wiring will require 100 m of wire. Divide the amount of cable by two and get 200 pcs. insulators.
The last point is to choose electrical installation products:
- Sockets. According to fire safety requirements, they must be overhead. In addition, it is advisable to install a backing under the sockets; it serves as a protective barrier from heating, as well as a decorative element.
- Switches. One main nuance when choosing switches for retro wiring is that they must be rotary or in the form of toggle switches. This very clearly emphasizes the style of the interior.
- Mounting boxes. There are no special requirements here, the main thing is to choose the appropriate shape and color.
Materials used for retro electrical wiring
Currently, domestic and foreign manufacturers of cable products and installation products produce a wide range of products in retro style. This is due to the demand for these materials and the high profitability (cost) of the latter. The most widely represented products in this segment on the domestic market are “RETRIKA”, “Salvador”, “Fontini”, “Bironi” and “Gusev”.
Wires (cables)
Modern decorative wires (cables), used to create a retro style in a wooden house, are made of copper with a PVC sheath of polyvinyl chloride and a braid of synthetic materials that do not support combustion.
2- and 3-core cables are available in various colors (white, black, brown, ivory, cappuccino, caramel, as well as gold and copper), with a cross-section of 0.75, 1.5 and 2.5 mm².
Wire in retro style for a wooden house.
How to make a twisted wire with your own hands?
In order to reduce the cost of purchasing components, since original wires are quite expensive, you can make a twisted wire yourself.
Single-core copper wires in flame-retardant insulation may be suitable for these purposes, such as:
- RGKM - stranded copper wire with two-layer silicone rubber insulation and fiberglass braid;
- BPVL - copper wire with PVC insulation and thread braiding filled with varnish.
When purchasing the above wires, it is necessary to take into account that during the twisting process the wire consumption increases. The increase is 25–30% of the linear length of the mounted section. It is not unimportant that these wires are produced in a wider range of conductor cross-sections, 4.0 and 6.0 mm², which allows you to connect electric stoves and other energy-intensive consumers in the same style across all sections of the electrical network.
Advantages and disadvantages
Retro-style wiring in a wooden house attracts with the following advantages characteristic of open installation:
- looks very impressive and attracts attention with its unusual design and original appearance;
- has good maintainability; when wires are broken or destroyed, they are easily detected by a thorough visual inspection;
- you can easily and quickly eliminate faults in other electrical wiring elements that are not hidden in the thickness of the walls (in junction boxes).
The disadvantages of this type of gasket include the same openness, which in certain conditions turns out to be dangerous. If it is accidentally cut or broken, the phase wire may be exposed, creating a threat of electric shock to everyone around.
If parts of the conductors fail, it is not at all easy to find ones that are similar in color and texture (in this situation, you have to replace the entire wiring) - unnecessary labor costs and unjustified costs. Added to the disadvantages is the high cost of components.
What is vintage wiring
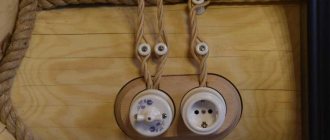
Retro wiring - installation of twisted cables using the open method. The wires are not hidden in the walls - they are in plain sight and fit perfectly into the interior design.
External installation of cables is a solution for owners of new wooden houses. The fact is that some types of buildings experience seasonal shrinkage. In this case, the internal wiring system may be damaged, and the repair will have to be redone. And it is easier to implement an open circuit by adjusting the degree of cable tension.
Vintage wiring is not only stylish, but also safe. You can immediately notice broken or damaged wires and quickly fix the problem.
An example of retro wiring in a wooden house
Installation rules
Before starting work, prepare the following tools:
- Pliers, wire cutters.
- Device for cutting and stripping wires.
- Roulette, level.
- Screwdriver Set.
- Drill, drill bits.
- Stepladder.
And now a little step-by-step instructions for installing retro wiring:
- First of all, we determine the location of lighting fixtures and sockets.
- Next, you need to draw a diagram for connecting all electrical installation products.
- We mark the walls where the cable will run. For greater accuracy, it would be a good idea to use a laser level.
- We install mounting boxes in the required places.
- We install sockets, switches, lighting fixtures.
- We fasten the insulators according to the markings using self-tapping screws. If the walls are concrete or brick, you will have to drill holes for the dowels. It should be taken into account that the rollers are installed at a distance of at least 5 cm from sockets, switches, and boxes.
- We lay the wiring by stringing it onto insulators. For a tighter fit, it is recommended to put on heat-shrinkable tubes and secure with ties. When turning the cable, maintain an angle of 45 degrees. To connect the wires in the wiring boxes, we use a terminal block, no twists!
- We connect all the devices and turn on the lights.
Quantity of materials
To most accurately calculate the length of wires and the amount of piece materials, it is better to use a laser level. With its help, the most optimal routes for laying cables are determined. The required number of insulators is calculated based on the desired installation step. For example, to lay 10 m of wire, you will need about twenty insulators.
Creating a diagram and installing electrical wiring
Laying wiring in the house begins with drawing up a diagram of the placement of electrical circuit elements.
It is necessary to coordinate the plan with Gosenergonadzor - if there are no comments, the organization will provide permission to connect to the power grid within 5 days.
When creating a drawing, consider a number of nuances:
- The distribution board is mounted in the hallway, at a height of 1.5 m.
- SNiPs and PUE do not impose requirements for the location of sockets and switches - proceed based on the characteristics of the arrangement of furniture and household appliances.
- The wire line is laid along the top or bottom of the wall at a distance of 20 cm from the ceiling/floor, respectively. Ceiling installation is acceptable.
- The wires are laid strictly vertically or horizontally. The turns of the route are at right angles.
Based on the compiled and approved markings, components are calculated.
Basic mistakes when installing open electrical wiring
Electrical installation work always involves a certain risk and requires extreme care. We tell you what mistakes can ruin all your efforts:
- Saving on materials. Using low-quality cables and sockets increases the risk of fire. It is better to purchase products from trusted manufacturers who manufacture products taking into account all requirements and safety standards.
- Lack of scheme. Wiring cannot be installed by eye. To ensure a reliable system, you need to carefully consider all the nuances.
- Use of aluminum wires. Products made from this metal often overheat, which can lead to wiring problems. This is why experts recommend laying cables with a copper core.
- Incorrect wiring calculation. Add 15-20% to the number and cross-section of cables. This margin will avoid the need to twist the wires together.
- Connection of cables of different power in one box. Low and high voltage wires should be separated. If you break the rule, interruptions in the operation of home appliances will inevitably occur.
- Incorrect placement of distribution elements. The boxes must be mounted at least 20 cm below the ceiling. If they are placed higher, the risk of accidental damage during repair work will increase.
Important! Provide easy access to distribution boxes to quickly troubleshoot network problems if necessary.
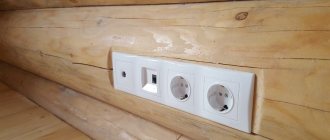
Spectacular retro wiring in the interior of the house
Laying lines across rooms
There are three ways to make open wiring indoors:
- Cable laying in channels: cable channels protect wires from physical damage, prevent the possibility of fire in the home during a short circuit, and are easy to install. Correctly selected channels are appropriate in a retro style (for example, products stylized as “wood”).
- Laying on rollers: the essence of the technology is to fix ceramic barrels on the walls that hold the line.
- Fastening with staples is a cheap, but decoratively unattractive option. It is assumed that the route will be laid with the cables secured with special brackets, which do not always fit into the interior.
At the points where the cores are connected and the lines are distributed to sockets and switches, branch boxes are installed. To connect lines of open retro wiring, vags, sizas, and sleeves are used. Simpler methods are allowed - welding, soldering or “twisting” wires.
After wiring the route, we begin installing sockets and switches. For retro wiring, special overhead sockets are suitable, which are not recessed into the wall, but are mounted on top.
How to save on components for retro wiring?
Exposed retro wiring is not a cheap pleasure. Simple recommendations will help reduce the work budget without compromising the operational characteristics of the route.
The mixed type of installation not only saves money, but also allows you to connect more powerful devices. To do this, partially use copper wires in some places - mostly inaccessible to the eye. The line is hidden under the floor, baseboard or in ceilings, raising/lowering the joints of twisted and traditional cables using a junction box.
50% of the costs come from the purchase of special twisted cables. Decorative elements can be made independently from copper wire:
- Type RGKM - multi-core cable with a rubber sheath and fiberglass braid, withstands heating up to +180°C;
- Type BPVL - wires in a PVC sheath with a thread braid, available in different colors.
Antique electrical wiring in a wooden house
So, as was written in the article “Electrical wiring in a frame house from A to Z,” in wooden houses the best safety solution would be open wiring. If we are considering a house made of logs, then it will not be possible to apply the cable channel neatly along the walls and we need to look for another method. It is in this case that retro wiring installation is most in demand.
The wire manufacturer provides different colors. There is a whole field for creativity in the design of such premises. You can combine light twisted wire with dark mechanisms and vice versa.
Components necessary for laying antique wiring
What antique electrical wires exist:
- Power for powering sockets and lights, 2 and 3 wires;
- UTP for Internet sockets;
- Coaxial cable for TV sockets;
- Combined UTP and coaxial in one (very convenient - not available from all manufacturers).
For wire installation, there are plastic or ceramic insulators of different colors to choose from. The number of insulators can be calculated as 3.5 insulators per linear meter of wire.
Kit for electrical wiring in a wooden house
This value is derived from practice. So, to fasten a twisted wire, it is necessary to place insulators through a log or two. However, it is also necessary to install insulators at the junction box and the mechanism itself. If the house is made of timber, then the distance between adjacent insulators should be no more than 400-450 mm.
Also, to install antique wiring, you need to stock up on:
- Thin but durable nylon ties match the color of the wire or transparent, for fixing the twisted wire on the terminal insulators, as well as in the mechanisms themselves.
- WAGO 221 series terminals with the number of outputs 2, 3 and 5 will be required for switching in distribution boxes. Using the 222 series will be inconvenient due to its large size. NShVI lugs for crimping the ends of conductors for good contact.
- You will also need self-tapping screws: nickel-plated or galvanized, 45 mm long. Don't forget to take a bit with the appropriate shank for the screws.
Reasons for choosing external wiring
The first reason is clear - aesthetic considerations. The second is the technical difficulties when performing hidden wiring in log houses. According to the requirements of the PUE, in combustible structures (wooden walls), wiring can only be laid in blind (without perforation) metal boxes. The second option is in non-combustible plaster. Moreover, a layer of 1 cm should surround the conductor. To put it mildly, this is difficult to achieve.
Well-made retro wiring serves as interior decoration
The problem with laying wiring cables in metal boxes is not only that you have to make deep grooves. The main difficulty is that a wooden house changes its height all the time. Even after the main shrinkage has passed, there are changes and they are seasonal in nature - in wet periods the wall becomes higher, in dry periods it settles. The difference in height can be up to 5-7 cm per floor. Since metal boxes do not stretch, this becomes a serious problem. In general, it turns out that open wiring is easier to do. Well, since the wires will stretch on top, then you can make a decoration out of them, which is what happens if you make retro wiring correctly.
From a fire safety point of view, it fully meets the requirements: it is mounted at a distance of 12-18 mm from combustible walls, and is supported by ceramic or metal (non-flammable) insulators. The wire used for laying is twisted, with reduced flammability. So there are no problems on this side either.
If you keep everything in the same style, it looks very good
Sockets, switches, junction boxes can be used in ordinary plastic ones. But to make everything look organic, it makes sense to put porcelain or metal ones in “retro” beds too. They also meet safety requirements as they are made of fireproof material.
Retro electrical wiring in a wooden house: pros and cons
Disadvantages of using retro wiring:
#1 - Due to the fact that the wires are laid openly and have a coating good enough to collect dirt, they become rubbed over time. Whether you like it or not, in places where there is constant contact with your hands (near switches), the wires will eventually take on a dirty tint.
From this point we can conclude that using light-colored wires is worse than dark ones. The chocolate color of the wiring on a light log looks much better than in color. And if the wire is completely white, I announced the price with a factor of 1.5 for installing a white wire. Just imagine that every ten minutes of installation work you need to go and wash your hands with soap. The gloves alone took three packs. The slightest dirt on your hands is literally rubbed into the wire and it is almost impossible to clean it to its original state. If this is not done, the wire will be worn out before commissioning.
#2 - Wires stretch over time. Even if you tighten the wire so that you can play it like a balalaika, it will loosen over time. This is especially evident when the house has not “settled” properly.
Savings on mixed installation type
When laying industrial wiring lines, it is possible to use a series connection scheme for loads (sockets and lighting fixtures) or their parallel connection. But for domestic conditions, a mixed scheme will be more convenient and economical, in which some of the lines are included in parallel groups, and then they are all connected in a serial chain.
Using a combined or mixed method of connecting individual lines allows you to save on the total length of wires and ensures the convenience of connecting sockets and switches. In addition, the wiring itself takes on a neat and strict appearance.
Safety precautions
According to the instructions, the step-by-step wiring plan should take into account the safety of its operation and maintainability.
When choosing the type of wires and the conditions for their installation, you need to worry about the following:
- decorative conductors must have double insulation, which reliably protects people from electric shock;
- when wiring them through walls and ceilings, it is necessary to use sections of corrugated or metal pipes;
- the height should be sufficient so that children cannot reach the wires;
- at this level it is undesirable to locate equipment and objects that pose a danger to electrical wiring;
- It is unacceptable to carry out any work near it that is dangerous from the point of view of damaging the wires.
The provisions of the PUE also stipulate the operating conditions for electrical wiring inside a wooden house, which mainly concerns elevated temperatures and humidity. When laying wires in the bathroom, it is advisable to place them in a cable duct or corrugated pipe (this should be done even at the expense of decorativeness).
General rules and safety precautions when organizing antique wiring
Installing retro-style wiring yourself is a simple but painstaking task. To avoid trouble and injury, it is important to familiarize yourself with the safety rules. Pro Tips:
- Make branch wires only in junction boxes.
- Route the wires downwards from the junction box.
- Maintain spacing between switches and doorways. Ideally, the distance should exceed 10 cm.
- Place sockets and switches at a distance of at least 50 cm from the last insulator.
- For ease of installation, mark in advance the surfaces where the wires will pass.
- Make sure that decorative cables are double insulated. This will significantly reduce the risk of electric shock.
- Place the wires so that they are not accidentally damaged during repair work.
- Do not place objects near the wiring that could damage the cable.
Important! Study the recommendations of manufacturers of materials for retro wiring.