Advantages
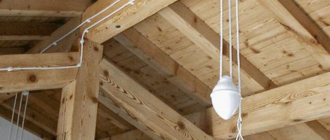
Design. For some retro styles, wiring is more of a rule than a preference. And in a wooden house, this design looks much more harmonious than plastic cable channels.
Excellent appearance. Thanks to the silk braiding, available in a wide range of colors, the wires can be matched to almost any interior.
Minimum investment of time and labor. Installation of the structure is quite simple; no time is wasted on wall slitting and subsequent sealing.
Compliance with safety standards. Houses made of wood belong to the category of flammable buildings. Proper installation of internal wiring in a wooden house is a complex and responsible task. Open retro wiring is a great solution!
Unobstructed access to wires, simple maintenance.
Safety precautions
According to the instructions, the step-by-step wiring plan should take into account the safety of its operation and maintainability.
When choosing the type of wires and the conditions for their installation, you need to worry about the following:
- decorative conductors must have double insulation, which reliably protects people from electric shock;
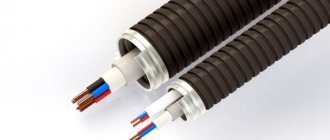
- when wiring them through walls and ceilings, it is necessary to use sections of corrugated or metal pipes;
- the height should be sufficient so that children cannot reach the wires;
- at this level it is undesirable to locate equipment and objects that pose a danger to electrical wiring;
- It is unacceptable to carry out any work near it that is dangerous from the point of view of damaging the wires.
The provisions of the PUE also stipulate the operating conditions for electrical wiring inside a wooden house, which mainly concerns elevated temperatures and humidity. When laying wires in the bathroom, it is advisable to place them in a cable duct or corrugated pipe (this should be done even at the expense of decorativeness).
Flaws
Price issue. Wires, components, and accessories in retro style are not cheap, especially if we are talking about imported goods.
Low power. The cross-sectional diameter of a retro wire does not exceed 2.5 millimeters. This indicator will not allow you to enjoy comfort surrounded by powerful modern devices.
You will have to think about moving the boiler and washing machine to a separate room - a boiler room or boiler room. Or adjust the design: external wiring, but with the usual powerful cable laid in steel pipes, aged to look like brass.
A little history
As a matter of fact, such shortcomings once became the reason for the abandonment of open wiring. In addition, those old wires were made of a much higher quality: thick rag braiding and rubber insulation were used.
A small amount of furniture and a minimal set of technical devices made it possible to use open wiring without harm to the life and health of the inhabitants of the house or damage to the structure.
But over time, the danger of using open wires became more and more noticeable, so a clause appeared in the Electrical Installation Rules requiring the removal of wires into special channels or pipes.
Since then, technology has come a long way, so today's wiring is completely safe if you follow the basic rules: don't chew, don't cut, don't break the wires.
Quantity of materials
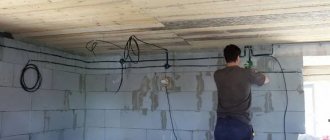
To most accurately calculate the length of wires and the amount of piece materials, it is better to use a laser level. With its help, the most optimal routes for laying cables are determined. The required number of insulators is calculated based on the desired installation step. For example, to lay 10 m of wire, you will need about twenty insulators.
How to make a twisted wire with your own hands
To save on the purchase of special wires, you can save money and make it yourself.
To implement this task, you will need a regular single-core wire that is fire resistant.
The following devices fall into this category:
- RKGM is a stranded copper wire, characterized by the presence of 2-layer rubber insulation. Manufactured using silicone rubber and fiberglass braid. It has improved temperature resistance and can withstand temperatures up to +180 degrees Celsius.
- BPVL is another type of wire that has a PVC sheath and braid in the form of a dense thread. Sold in different color options. For reliability it is varnished.
When determining the required length, keep in mind that when twisting, consumption also increases by an average of 20-30 percent.
In addition, if necessary, you can order wires of a larger cross-section that can carry large currents - 4 and 6 kW. meters. This cross-section allows you to connect electric stoves and other equipment with high consumption.
The downside is the difficulty of choosing a color, because the same RKGM is produced in white and gray, and BPVL is very difficult to find due to the specific purpose.
As for the manufacturing process itself, it takes place in several stages:
- Cut the purchased wire into the required sections and taking into account the required margin.
- Twist the wires. Please note that after passing through each successive insulator, the direction of twisting should change.
- Eliminate sags if they appear. This may require dismantling the area of interest, followed by twisting and returning it to its place.
DIY retro wire, retro cable.
Basic rules for wiring installation
To install outdoor wiring in a retro style, you must adhere to the following requirements:
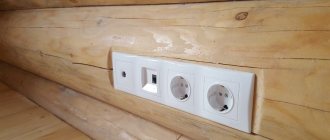
- The distance from the socket (switch) to the window or door slope must be at least 100 mm.
- The distance from the wiring line to the water supply and gas pipelines is at least 500 mm.
- The distance between installed insulators is 700-800 mm. The last insulator is installed at a distance of 500 mm or less from the socket or switch. If the installation is carried out in a wooden house made of timber, the distance between the insulators may be less than 500 mm.
- A laser level will help you position the insulators beautifully in a straight line.
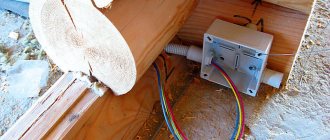
- The wires in the junction boxes are connected by soldering. You can choose distribution boxes with terminals. Twisting of wires is not allowed.
- Sagging of cables between attachment points is also not allowed. The optimal distance from the wire to the wall is 10 mm.
In general, installation of a structure requires a significant amount of time and attention to detail.
The wiring can be top or bottom. There are no strict rules in this matter. The lower option helps to save a little on material consumption. However, the lower wiring, unlike the upper, is more susceptible to mechanical damage.
Ceramic or plastic insulators
The stand for the twisted wire in retro wiring is an insulator. Called a roller. It has a through hole. To fasten such rollers, special self-tapping screws with decorative caps are produced.
Ceramic insulators are mainly used. Plastic ones become covered with microcracks over time. There are metal insulators, but they are used in exceptional cases.
- Power cable brand ASB - characteristics, classification and rating of the best manufacturers. 115 photos and video instructions for choosing
Heating cable for gutters and roofs: choosing and installing a self-regulating anti-icing heater with your own hands (135 photos + video instructions)
- Types of electrical cables and wires: device, purpose, marking and characteristics of the main types of cables used in houses and apartments (150 photos)
The size of the rollers is made for thin and dense cords; they differ in diameter and height. Overall dimensions: height from 1.8 to 2.4 cm, diameter from 18 to 22 mm. Modern technologies make it possible to produce rollers of different colors, from white to dark brown.
At least 3 insulators are required per linear meter. On walls made of calibrated rounded wood, the wiring is fastened in increments of two or three logs. On a level beam, take the maximum possible step.
conclusions
Country wiring is rightfully considered one of the original and beautiful types of solutions in a wooden house. A wide range of colors and a variety of components can create a cozy, ancient atmosphere in your home. To be convinced of this, look at the photo of finished retro wiring in wooden houses.
- Wire connector: instructions on how to make the connection yourself. Instructions for use of clamp, clamp and lugs
- Wire lugs: instructions on how to select and install a lug. Overview of all types, photos, instructions, diagrams
Heat shrink for wires: all types and characteristics. Detailed description of how to choose and use heat shrink
Open wiring device
For open wiring, twisted retro wire with triple insulation is used. The first layer, which is in direct contact with the metal core, is made of vinyl, the next one is made of non-flammable chemical fiber.
The third decorative layer is made of natural fabrics or silk threads, as well as fiberglass. For fire safety purposes, fabric insulation is impregnated with fire-resistant, non-flammable varnish. Electrical wire cores are made from copper wire.
For external wiring, two types of cables are made: for installing lighting products and for connecting sockets. Wires differ in the thickness of the current-carrying strands. Wires with a cross-section of 1.5 mm2 are used for lighting, and 2.5 mm2 for socket wiring.
Retro wires of a larger cross-section are not produced, therefore, to install wiring for connecting electrical appliances with a current load exceeding 27 A, it is necessary to use a different cable. To do this, separate hidden lines are laid and different cables are combined.
According to the cross-section and load power of the wires, they can be:
- cross section from 0.5 to 0.75 mm2 – maximum power up to 2.9 kW;
- cross section 1.5 mm2 – maximum power up to 4.4 kW;
- cross section 2.5 mm2 – maximum power up to 5.9 – 6.0 kW.
Retro wiring is the best solution for your home.
If you need wires with a larger cross-section than those available on the market, you can make your own. To do this, wires corresponding to the current consumption are selected, from which a braid is braided, repeating the original step and pattern.
Photo of retro wiring
3+
Read here! Which wire is better - optimal grades and cross-sections for use as electrical wiring (105 photos)
Recommendations from experts
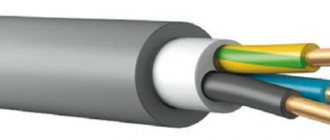
In hidden areas it is recommended to use VVGng-ls cable. Its insulation does not propagate combustion (index “ng”) and is characterized by reduced smoke emission (“hp”).
It is recommended to place the electric meter and input machine in a cabinet outside the house so that the energy sales inspector does not need access to the territory to take readings and check the connection diagram. The equipment is mounted on the so-called. pipe stand - a special design that you can make yourself.
Group switches, RCDs, voltage relays and other protection devices are installed in a switchboard inside the house. This is expensive equipment, and if placed on a pipe stand there is a risk of theft.
Where the cable passes through a wooden wall, a steel sleeve with a wall thickness of at least 2 mm is installed. Ceramic plugs are installed only at the inlet and outlet of the hole. Drilling is performed with a drill bit with a diameter of 20 mm.
When laying hidden, the size of the cable channel is selected so that the wire occupies no more than 40% of its cross-section.
To avoid confusion, core connections are made in accordance with color coding. The blue one is used as a neutral conductor, the yellow-green one is used as grounding. The red, brown or black phase is connected.
In the distribution board, it is recommended to provide each line with a designation of which consumers are powered by it. This will make troubleshooting and rewiring easier. It is also advisable to draw and place a home network diagram near the closet or inside.
It is recommended to use an RCD with a rated current one step higher than that of the circuit breaker protecting it. With moderate overloads, the switch does not open the circuit immediately, but after a few minutes (up to 60). If the devices have the same rating, excessive current will flow through the RCD all this time, which will lead to its breakdown.