Rules for laying cables along the facade of a building
The task itself looks somewhat strange.
Why run wiring along the facade? First, let's understand the terms. If you go into the details of GOST: “a wire is a wire with or without a sheath...”, and “a cable is several wires...” and so on, you can get completely confused. Moreover, installing the wire along the wall of the building is impractical in principle. It must be inside. And if this is a power input, laying the cable along the facade of the building is generally prohibited; immediately after the suspension point it must be brought into the room. All this is true, but we will talk about a relatively new cable (or wire, as defined by GOST) - SIP.
Self-supporting Insulated Wire (after all, a wire!) has recently been actively replacing non-insulated power wires. Residents of private houses know very well what it is. So, SIPs are allowed to be laid on the facades of buildings, and the norm is prescribed in the Rules for the Construction of Electrical Installations. When organizing the connection of households, this can bring significant savings for the owner.
General requirements
The external electrical line is laid along the architectural lines of the building. The use of armored elements with a flammable fibrous coating is prohibited. It is unacceptable to use both power and telephone wires within the same bundle. The distance between them must be at least 25 mm. When installing several conductors, you should try to make the smallest number of overlaps.
When laying SIP in accordance with the PUE, you need to maintain certain distances between it and certain parts of the building:
- above the window and door - 0.3 m;
- below the balcony and window - 0.5 m;
- height above ground level - 2.5 m;
- on the side of the window - 0.5 m;
- on the side of the balcony and door - 1 m.
When running the power cable along the wall, it is necessary to maintain minimum distances to windows
In what cases is it necessary to lay a power cable along the facade?
The most obvious option: if an obstacle in the form of a building appears in the path of an overhead power line. It can be bypassed by organizing a route loop in the power line. But it will cost extra design money, and extra wire, not to mention poles. This is how they used to do it (when power lines were built only on bare wires). And since the Rules for the Construction of Electrical Installations (PUE) allow the laying of SIP along the facade (or any other walls), it is possible to draw a power line directly through the obstacle.
But this applies to energy drinks. We are interested in the applicability of the PUE permit for private houses, in the area of responsibility of the owner of the property.
- If the switchboard in the house is located on one side, and the main power line is on the other, it was necessary to install another pole (the length of the overhead line is limited in length). Often right on the site. A self-supporting insulated wire is laid through the air to the nearest point of the building, and to the switchboard it can go along the wall.
- The mounting point from the pole is too high on the wall, and the shield is located at the surface of the ground. It is necessary to organize the so-called cable lowering. The SIP is attached to the wall before entering the panel.
As an alternative, a transition is made from the aluminum conductors of the self-supporting wire to the copper conductors of the input power.
And then the usual cable is laid along the facade.
Information: why make transitions from aluminum SIP to conventional VVG?
It would seem easier to tighten the input wire directly into the shield without buying crimp sleeves or piercing couplings. But connecting the SIP to the metering device (meter) is so problematic that it is easier to make the transition and lay the VVG cable along the wall of the building.
We start dancing from the façade wall
First of all, you need to select a point on the wall from which the branch will begin. The rules for electrical installations do not regulate the choice of wall: it can be front or side. But in practice, in our latitudes it is the façade that is chosen. Roof slopes usually extend onto the side walls of buildings, from which ice (icicles) or snow can fall off.
The starting point for laying on the wall is considered to be the point where the cable exits the anchor clamp. The main design elements are shown in the illustration:
- Anchor bracket.
- An anchor clamp, after which the wire is not held on the overhead line route.
- Facade fastening is the first element of the wall installation system.
The bracket is installed at a height of at least 2.75 meters. The distance to the nearest corner of the load-bearing wall (excluding the thickness of the insulating material) is at least 10 cm.
Tip: If the cross-section of the power cable allows you to choose between different anchors, you should choose a hanger with a lower load. In this case, if there is a mechanical impact on the SIP (for example, caught by a truck on the road, or a pole falls), the wall will not be destroyed, the anchor will simply be torn off.
What does the Electrical Installation Rules say about this?
- The cable being laid should not experience tension or pressure loads.
- At transition points (couplings, piercing connections, etc.) insulation must be provided, the properties of which correspond to the characteristics of the main wire.
- All outlets and connections must be accessible for inspection and repair without mechanical intervention in the building structure.
- All connections of wire and cable cores are made in accordance with the PUE: crimping, welding, soldering or crimping.
- In the case when the cable is laid along the facade using pipes, flexible hoses, closed boxes, the possibility of quickly replacing the wiring is provided.
- Structural elements, insulation, transition points must be selected based on the environment of use: weather conditions, exposure to ultraviolet rays, temperature conditions.
- Metal parts of the structure must be protected against corrosion.
- The length of the cable laid along the wall of the building is calculated taking into account the temperature gaps for compression and tension. The movement of the wire under the influence of temperature should not create conditions for mechanical tensile forces.
- In places of connection, branching, transitions, slack is provided (cable reserve in case of reconnection or repair).
Outdoor wiring
To carry out exposed electrical wiring, you need to secure the cable over the decorative wall trim. As a rule, this electrical installation option is used in wooden houses and garden buildings, for example, in a garage or outbuilding. Cable ducts, clips, or special porcelain insulators can be used to attach wires to walls. Let's consider the features of using each option.
Cable channels
Today, fastening wires and cables in special plastic channels is most often used. This is due to the fact that cable channels have an attractive appearance, low cost and, most importantly, allow you to quickly secure a group of conductors in one place. To do the fastening yourself using this method, just secure the plastic box to the wall using self-tapping screws.
If you need to connect several elements in one line, you can use special connections provided by the manufacturer. After the cable channel is secured, you can put all the cables into it and close the front cover (it is latched). We talked in more detail about how to attach a cable channel to a wall in a separate article.
Video instructions for installing a cable channel with your own hands
Clips
Fastening wires and cables with clips is used only when installing electrical wiring in pipes, and also if the conductor will be additionally protected by a corrugated pipe. In this case, attaching the wiring to the wall and ceiling is very simple.
If the surface is wooden, all you need to do is secure the clip with wood screws. In a concrete wall or ceiling, you need to pre-drill holes using a hammer drill, then drive in dowels, and then fix the clips themselves. The entire installation technology is clearly shown in the video example:
Correct fastening inside the house
By the way, clips can be attached not only indoors, but also outdoors. This method is suitable if you decide to conduct street electrical wiring along cinder blocks or brick walls of buildings.
How to attach corrugation on the street
If you want to secure the cable
Insulators
Fastening wires to the wall on an insulator is most often used when installing electrical wiring in a wooden house and bathhouse. First, you must secure the porcelain barrels themselves, which are fixed to the wooden sheathing or frame using self-tapping screws, then twist the wires into a tight bundle and thread it onto the insulator as shown in the photo below:
In order not to twist the wires yourself, you can buy special antique wiring that is already twisted. Read about how to make retro wiring with your own hands in the corresponding article.
Nail staples
This mounting method is suitable for television and telephone cables, as well as Internet lines. There are flat and round plastic brackets that can be easily attached to the wall using the small nails included in the kit.
Laying cables along the facade of a building without making a transition
General rules for external installation on the wall of a building:
Minimum distances to elements for horizontal installation:
- above the frames of windows or doors - 30 cm;
- under window frames or balcony platforms (lower plane) - 50 cm;
- above the ground - 275 cm.
Minimum distances to elements for vertical installation:
- to window frames - 50 cm;
- to the edge of balconies or doors - 100 cm.
The minimum distance from the SIP to the wall is 6 cm.
The last point requires decoding. It refers exclusively to SIP, and is associated with the features of its design. This wire does not have an outer layer of insulation; only the current-carrying conductors are coated. The insulating material (PET) supports combustion and retains its properties only at temperatures up to 70–90°, depending on the modification. In addition, there is a SIP with a bare core, which is used as a zero wire.
Due to its low fire resistance, this cable should not be attached close to the wall. If the cable catches fire, the fire will not spread to the wall. For installation, special façade fastenings are used.
Important! If, after laying the cable, insulating panels will be mounted on the wall, the distance to the self-supporting insulation insulation is calculated according to the new outer plane, increasing by the thickness of the panels.
How to hide TV wires on the wall
Let's not reinvent the wheel, but simply use ready-made solutions for how to remove wires from the TV on the wall. They take into account not only the aesthetic side of the issue, but also competent technical execution:
- Laying wires into grooves.
- Disguising cords behind interior items.
- Use of cable channels.
- Decor of wires on the wall.
- Combining methods.
A safe, but time-consuming and expensive way to cover the cord is to hide it inside the wall.
If the wall is made of concrete
The main and most reliable way to hide television wires on a concrete surface is gating. It must be said right away that when performing such work, a lot of dust is generated, so the method is acceptable for the initial stage of apartment renovation. Grooving is the laying of installation channels for hidden wiring in the thickness of concrete mechanically using a hammer drill and special milling bits for an electric drill.
It is advisable to install electrical wiring at the renovation stage, preferably during the planning of the premises.
Before laying grooves, you need to determine in advance the places where they will pass. The number and purpose of cables that will be hidden in them. Mark the points of entry and exit of wiring from the wall, the location of junction boxes and sockets. In order not to damage previously installed, hidden wiring, you will need a detector for detecting wires in the wall. It is advisable to lay grooves on a concrete surface in vertical and horizontal directions.
As long as the walls are bare and there is no decor on them, the damage will be minimal.
Plasterboard wall
Hiding TV cables under a plasterboard surface is much easier and faster than hiding them in concrete.
Installing electrical wiring under drywall is much easier than installing into concrete.
Let's assume that the TV mount to the wall is already installed, all that remains is to connect the wires:
- We mark on the drywall the location of the TV, the socket for it and the cable outlet.
- We cut out technological holes for installing sockets.
- We take a nylon cord, attach a nut to its end and run it behind the drywall from the top hole to the bottom.
- Using electrical tape, attach the cable to the cord and, carefully pulling the cord by the upper end, put the cable in place.
When laying in a horizontal direction, the wire is tightened in the same way using wire.
The cord must be laid in a special corrugated pipe, which has a fire safety certificate.
Masking using a cable channel
The apartment has a fresh renovation, an updated interior, a plasma on the wall and crawling wires to it - the picture is so-so. How to decorate TV wires on the wall without damage and dust. This is where special channels for wiring over the wall will come in handy.
The plastic channels where the cord is inserted are called cable channels.Today, such means for laying electrical communications are presented in a huge assortment, from ordinary plastic boxes to room decor elements, to suit the tastes of the most demanding buyer. Fastening such channels to the wall surface will not cause any particular difficulties; this can be done using dowels, self-tapping screws or “liquid nails”.
This is one of the most convenient options for hiding electrical wires, used after completion of finishing work.
Disguise with furniture
Hiding the wires for connecting the TV behind furniture or its elements is probably the simplest solution to the problem of all possible. Moreover, today furniture designed for installing household appliances meets the requirements of the time.
Under the TV you can place a hinged panel with a built-in wiring compartment and a lockable door.
Many furniture manufacturers equip their products with special technological holes for feeding wires from the back, which is very practical. This approach allows you to remove cables without damaging the walls and without disturbing the overall design of the room.
The most common way to hide the cord coming from the TV is to place practical furniture under it.
Laying on the wall
Next, facade fasteners are used. If you purchase factory fittings, the distance is already regulated: at least 6 cm from the cable to the wall.
Then the cable route is marked and holes for fasteners are prepared. The distance between the fastening points is usually at least 70 cm. In bending areas, the frequency of fastening increases to prevent free sagging.
Important! If SIP is used, it is necessary to take into account the requirements for the geometry of the gasket. The bending radius is at least 10 cable diameters.
Then, using standard bolts, all facade fastenings are secured. To prevent corrosion and destruction of fasteners, the metal caps are closed with special plugs.
If house communications are located along the laying route, it is necessary to ensure a safe distance. At least 10 cm to water pipes, at least 40 cm to gas pipes.
Important! It is prohibited to form loose cable loops near metal structures.
Under wind load, the cable can fray the insulation and the wires will short out.
The use of fasteners that are intended for other purposes is not permitted. For example, pipe clamps or cable clips for indoor installation.
Cable in corrugation, pipe or cable channel
If open wiring is performed, this method is preferable. This is due to the fact that the wires are hidden in a corrugation or pipe, a special channel made in the form of a box. Thanks to the use of a closed design, the safety of cable operation is increased. However, this method is much less commonly used for laying large bundles of wire.
Cable channels
Existing varieties are made from:
- galvanized steel;
- plastic;
- aluminum
The cable channel can be made in the form of a rectangular box; the outer surface of some products has a radius. Such varieties are often installed along the wall: on the floor or instead of a baseboard. Other types of cable channel:
- main lines;
- parapet.
The first option is intended for laying wires over significant distances. These boxes are larger in size. Parapet analogues are installed in offices to protect against damage. They have a flattened shape, due to which such boxes are less likely to be touched when moving. To install the cable channel, dowels and screws, as well as liquid nails, are used.
Fastening with clips
This method is often used in open electrical installations. It is designed for quick cable attachment. The wires are fixed with clips with small increments. Such fasteners are installed more often on the wall than on the ceiling, since some varieties are characterized by an open design. The wires will not stay in them. Fasteners of this type have the shape of arches, a closed or open loop, and are installed using nails and self-tapping screws.
Clips are selected according to the type of material: metal, plastic. There are holes on the arms, thanks to which the fasteners are fixed to the wall. In this case, dowel clips or an option with a hole for a nail are used. Such elements are most suitable for mounting bundles of wires.
There is another option for fixing this product using adhesive single-sided tape. In this case, attaching the wire to the wall does not require drilling the surface. The type of clips is selected taking into account the type of base material.
An alternative to open cable routing along the façade
Reasons why you should not install SIP or other wires openly on the wall:
- The house is covered with fire-hazardous insulation, decorative upholstery: siding, wooden paneling.
- There is a danger of mechanical impact on the cable: opening shutters, tree branches, etc.
- Just for aesthetic reasons: I don’t want the cable to be laid along the facade at a distance of 6 cm from the wall.
- According to the characteristics, the cable used is not intended for open installation on external walls of buildings.
In this case, a closed cable duct or metal hose is used. It can be fixed directly to the wall. If the surface is covered with a flammable material, the hose should not support combustion.
There are no special requirements; the installation principle is similar to the SIP cable. The only mandatory condition is that when inserting the hose (box) into switching or distribution panels, protection is provided against moisture entering the internal cavity.
Subject to all of the above rules, you can lay the cable in the owner’s area of responsibility without the help of electricians.
Preparation for installation, surface marking
Open installation imposes increased aesthetic requirements: everything must be “smooth and parallel.” In this case, the box is fixed along the preliminary marking lines. It is carried out using a level (laser or water, construction), a square, a tape measure, a marker, a ruler, a pencil (marker).
Here's how to properly divide the process into stages:
- Initially, a diagram of the optimal electrical wiring is drawn up;
- lines on the wall are drawn by tapping according to the level, all branches are strictly at right angles;
- on them, with a pencil, according to the existing plan, the location of distribution boxes, sockets, switches is marked;
- necessary adjustments are made as work progresses.
At the end, you should calculate the length of the marking stripes, the number of installation points, turns, and corners. This will allow you to order the exact amount of working material.
Turns and corners can be purchased either ready-made or made from cable duct yourself. Using the former leads to increased costs. But work on difficult sections is faster, and the appearance of the route is better than when using homemade ones.
Self-production will require the additional use of sealants to seal seams.
Boxes for installation can be cut in advance (for a large area) or during the process. The first case begins with precise measurements using a tape measure along the marking lines.
Then they cut the working material into the required lengths in order to install it later. Accuracy of measurements is important here.
It is easier to carry out the work according to the scheme: try it on - cut it - fasten it.
How to attach SIP wire to the house
Non-insulated aluminum stranded wires, which were previously used to connect the electrical network to the consumer, have been replaced by SIP wires. SIP is a self-supporting insulated wire. In comparison with its “predecessor” it has a number of advantages:
- reduces cost and increases installation speed
- increases the safety of operation of electrical networks. The wires do not overlap, creating short circuits.
- wide range of applications. From connecting subscribers at 220/380 W to installing lines at 35 kW
- have a wide variety of designs for different tasks
- wires resist ice formation
- use of universal fasteners for SIP
- wide range of performance characteristics. Temperature – from -60 degrees. From up to +50 degrees. C. Service life – 45 years.
Below we will look at an example of attaching SIP to a house. Clearly, such work should only be performed by certified electricians, and the purpose of this article is to acquaint the reader with the necessary fittings and method of fastening. Having such information, you can not only control the electrician, but also suggest something useful. Proper SIP fastening is your safety.
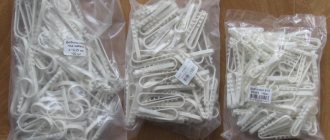
To connect the electrical network to the house you will need:
- Bracket (hook) – 2 pcs.
- Tension clamp – 2 pcs.
- Piercing clip – 2 pcs.
- The bracket for fastening the SIP wire to the facade depends on the distance between the point of supply and the point of entry into the house. Installed every 70 cm.
- Bandage tape.
- Actually, the SIP wire itself is 2x16
Common mistakes
During the construction of a power line, it is necessary to strictly comply with the requirements of current regulations and standards that can affect the reliability of power supply. That is why it is necessary to be especially careful when choosing linear coupling fittings and calculating the parameters of the overhead line.
Mistakes can have very serious consequences. You can prevent or minimize their occurrence by remembering the following important nuances:
- Before making a final decision during the acceptance of an overhead line, it is necessary to rely not only on the results of a visual inspection of the already erected line, but also on the correctness of the installation, during which personal presence is required.
- To lay the main line, materials must be used that meet the requirements for the overhead line under construction.
- The installation team must have all the necessary equipment, tools and accessories available.
- Only trained personnel should be involved in the construction and maintenance of the highway.
- It is allowed to start laying a line only if you have a well-developed project in hand.
Wrong choice of clamps
In most cases, the need to refine an overhead line design that involves the use of SIP cable arises due to incorrect selection of piercing clamps. For example, when the recommended clamp was selected without taking into account the wire cross-section. As a result, it turns out that the clamp, which is designed to work with a cable of a smaller cross-section, is unable to pierce the insulation, as a result of which good contact with the conductor cannot be ensured.
If contact does occur, then a current greater than the value for which it is designed will pass through the clamp. This can ultimately lead to a breakdown on the line. Another situation is also possible when the clamp recommended for use in the project was selected without taking into account the material of the SIP cable. If this error is not noticed and corrected in a timely manner, it can lead to destruction of the conductor at the point of contact due to electrochemical corrosion.
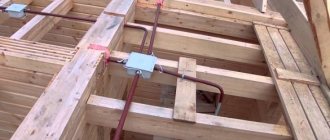
The sequence of operations for attaching the SIP wire to the house is as follows:
1. Mark a place for installing the bracket on the facade of the building. Using a hammer drill we drill holes for the anchors. Using metal anchors we secure the bracket.
2. Along the line of passage of the wire along the facade of the house, we install facade brackets every 0.7 m.
3. Install the tension clamp on the branch wire. To do this, unscrew the clamping screw, insert the wires into the seat and tighten the screw. We put the clamp loop on the hook. The branch wire should be sufficient to connect to the meter or entry into the house.
4. Using bandage tape and a special tool, secure the hook to the support (pole).
5. Install the tension clamp, put it on the hook of the support and mark the place of connection to the main wire.
6. Fix the wire in the façade brackets
7. We connect the branch wires to the house to the air main using piercing clamps. To do this, cut the branch wire to the required length and insert its end all the way into the piercing clamp, having previously torn off the protective cap at the input. We install the clamp on the main wire and tighten the nut until it breaks.
The SIP wire is attached to the house using standard connecting fittings. Fast, reliable, safe. And let joining as below in the picture remain a thing of the past.
You can fasten the SIP wire using various fittings, but in any case it must be a high-quality product. You can't experiment with electricity.
SIP with carrier neutral up to 1000V
SIP fittings used in the scheme of this network:
- Anchoring and connection of SIP with power cable
- Connecting wires
- Intermediate fittings SIP and subscriber branch
- Anchor fittings for SIP subscribers
- Fittings for laying wires along building facades
- Termination of SIP subscribers
- Intermediate and re-grounding fittings
- Intermediate fittings and fittings for the main SIP branch
- Double anchor fastening of self-supporting insulated wires when the direction of the route deviates ≤100° and installation of surge suppressors
- Input of SIP into the transformer substation and connection to the transformer
- Intermediate SIP fittings for the main line
- Intermediate SIP fittings and street lighting connection
- Double SIP anchor fastening when the route direction deviates 90°
- Anchor fittings and clamps for connecting SIP to bare wires
The network diagram shows a SIP line up to 1 kV with 14 nodes. The cross-section of the wires is the same, and all fittings are selected according to the dimensions of the specified SIP. To select fittings for wires of different sections, it is better to use the main catalog for fittings for SIP up to 1 kV.
Installation of SIP wire
Installation of SIP wires on supports is carried out for the purpose of distribution between objects and input of electricity into the house in networks with voltages up to 1 kV. It is carried out with VLI wires (overhead insulated lines) - SIP-1, 2 or 4. SIP-3 is used for laying VLI lines (overhead protected lines) up to 10 kV
Installation of SIP on supports
Self-supporting insulated wire (SIP) is made of four (or two) stranded conductors, insulated from each other and the environment by a layer of cross-linked polyethylene. Installation of SIP wires can be carried out by attaching them to special supports and pulling them along the facades of electrified objects.
Description and types of SIP
A self-supporting electrical wire consists of several wires isolated from each other (aluminum wire intertwined). When laying new lines in accordance with GOST R 52373-2005, it is necessary to use a self-supporting cable. According to the new PUE rules, these cables are recommended to be used to connect electricity consumers.
Today there are the following types of SIP:
- SIP-1. This is a four-core cable used in three-phase electrical networks with voltages up to 1000 V. Moreover, three of its cores are designed for connecting phases (isolated from each other), and the fourth (zero) is without braid and has a steel core. They also produce SIP-1A cable, in which the neutral core is insulated.
- SIP-2. All cores in this cable are insulated. Its scope of application is the same as that of the cable described above.
- SIP-3. This is a single-core wire with polyethylene insulation. Thanks to the steel core, it is highly durable. It is used in electrical networks up to 35 kV.
- SIP-4. This is a four-core cable with polyethylene insulation, designed for power lines up to 1000 V. It does not have a steel core. It is often used to make branches from the main power line in country houses and in the private sector.
- SIP-5. It includes two or more insulated conductors, all of them without a steel core. This cable is used in electrical networks up to 1000 V.
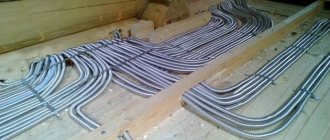
Features of SIP laying
Before installing the SIP wires, prepare the route by clearing the area for installing supports and rolling out the cable. During the preparation process, the old overhead line is removed or a new one is laid next to it, taking into account the dismantling of the old one. Rolling is performed by tightening the wire onto the supports using a special cable. Fastening the SIP to the pole is done using tools and materials for installing the SIP cable.
Band tensioner
- Install supports.
- Special hooks or brackets are mounted on the supports for mounting SIPs.
- Using equipment, the leader cable is unwound and suspended.
- Stretch the SIP onto the supports and tighten it.
- Attach the cable to supports.
- Arrange linear branches from the main line.
Preparing to roll out the cable
Special rollers are installed on the supporting and supporting supports. To do this, belts are used on the load-bearing ones, and hooks on the supporting ones. At a distance of at least the length of the support, a drum with wire is placed on the side of the outermost supporting column of the span prepared for rolling out. On the other side of the span, a drum with a cable leader is installed, the diameter of which is selected taking into account the method of rolling out: manual or mechanized, and the wire used.
Pulling SIP wire onto supports
Important. Before installing the poles, you need to secure all the necessary brackets and hooks to eliminate unnecessary work on the pole later.
Pulling the cable leader
A synthetic rope is lifted onto each support. As soon as the leader cable is tucked into the rollers of all supports, it is connected to the SIP cable using a stocking and a swivel. The swivel will not allow the cable to twist while placing the wire on the supports.
Swivel for connecting cable and SIP
Rolling out
By slowly reeling in the leader cable, they begin to lift the SIP onto the supports. As it moves, the wire smoothly rises to the first and subsequent poles, taking the place of the cable on rollers until it stretches over the entire prepared span. During the stretching process, make sure that the cable does not touch the ground or rub against poles and fasteners. You cannot lift SIP from the ground after first rolling it out or rolling it out while moving. But quite often this is what is done.
Attaching to supports
When the cable, together with the cable leader, passes the last support of the span, the SIP is secured in a clamp on the first anchor pole, leaving enough wire for further connection with another span, the supply to the house. Next, the leader cable is disconnected and during installation the wire is secured to all anchor and intermediate supports. The unrolling rollers are removed during the fixation process.
Intermediate clamps for fastening SIP on a pole
Cable termination
Stretch
The tension is carried out using a hand winch. The end of the load-bearing cable core located on the first anchor support in the span is inserted into a special clamp. Using a hand winch, the wire is pulled up, controlling the tension force using a dynamometer. The recommended readings of the measuring device can be found from the SIP installation project or from a special table. It shows the parameters calculated for wires of certain brands, taking into account the length of the anchor span and temperature.
Types of fasteners for SIP
To lay a self-supporting wire, use the following fasteners:
- intermediate support clamps;
- brackets for fastening anchor clamps;
- brackets for fastening intermediate clamps;
- anchor brackets for power consumer wires;
- anchor clamps for insulated load-bearing neutral core;
- anchor clamps for power consumer wires;
- mounting hooks;
- fastening tape (the tape must be made of stainless steel);
- stainless steel clamps;
- stainless steel yokes;
- fastening ties;
- facade fastenings for SIP;
- Spiral knits.
Many clamps allow you to attach two self-supporting cables at once. To do this you need to use another clamp. In this case, fastening the SIP will save not only materials, but also free space. Do not use simple cable ties for this purpose. You only need to install clamps for the self-supporting wire - they are wide. In addition, they are made of high-strength plastic, so they are more durable.
Anchor clamps
Using these clamps, SIPs with an insulated load-bearing neutral core are secured. The anchor clamp consists of a body and self-adjusting wedges that allow you to carefully clamp the neutral core.
Thanks to the flexible cable, you can install up to three clamps on one bracket.
Facade and pillar brackets
The brackets securely hold the anchor clamps on the facade. They differ in design. When choosing these fasteners, you need to consider the purpose for which the cable is used, because power wires often get very hot (heating of the cores up to 90°C is allowed). Such fittings for fastening SIPs must provide a large gap between the walls and the cable so that it is well cooled.
For installation with tape, use brackets with large limiting projections. During the operation of power lines, a backlash appears in them, which is associated with the stretching of the tape. If these SIP fastening units are on supports with small protrusions, then it can jump off the fastening point.
SIP supply to a house underground
When connecting an object to a source of electricity, sometimes difficulties arise, for example, it is necessary to install additional support or remove a tree that interferes with the laying of cables through the air. In this case, the owners of houses and dachas are interested: is it possible to lay SIP in the ground? The answer to this question can be found in GOST R 52373–2005. It states that the self-supporting insulated wire is intended exclusively for laying overhead power lines. Therefore, the use of this cable for laying an underground line will be a direct violation of current regulations.
According to the operating instructions for electrical installations, electrical products must be used in strict accordance with the manufacturer's instructions regarding the intended purpose of the product. If the technical specifications of the power supply project specify the use of a self-supporting cable, then the supply to the house must be carried out only by air. Otherwise, the connection will be incorrect.
If such a method is really necessary, then do this installation in a metal pipe, or at least in HDPE or PVC. This will protect the cable from moisture and, most importantly, rodents.
Security measures
For any electrical installation work, the first and most important thing is to comply with electrical safety rules.
- Do not carry out work in high humidity, fog or during rain, as well as in the dark or at twilight;
- It is necessary to use only certified and reliable tools, cables and fasteners;
- Do not use a damaged cable;
- Do not use fasteners and clamps that are not intended for the type of cable used;
- Work must be carried out strictly using special clothing;
- Live wires are insulated with special overlays;
- Work at height must be carried out by professional installers using machines and mechanisms designed to work near power lines and having the appropriate permit.
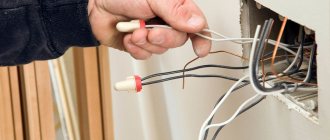
Connection to metering devices
Typically, an electricity meter along with circuit breakers is installed on the outer wall of the house. The connection is made first to the circuit breakers and electricity meter, only then is the cable inserted into the room. To lay SIP from the metering device to the point where the cable enters the house, a solid wire is used. It is fixed on the facade using a mounting hook or other special fasteners.
SIP facade fastenings for brick and wooden houses
Features of connecting to a meter or machine
The SIP is connected to the metering device in the usual way: the ends of the wire are stripped of insulation, inserted into the holes with terminals and clamped with screws. The connection to the meter can be made through automatic switches, which are mounted in front of the electricity meter. Depending on the type of protection device used, the connection is made by directly inserting the bare end of the cable into the hole with terminals or using special lugs.
Connecting SIP to the machine
Tools and accessories for working with SIP
The following allow you to install a self-supporting wire efficiently and safely:
- tools for tensioning steel mounting tape;
- cable cutting scissors;
- scissors for cutting steel tape;
- winches;
- mounting stockings;
- mounting clamp;
- mounting rollers;
- swivels;
- hydraulic presses for crimping insulated sleeves and tips with cord brush;
- dynamometers;
- cord brushes;
- tools for installing reinforced ties;
- insulated spanners;
- grounding kits;
- separating wedges;
- short-circuit devices;
- universal claws and manholes;
- safety belts;
- slings;
- device for twisting wires.
Entering the house
In the case when the metering device is located indoors and the issued Technical Conditions allow this option, a dilemma arises: install the SIP inside the building and connect directly to the metering cabinet, or make the transition to VVGng cable before entering the house? Both options are possible in principle, but the following nuances should be taken into account. The SIP shell does not have sufficient fire resistance compared to the VVGng cable, therefore, it is undesirable to run this wire inside, especially if the house is wooden. On the other hand, energy sales representatives are unlikely to accept a wire connection located before the meter. There are two ways to get out of this situation:
- Input a solid SIP cable using metal pipes and corrugated hoses, treating it with one of the fire retardant compounds in the form of paint or paste;
- On the outer wall, before entering the house, install a circuit breaker, connect the SIP to the input, and connect the cable to the output, going inside the room to the meter. The switch should be placed in a sealable box.
The second option looks preferable, since: firstly, a material with high fire resistance is used indoors, and secondly, a section of the cable hidden from view, where it passes through the wall, is protected by an automatic machine. In this case, an automatic input to the meter in the metering panel is no longer required.
Input of electricity into the building
As mentioned above, laying the input cable is the prerogative of the employees of the energy sales organization.
Connecting a house to a power line can be done in three ways:
- Overhead line from pole to building. Aluminum wires without insulation are used. The method is unsafe; in recent years, they have been trying not to use it.
- Input from the overhead line using SIP. Due to the reliability of the line and operational safety, this method of delivering electricity is considered a priority.
- Armored underground cable. The method is considered the safest (especially for wooden buildings), but its disadvantage is its high cost. Rarely used.
Despite the advantages of SIP described above, there are many opponents of this technology when it comes to residential buildings (even if they are houses made of brick or stone). Many experts consider the SIP insulation layer to be not reliable enough for residential buildings.
To prevent undesirable consequences in the event of an insulation rupture, cables must be positioned at a certain distance from building structures.
The fact is that overhead lines are protected from short circuits by an automatic device that operates under conditions of high currents, and shutdown, if necessary, occurs with some delay. Even in a short period of time, the resulting electric arc can ignite building structures, especially if they are wooden.
However, most specialists prefer SIP. The numerous advantages of this type of cable cancel out the disadvantages, especially since safety can be ensured using a special thick-walled metal pipe into which the cable is laid.
The pipe allows you to neutralize the effects of an electric arc. It is recommended to pay close attention to the inlet and outlet holes of the pipe: they should be covered with corrugated material to prevent the wire from rubbing against the metal.
One of the ways to organize the input is to switch from aluminum SIP cores to an internal cable, which is used for wiring throughout the building. The main requirement for such a cable is fire resistance. In addition, the area up to the switchboard must be additionally protected with a circuit breaker. An automatic device is all the more necessary if wires without insulation are used, connected to a piece of cable.
Note! The rating of the machine must be one value higher than the value of the input panel.
Slider systems
Currently, the building materials market offers a variety of fastening systems and profiles that can be used for installing electrical wiring on the external walls of residential buildings. Modern slider fastening systems are distinguished by many positive qualities and attractive technical characteristics, in terms of which they are not inferior to the already described products of the Alta brand - SF and brpf.
Slider systems are usually called any structures that are equipped with special fittings - rails and guides along which certain elements of such structures move.
Other types of facade fastenings, comparison of characteristics
Facade clamps of the SF series have significant advantages for installing SIP along the wall. The range of wire sizes secured with straps is sufficient for any type of wiring except reinforced cables. No additional parts are required for wall mounting.
| Facade fastening brand | Wire thickness, mm | Distance to wall, mm | Step, cm | Peculiarities |
| SF 20 | 18 — 55 | 80 | ||
| SF 50 | 80 | |||
| SF 60 | 70 | |||
| SF 50D | 80 | reusable belts | ||
| SF 50W | 70 | for wooden walls | ||
| BIC 15 - 50 | 15 — 50 | 0 — 20 | Fixation with self-tapping screws, metal tape and couplings | |
| BIC 15 - 90 | 15 — 90 | 0 — 20 | Fixation with self-tapping screws, metal tape and couplings |
Fastening for SIP model BIC
For comparison, fastenings for SIP model BIC are taken. They are mounted on the surface of the facade using self-tapping screws. The safe gap between the wall and the cable is not maintained. To lay the harness, special couplings are required. The labor intensity is much greater. It is impossible for one person to do all the work. Not suitable for wooden walls.
Characteristics of facade fastenings of the SF series
This method of fixing electrical systems was invented and began to be used in Sweden on wooden poles in the middle of the last century. Now the SF model is also produced in Russia. Products from foreign manufacturers are also available for sale. Facade fastenings for SIP series SF 50 and 20 are designed for mounting cables on external walls made of concrete, brick and wood. The outside of the structure is coated with insulating material. The rod is a self-tapping screw made of durable alloy steel. All parts are not subject to corrosion and have a service life of more than 50 years.
Facade fastening SF 50
Facade fastenings SF 50 are designed for installation of individual or several SIP cables 2 and 4. The minimum diameter of the fixed harness is 18 mm, the maximum is 55 mm. Fixation is carried out by tightening the belt laid in the semicircular base of the cable. All parts are installed on the SF 50 facade mount. Additionally, only a replacement belt is sold separately for cases when it is necessary to replace the wiring or increase the number of connections. Facade fasteners marked D have reusable straps. The letter W is placed on products intended for wooden walls.
Facade fastening SF 50 W
The peculiarity of installing SIPs using SF series fasteners is simplicity. The harness is placed in the saddle and tightened with a belt. A safe distance of the laid cable from the wall surface is guaranteed. According to GOST requirements, it must be at least 60 mm.
Self-supporting insulated wire for supplying electricity to industrial facilities and residential buildings
The SIP cable is a bundle of wires. The base is zero. It can be covered with a protective film marked 2, or simply bare - number 1. There are three insulated cores around - according to the number of phases. If all four wires are located in a straight line, they are marked with a colored stripe along the axis - SIP-4.
This design is more convenient than the classic one, when each cable is pulled and attached independently:
- the amount of fastening fittings used is several times less;
- one line replaces four;
- it’s easy to supply electricity to the house yourself;
- significant time savings;
- there is no need to mark the wires, since the zero is in the center or the insulation has stripes of different colors, as in SIP-4.
Self-supporting wire SIP-4
The disadvantages of installation include its rigidity. When replacing old wires with self-supporting ones, it is difficult to fix them to old insulators using the screwing method. Tightening straps or steel straps are required. Small radius bending is not possible. In other cases, when the line is evenly positioned, the rigidity reduces sagging. To stretch the wire along the wall and make the wiring, you need a special façade fastening. They should easily fit into the wall material and securely fix the wire, taking into account linear thermal expansion.
Mounting SIP to the wall
Video “Connecting to the network from a pole”
Power lines are something to which it is very easy and convenient to connect your own home electrical network.
It is only important to know how to do it correctly. This video will help you with this
03/08/2016 at 11:51 am
Thank you very much for the information. My closest room to the main line is a workshop. Since I repair cars there, I have to connect various electrical tools with high power. One time, the external wiring at the connection point began to spark. And when I quickly ran to turn everything off, I got a strong electric shock. All because there was no insulation on the aluminum core... Now I regret that I did not replace it with such a wire earlier. I kept putting it off until the emergency happened.
03/09/2016 at 7:53 am
But I myself understand a little about electrical engineering, and even if I know something, I’m still afraid to do it. As a result, when I needed to start working with electricity, I turned to the company. There are guys there who understand what to do. Three people completed the job in a few days; all that remained was finishing work in the house. We did absolutely everything! Cables with grounding, a grounding loop was even installed. Everyone is happy. At the beginning of spring I plan to install a lightning rod and nothing will be scary))
03/10/2016 at 8:23 am
For some reason, I personally don’t really trust aerial laying. I remember once my neighbors’ wires broke. It all happened due to the fact that a strong wind and constant erosion of the pole constantly tilted it towards the road. I warned them that something might happen, let them call the emergency service. Of course, everything is as usual. They were postponing it, and this pole fell onto the roadway after a rainstorm. As a result, two houses were de-energized, part of the wiring was torn out and the meter fell off. Now there are even more problems. I advise you not to put off resolving such issues, and everything will be fine!
Advantages of using SIP
First of all, for owners who want to do the installation of electrical wiring in the house with their own hands, you should understand what a SIP is. SIP is a self-supporting insulated wire. Now its cores are made of aluminum. Previously, wires for laying overhead power lines did not have external insulation, since at that time there was no material available that could be exposed to the open air for a long time and withstand tension.
Therefore, bare aluminum cables without external insulation were used. This approach could not ensure the safety of the overhead line. During frosts, the cores themselves became icy, moisture entered, the metal was subjected to oxidation and corrosion, and in strong winds there was a possibility of breaks and a pair of main wires intertwining with each other.
The solution to such problems was SIP. The SIP design made it possible to eliminate most of the dangerous consequences for the electric line in any area, since the insulation made of cross-linked compressed polyethylene provided reliable protection from external factors. SIP insulation is resistant to water, excess tension, and can also withstand high temperature changes. The polyethylene shell does not ignite when exposed to open fire, and can be exposed to sunlight for a long time. The minimum service life of SIP is from 25 to 40 years even under the most severe conditions.
The use of this type of wire allowed for a reduction in floor space, as the exposed electrical lines needed a large space to prevent them from touching each other. When bare conductors came into contact, a short circuit could occur, and the resulting fault could knock out power to a large number of homes.
The SIP design makes the installation process easier. For this, a variety of fasteners, metal supports and poles can be used. Experts recommend using SIP during installation if the work involves supplying electricity to the house from a power pole.