Electrical overhead lines (OHLs) are now mainly built using insulated self-supporting wire. Its distinctive feature is the presence of surface insulation made of thermoplastic or cross-linked lightproof polyethylene, which makes the operation of lines and bends safer.
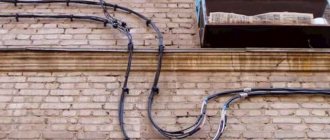
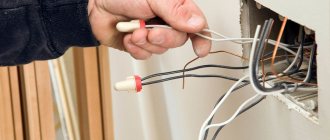
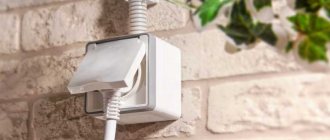
Let's look at how SIP installation is carried out as part of the arrangement of electricity input into the building.
Inserting wires into a residential building Source izion.pro
Description and types of SIP
A self-supporting electrical wire consists of several wires isolated from each other (aluminum wire intertwined). When laying new lines in accordance with GOST R 52373-2005, it is necessary to use a self-supporting cable. According to the new PUE rules, these cables are recommended to be used to connect electricity consumers.
Today there are the following types of SIP:
- SIP-1. This is a four-core cable used in three-phase electrical networks with voltages up to 1000 V. Moreover, three of its cores are designed for connecting phases (isolated from each other), and the fourth (zero) is without braid and has a steel core. They also produce SIP-1A cable, in which the neutral core is insulated.
- SIP-2. All cores in this cable are insulated. Its scope of application is the same as that of the cable described above.
- SIP-3. This is a single-core wire with polyethylene insulation. Thanks to the steel core, it is highly durable. It is used in electrical networks up to 35 kV.
- SIP-4. This is a four-core cable with polyethylene insulation, designed for power lines up to 1000 V. It does not have a steel core. It is often used to make branches from the main power line in country houses and in the private sector.
- SIP-5. It includes two or more insulated conductors, all of them without a steel core. This cable is used in electrical networks up to 1000 V.
Connector design
You should start by getting acquainted with the internal structure of the product, studying which will help you understand the principle of the formation of a branch and why it is called that. The fact is that in its shape this connector with steel clips is very similar to a nut (photo below).
This connector consists of the following parts:
- The dielectric outer shell is oval in shape, which is the body of the product with latches located on it.
- A kind of “core”, which is a structure of metal plates held together with bolts.
After disassembling the nut, two dies are visible with recesses (grooves) on each of them, intended for fixing and clamping the bare ends of the wires. Their depth and width depend on the section for which the branch compression sample is designed. The most common models of products of this class and the cross-sections of the cores fixed in them are indicated in the table below.
The samples of “nut” type compressions given in it are used in alternating current networks with operating voltages up to 660 Volts inclusive.
Advantages and disadvantages of using SIP
These wires allow:
- ensure the required electrical safety class;
- increase network reliability during operation;
- reduce the cost of maintaining the electrical network (up to 80%);
- reduce installation time and reduce labor costs;
- place electrical lines on the walls of buildings;
- reduce losses during electricity transmission (due to low resistance);
- connect objects without disconnecting the main supply line;
- lay and connect lines on your own.
Disadvantages of SIP:
- cost 20-25% more than conventional wires without insulation;
- many energy suppliers are not ready to use SIP (outdated equipment and no tools for installation);
- Only overhead power lines can be laid.
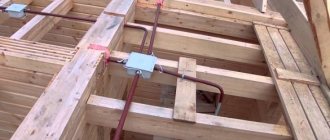
Methods of attachment to different surfaces
Walls and ceilings are made from various materials with different structures and densities. Depending on this characteristic, the method of fastening changes:
- Dense - wood in any form, plaster and soft plaster solutions (including gypsum). A nail or self-tapping screw fits perfectly into all these materials. In some - chipboard, OSB and some others - it is better to first drill a hole with a slightly smaller diameter than a self-tapping screw, and then screw it in. Nails are often driven in immediately without pre-drilling. Self-tapping screws are screwed into wood and products made from it. Only for attaching the cable it is better to take them with a flat head
- Solid. This category of materials includes brick, concrete, screeds, and cements. You can’t screw a self-tapping screw into them even with a pre-drilled hole. For such materials, dowel-nails are used (they are also called dowels). This is a fastener consisting of two parts - a plastic dowel cap and a metal (sometimes plastic) screw. In such cases, a hole is drilled in the material with a drill diameter equal to or slightly smaller than the diameter of the dowel. A plastic cap is inserted into the hole. Its top edge should be flush with the surface (if necessary, you can hit it a couple of times with a hammer to level it or cut off the excess with a sharp knife). Then a fastening element (plate, clamp, etc.) is applied, which is attached to the inserted dowel with a screw.
Dowel installation
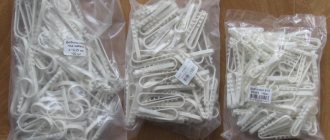
- Thin or soft. These are plastic, plasterboard, fiberboard, aerated concrete, foam concrete, etc. The usual fasteners do not hold in them; you need a special one, which has an extended “back” part. It has a large support area, due to which the fasteners can be held. Some examples of such fasteners (umbrella, butterfly dowel and dowel with drill) are presented in the photo.
To attach the cable to thin walls, you need special fasteners.
Rules for connecting wires
To connect the desired conductor to the main electrical cable, you must first disassemble the clamp. To do this, you need to remove the retaining rings located on the sides of the “nut”. After this, the bolts connecting the dies and the plate between them are unscrewed.
Then it is necessary to remove the insulation from the cable in accordance with the length of the intermediate plate inside the clamp. It is no longer advisable to strip the insulation.
How to connect the wires further? Very simple! The exposed sections of the conductors are inserted into the grooves of the dies, and then tightened with screws. Now the resulting structure is placed back into the insulated polycarbonate body of the “nut”. You will notice that there are four holes in the case. The first hole is tightly sealed, the second is intended for a branch cable, and the main electrical conductor is pulled through the remaining two holes. This is how electrical cables are connected using a nut.
Do not forget that a “walnut” type connection is not able to guarantee the tightness of all joints, therefore, during operation under different climatic and weather conditions, dust, dirt and moisture can get inside the case. To provide some degree of protection, the compression housing must be insulated or, in other words, simply wrapped with electrical tape.
Finally, we recommend watching a video that clearly shows how to connect wires using a nut clamp:
Types of fasteners for SIP
To lay a self-supporting wire, use the following fasteners:
- intermediate support clamps;
- brackets for fastening anchor clamps;
- brackets for fastening intermediate clamps;
- anchor brackets for power consumer wires;
- anchor clamps for insulated load-bearing neutral core;
- anchor clamps for power consumer wires;
- mounting hooks;
- fastening tape (the tape must be made of stainless steel);
- stainless steel clamps;
- stainless steel yokes;
- fastening ties;
- facade fastenings for SIP;
- Spiral knits.
Clamps
Many clamps allow you to attach two self-supporting cables at once. To do this you need to use another clamp. In this case, fastening the SIP will save not only materials, but also free space. Do not use simple cable ties for this purpose. You only need to install clamps for the self-supporting wire - they are wide. In addition, they are made of high-strength plastic, so they are more durable.
Anchor clamps
Using these clamps, SIPs with an insulated load-bearing neutral core are secured. The anchor clamp consists of a body and self-adjusting wedges that allow you to carefully clamp the neutral core. Thanks to the flexible cable, you can install up to three clamps on one bracket.
Facade and pillar brackets
The brackets securely hold the anchor clamps on the facade. They differ in design. When choosing these fasteners, you need to consider the purpose for which the cable is used, because power wires often get very hot (heating of the cores up to 90°C is allowed). Such fittings for fastening SIPs must provide a large gap between the walls and the cable so that it is well cooled.
For installation with tape, use brackets with large limiting projections. During the operation of power lines, a backlash appears in them, which is associated with the stretching of the tape. If these SIP fastening units are on supports with small protrusions, then it can jump off the fastening point.
A drawing of an anchor fastening of a self-supporting cable to a reinforced concrete support is shown below.
Soldering or welding wires
This method is reliable. Typically, this method of connection in a junction box involves first stripping and twisting the ends, after which they are dipped into heated solder. It is advisable to connect aluminum to aluminum wires by soldering. They are then insulated using a heat pipe or insulating tape.
Method of twisting wires
It is strictly not recommended to immediately cool soldered wires in water; microcracks that occur with this type of cooling affect the quality of the connection. They don't last long.
Evaluation of the soldering method. It provides strong circuit contacts and excellent quality, is not expensive, and is the most reliable method of connecting electrical wires in a soldered box.
Technological disadvantage. You can't do this without a soldering iron. The speed of work is not high. The connection is naturally not detachable. It follows from this that soldering is done in extreme cases, using more modern connection methods. It has not been popular among masters for a long time because it takes more time.
There is also a less common method for connecting electrical wires, welding. The process is similar, but requires the use of a special welding machine, of course, and certain skills.
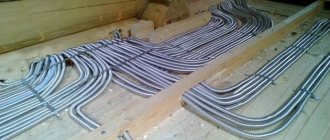
Features of SIP laying
Before installing the SIP wires, prepare the route by clearing the area for installing supports and rolling out the cable. During the preparation process, the old overhead line is removed or a new one is laid next to it, taking into account the dismantling of the old one. Rolling is performed by tightening the wire onto the supports using a special cable. Fastening the SIP to the pole is done using tools and materials for installing the SIP cable.
- unrolling device;
Unrolling device
- bandage tape tensioner;
Band tensioner
- fastening materials;
- line tensioner;
- dynamometer.
Step-by-step installation:
- Install supports.
- Special hooks or brackets are mounted on the supports for mounting SIPs.
- Using equipment, the leader cable is unwound and suspended.
- Stretch the SIP onto the supports and tighten it.
- Attach the cable to supports.
- Arrange linear branches from the main line.
Wire rolling
The installation of SIP begins after installing the VLI supports with clamps attached to them. Anchor clamps are installed on the anchor supports that carry the tension force of the conductors, and supporting clamps are installed on the intermediate supports located between them.
Installation of SIP cable begins with its unrolling. To do this, perform the following steps sequentially:
- Special unrolling rollers are installed on all supports of the anchor span on which the wire is mounted. On the extreme, anchor supports, the rollers are fastened with a belt; on the intermediate supports, the rollers are suspended on a hook in the eyes for supporting clamps;
- A drum with wire is installed behind one of the outer supports of the span. It is located in a vertical position on special stands that allow it to rotate during the rolling process. In order for the wire to enter the roller at a flatter angle, it is recommended to install the drum from the support at a distance not less than its length;
- On the other side of the mounted span there is a drum on which a leader cable is wound, usually a synthetic rope with a diameter of 10–12 mm, depending on the rolling method (manual, mechanized);
- Next, the leader cable is rolled out manually. This operation is performed by sequentially lifting onto each support, threading the cable into the roller and further pulling it;
- After lifting to the last support, the leader cable is connected to the SIP using a special stocking and swivel that prevents the wire from twisting during the rolling process.
What is the best way to connect wires in a junction box?
Above are all the permitted methods by which you can connect electrical wires in a junction box when installing wiring in an apartment or house. Each of them has its own characteristics, strengths and weaknesses. Obviously, the choice should be made between two:
1. Welding of wires should definitely be considered first, because... This method of connecting wires guarantees maximum reliability of all wiring. If you want to be completely confident in your electrical network, and as you know, connections are the bottlenecks of any electrical wiring, I recommend renting, buying or assembling a welding machine yourself in order to be able to weld wires in boxes.
2. Connecting wires with self-clamping terminals, suitable for those who want to do the wiring quickly, while still getting a fairly high-quality connection
In this case, it is very important to correctly calculate the electrical wiring and not overload it. Many electricians, not just self-taught ones, have recently chosen terminals because of the ease and speed of installation
I would recommend performing crimping only in cases where you already have specialized equipment (press jaws) and material - sleeves.
And if you know other convenient permitted ways to connect wires during electrical installation, leave a comment. In addition, write about your experience, which connection method and why you prefer. I think this will be useful to everyone! Just as usual, any comments on the topic, questions, discussions are welcome!
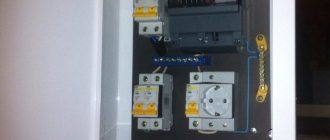
Connection to metering devices
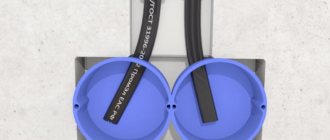
Typically, an electricity meter along with circuit breakers is installed on the outer wall of the house. The connection is made first to the circuit breakers and electricity meter, only then is the cable inserted into the room. To lay SIP from the metering device to the point where the cable enters the house, a solid wire is used. It is fixed on the facade using a mounting hook or other special fasteners.
SIP facade fastenings for brick and wooden houses.
Methods for connecting wires to a support
To connect the SIP wire to current-carrying power lines on a support, several options are used, depending on the power line cable.
For insulated cable lines, special piercing clamps are most often used, which are available in a wide range for various sections and types of insulation. Some clamps can be used without removing the voltage from the line: in their design, the stripping head is made in insulation, which allows you to safely connect the self-supporting insulated insulated insulated wire to the power line. At the same time, the design of the piercing clamps does not allow them to be reused, so everything must be calculated correctly, without any room for error.
But for bare conductors, special clamps are used that have contacts with a smooth surface and do not have piercing elements. When connecting a house to a power line, it is better to coordinate all actions with the energy supply organization. Such organizations may have their own requirements for connections and materials used.
Some “masters” lower the SIP along the pole and lay it underground to the house. But it is important to understand that a self-supporting SIP cable is not intended for such installation, since it does not have special protection from harmful influences and armor from mechanical damage, as a result of which it is intended only for laying in the air.
List of main characteristics
The characteristics of clamps of this type are determined by the following parameters:
- The number of branch SIPs that connect to the main core (usually from one to four).
- Cross-section of the main core (mm2).
- SIP cross-section (mm2).
- Maximum current load (A).
- Product weight (g).
As an example, we give a table of characteristics of NILED connecting fittings.
Characteristics of NILED connection clamps
Possible installation errors
When installing an input into a house using a SIP cable, difficulties may arise, and in order to avoid mistakes, the most common of them are listed below:
- Weak tension: a dynamometer was not used when tensioning, and installation was carried out “by eye.” This error can lead to increased load on the cable, especially in winter, and its breakage.
- Strong tension: also has a negative effect on the cable, especially its insulation.
- An attempt to reuse piercing clamps: they are disposable, since the head breaks off and re-installation is not possible.
- Damage to insulation during work: It is important to use a solid cable; damage to the insulation may result in a short circuit or electric shock.
- The clamps are not fully secured: the conductors must be correctly and securely fixed in the clamps and not dangle in them. A bad clamp will lead to poor contact, sparking and cable damage.
Band tensioners
There are two types of such tensioners:
- with a threaded mechanism (“meat grinder”, “helicopter”)
- with ratchet mechanism
Which one is better to use is entirely up to you. The point here is the habit and skill of working with this or that machine. But still, a mechanism with a threaded tension principle has gained great popularity among us.
Primarily due to its simplicity and lower cost. How to work with them and avoid popular mistakes, when you need to install yokes, and when you need to use clamps, is described in the articles “Installation of SIP bandage tape” and “Tool for bandage tape with a ratchet mechanism.”
Technical characteristics and brands of machines for bandage tape from Ensto, Sicam, Niled, KVT:
KVTSicamNiledEnsto
KVT
Sicam
Niled
Ensto
Security measures
For any electrical installation work, the first and most important thing is to comply with electrical safety rules.
- Do not carry out work in high humidity, fog or during rain, as well as in the dark or at twilight;
- It is necessary to use only certified and reliable tools, cables and fasteners;
- Do not use a damaged cable;
- Do not use fasteners and clamps that are not intended for the type of cable used;
- Work must be carried out strictly using special clothing;
- Live wires are insulated with special overlays;
- Work at height must be carried out by professional installers using machines and mechanisms designed to work near power lines and having the appropriate permit.
Combining tires from different materials
Connecting copper and aluminum wires with a walnut clamp
Connecting wires using electric nuts can be done using more than one branch method. Due to the simplicity of the design and the reliability of the resulting connection, these elements are used in any sections of existing electrical networks, including distribution boxes. When using them inside installation products, you need to take into account the dimensions of the clamps themselves and select boxes of appropriate dimensions.
If it is necessary to connect aluminum and copper conductors, electrical wiring clamps “nuts” are simply irreplaceable. The need for them is explained by the following reasons:
- When aluminum and copper wires come into direct contact, the metals in the connection area oxidize over time.
- With prolonged use of the twist, it gradually breaks down and can weaken so much that the circuit through which the load current flows is completely broken.
- As a result of this destruction, the power supply to the object connected to it is completely interrupted.
When forming nut connections, first the copper and aluminum wires are stripped of insulation to the width of the plate. After this, the fasteners are first loosened, and the corresponding wires are inserted into the vacated grooves. At the final stage of assembly, they are tightened with the previously loosened screws. Due to the fact that a brass plate is placed between the copper and aluminum wires in the nut, direct contact between them is not formed.