The importance of correct installation
The temperature of the electric arc, which occurs when a short circuit of conductors carrying a current of standard 220 V, can reach 5000 °C (!). No fire-prevention impregnation helps against the temperature that melts steel.
Despite this, wiring in a log house made of rounded logs or a frame country house is often done “carelessly,” if not carelessly.
This is usually motivated by a reluctance to tinker a lot with the dacha, where they live for two to three months a year. But you should understand: poorly made internal wiring of a wooden house can leave you without this very house.
Please note that “poor quality” primarily means “not according to the rules provided for a wooden house.” The usual practice of installing a household electrical network in an apartment or brick house is not suitable for a wooden one due to the flammability of the building material .
Cost of work performed
The cost of work performed independently consists of prices for materials and additional tools. When contacting a specialized company, you should keep in mind that the fee is charged not only for wiring installation (the tariff depends on the footage), but also for each device (for example, installers will charge from 300 to 500 rubles for installing a switch or socket). On average, installing a network in a house with an area of 50-60 m² will cost the owner from 50 thousand rubles. (excluding payment for the project and materials).
What the regulations say
The rules for electrical installations - PUE - give a clear answer to this question. Hidden wiring in the voids of partitions made of flammable materials is permissible only in metal pipes that have the property of localization.
SNiP gives a more vague formulation, so it is recommended to be guided by the PUE. By flammable material we mean wood, even if it has fire-resistant impregnation.
Under the metal pipe is a steel or copper pipe of square or round profile, having a regulated wall thickness of at least 2.8 mm for any cable with a conductor cross-section of up to 4 mm.
For cables with a cross section of 6-10 mm, the pipe wall thickness should be 3.2 mm.
In this case, it is forbidden to tightly “clog” the pipe with cables - the cable should occupy no more than 40% of the clearance.
To insert a cable from a power line into a wooden house, only a thick-walled steel sleeve is used.
This requirement is due to the following situation. If a short circuit occurs due to a cable breakdown, only a thick-walled pipe can withstand the flash until it self-extinguishes or the circuit breaker is triggered.
The use of metal hoses or other “armor” made of corrugated metal or plastic for hidden wiring in a wooden house is unacceptable for the following reasons:
they do not provide localization of the source of a possible fire, since they instantly burn out during a flash;- they do not protect the wiring from the teeth of mice and rats;
- they do not protect the wiring from damage if the wooden house shrinks.
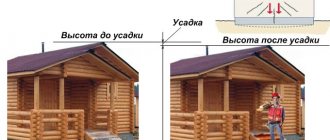
The main “unofficial” rule for high-quality wiring in log wooden houses is the prevalence of safety over external beauty.
Regulations
When developing design documentation and carrying out installation work, it is necessary to take into account the requirements of the following standards:
- Rules for the operation of electrical installations (PUE) in the current edition;
- A set of construction norms and rules (SNiP), which are updated as adjustments are made to the legislation of the Russian Federation.
PUE, edition 7
The document lists the requirements for the design and organization of electrical networks in multi-apartment residential buildings or private properties, as well as at industrial facilities.
In addition to the requirements for the location of entry points and the list of protective equipment, the standard contains tables that allow you to select the cross-sections of cables or lighting devices.
As of mid-2022, the latest is the 7th edition (in force since the beginning of 2003), approved by Order of the Ministry of Energy of the Russian Federation No. 204 of July 8, 2002.
SNiP 3.05.06-85
The documentation was developed in the USSR and contained rules for the creation and reconstruction of electrical wiring in houses and during the construction of main power lines with voltages up to 750 kV (overhead type). After updating, the standard received the designation SP 76.13330.2016. At the same time, the text contains references to GOST standards adopted in the USSR.
SNiP 31-02
In 2001, an additional standard SNiP 31-02 was adopted, regulating actions during the construction of private houses in rural areas or within the city. The document was approved by the Decree of the State Construction Committee of the Russian Federation. Subsequently, additions were made to the text. The regulatory legal act lists the basic requirements for the layout (indicating the permissible areas) of premises, the load-bearing capacity of structures and fire safety. SNiP 31-02 is used when developing projects together with other acts (the list is given in the appendix to the document).
Laying in pipes
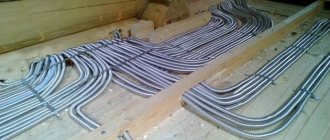
Laying wiring in steel or copper pipes, observing the requirements specified above, is possible only at the stage of building a house from scratch.
For example, when installing electrical wiring in a house made of laminated veneer lumber, the installation of a system of such pipes, junction boxes and sockets (also metal) is carried out at the stage of installing the frame.
The rules for hidden wiring of power cables in a wooden house do not allow laying the cable in metal or plastic corrugation in sawn grooves. Laying wiring in grooves inside the walls of a wooden house in thick-walled pipes is acceptable, but difficult due to the need to bend the pipes and make complex connections using couplings, fittings or welding.
There are a number of requirements that must be met when installing hidden wiring in a wooden house.
The inner surface of steel pipes must be painted or galvanized to prevent corrosion, copper pipes must be painted to protect against oxides.
The use of a metal hose/steel corrugation on bends and transitions makes the entire structure meaningless - transitions are provided with threaded connections or butt-to-butt welding.
Horizontally, electrical wiring pipes in a wooden house are laid at a slight angle to allow condensation to escape; at the lowest point, a hole is made for liquid drainage (not inside the wall). The entire system is provided with a grounding connection that is separate from the grounding provided by the wiring.
In wooden houses, only metal sockets are used for sockets and switches. The connections between the junction box and the pipes entering it must be sealed.
To avoid damage to the cable sheath by a sharp edge when exiting the pipe, the edge must be rolled or provided with a protective plastic plug.
Power supply to a wooden house
The internal power supply system of the house is connected to the electrical network by the local energy supply organization - at the request of the consumer, with the installation of an electric meter and only subject to the availability of a project.
Power supply to a wooden house is carried out in one of two ways:
- By air line.
- Underground cable laying.
Overhead connection
The rules for connecting a private house to power supply from an overhead line are determined by clause 3.18 of SNiP 3.05.06-85. According to these standards, the following must be used at the power supply input to the building:
- insulated cables in an NG class sheath (non-flammable) with a conductor cross-section from 4 mm² for copper and from 2.5 mm² for aluminum;
- insulated wires of the same cross-sectional dimensions.
In the designed places for the passage of cables through combustible structures, sections of steel pipe (sleeves) are installed so that their cuts protrude outward by 1 cm. The gaps between the sleeves and the walls of the holes made are sealed with cement mortar.
To prevent the ingress of rainwater and the accumulation of condensate, the passage sleeves in the external walls are mounted with a slope of 5 degrees.
In the section of passage through the steel sleeve, a piece of rubber tube is put on each wire - an additional rubber sleeve.
At the ends of each of the rubber sleeves, maintaining alignment, special input fittings are put on: on the outside there is a funnel, and on the inside there is a bushing. These products are made solid from porcelain or split with tightening clamps - from stainless or galvanized steel.
For a wooden house, the distance between adjacent funnels (outside) must be at least 10 cm. The bushings and funnels of both pipes are filled with bitumen waterproofing compound upon completion of installation.
Conventional section of the power supply input from an overhead line into the wall of a wooden house
Wires outside should be located at a distance of at least 0.2 m from each other and from the protruding structures of the house, and the point of entry of power into the house (hook with an insulator) is located at a height of at least 2.75 m from the surface of the blind area.
In addition to porcelain and metal lugs, when installing a cable entry into a house from an overhead line, various UCPs (cable passage seals), including heat-shrinkable ones, are also used. As a rule, such devices are designed for a certain range of cable and sleeve diameters, so choosing the right size is not difficult.
Further installation of wiring inside the house at the cable exit from the porcelain bushing depends on the design method of its installation (hidden, open).
Input of electricity through a pipe stand
If the height of the building is insufficient to meet the requirements of the PUE for the vertical parameters of the overhead line connection, the power supply to the wooden house is carried out through a pipe stand - a hollow mast, vertically mounted outside on the wall or roof and serving as a channel for the cable.
Pipe stands are made of steel pipes with an internal diameter:
- from 20 mm – when power is supplied by two wires;
- from 32 mm - for four conductors.
On the upper section of the pipe stand, to prevent rainwater and snow from getting into it, a semicircle is formed using a pipe bender.
Approximately in the middle of the height, a horizontal crossbar made of a 40x40 mm steel angle, 45-50 cm long, with two vertical steel rods for mounting ceramic insulators, is welded to the pipe stand.
At the transition of the arc into the straight section, a ring (washer, nut) is mounted to the pipe, to which two guy wires made of steel wire will be attached to counteract the tension created by the overhead line.
Some hardware (bolt, nut, stud) is also welded to the pipe stand - to “zero” it by connecting it to the neutral core.
In the lower part of the pipe stand, using the same pipe bender, an angle of 85° is formed so that the bent section of the pipe (10 cm longer than the wall thickness) after installing the structure is located in the wall with an inward rise of 5°. At the bottom of this bend, a Ø 5 mm hole is drilled in the pipe for the condensate outlet.
The cut edges of the pipe stand are processed with a file, after which the structure is coated on the outside with two layers of anti-corrosion paint.
If, when installing a pipe stand on a wall, the distance from its lowest point to the ground is less than 2 m, then it is mounted on the roof, arranging for the supply of power to the home through the roof. Particular attention in this situation is paid to the rigidity of the installation of the rack on the roofing and the sealing of the passage in it.
Before installation at the design location, a “conductor” (cable or thin wire) is pulled through the pipe stand for subsequent pulling of the cable through it. The structure is installed in place and attached to anchors mounted on the base, after which it is equipped with guy wires and the gaps in the passage are sealed. Threaded connections “bolt-nut” are made using screw washers and are covered with a protective layer of technical petroleum jelly.
Connection with underground cable
Inputting power into a wooden house using an underground cable is more reliable and safe, since the impact of external factors on the conductor when installed correctly is minimal.
The supply of electricity to a house via an underground cable line is regulated by clause 12.1 of VSN 59-88 (Departmental Construction Standards).
Underground power supply to the house should be carried out only with armored cables, which are laid in a trench without protection by pipes. The practical use of unprotected cables placed in electrical polymer pipes is a violation of current standards.
From the trench, the power cable is inserted into the building in one of two ways:
- through the foundation or wall of the basement - with the installation of a thick-walled passage sleeve made of steel;
- through an external wall - with an entrance to the building at a height of at least 2.75 m and pipe protection up to a height of 1.8 m.
The power supply to the house via an underground cable is arranged during the construction of the building - at the stage of constructing the foundation, which makes it possible to provide everything necessary for the input of communications.
Open wiring - installation features
If a wooden house has already been built, but there is a need to replace the wiring in it, then this can be done without sawing grooves in wooden partitions, which are often not very thick and strong themselves.
Let us remind you that aluminum wire, the most popular among electricians in past years, is categorically unacceptable in a wooden house due to its tendency to fracture and fire hazard.
Open wiring in a wooden house is quite possible. Here are some options.
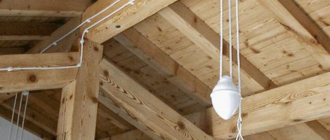
You can run the cable directly along the wall of the house, enclosing it in standard plastic corrugation or metal flexible armor.
The open method allows this wiring method, since the source of fire in the event of a short circuit will be immediately visible. There will be no fire inside the wall.
Wall mounting is carried out with ordinary corrugation clips.
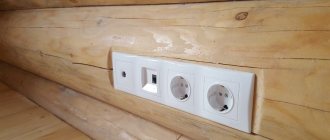
Wiring in standard cable channels is the same method as for an apartment, only a non-flammable asbestos or, for example, felt gasket must be provided between the cable channel and the wooden wall. A variation of such wiring is wiring disguised as a baseboard.
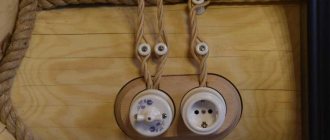
Retro wiring in a wooden building is a fresh take on old methods. The wiring is mounted on the wall of a wooden house using ceramic or plastic (non-flammable) insulators, maintaining a clearance of at least 10 mm from the wall.
A special, “antique” twisted power cable and sockets of the same style are used.
An open installation of a system made of metal pipes is also possible.
Fire protection measures
Basic measures to reduce the fire hazard of wiring:
- use of a continuous grounding system with an external loop and installation of line protection devices;
- installation of protective elements made of non-combustible materials between the wires and the wooden base;
- use for hidden wiring of steel guide pipes;
- selection of the electrical wiring cross-section and the rating of automatic fuses in accordance with the peak load;
- use for hidden installation of sockets with housings that protect walls from sparks;
- use of protective channels or sleeves made of materials that do not support combustion for an open circuit.
Advantages and disadvantages of open installation
All these wiring methods for a wooden house have their advantages and disadvantages. Installing wiring on a wooden wall of a house in a corrugated pipe is the easiest way; there are no problems with wiring in the junction box.
The downside is that this method is unaesthetic, as well as the need to remove the entire corrugated pipe in order to gain access to one cable.
In this regard, the cable channel is preferable, fortunately, now on the market you can find the color of the box “like wood”, and choose an individual shade to match the color of your internal coating.
The cable channel is convenient for installation - it is easy to open and close, and is relatively safe for a wooden house, since it itself is made of non-flammable plastic.
If desired, you can hide the wires by selecting the “bottom” wiring in the cable channel, disguised as a baseboard.
Please note that it is unacceptable to embed wires under a real baseboard!
Lighting or connecting sockets with a load of no more than 16 A can be done using “antique” wiring.
For this purpose, specially stylized wires, insulators between the wall and the wire, sockets, and the like are produced. But keep in mind that for a powerful load like a welding machine, you need to provide an outlet to which a suitable cable with a cross-section of at least 2.5 mm is connected.
The need to draw up a diagram
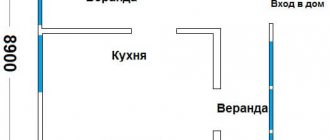
Before starting installation work, it is necessary to develop a project that ensures reliable and safe operation of electrical equipment. The scheme allows you to install sockets, switches or distribution panels in accessible places, allowing for repairs and reducing the risk of fire. A good design plans ahead for installation locations for cabinets that can limit access to outlets or switches. When drawing up the diagram, take into account the requirements of the standards for the number of sockets and the arrangement of elements relative to the floor level.
General installation rules
Open wiring in a wooden house must be carried out in compliance with the following standards:
- the point of entry of the cable from the power line into the wall, as well as the point of passage of the cable through the internal ceilings only in thick-walled metal sleeves;
- the distance from the cable to the wall when installed in an open way is not less than 10 mm;
- Grounding must be installed;
- Only a cable with a non-flammable sheath is used;
- socket boxes and distribution boxes in a wooden house are made only of metal;
- connecting wires to each other only in mounting boxes, and only using spring/screw terminals or soldered twist, which is closed with a casing or cap;
- Unsoldered twisting is unacceptable.
It is imperative to install an RCD for protection against leakage currents, as well as separate circuit breakers for short circuit protection for each group of consumers.
Electrical supply project for a wooden house
At the first stage, it is necessary to build a house plan indicating the location of switches, sockets, lighting fixtures and junction boxes. The owner should determine the installation location of equipment that requires separate power (washing machine, heating boiler, hob, etc.). After calculating the load power by group, the cross-section of the wire for wiring is determined, fuses and additional protective devices (for example, lightning arresters) are selected.
Selection of wires and electrical devices
To select the required cable cross-section, use the tables to determine the peak power of the load that will be connected to the outlet or electrical wiring main.
It is recommended to provide a margin of 20-30%, which increases the reliability of the wiring.
The insulation should not support combustion (for example, in residential buildings they use NYM brand cables with an additional sheath). An additional wire is required in the wiring to connect the ground. Sockets and switches are selected according to the power of the equipment and the design of the house.
An example table of cross-section, diameter and load power for a copper cable (at a voltage of 220 V) is given below. There are special online calculators that allow you to select the cable cross-section based on the initial conditions (voltage, number of phases, load power, length of lines and core material).
| power, kWt | Section, mm² | Diameter, mm |
| 3,0 | 1,0 | 1,12 |
| 4,1 | 2,0 | 1,59 |
| 5,9 | 4,0 | 2,26 |
| 11,0 | 10,0 | 3,57 |
Selection of input cable and circuit breaker
It is necessary to install a power cable into a residential building that can withstand the peak load of all equipment with a margin of at least 20%. If new wiring is being installed using wires with an increased cross-section, then it is necessary to check the diameter of the input cores (if the size is insufficient, the cable must be changed). Since it is impossible to install the power line with your own hands, they fill out an application to the sales company and pay the cost of the service.
The type of circuit breaker depends on the number of phases in the power circuit (1 or 3). For standard household networks with a voltage of 220 V, a differential circuit breaker is used, which ensures a phase break. The circuit breaker rating must correspond to the peak load. Otherwise, premature power failure or overheating of the cores due to overload (for example, in the event of a short circuit) may occur.
Rating and type of single-phase power supply circuit breaker
To determine the rating of the machine, it is necessary to calculate the current strength using the formula I=(P/U)xcosµ, where:
- I is the required current strength;
- P—total power of devices, W;
- U is voltage;
- cosµ - correction factor, taken equal to 0.8.
Cable selection
An important stage of wiring work is the selection of the main cable. Choosing the right cable for wiring means solving the main problem regarding the safety of a wooden house.
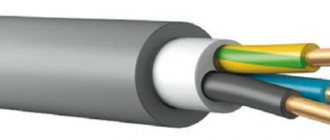
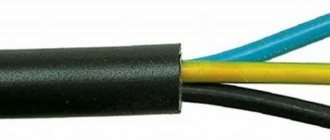
According to modern requirements, a so-called SIP cable, a self-supporting insulated wire, is used to extend from the power line to the house.
It uses aluminum conductors with a cross-section of at least 16 mm, and also contains a steel reinforcing cable (for rigidity).
The sheath of this cable is designed to withstand exposure to adverse external factors for a minimum of 25 years.
But the SIP cable can only be laid up to the wall of a wooden house. On the outside of the wall, through special insulators, or better yet, hermetically sealed clamps, it is connected to a copper cable, for example VVGng (ng - non-flammable).
The VVGng section is selected as standard - 1.5 mm for the lighting line, 2.5 mm for household appliances, 4 mm for powerful consumers such as an electric stove, electric heating line or welding machine.
Direct twisting of aluminum SIP conductors with copper conductors of internal wiring is prohibited.
Only copper is used for wiring inside a wooden house. When choosing a brand of wire, use either the already mentioned VVGng, VVGng(P) marked “GOST”.
These types of single-core copper cables are equipped with double non-flammable insulation, while having sufficient flexibility for convenient internal wiring.
You can use a German NYM cable - it is equipped with triple non-flammable insulation.
Testing and commissioning
At the testing stage, automatic fuses (without switching) of the load are turned on one by one. If the protection does not work, then use a test device to check the presence of phase in the sockets, and then turn on the lighting and additional load. After checking, it is necessary to turn off the machine at the entrance to the house, and then tighten the terminal screws (after 2-3 weeks of operation, the threads should be re-tightened, avoiding sparking of the contacts with burning of the surface). If problems are identified during testing (for example, lack of a phase), then the shortcomings must be eliminated.
Installation of grounding with a residual current device (RCD)
In addition to grounding the junction box, in order to ensure reliable protection of electrical appliances and household appliances, it is necessary to arrange a full-fledged grounding circuit.
Therefore you will need:
- three-meter reinforcing rods with a cross-section of at least 30 cm in the amount of 3 pcs.;
- a dug ditch in the shape of a triangle, about 50 cm deep and up to one and a half meters on a side;
- reinforcement is driven into the ground at the vertices of the triangle;
- the rods are connected to each other with a steel angle and fixed by welding;
- the resulting triangle of one of the vertices is connected to the house by a trench (of the same depth), into which the same corner is placed and welded to the contour.
Directly next to the building, the corner is welded to a meter-long reinforcing rod. Ideally, after burial, a 30 cm piece of rod should remain on the surface. A copper cable from the distribution panel passing through the RCD is attached to the end of this rod. The normal cross-section of such a cable will be 2.5-4 mm.
Example of ground loop equipment Source remontnik.ru
General recommendations
When installing networks, it is necessary to take into account the location of water pipes, heating and gas supply lines. The distance from water routes to cables should not be less than 100 mm, and from gas routes - from 400 mm.
At the transition points between floors or walls, it is necessary to drill a hole and install a sleeve made from a piece of water pipe.
To protect against condensation, a seal is used that can be removed without the use of special tools.
When choosing a cable, it is recommended to use a 3-core cord with a cross-section of 2.5 mm² for sockets, and for lighting devices with incandescent lamps, a wire with a cross-section of 1.5 mm² is sufficient (when using LEDs, the parameter can be reduced to 1 mm²). If the house has equipment with high energy consumption (more than 2.5 kW), then separate circuits should be provided from a copper 3-core cable with a cross-section of 6 mm². The reliability of the power supply system in a wooden or frame house depends on the correct selection of wire cross-section.
No. 4. Creating a Wiring Diagram
Installation of electrical wiring in a wooden house begins with the creation of a diagram that is agreed upon with Gosenergonadzor. It is necessary to indicate on it the places where all sockets, switches, as well as the panel and meter will be located . The diagram also shows the future location of the cable, indicating the distance from the floor, ceiling, window and door openings. It is better to take the house plan as a basis, where the exact parameters of all rooms are indicated.
To correctly draw up a diagram, follow these rules:
- It is necessary to think in advance about the location of large household appliances, as well as the lighting scheme. This will eliminate problems with extension cords in the future;
- determine the maximum power of devices;
- create connection groups. The rules dictate that each room be provided with two branches of wiring: one for sockets, the second for lighting. Each powerful appliance (washing machine, boiler, etc.) is placed in a separate group - a separate cable must be laid for them. Residential lighting is another group, but it is often connected to a separate circuit breaker to be able to turn on the lighting when no one is home. For each group, the maximum load is calculated;
- sockets can be located at any height. The main thing is that they are convenient to use, so consider the type and number of electrical appliances;
- switches, as a rule, are located at a height of 80 or 150 cm. It is advisable that they are all at the same height;
- the distribution panel is mounted at a height of 150 cm so that small children cannot reach it;
- The wiring can only run vertically and horizontally, and turn at right angles.
When the scheme is agreed upon and the necessary power is allocated, you can move on.