An electric boiler is an effective solution to the problem of hot water supply for a private home. Such equipment, however, like any other, periodically breaks down.
If you wish, you can repair the water heater yourself, provided that the breakdown is simple. But serious damage will have to be repaired at a service center.
In this article, we will analyze common types of breakdowns and provide recommendations for eliminating them, which will allow any more or less experienced technician to cope with the repair.
Operating principle of a water heater
To minimize problems with the device, you should study its structure and operating principles. Typically, private households use storage models rather than flow-through ones, which allow them to use electricity more efficiently. Such a device consists of a heat exchanger tank, inside of which a heating element is installed - a heating element, connected to the power supply.
An important part of the device is the thermostat. This element allows you to maintain a constant temperature of the water inside the storage tank. Water flows through pipes into the heat exchanger. If its temperature is too low (and this is usually the case), then the thermostat sends a signal and turns on the heating element.
The water is heated until it reaches the required temperature. After this, the thermostat operates again and turns off the heating element. Hot water is taken from the tank and replaced with cold water, the heating process is repeated again and again. This is a general diagram of the design and operation of a conventional storage water heater.
The design of a storage water heater is not too complicated. The most vulnerable elements of such a device are the tank, heating element, thermal relay and gasket
Also popular among consumers are instantaneous water heaters, which are available on the market in a wide range. Such models are arranged somewhat differently. They heat not a static volume of water, but a flow. They use more powerful heating elements that start when the water is turned on and stop when it is turned off.
To study the operation and design of a particular model in more detail, you need to carefully read the technical documentation accompanying it.
The heater tank is a durable stainless steel container, one or two millimeters thick. No matter how resistant this material is to corrosion, these processes still periodically arise and develop, which leads to water leaking from the device. One of the common causes of such breakdowns is electrocorrosion.
Flow-through heaters usually break down for the same reasons as storage models. Diagnostics and repair of such devices are carried out using similar methods.
To prevent it, you need to regularly, i.e. annually replace the magnesium anode installed inside. This element is designed specifically to prevent electrocorrosion. Over time, it wears out, and storage tank owners neglect to replace this important part.
As a result, the tank, which has been serving well for some time, suddenly begins to leak. The incorrect condition of the magnesium anode can also affect the condition of the heating element. On the outside, the storage tank is usually enclosed in a metal or plastic housing, and it also has an insulating shell that prevents heat loss.
Regular cleaning of the insides and heating elements of the water heater from dirt and scale, as well as replacing the magnesium anode will reduce the likelihood of breakdowns
Damage to the outer shell and insulation occurs rarely, usually due to careless handling of the device. Cracks and chips on the body of the water heater may not disrupt its operation, but this will lead to a deterioration in the properties of the heat insulator and will negatively affect the functioning of the device as a whole.
Inlet and outlet pipes for cold water and outlet pipes for hot water usually do not cause any problems if the storage or flow-through heater is installed correctly.
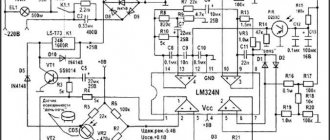
An electrical diagram of a household water heater will help you correctly repair it, which usually consists of replacing damaged elements
Typically, a water heater is equipped with two thermostats, one of which is designed to control the water temperature, and the second monitors the condition of the first device.
Sometimes a third thermostat is used, which determines the working condition of the heating element. In any case, a broken thermostat will have to be completely replaced. There are capillary, rod and electronic types of thermostats. Their design is different, but the principle of their operation is similar.
The insulating gasket not only serves to seal the connection between the elements of the water heater, it is also necessary as an electrical insulator. It is recommended to replace this element regularly during each maintenance of the water heater.
The thermostat shows to what temperature the water inside the device is heated. If this element breaks, the water heater will still perform its functions, although data on the degree of heating will not be received.
Causes of boiler problems
To understand why heaters fail, you need to understand the principle of their operation and the purpose of the main elements. Regardless of what type of boiler you have - storage or instantaneous, their design is similar. Only the brand, design and capacity of the tank differ.
The design of the heater tank is quite simple. It consists of two parts: internal and external. Between them is laid a layer of thermal insulation - polyurethane foam. The housing includes two pipes: one with a divider at the end is used for pumping cold water, the other – hot.
Flow-type devices do not have a storage tank, and the heaters have more power.
The presence of a thermostat allows you to set the desired heating temperature.
Most boilers are equipped with a magnesium anode, which protects against corrosion. The anode requires periodic replacement, then the heater and boiler as a whole will last much longer.
Breakdowns don’t just happen, there are reasons for this:
- Power surges in the network.
- Long-term neglect of service.
- Incorrect installation or connection of the device.
- The appearance of scale and corrosion on parts.
- Untimely repairs.
To find out the cause and accurately determine the location of the problem, parts are diagnosed.
Common breakdowns and repair methods
Next, we will consider the most common problems with a water heater and provide repair methods for each of the breakdowns.
Problem #1 - heating element malfunction
Failure of the heating element is a typical problem for both instantaneous and storage water heaters. This element works under high load and therefore wears out quickly. If the power supply is connected, but the water in the tank does not heat up, most likely the problem has arisen with the heating element.
The heating element should be removed from the tank carefully, especially if a significant amount of scale has accumulated on its surface. Sudden movements can lead to deformation and breakage of some elements
First, you should check whether electricity is flowing to the heating element and thermostat. At the cable connection points, check the presence of voltage with a tester.
If there is no power, you may need to replace the cable itself or check to see if there is a power outage throughout the house.
Regardless of the model type, each thermostat has a power button. When you press it, the device turns on, and when you turn it off, the button returns to its original position.
If there is electricity and the cable is working properly, then problems have arisen with the heating element, which will have to be replaced, or with the thermostat. To figure out what exactly is broken, you need to remove the thermostat and check it with a tester.
Testing the serviceability of the heating element is carried out as follows. First, the measuring scale of the device is set to 220-250 V. Then the resistance is measured at the terminals connecting the heating element to the electrical network.
If there is voltage, you should disconnect the heating element from the network and check the potential at the terminals of the heating element. The lack of response from the tester will indicate that the device is faulty. If there is a reaction, you need to continue the diagnosis.
First, disconnect the water heater from the power supply. Then the heating element is disconnected from the thermostat so that the contacts of the heating element remain uninsulated.
The contacts of the tester are applied to them and the reaction is observed. If it is, the heating element is working, but if not, the heating element needs to be replaced. In this case, it does not matter what numbers the tester produces, only the presence or absence of a reaction is important.
These fault detection methods are suitable for both storage electric water heaters and instantaneous models.
To determine the serviceability of the heating element and thermal relay, an electrical tester is used. Typically, the presence of voltage on the contacts indicates the serviceability of the element, and its absence indicates the need for repair
Problem #2 - thermostat failure
To check the serviceability of the thermostat removed from the water heater, you need to set the adjustment knob to maximum and take measurements at the inlet and outlet of the device. If the tester's needle remains calm, i.e. its position does not change, which means the thermostat is faulty and needs to be replaced.
If the arrow deviates, then you need to continue testing. Now you should set the thermostat to the minimum position and apply the tester's measuring probes to the contacts. It will not be easy to continue the diagnosis alone; you will have to fix the probes or ask someone to hold them for some time in the correct position.
After this, you need to take a lighter and heat the tip of the temperature sensor. If the thermal relay works, the circuit opens, and the resistance on the tester scale goes down sharply, then the thermal relay can also be considered working. If the system does not respond to heating, then this element is damaged and needs to be completely replaced.
Sometimes a water heater may stop working due to the safety valve tripping, causing the unit to dangerously overheat. It is enough to correctly adjust the operation of the device so that it starts working as usual.
First you need to unfasten the fasteners of the heating elements and the thermostat (red arrows), then unscrew the screw (green arrow) and nuts (blue arrows. The thermostat is circled with a yellow line
Problem #3 - control board malfunction
If the check shows that both the heating element and the thermostat are working, most likely the problem has arisen with the control board. It is almost impossible to repair such an element at home.
You will have to replace it with a new one, and you will have to use the help of a specialist who will help you set up the electronic equipment. Most often, you just need to contact a service center, where the required element will be selected and installed correctly.
Typically, the heating element is secured with six bolts and nuts (marked with red indicators). When reassembling, it is recommended to tighten them evenly
Problem #4 - tank leaking
A tank leak is a serious problem that you can’t always fix on your own. In some models, either the tank or the entire heater will have to be replaced.
Sometimes the leak can be sealed, but care must be taken to restore the integrity of the outer casing and the thermal insulation layer. Usually such measures are insufficient and short-lived, and soon the leak will occur again.
If water leaks from places marked with black indicators, it is likely that the gasket or heating element needs to be replaced; red indicators mark places of leaks if the internal tank is damaged
A water heater tank is most likely to leak if:
- damage to the internal tank has occurred;
- the heating element has deteriorated;
- the gasket has leaked.
If water flows at the place where the heating element is attached, it may not be necessary to repair the tank itself. A special gasket is installed in this place; a leak may be caused by its damage. The gasket is replaced and this solves the problem.
A leaking water heater tank is usually caused by neglect or late maintenance, which also includes replacing the magnesium anode. Another common problem is lack of grounding. This can also lead to the development of corrosion processes and leakage.
If it is necessary to replace the gasket, you should select a new one of exactly the same size and shape and made of suitable materials
If you need to replace a gasket or heating element, it is best to first dismantle the faulty element in order to take it with you and select an exact analogue. Purchasing parts by eye can lead to unnecessary expenses. Making such a replacement is relatively easy.
But if problems arise with the tank, you will have to at least contact a service center. You must immediately find documents for the water heater and clarify the warranty periods and service conditions.
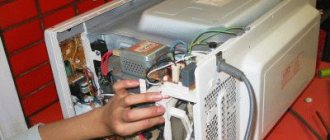
Before repairing or cleaning the water heater, you must remove the protective cover, which can be located at the bottom, center or side
Fixing tank leaks
A water collection tank leaking can occur for a number of reasons. Errors made during installation can lead to poor sealing at the base of the pipes. In this case, it will be necessary to replace the gaskets.
If everything is in order with the tubes, you need to carefully inspect the body itself for cracks. A cracked or rusted tank cannot always be repaired. However, if the defects are not too large, then the holes in the container can be repaired using welding. As an alternative, you can use so-called cold welding, but this will only be a temporary solution to the problems.
Recommendations for home repairs
Regardless of the nature of the breakdown, before starting repair work, you first need to turn off the power supply, remove the protective cover, disconnect the wires, pipes and drain the water.
Wall-mounted models are usually removed from their brackets. The protective cover, which hides the connection point for electrical wires and the mounting of heating elements, may have a different position depending on the model.
On horizontal devices, this element is usually located on the left, on vertical heaters - at the bottom, and on small models - in front. In some devices, you first need to unscrew the main mounting bolt located in the center. Sometimes this element is hidden under a decorative sticker.
After this, you need to carefully remove the thermostat, and then remove the temperature sensor tubes. They must be handled very carefully. If the integrity of the temperature sensor tube is damaged, liquid filler will leak out of them. As a result, you will simply have to throw away the water heater and buy a new device.
The temperature sensor tubes highlighted in blue should be protected from any deforming influence; if they break, the entire device will have to be completely replaced
If the thermostat of a household water heater has become unusable, it will have to be completely replaced. The models of such devices are varied; it is best to choose an analogue with a similar device and characteristics
If there are stickers on the case that indicate the serial number, they must be preserved, even if they interfere with the maintenance and repair of the product. This may affect the manufacturer's fulfillment of warranty obligations, as well as make the work of service center employees easier.
What you might need
- Adjustable wrench - for disconnecting pipes.
- Wrench – for unscrewing the bolts securing the unit to the wall (not required if the mounting is on hooks).
- A hose to the return valve or to the water inlet - for draining (not required if you use containers to collect water).
- Phillips screwdriver for unscrewing the protective cap.
- Two flathead screwdrivers: needed to lift a protective cap that is too tight.
- Gas wrench number two or hub wrench 55. Sometimes a socket wrench is preferable for tightening nuts.
- A thin screwdriver for unscrewing and removing power cables.
The dismantling of boilers is preceded by the following preparatory stages:
- de-energizing the installation;
- draining;
- removal from the wall.
First, the device is disconnected from the outlet. Then you need to lighten it as much as possible by removing the water. An eighty-liter heater weighs about twenty kilograms. With water its weight approaches a hundredweight.
Basic rules for servicing the device
For long-term and trouble-free operation of the water heater, it is important to follow the rules of its operation and maintenance. Otherwise, breakdowns are inevitable.
The fact that problems have arisen in the operation of the device may be indicated by some changes in its operating mode:
- increasing the time for heating water to a given temperature;
- the appearance of unusual sounds accompanying the operation of the device;
- the appearance of foreign impurities in tap water, changes in its color, smell or taste.
If at least one of these signs is observed, you should immediately clean the water heater.
To do this you will have to perform the following operations:
- Disconnect the device from the power supply.
- Remove the protective cover.
- Disconnect the contacts of the electrical wires.
- Shut off the cold water supply.
- Use a hose to remove any remaining water from the tank.
- Unscrew the bolts that hold the heating element.
- Remove the heating element and descale it.
- Clean the inside of the drive from dirt and scale particles.
- Rinse the device thoroughly.
- Check the serviceability of the magnesium anode.
- If necessary, replace this element immediately.
- Wait for the cleaned tank to dry completely.
- Reinstall the heating element.
- Reassemble the device.
- Check the reliability of all fastenings.
- Connect the water heater to the power supply.
- Check for grounding.
The heating element should be removed from the tank carefully; the bolts may be too stubborn; sometimes the heating element is difficult to remove due to too much scale.
The heating element is cleaned by mechanical or chemical means, as is the removal of contaminants from the tank. If a large amount of scale is found inside the device, you should consider reviewing the operating mode of the water heater.
This phenomenon is often observed when the device operates at maximum power for a long time. It is recommended to set the maximum heating temperature no higher than 60 degrees to increase the life of the device and reduce the number of breakdowns.
If the body of the heating device receives an electric current, the heating element may be deformed and ruptured, or there may be a breakdown in the control system.
Dirty and foul-smelling water from the heater
If, when you turn on the hot water, something similar to kvass flows out of the tap, having a characteristic swamp smell, then it’s time to clean the heater. This situation occurs when sediment accumulates inside a closed tank and flows through the pipes. Visually this may not be noticeable, but debris tends to accumulate and settle not only on the heating element, but also on the walls of the boiler.
The problem should be solved in two stages:
- Place a filter at the cold water inlet: it will trap debris and dirt, as well as bacteria that can live in a closed tank system. The water will become much cleaner, and preventative cleaning of the boiler will be needed less often.
- Clean the boiler: you can pour special disinfectant solutions through the supply tube, then drain the contents into a bucket. There are a lot of special products to clean your boiler.
The cleaning procedure will not cause any particular difficulties. The sequence of actions depends on the chosen tool:
| Name | Quantity | Sequencing |
| Lemon acid | 20 g of powder for every liter of water | Mix the required amount of citric acid with 2 liters of water, then introduce the solution through the water supply hose. Plug in and set the maximum values on the relay. Let it boil for 3-4 hours, then open the hot water tap and completely drain the water from the boiler. |
| Vinegar essence | 10 ml for every liter of water | Vinegar should be introduced into the boiler through a hose, and then connect the hose to the pipeline. Set to maximum temperature and drain completely after 4 hours |
| Acidic solvents for cleaning boilers | Please refer to the instructions for proportions. | The product is poured into the boiler and left for 1-2 hours, after which the water is completely drained |
Conclusions and useful video on the topic
A detailed video on diagnosing the condition, maintenance and self-repair of household water heaters can be viewed here:
Repairing a water heater is not so difficult if we are talking about replacing some of its elements. In the event of a serious breakdown, it would be wiser to contact a specialized service center. Proper operation of the device and its timely maintenance will save you from many problems and expenses.
Have you been repairing water heaters for a long time and want to supplement our material with useful tips and professional secrets for eliminating various types of breakdowns? Or is this the first time you’ve encountered a malfunction and can’t find its cause? Write your comments, ask questions, share your opinion below the article.
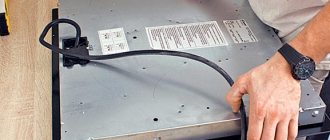
Disconnecting from the electrical network
Start of disassembling the Ariston water heater
Before any work involving electrical appliances, you must first de-energize them.
If the water heater is powered by a separate cable from the electric meter, then it is connected through a two-pole circuit breaker and must be turned off.
If the water heater is connected to a regular outlet, you simply need to remove the plug from the outlet.
After this, you can safely begin disassembling the Ariston water heater:
- First, the lid is unscrewed; it is secured with several screws.
- Further, if there is a danger that something could be mixed up during subsequent assembly, it is advisable to photograph the existing position of the parts from several angles.
- The next stage: disconnecting 3 electrical cables, 1 – phase, 2 – neutral, 3 – ground. This is easy to do with a screwdriver. Since we disconnected the first two wires from the thermostat and freed it, we can now pull it out of the tube with a little effort.
- This completes all electrical procedures. You can start draining the water.
Diagnostics
What to do if an electrical appliance that was working yesterday shows no signs of life?
First of all, you need to check the input electrical circuits.
- sounds trivial - but look to see if the electricity in the house is turned off (after turning on the boiler);
- we check the circuit breaker on the line to which the water heater is connected;
- in 90% of cases (especially if you have an instantaneous water heater), the connection is made through an RCD: we also check this circuit breaker;
- We look at what temperature the thermostat is set to (sometimes in a hurry the user forgets to set the required mode);
- inspect the plug and socket of the storage water heater (under high loads, the contacts may “burn out”).
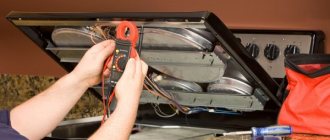
If there are no external causes or have been eliminated (you turned on the machine, etc.), and the water heater still does not work, we will deal with the electrical appliance. Of course, you can call a specialist or take the equipment to a workshop. However, this will incur additional costs. Despite the apparent complexity of the design, repairing a water heater with your own hands is possible, even in the absence of special equipment. You will need a set of wrenches, a good screwdriver, pliers and a multimeter, and you may need a soldering iron. If you have one and you know how to use it, your chances of repairing the boiler yourself are significantly greater.
There are no fundamental differences in the design of electric heaters. The Polaris water heater has the same heating element and control element as Ariston. Moreover, many brands are united by large corporations (costs of globalization), so the design of household appliances can be absolutely the same. The only exceptions are little-known Chinese brands, or Japanese models imported unofficially. They contain design solutions that cannot be found on the Thermex or Electrolux water heater.
Although the repair of such electrical appliances follows a general logic, it would still be better to find branded electrical circuits.
Mixer dirty
The liquid will flow in a weak stream if the mixer spout
a traffic jam has formed. The pressure will be equally bad for both cold and hot water. To fix the problem, it is necessary to carry out a number of procedures.
- Close the riser to turn off the water.
- Carefully remove the mixer.
- Unscrew the spout from the general body.
- Remove the mesh and rinse it under running water. If salt deposits or heavy dirt forms, let it soak in a special cleaning solution.
- Rinse the faucet spout thoroughly and clean the insides of dirt using a brush.
- Reassemble the mixer in reverse order and install it in place. Don't forget to open the riser.
This procedure may take some time; alternatively, you can simply replace the clogged faucet with a new one. Experts recommend replacing worn parts every few years to avoid serious damage in the future.
When to call a specialist
When the water heater stops heating water, it immediately becomes clear that it is faulty. However, sometimes this is noticeable indirectly, the automation simply regularly knocks out, the RCD is triggered, and upon contact with water it gives an electric shock. All this also indicates a faulty boiler. Of course, in most cases you can repair a water heater yourself, but there are times when you need to call a specialist.
There are breakdowns that only a professional can fix.
Such breakdowns include the following:
- an almost new boiler shuts down unexpectedly;
- The settings on the thermostat are constantly reset;
- The RCD is constantly tripping;
- The water heater bulb is leaking.
It is worth noting that in the latter case, repairs are rarely effective; it is better to purchase a new boiler. Of course, you can replace the magnesium anode yourself, but it is better to entrust it to specialists by contacting a service center.
What's under the lid
When the cover is removed, the wiring of the heating element is visible, which needs to be disconnected. Before doing this, you need to sketch or photograph the original position of the wires. This will come in handy during the reverse assembly stage. After photographing, you can unscrew the bolts of the wires.
Wires under the removed housing cover
Many models have a thermostat under the cover. To remove the device, you need to grab it firmly and pull it down. It is better to do this with a sharp but precise movement. You can watch the video in detail:
Some Ariston models have a thermometer on the body. To remove it, after disassembling the electrical circuit, the device is pryed off from both sides with flat screwdrivers. This allows it to pop out of the nest with a click. Next, carefully pull out the wires disconnected from the thermostat.
Some boilers are designed in such a way that a non-return valve may prevent the removal of the lid. Then you need to unscrew it. A temperature sensor is sometimes attached to the back of the cover. It must be removed by disconnecting the contacts from the heating element.
In Termex boilers, an electronic control board (power unit) is located under the lid. It is secured with self-tapping screws and is also easy to remove. The control board and the external sensor board are connected by connectors that need to be unscrewed. The grounding attached to the nuts is also disconnected.
Tools required for the operation
All water heaters are similar to each other, so they have the same drainage system and to carry out this procedure you will need an adjustable wrench, a rubber hose and access to the bathtub into which the water will flow. If the water does not drain into the bathtub, then you need to prepare several large containers so as not to flood your neighbors and simply avoid any tricky situations.
Emptying the boiler
In the case of an Ariston water heater, you will need various screwdrivers, a hexagon and adjustable wrenches of different sizes.
A person who reads the instructions and adheres to a clear algorithm will not have any difficulty emptying the boiler correctly.
Removing the Housing Cover
Inexpensive heaters without adjustment devices usually have two screws on the bottom cover of the housing. They need to be twisted with a Phillips screwdriver and the cover removed. If the cover is too tight, you can pry it off with flat-head screwdrivers.
A special place is occupied by models with oval flanges. They are dismantled directly on the wall; it is not advisable to turn them upside down with the fittings. Near the fittings (they are marked in blue and red) there are two bolts, unscrewing which you can remove the cover.
On some models it is not immediately possible to immediately find the screws to remove the cover. They are hidden under stickers. After removing the stickers, you can unscrew the housing cover. Sometimes, before removing the cover, you need to remove the plastic shields and plugs from the screws.