terms of Use
In an apartment and private house
When choosing a cable for electrical wiring, most often the same brand is used for sockets, lighting and individual powerful consumers. Therefore, you can use the same option for the light as for the socket group. The most popular cable for lighting in apartments and houses is VVG. When installing hidden wiring, it is one of the best options. In a wooden house, you should use a cable that does not propagate combustion - VVGng, VVGng-LS or NYM.
On the street or in the garage
First you need to decide how the wiring will be laid. The fact is that with open wiring, the cable is laid in pipes or in corrugation. In the case of underground installation, you can use armored cables or ordinary ones, but laid in a PVC pipe. For lighting in the garage, the recommendations are similar - laying external wiring in a protective corrugation, it will protect the wire from mechanical damage and rodents
You can use 2 or 3 wire wire. Using a 3-core wire will make it possible to install two groups of lamps by connecting another phase to the third core. Also, a three-wire wire is mandatory to use if there is grounding. If you do not have a ground connection, it is still better to use a three-core conductor when installing the wiring so that there is no need to change the cable in the future.
On the balcony or porch of the house
In the case of installing a street lamp on the porch, the lighting wire can be laid both internally and externally. And in the case of installation in the wall, the VVG 2x0.75 cable is perfect. For external laying, you can use the same, but be sure to lay it in a protective corrugation or pipe. Also suitable in this case is a round wire of the PVA brand or a flat SHVVP - they are flexible and will be easier to insert into the corrugation.
Important! When using a wire with a stranded core, the ends that will be connected to the lamp, if you use a screw terminal block, must be tinned or terminated with NShVI type lugs. If you use WAGO terminals, this is not necessary
In the garden
The wire for connecting lighting in the garden must be laid overhead or underground. Air laying in this case is not always possible, because it requires posts; it is also possible to lay wires along the fence. In this case, the recommendations are as follows:
- If several groups of powerful lamps are intended to illuminate the entire area, then VVG 3x1.5 or flexible wire grades listed above will be suitable.
- The cable must be protected with corrugation.
For laying cables in a trench, a variant of the VBBShV brand is suitable - this is an armored copper cable. It is suitable for digging into the ground without additional protection, if there is no heavy load on the soil. That is, if you are laying a cable in the ground under a parking area for cars, it is better to protect it in this area by laying it in a HDPE pipe or PVC sewer pipe. In underground pipes, you can use both the VVG brand and other “unprotected” brands of wires.
In the bathhouse or toilet
A special feature of connecting light in a bathhouse or sauna is high humidity and temperature. Therefore, it is recommended to use RKGM heat-resistant wire for lighting, laid in a plastic corrugation. This way you will receive protection from damage to the cores, as well as from melting of the insulation when operating at high temperatures. The calculation of the cross-section of the wire cores in this case is no different from the previous options.
To connect the light in the bathroom, you can use both RKGM and the above brands of cable products, but it is recommended to use internal wiring or use cable channels for external wiring.
Important! All junction boxes must be sealed because high humidity areas increase the risk of electric shock. If possible, preference should be given to lamps that are powered by 12V.
2Thu, 6 Mar 2008 21:48
Minimum cross-sections of copper conductors: - for fixed wiring - 1.5 mm sq. — for flexible connections = 0.75 mm sq. This data is from GOST for electrical wiring. There are, of course, “craftsmen” who use twisted pair cables for lighting, but this does not mean that it is correct.
ANT wrote:
This statement is fundamentally incorrect. It may not be a complete short circuit, but a significant decrease in insulation resistance and the currents will be unpredictable... and your 0.5 wire will be “welded”... But in the lamp itself you can use 0.75 conductors - this is allowed by GOST.
What wire cross-section is needed for 2-3-5 and 7 kW
What wire cross-section is needed for 2-3-5 and 7 kW power
In order for the wire to withstand the load, it is necessary to correctly calculate the cross-section of its cores. When connecting sockets and lighting fixtures, as well as a number of different electrical appliances, wires of different sections are required.
The passport for the electrical appliance indicates its power - 2, 3, 5 or 7 kW. Therefore, in order to connect the device, you need to calculate the cross-section of the conductor cores. What you need to know for this, and how to correctly perform all the necessary calculations, read in this article on the website elektrikinfo.ru.
What you need to know before determining the cable cross-section
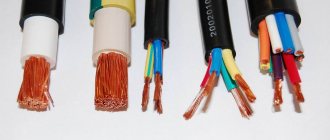
Before going into various cable sizing calculations, there are two things you need to know. The first is the material used to make the wire cores - copper can withstand significantly greater loads than aluminum. Therefore, a copper wire with the same cross-section of conductors as an aluminum wire can withstand a greater load.
For a more accurate analysis and comparison, a table is attached to this article for calculating the cable cross-section by power. Thus, it will be possible to most simply determine what wire cross-section is needed for 2-3-5 or 7 kW of electrical appliance power.
The second point is related to what kind of network the conductor will be used in - single-phase or three-phase. A copper or aluminum wire, no matter the same cross-section, will withstand much larger loads in a three-phase network. This is due to the fact that the power, in this case, is divided into three phases, instead of two, as happens in a single-phase 220 Volt network.
What wire cross-section is needed for 2-3-5 and 7 kW
The formula for calculating the wire cross-section is as follows: S = 3.14 × d²/4= 0.785d2 ≈ 0.8d2 . However, it is much easier to calculate the wire cross-section for a certain power using pre-prepared tables.
If you do not correctly calculate the cross-section of the wires, then the following will happen:
- The conductor will begin to heat up, and its insulation will gradually melt. As a result, the wires will be exposed and a short circuit will occur. If the wiring is not protected by circuit breakers, a fire may occur;
- You can use a wire with a noticeably larger diameter than necessary, it will not make things worse. However, over large areas this approach cannot be called rational. As a result, ineffective costs will increase significantly.
When connecting sockets, you need to use a wire with a cross-section of 2.5 mm². To connect lighting groups, a wire with a cross-section of 1.5 mm² is sufficient. It is recommended to connect all other electrical appliances, heating boilers and hobs, with the wire recommended by the manufacturer of the device.
And, of course, it is best to use copper cable, not aluminum, for wiring in the house. And it's not just about ease of installation. Copper cable practically does not oxidize; it can be bent many more times than aluminum. Also, the copper conductor lasts longer and can withstand significant loads.
General principles for installing a spotlight
According to existing norms and standards, the wiring for such lamps is hidden directly in the thickness of the wall. This approach allows you to get rid of hanging wires that visually “clutter” the interior space of the room. However, you should not only accurately calculate the location of the wire, but also document it in any convenient way.
In order to make a groove for laying the power wire, you will need a hammer drill or drill with an impact bit. The thickness of the gutter should be about several centimeters, since some models of spotlights are equipped with a thick cable.
There are situations when the wire length is not enough to power the lighting source. It is not recommended to make “homemade” products and connect several wires into one. Specialized stores sell cables of various lengths, so you should use a ready-made option. If you decide to use this option, make sure that the connection is working and that the connection has been isolated.
How to find “power” for a lamp?
A pressing issue for people who want to install a spotlight on their own is the source of power supply for the lamp. The most relevant options (by popularity) are:
- Power socket;
- General lighting switch;
- The actual distribution board.
The last option is used extremely rarely, as it is extremely expensive and not optimal. A similar solution is resorted to in cases where increased power consumption is implied. Modern LED spotlights are devices that are economical.
If you plan to conduct wiring from the switch, then make sure that the connection is made before the “cut-off” mechanism. If you do the opposite, the lamp will turn on and off together with the lamp or chandelier. Of course, in some cases such a solution is justified, but such tasks are rare.
To control spot lighting, you will need to install an additional switch or use standard devices. Installing a switch is an expensive solution because you will need to create a “socket” for the switch. This type of work is noisy and dirty, and also requires specific knowledge and skills.
If your budget allows, then choose the so-called. “smart” spotlights that can be controlled using a remote control or even from a smartphone or any other personal device. Such solutions are becoming increasingly popular, but few people know about them yet.
Serial connection
You can connect spotlights in series, although this is not the best solution. Despite the fact that this type of connection requires a minimum number of wires, it is practically not used in everyday life. This is because it has two significant drawbacks:
- The lamps do not glow at full strength because they are supplied with reduced voltage. How much reduced depends on the number of connected light bulbs. For example, if three lamps are connected to 220 V, you need to divide by 3. This means that each lamp receives 73 V. If 5 lamps are connected, divide by 5, etc.
- If one light bulb burns out, all of them do not work. The cause of the malfunction can only be found by sequentially changing the light bulbs in the entire chain.
It is for these reasons that this type of connection is used exclusively in Christmas tree garlands, where a large number of low-power light sources are collected. You can, of course, use the first disadvantage: connect 18 or 19 12 V light bulbs in series to a 220 V network. In total they will give 220 V (with 18 pieces 216 V, with 19 - 228 V). In this case, you don’t need a transformer, which is a plus. But if one of them burns out (or even the contact deteriorates), it will take a long time to find the cause. And this is a big minus that negates all the positive aspects.
Diagram of serial connection of light bulbs (spotlights)
If you decide to connect spotlights in series, this is easy to do: the phase bypasses all the lamps one after another, zero is supplied to the second contact of the last bulb in the chain.
If we talk about the actual implementation, then the phase from the distribution box is supplied to the switch, from there to the first spotlight, from its second contact to the next... and so on until the end of the chain. The neutral wire is connected to the second contact of the last lamp.
Diagram of sequential connection of spotlights via a single-key switch
This scheme has one practical application - in the entrances of houses. You can connect two incandescent light bulbs in parallel to a regular 220 V network. They will glow incandescently, but will burn out extremely rarely.
Power supply placement
This question is always a stumbling block between the designer and the electrician. The electrician asks the designer where to put the power supplies, and the designer says that it’s not his designer’s business to put the power supplies: you’re an electrician, that’s what you do. You won’t explain to him about the voltage drop. In fact, I believe that a good designer should not shy away from technical issues, but should delve into them and grow above his uninvolved colleagues, just like an electrician delving into design issues. But this is a topic for separate reflections.
Ideal, of course, is to place the power supply somewhere at the beginning of the tape. Often the block can be placed over the side of a two-level ceiling; very thin models are available
It is important to connect the power cable in advance not to one point on the ceiling, but to several, so that the power of the power supply is enough to power the tape connected to it. The cable from the switchboard to the power supply has a cross-section of 1.5, since the voltage in it is 230 volts and the current is correspondingly small
It is important that the unit is serviceable and ventilated. It can be assumed that 5% of the power of the connected tape will be used to heat the power supply
For 200W this is 10W of heat. You must also be prepared for the fact that the contacts of the unit may melt, that the capacitor in the unit may explode, and that the unit may begin to get very hot. That it may not survive a short circuit in the tape. This will not happen in a good block, but you need to be prepared and not put the block in a fire hazardous place (do not cover it with paper to hide it in a ceiling niche).
You can place one power supply somewhere in the furniture, with several outputs from it on tapes. Here is the placement of the power supply in the cabinet, from it there are three cables with a cross-section of 1.5 each to its own piece of tape.
The tape power supply must always be serviceable. It can, like any equipment, burn out.
I had a couple of objects where the power supply units of the tape were walled up in the walls by the customer’s decision. We took the most expensive (Meanwell) power supplies with IP67 protection, the power was selected with a reserve, we checked three times that they were working, and we sewed them up with the ceiling. They've been working for at least three years now. In general, the probability of a malfunction is quite low, but if something happens, you will have to expand the ceiling.
Here is a photo of the placement of power supplies in the shield. Chinfa 24 volt power supplies. Each has a trim resistor that can provide up to 29 volts.
Next to each block there is a relay for turning it on and an automatic machine. Here one block - one tape.
ShVVP, PVS or VVG
The main topic of debate regarding the choice of cables and wires for spotlights is the choice of one of three brands of cable products:
Which of them can and which cannot be used? Let's look at it in order.
SHVVP - a cord with a vinyl sheath and core insulation and PVC. The cores are made of twisted copper wires, which ensures a high degree of flexibility. This fact makes installation easier.
It is designed for non-stationary connection of electrical appliances to the power supply network. According to the definition, it is no longer suitable for such a task as lighting installation. Its element is the power cords of hair dryers, televisions, fans, as well as various household appliances that are low-power or very mobile during operation. However, craftsmen often offer it for connecting spotlights as an inexpensive solution. In addition, the good flexibility of the cord significantly speeds up and simplifies the connection of the points themselves. Its insulation is not too thick, although it is within normal limits. This is also why it is not suitable for long-term work. According to GOST, its time between failures is about 5000 hours.
Apart from this definition, there are no other regulated reasons not to use it to connect “dots”, it is simply not designed for that.
PVS – vinyl connecting wire. This is the abbreviation for the marking of this cable product. The cross section of this wire is already round; accordingly, it has thicker and more durable insulation than that of the SHVVP. The cores are the same multi-wire flexible.
PVA is also designed for non-stationary connection of electrical equipment to the network. Therefore, the PVA wire is similarly not intended for lighting installation. But it is great for extension cords and for powering a variety of hand-held power tools and other appliances.
Nevertheless, a high-quality shell allows it to be used for wiring, and electricians often use it for electrical installations behind plasterboard ceilings and tensioned fabrics. A flexible wire is easier to install than a rigid wire with single-wire conductors (solid-core).
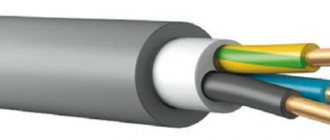
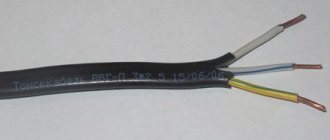
VVG is a wire with rigid monolithic conductors. Its insulation is also made of PVC, both the overall shell and the insulation of each core. Designed for permanent connection of electrical equipment and wiring.
This means that by definition it is suitable for installing wiring for spotlights. But electricians do not always like to install VVG cable to connect spotlights. VVG is rigid, which makes it difficult to connect the lamp in a limited window space to install a point. In addition, the lamps themselves usually have soft wires and connecting to hard wires can be difficult.
Nevertheless, a detailed study of GOST 7799-97 slightly corrects the above, as follows:
That is, according to this information, SHVVP is still allowed for connecting lamps, but for PVA this is not said. Apparently we are talking about table lamps, floor lamps and similar devices.
And this is an excerpt from GOST 31996-2012, which concerns the VVG cable:
Classic connection via electromagnetic ballast
Features of the scheme
In accordance with this circuit, a choke is connected to the circuit. Also, the circuit must include a starter.
Choke for fluorescent lamps
Starter for fluorescent lamps - Philips Ecoclick StartersS10 220-240V 4-65W
The latter is a low-power neon light source. The device is equipped with bimetallic contacts and is powered from an electrical network with variable current values. The throttle, starter contacts and electrode threads are connected in series.
Instead of a starter, an ordinary electric bell button can be included in the circuit. In this case, voltage will be supplied by holding the bell button pressed. The button must be released after the lamp is lit.
Connecting a lamp with electromagnetic ballast
The operating procedure of the circuit with an electromagnetic type ballast is as follows:
- after being connected to the network, the inductor begins to accumulate electromagnetic energy;
- electricity is supplied through the starter contacts;
- the current rushes through the tungsten heating filaments of the electrodes;
- the electrodes and the starter heat up;
- the starter contacts open;
- the energy accumulated by the throttle is released;
- the voltage on the electrodes changes;
- a fluorescent lamp gives light.
In order to increase the efficiency and reduce interference that occurs when the lamp is turned on, the circuit is equipped with two capacitors. One of them (the smaller one) is located inside the starter. Its main function is to dampen sparks and improve neon impulse.
Connection diagram for one fluorescent lamp through the starter
Among the key advantages of a circuit with an electromagnetic type ballast are:
- time-tested reliability;
- simplicity;
- affordable price.
- As practice shows, there are more disadvantages than advantages. Among them it is necessary to highlight:
- impressive weight of the lighting fixture;
- long lamp on time (on average up to 3 seconds);
- low efficiency of the system when operating in cold conditions;
- relatively high energy consumption;
- noisy throttle operation;
- flickering, which negatively affects vision.
Connection procedure
Connecting the lamp according to the considered scheme is carried out using starters. Next, we will consider an example of installing one lamp with the inclusion of a model S10 starter in the circuit. This state-of-the-art device has a non-flammable body and high-quality construction, making it the best in its niche.
The main tasks of the starter come down to:
- ensuring the lamp is turned on;
- breakdown of the gas gap. To do this, the circuit is broken after a fairly long heating of the lamp electrodes, which leads to the release of a powerful pulse and direct breakdown.
The throttle is used to perform the following tasks:
- limiting the current value at the moment of closing the electrodes;
- generating voltage sufficient for gas breakdown;
- maintaining the discharge combustion at a constant stable level.
In the example under consideration, a 40 W lamp is connected. In this case, the throttle must have the same power. The power of the starter used is 4-65 W.
We connect in accordance with the presented diagram. To do this we do the following.
First step
In parallel, we connect the starter to the pin side contacts at the output of the fluorescent lamp. These contacts represent the leads of the filament of the sealed bulb.
Third step
We connect the capacitor to the supply contacts, again, in parallel. Thanks to the capacitor, reactive power will be compensated and interference in the network will be reduced.
Cable cross-section for electric stove
An electric stove or hob in an apartment is most often the most energy-intensive consumer; accordingly, the cross-section of the cable for connecting it differs from others and, most often, is:
For single-phase connection – 3 x 6 mm.sq.
For three-phase connection – 5 x 2.5 mm.sq.
If there is a three-phase input into the apartment, you should not connect the electric stove to only one phase with a three-core cable, even if you take the cross-section with a margin, because Perhaps there will be a “phase imbalance” - an unevenly distributed load on different phases. Be sure to read our article about choosing a cable cross-section for a hob or electric stove; it describes in sufficient detail the rules for choosing a cable, its cross-section and everything connected with it.
Permissible LED strip voltage
I conducted an experiment: I connected a 24-volt strip to a voltage source and began to lower the voltage. Photos cannot convey the change in the brightness of the glow; you have to watch it live and compare it. The conclusion is this: at 22 volts the tape burns dimmer, but only a little dimmer. Let's just say it's acceptable. At 21 volts the tape burns even dimmer. At 20 volts it is even a little dimmer.
We can assume this: reducing the supply voltage of the tape by 10% slightly (to 21.6 volts) reduces the brightness of the glow, but is still acceptable. More is undesirable. It is better to take 6-8% as an acceptable voltage drop.
Next, we calculate according to the formulas presented above.
The tape comes in different capacities and different voltages. I believe there is no need to explain that it is always more profitable for us to use a tape of higher voltage. More voltage - less current. Less current means less unwanted voltage drop. The most common tape itself has a voltage of 24 volts. We don’t look at 12 volts or lower, unless there is a very short cable to the tape and there is a free 12-volt power supply.
Let's imagine that our tape has a power of 9.6 watts per meter (the most common option) and is 10 meters long. Voltage 24 volts. The distance to the tape from the power supply is 20 meters. What section should I use for the cable?
First we count the current. That's 4 amps (power per meter * length/voltage). I made a table in Excel in which I wrote down all the formulas for a simple calculation of the voltage drop as a percentage.
I found that with a cross section of 1.5 mm2 the voltage drop will be 1.92 volts or 8%. With a cable length of 25 meters - 10%. With a cable cross section of 0.75, the length can be no more than 10 meters. These are the maximum values; if you want the tape to burn not “a little dimmer than usual,” but rather brightly, then you need to increase the cross-section. Taking into account the fact that cables are often sold with a smaller cross-section than stated, it is worth taking a cross-section one step larger.
Safety precautions when routing wires for spotlights
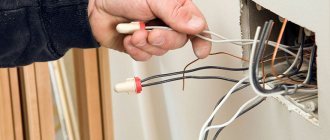
When wiring lighting, regardless of the type and type of lighting devices, it is necessary to turn off the voltage supply to the main power cable. All tools used during work must have reliable insulation.
When choosing a wire and power cable, you need to pay special attention to the correspondence of its cross-section to the calculated load. In houses or residential premises in which a grounding scheme is provided, it is definitely worth choosing a three-wire wire
In this case, the likelihood of accidental electric shock when operating electrical appliances will be minimized. The sheath of cable products must have high fire resistance and attenuation ability.
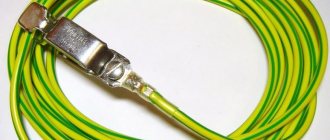
It is prohibited to use homemade twists at the points of contact and connection of wires. It is necessary to use special terminals or crimp sleeves.
By following the above tips and requirements when creating wiring for spotlights, you can achieve maximum safety both during the work and during its operation.
Which spotlights to choose?
Rules for connecting lamps to a 220V network
- The circuit consists of junction boxes, wires and corrugations.
- It is important to use exclusively copper wire. If there were twists in the wires, it is better to solder and insulate them.
- A separate flexible wire is allocated for each of the lamps. Connection and connection of them together occurs through copper sleeves or a special “terminal block”, which is then additionally insulated using insulating tape.
- Before installing ceilings, it is important to check the wiring and light bulbs with a switch.
Before installation on the ceiling surface, it is important to determine the location of the built-in lamps. By their design, such lighting devices cover a lighting sector of only 30º. On the other hand, due to its compactness, the scheme for their installation can be quite dense. If you follow it, then there can be quite a lot of them on different ceilings.
To ensure optimal illumination of the room, the installation diagram of light elements should be as follows:
- The distance between the points of light should be no more than a meter.
- Holes for lamps should be located at a distance of 25-30 mm from the nearest frame.
- The spotlight should be located at a distance of 60 cm from the wall.
- It is better to separate the lighting circuits of different zones with a separate switch.
You can install and connect lamps in a plasterboard ceiling yourself. The technology and design are universal - the same for all types of suspended ceilings.
Deciding on the installation location
Absolutely any type of construction work must begin with careful planning on paper or in another accessible way. Many customers prefer to save on expense items, so after some of the work has been completed, defects and shortcomings are visible.
If we are talking about installing spotlights, then there is a list of common places where they are most often installed:
- Above the berth;
- Above the work area;
- In the relaxation area and reading area;
- In the kitchen or room above the tables.
Installing a chandelier is different from installing spotlights - they do completely different things that seem similar from the outside. For a spotlight, the wiring can be routed directly from the distribution panel in the house or apartment. You can also power this type of lighting from an outlet.
Installation on a suspended ceiling
Stretch ceilings are one of the most popular solutions during renovations. It is thanks to this type of coating that you can create an original design. For example, you can make a multi-level ceiling or create an imitation of a starry sky. By adding spotlights to the ceiling, you can achieve extraordinary comfort in any room.
Installation of spotlights on suspended ceilings, as in the previous case, begins with laying the wiring.
In order not to make mistakes during installation, it is recommended to tighten the usual threads that are attached to the profile and indicate the level of the future ceiling.
Next, you should mark the places where the lamps will be installed. There are two ways to do this.
The first is to make the appropriate markings on the ceiling using a pencil and tape measure. If you have a laser level at home, marking will be much more convenient.
A special platform is installed in those places where the spotlight will be located. It looks like a plastic circle, inside of which the lamp will be placed. The platforms are installed in such a way that there is a distance of five centimeters between their edge and the stretched thread. Having set the platforms at the required level, you can remove the stretched threads.
After the preparatory stage is completed, you can proceed to tensioning the ceiling fabric. After this work is completed, you need to find the pre-installed platforms by touch. A mark is made along their outline on the ceiling canvas.
Next, protective thermal rings are placed on the made marks with glue. They perform several functions. Firstly, they protect the ceiling from the heat radiation of the light bulb in the future. Secondly, the rings hold the canvas, preventing it from tearing during installation of the lamp.
The glue is applied very carefully, only to the surface where the thermal ring will be attached. You shouldn’t smear it all over the ceiling, just apply a thin layer on the thermal ring and press it well with your fingers.
After the glue has set, which will take 3-4 minutes, you can move on to the next step. So, using a sharp knife, a hole is made inside the ring through which pre-prepared wires are removed.
When cleaning the film inside the ring, it is important to remove it completely, since its remnants may further interfere with the cooling of the lamp. Next, they are connected to the lamp, and the device itself is attached to the landing platform with special “ears”.
We also recommend reading our other material, where we talked in detail about the features of choosing light bulbs for suspended ceilings.
How to choose the right transformer power
Before connecting ceiling lamps, one point should be understood: for normal operation of all connected lighting fixtures, it is necessary to use a transformer whose power is 20% higher than the total power of the lamps in the electrical circuit. For example, a power reduction device is required for 8 40-watt light bulbs. First, the total power is determined: 8*40=320 Watts. Therefore, for this voltage you should purchase a driver with a power of about 400 Watts.
When calculating voltage, it is important to take into account that a large number of light bulbs requires a higher power converter. However, the cost and size of the step-down device increases with increasing power value
To solve the problem, spotlights are divided into several groups and a transformer is connected to each of them. But in this case, the converters must have less power.
Features of connecting 12V lamps
Many people prefer to use 12 V spotlights for lighting. Connecting them requires a voltage-reducing transformer and a device that stabilizes the current (can be made from a capacitor, resistor, diode bridge). Factory-produced devices are more reliable and are sold with a guarantee.
The driver parameters must be calculated after purchasing the lamps. Its power should be 20% higher than the total power of the lamp(s). It’s difficult to make a mistake with your choice, since popular manufacturers indicate the power on the packaging. It is imperative to evaluate the conditions at the installation site of this equipment. For example, for a bathroom you need to buy a driver that is resistant to high humidity.
The connection diagrams are the same as for a 220 V network. The transformer is mounted and connected first, wires are pulled from it to the lamps.
Most often, spotlights are used in suspended ceilings. These are built-in models that come with a driver and a connection connector. The cable in the ceiling structure is laid in advance. At the installation site of the lamp, a hole is drilled, the braiding and insulation are removed from the cable cores, and the covers hiding the terminals are removed from the transformer. The wires are connected according to the diagram on the case. Two terminals are provided for the cable, the rest (usually on the other side) for lamps. First, the cable wires are connected (exact polarity is not necessary, since the current from the network is alternating). On the other side, the wires of the lamp (or several lamps, if the driver is designed for this) are connected.
Next, the transformer covers are put in place, the device is hidden in the hole, and only the connector for connecting the lighting device remains outside. The lamp body is installed in the hole, the clamp is removed, the light bulb is installed, and secured with the clamp.
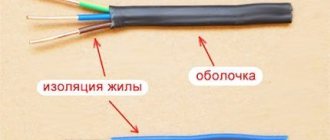
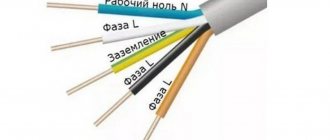
Accepted markings of cores inside cables for lighting
Traditionally, cable insulation has different colors. This makes it easier to carry out electrical installation work on lighting houses and apartments. Thus, a red, brown or white sheath is present on live wires (denoted in the diagrams by the letter “L”). The blue wire means “zero” (letter “N” in the diagram), and green or yellow-green colors are used for the ground wire (letter “PE”).
For a two-core cable we have only phase and zero.
4Fri, 7 Mar 2008 01:25
sergey_sav wrote:
Then please explain to me why 0.75 is possible in a lamp - where is the logic? How many factory lamps have you seen, such as chandeliers, with 0.75 mm wires? At best, 0.5 mm, and very often 0.35 or even less. (It’s another matter that industrial lamps are really 0.75) In addition, the concept of “incomplete short circuit” does not exist among electricians. There is a concept of reduced or dampened insulation. Which either eliminates itself due to self-drying by flowing currents, or goes into a short circuit due to a breakdown. And KZ is KZ!!! There is an incomplete phase short circuit, but this is already higher matters.
electro wrote:
There is no cutoff in any of the examples given. I meant automatic rifles like AP-50 or automatic plugs, which are still being produced. That is, devices with a current trip coil. This coil instantly turns off the device when a certain value of the current flowing through it is reached. The thermal release, unlike the coil, has significant thermal inertia, and its shutdown time strongly depends on a number of initial factors: Current of the previous fault; Initial temperature of the thermal release. The material of the bimetallic plate and the heating element (sometimes these are different parts) And finally, on the ambient temperature. (i.e. depending on the degree of cooling)
In general, I wanted to know the link where you can find the Ampere-second characteristics of modern machines. To prove to the client that he is right by calculating the thermal resistance of the wires used. Taking them yourself is quite a chore, and the client may not believe in the reliability of the data; he is a mathematician who checks all the calculations for me. In reality, it is much easier to do this experimentally. As I will not tell you, “a bad example is contagious,” and repeating these experiments without sufficient knowledge is dangerous.
Thank you, of course, for the answers, but so far the arguments are not convincing.
Creating Lighting
Before buying lamps and starting their installation, you need to clearly plan and think through everything. You can choose the most suitable option for your room, guided by these simple selection parameters:
- what will be the light source, what are its advantages and power;
- ceiling type;
- lamp option (rotating or fixed);
- method of placement in a suspended structure.
Once you have decided on the lighting fixture and the light source for it, we proceed to install the lamp. Installing the backlight yourself involves the following manipulations:
At the stage of assembling the frame structure, it is necessary to lay all the wires and all the necessary lighting elements. This will allow you to better and quickly install lighting fixtures on the ceiling in the place you need;
- To increase fire safety, all connections must be insulated in special channels or corrugated plastic pipes. Wires are placed in them, which reduces the risk of short circuits or negative effects of structural elements on the insulation of wires. A pipe or channel will prevent moisture from entering the wires;
- to prevent the wiring from dangling, it must be secured to a metal frame using plastic clamps;
- Next, in the material with which the ceiling will be sheathed, we make holes in the right places to place lighting fixtures in them. The diameter of the hole must match the circumference of the lamp;
- The hole is made with a drill with a special attachment - a crown. This way it will definitely turn out smooth and neat;
- To connect the lighting device, it is recommended to use a stranded soft wire (VVG or ShVVP - 3x1.5). In this case, both soft and hard wire are suitable for all wiring. When using terminal blocks, you need to use soft wire;
- We connect the lamps to the wiring and install them in the ceiling surface.
As you can see, the installation of spot-type lighting has certain nuances, but if desired and with the appropriate knowledge, it can be easily installed with your own hands on various ceiling structures. The main thing is to carry out all work with wires when the electricity in the room is turned off.
https://youtube.com/watch?v=5WQ-whRBkGU%2520
How to wire for spotlights in different types of ceilings
There are two types of connecting electrical devices into a single circuit. These are serial and parallel connections. With the first option, connecting the wiring to the spotlights is not difficult. As is clear from the name of the connection type, lighting devices are connected one after another and at the same time have only one point of contact with the previous and next device. The advantage of a serial connection is that it saves on the amount of cable or wire, but the disadvantage is that if one lamp fails, the lighting system stops working completely.
Wiring lighting using a parallel connection is much more difficult. It involves greater wire consumption, as well as the presence of additional contact points at branching points. But this is the most common option to make wiring for spotlights reliable and efficient during operation.
Beam connection
The radial connection is more reliable, but installing the wiring this way is more difficult. You will need more cable. The connection should be of better quality so that all the wires stay where they are secured. A convenient installation method is using a terminal block, when you conduct a phase on one side and separate it into contacts. From the other end, bring the cable sections leading to the lamps.
A similar method is to use Vago terminal blocks. It is simple and quick to implement. You need to strip the wires and insert them into the sockets.
You can use another option - twist the wires, crimp with pliers and weld. The connection is permanent, but quite strong.
If you are knowledgeable about electrics, you can handle the installation of lamps yourself. If in doubt, contact electricians who will calculate the number of electrical appliances for your area, correctly mark the installation locations and carry out the installation.
Appearance and lighting effects
Lighting is not only functional. Often this is also a decorative component. To make choosing spotlights based on this principle a little easier, let’s divide them into categories:
- In some rooms - the bathroom, for example, special design refinements are not required. Here are the most popular models in which only the ring remains on the outside. The same models are installed if the interior is designed in a style that does not tolerate “embellishment” - minimalism, hi-tech, loft. The models chosen are the same, only the approach to choosing a color scheme may be different.
- If you want to “revive” the interior, spotlights with decorative shades are suitable. They are very different - with balls, cylinders, carved shades. The styles are very different.
- If you need “lighting effects” on the ceiling - a play of light and shadows, look towards models with crystal shades and/or pendants. They are, again, in different styles - geometric cut, in the form of flowers, etc.
In fact, choosing a design is almost the most difficult thing, because there are also rotating models, and two, three, or four light bulbs in one housing, and with various inserts of a different color, and with painting, embossing, etc. . and so on.
Advantages and disadvantages of LED lamps
The continuous increase in the cost of electricity forces us to think about saving. Replacing incandescent light bulbs with LED ones reduces costs by 10 times.
There are other advantages:
- compactness;
- no soot;
- fast ignition (without warming up);
- long service life;
- low sensitivity to voltage changes;
- ease of installation;
- high quality (if you buy products from a popular manufacturer);
- environmentally friendly.
LED lamps have an attractive appearance, but they are more expensive than all others. If you purchase cheap Chinese-made products, the quality of the glow and service life will decrease.
Disadvantages include exaggeration of some advantages:
- the real service life is not 10-11 years, but 3-5 (taking into account the degradation of LEDs);
- narrow directionality of the light beam, requiring the installation of a large number of lamps;
- the need for expensive drivers and cooling systems.
The costs of reconstructing lighting systems are not reimbursed in any way. Those who have begun to use LEDs in residential premises claim that it takes some time to get used to their glow.
terms of Use
In an apartment and private house
When choosing a cable for electrical wiring, most often the same brand is used for sockets, lighting and individual powerful consumers. Therefore, you can use the same option for the light as for the socket group. The most popular cable for lighting in apartments and houses is VVG. When installing hidden wiring, it is one of the best options. In a wooden house, you should use a cable that does not propagate combustion - VVGng, VVGng-LS or NYM.
On the street or in the garage
First you need to decide how the wiring will be laid. The fact is that with open wiring, the cable is laid in pipes or in corrugation. In the case of underground installation, you can use armored cables or ordinary ones, but laid in a PVC pipe. For lighting in the garage, the recommendations are similar - laying external wiring in a protective corrugation, it will protect the wire from mechanical damage and rodents
You can use 2 or 3 wire wire. Using a 3-core wire will make it possible to install two groups of lamps by connecting another phase to the third core. Also, a three-wire wire is mandatory to use if there is grounding. If you do not have a ground connection, it is still better to use a three-core conductor when installing the wiring so that there is no need to change the cable in the future.
On the balcony or porch of the house
In the case of installing a street lamp on the porch, the lighting wire can be laid both internally and externally. And in the case of installation in the wall, the VVG 2x0.75 cable is perfect. For external laying, you can use the same, but be sure to lay it in a protective corrugation or pipe. Also suitable in this case is a round wire of the PVA brand or a flat SHVVP - they are flexible and will be easier to insert into the corrugation.
Important! When using a wire with a stranded core, the ends that will be connected to the lamp, if you use a screw terminal block, must be tinned or terminated with NShVI type lugs. If you use WAGO terminals, this is not necessary
In the garden
The wire for connecting lighting in the garden must be laid overhead or underground. Air laying in this case is not always possible, because it requires posts; it is also possible to lay wires along the fence. In this case, the recommendations are as follows:
- If several groups of powerful lamps are intended to illuminate the entire area, then VVG 3x1.5 or flexible wire grades listed above will be suitable.
- The cable must be protected with corrugation.
For laying cables in a trench, a variant of the VBBShV brand is suitable - this is an armored copper cable. It is suitable for digging into the ground without additional protection, if there is no heavy load on the soil. That is, if you are laying a cable in the ground under a parking area for cars, it is better to protect it in this area by laying it in a HDPE pipe or PVC sewer pipe. In underground pipes, you can use both the VVG brand and other “unprotected” brands of wires.
In the bathhouse or toilet
A special feature of connecting light in a bathhouse or sauna is high humidity and temperature. Therefore, it is recommended to use RKGM heat-resistant wire for lighting, laid in a plastic corrugation. This way you will receive protection from damage to the cores, as well as from melting of the insulation when operating at high temperatures. The calculation of the cross-section of the wire cores in this case is no different from the previous options.
To connect the light in the bathroom, you can use both RKGM and the above brands of cable products, but it is recommended to use internal wiring or use cable channels for external wiring.
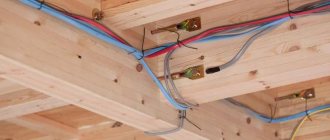
Basic Rules
Before proceeding with the installation of wiring intended for suspended ceiling lamps, you should carefully prepare and plan everything. As part of the preparatory stage, a number of works need to be completed.
Fig.1. Installation and preparation of wiring under a suspended ceiling
- Selecting an electrical wire. To ensure that the wiring is safe and can provide each lamp with the required voltage, it is important to choose the right electrical wires. Most often, a VVGng type power cable made of copper is used for this purpose. The cable cross-section is selected based on the number and power of the built-in luminaires.
- Checking the main cable. Before moving on to wiring the lamps, you need to make sure that the cable coming from the junction box is intact and can withstand the load of the number of lighting fixtures being installed.
- Creating a wiring diagram. Before laying the wires, you should decide on the location of each lamp on the suspended ceiling. It is advisable to make marks on the base ceiling in the places of future mounting of lighting fixtures and mark the places where the wires pass. You should also create a schematic drawing of the electrical wiring on paper.
- Selection of wiring materials. It is highly not recommended to install wiring for lamps behind a suspended ceiling in an open manner, without using protective corrugations and cable ducts. Compliance with this rule ensures the fire safety of the tensile structure. An open method of fastening wires is allowed only if the base ceiling is made of non-flammable materials, as well as when using LED lamps, which have low power and do not heat the wires during operation.
On a note
The process of wiring for lamps
If you decide to do the wiring yourself, you should start by creating a wiring diagram for the base ceiling.
note
The wires should be placed parallel or perpendicular to the junction of the walls and ceiling. Installation locations for distribution boxes should be chosen so that, if necessary, they can be serviced or repaired.
Fig.2. Wiring under a suspended ceiling
Drawing up a diagram is a very important stage, on which the safety of the wiring and the ease of connecting lighting fixtures will depend. You also need to think about how the lamps will be turned on: all together or in separate groups. Based on this, the wiring is connected to the switches.
The wires leading to the lamps must be secured to the base ceiling using dowel clamps or special clips. The fastening pitch should be such that the wires do not sag and do not touch the tension covering. As a rule, the wire should be fastened every 50-90 centimeters. If possible, wires should be installed without crossing points. If this cannot be avoided, it is important to provide high-quality short circuit protection by additional insulation of each wire.
Fig.3. Wiring and fittings for the lamp on the base ceiling
The wiring for suspended ceiling lamps must extend from the distribution panel. It needs to be brought to each lamp and terminal blocks attached to the end of the wires, to which the outputs of spotlights will subsequently be attached. It is very important to check whether voltage is supplied to each lamp before installing the stretch ceiling. This will help avoid problems with the performance of lighting fixtures and the need to dismantle the stretch ceiling. After wiring is completed, special mountings are installed under the lamps, consisting of a plastic platform, which is attached to the base ceiling using plasterboard hangers.
You can buy all the necessary materials and components for installing lamps in a suspended ceiling in the online store.