| 3/4″ drill bit for cutting holes | 1 PC. |
| Drill and drill bits | 1 PC. |
| Hacksaw | 1 PC. |
| Iron, electric | 1 PC. |
| Laser printer | 1 PC. |
| Miter box for 1/4″ plywood | 1 PC. |
| Multimeter with frequency meter (or oscilloscope) | 1 PC. |
| Sandpaper | 1 PC. |
| Saw for 1/4″ plywood | 1 PC. |
So let's get started!
Step 1: Make a PCB . To do this, download the board design here. Then print it out and etch it onto the copper board using the toner to board transfer method. With the toner transfer method, you print a mirror image of the board design using a regular laser printer, and then transfer the design onto the copper cladding using an iron. During the etching stage, the toner acts as a mask, preserving the copper traces while the rest of the copper dissolves into the chemical bath.
Step 1. Metal detector board design
Step 2: Populate the board with transistors and electrolytic capacitors
. Start by soldering 6 NPN transistors. Pay attention to the orientation of the collector, emitter and base legs of the transistors. The base leg (B) is almost always in the middle. Next we add two 220μF electrolytic capacitors.
Electrical circuit for a sensitive metal detector
Step 2.1. Solder 6 NPN transistors onto the board
Step 2.2.
Add 2 Electrolytic Capacitors Step 3: Fill the board with polyester capacitors and resistors.
Now you need to add 5 polyester capacitors with a capacity of 0.1μF in the places shown below. Next, add 5 capacitors with a capacity of 0.01μF. These capacitors are not polarized and can be soldered onto the board with legs in any direction. Next, add 6 10 kOhm resistors (brown, black, orange, gold).
Step 3.1. Add 5 polyester capacitors
Step 3.2. Add 5 capacitors with a capacity of 0.01μF
Step 3.3.
Add 6 10 kOhm resistors Step 4: We continue to fill the electrical board with elements.
Now you need to add one 2.2 mOhm resistor (red, red, green, gold) and two 39 kOhm resistors (orange, white, orange, gold). And then solder in the last 1 kOhm resistor (brown, black, red, gold). Next, add pairs of wires for power (red/black), audio output (green/green), reference coil (black/black), and detector coil (yellow/yellow).
Step 4.1. Add 3 resistors (one 2 mOhm and two 39 kOhm)
Step 4.2. Add 1 1 kOhm resistor (far right)
Step 4.3.
Adding wires Step 5: Wind the turns onto the coil.
The next step is to wind turns on 2 coils, which are part of the LC generator circuit. The first is the reference coil. I used 0.4mm diameter wire for this. Cut a piece of dowel (about 13mm in diameter and 50mm in length).
Drill three holes in the dowel to allow the wires to pass through: one lengthwise through the middle of the dowel, and two perpendicularly at each end.
Slowly and carefully wrap as many turns of wire as you can around the dowel in one layer. Leave 3-4mm of bare wood at each end. Resist the temptation to "twist" the wire - this is the most intuitive way to wind, but this is the wrong way. You must rotate the dowel and pull the wire behind you. This way he will wrap the wire around himself.
Pull each end of the wire through the perpendicular holes in the dowel, and then one of them through the longitudinal hole. Secure the wire with tape once you're done. Finally, use sandpaper to remove the coating on the two open ends of the coil.
Step 5. General view of the dowel with wound wires and drilled holes
Step 5. General view of the dowel from the other side
Step 5. And another view of our coil
Step 6: Making a receiving (search) coil.
It is necessary to cut the spool holder from 6-7 mm plywood. Using the same 0.4mm diameter wire, wind 10 turns around the slot. My reel has a diameter of 152 mm. Using a 6-7 mm wooden peg, attach the handle to the holder. Do not use a metal bolt (or anything similar) for this - otherwise the metal detector will constantly detect treasure for you. Again, using sandpaper, remove the coating on the ends of the wire.
Step 6.1. Cut out the spool holder
Step 6.2 We wind 10 turns around the groove with a wire 0.4 mm in diameter
Step 6.3 Attach the handle to the spool holder
Step 7: Setting up the reference spool.
Now we need to adjust the frequency of the reference coil in our circuit to 100 kHz. For this I used an oscilloscope. You can also use a multimeter with a frequency meter for these purposes. Start by connecting the coil into the circuit. Next, turn on the power. Connect the probe from an oscilloscope or multimeter to both ends of the coil and measure its frequency. It should be less than 100 kHz. You can, if necessary, shorten the coil - this will reduce its inductance and increase the frequency. Then new and new dimensions. Once I got the frequency under 100kHz, my coil was 31mm long.
Step 7.1 connecting the coil to the circuit
Step 7.2 Setting the coil frequency to less than 100 kHz Step 7.3 Coil length 31 mm
Metal detector on a transformer with W-shaped plates
Circuit of the simplest metal detector
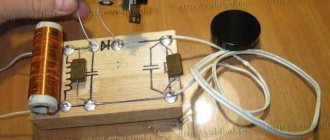
The simplest circuit of the metal detector. We will need: a transformer with W-shaped plates, a 4.5 V battery, a resistor, a transistor, a capacitor, headphones. Leave only the W-shaped plates in the transformer. Wind 1000 turns of the first winding, and after the first 500 turns, make a tap with PEL-0.1 wire. Wind the second winding 200 turns with PEL-0.2 wire.
Attach the transformer to the end of the rod. Seal it against water. Turn it on and bring it close to the ground. Since the magnetic circuit is not closed, when approaching the metal, the parameters of our circuit will change, and the tone of the signal in the headphones will change.
Operating principle
What is a metal detector? This is a device that, using certain radiation, finds metal located underground, without direct contact with it. The response data that comes back helps to identify the find and informs about it using an audio or visual signal.
The principle of operation of the metal detector
The electromagnetic field that the device emits comes into contact with metals, in this case gold, which provokes the appearance of eddy currents on their surface. By measuring electrical conductivity, metals are identified and data about this is transmitted by a signal.
Metal detectors can have different wave parameters, return signal processing techniques, additional functions and much more. Therefore, before you start making a device, you need to decide what exactly you want to get as a result.
The standard frequency for metal detectors is 6–20 kHz, but for gold it should be slightly higher, 14–20 kHz or more. This is because gold often occurs in tiny nuggets, so higher sensitivity is needed. If there is such a possibility, then it is good to have a device with a multi-frequency customizable search, then it will be possible to increase the number of objects that it recognizes.
Among all the metal detector circuits on the Internet, experts advise choosing devices with balanced induction, which have two coils in the head and a powerful electronic circuit. Also of great interest are circuits that have a receiver-transmitter operating principle, operating at high frequencies, about 20 kHz, which makes it possible to distinguish non-ferrous metals from ferrous ones.
Transistor metal detector circuit
Transistor metal detector circuit
A simple circuit using common elements. You need transistors of the K315B or K3102 series, resistors, capacitors, headphones, and a battery. The values are shown in the diagram.
Video: How to properly make a metal detector with your own hands
The first transistor contains a master oscillator with a frequency of 100 Hz, and the second transistor contains a search oscillator with the same frequency. As a search coil, I took an old plastic bucket with a diameter of 250 mm, cut it off and wound a copper wire with a cross-section of 0.4 mm2 in the amount of 50 turns. I placed the assembled circuit in a small box, sealed it and secured everything to the rod with tape.
Circuit with two generators of the same frequency. There is no signal in standby mode. If a metal object appears in the field of the coil, the frequency of one of the generators changes and sound appears in the headphones. The device is quite versatile and has good sensitivity.
Household metal detector
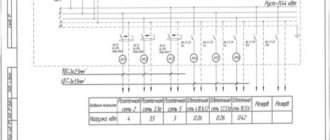
A household metal detector (HIM) (Fig. 15), produced earlier (Moscow), allows you to detect small metal objects at a distance of up to 45 mm. The winding data of its inductors are unknown, however, when repeating the circuit, you can rely on the data given for devices of similar purposes (Fig. 13 and 14).
Rice. 15. Scheme of a household metal detector.
Literature: Shustov M.A. Practical circuit design (Book 1), 2003
Metal detector circuit based on K561LE5 chip
Metal detector circuit based on the K561LE5 chip.
A simple circuit using simple elements. You need a microcircuit, capacitors, resistors, headphones, and a power source. It is advisable to first assemble coil L2, as shown in the photo:
Connecting circles
A master oscillator with coil L1 is assembled on one element of the microcircuit, and coil L2 is used in the search generator circuit. When metal objects enter the sensitivity zone, the frequency of the search circuit changes and the sound in the headphones changes. Using the handle of capacitor C6 you can tune out excess noise. A 9V battery is used as a battery.
In conclusion, I can say that anyone who is familiar with the basics of electrical engineering and has enough patience to complete the job can assemble the device.
Metal detector design.
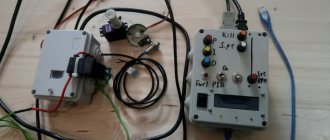
Structurally, I decided to make the metal detector foldable and compact. So that it fits into a regular bag, so as not to attract the attention of “normal” people. Otherwise, when you get to the search site, you look like an “alien” or a scrap metal collector. For this purpose, I bought the smallest (two-meter five-legged) telescopic rod in the store. Left three knees. The result was a fairly compact folding base, on which I assembled my metal detector .
The entire electronic unit was assembled in the 60x40 plastic wiring box I already loved. The end cap, the power compartment partition and the power compartment cover were also made from its plastic. The parts were glued together with superglue and mounted on M3 bolts. The electronic unit of the metal detector attached to the fishing rod in the form of a metal bracket, which is inserted into place of the fishing reel with fishing line and secured with the standard nut of the fishing rod. The result is an excellent lightweight and durable design. On the outside of the unit there is a power button, a coil connection socket (a five-pin socket from a “grandfather’s” tape recorder), a frequency regulator and a headphone jack.
The printed circuit board of the metal detector was made on site by routing the tracks with a waterproof marker. For this reason, unfortunately, I cannot provide a seal. Surface mounted mounting - no holes - “lazy” - my favorite. It is also important, after assembling the board, to cover it with any varnish to protect it from moisture and debris. In field conditions this is very important. For example, I lost one day because some debris got inside under the microcircuit. The metal detector just stopped working . And I had to return home, disassemble it, blow it out and open the board with varnish.
Metal detector made from improvised means
Another option is to assemble a metal detector from available materials; it is more suitable for humanists and novice technicians with a passion for finding treasures and lost artifacts.
During operation of such a homemade device, electromagnetic waves emitted by the calculator are caught on the AM band of the receiver.
An indicator of the location of an object in this device is the rotation of the electromagnetic field during re-emission, which changes the parameters of the sound signal. A photo of such a do-it-yourself metal detector can be found on the Internet and at the end of our material.
To use such a prefabricated version, you do not need a detailed diagram or assembly instructions, but compliance with certain requirements for the two main components of a homemade detector, namely a properly working calculator and a radio receiver.
To work on the model, you will also need a suitable sized plastic box with an opening lid, like a book, which will become the body of the finder.
An old CD box is ideal for these purposes. To attach the parts you will need double-sided tape.
Types of MI by purpose
In accordance with their intended purpose, MI is divided into the following types:
- Soil models designed for underground surveys in the upper layers of soil. Devices in this category are the most common among metal detectors and treasure hunters who can assemble a metal detector with their own hands at home. The simplest homemade product has low accuracy and does not always distinguish between different types of metals. Professional instruments can detect small grains of gold, ignoring other metals.
- Depth models designed to detect targets at a depth of up to 6 meters. However, they can only “see” large objects with an area of over 400 square meters. see. Deep devices are in demand by engineering services as route finders, by geologists as specialized georadars for searching for native gold, etc.
- Underwater metal detecting devices operating underwater. They are subject to increased requirements for the tightness of the search system. The operating conditions of underwater MI in sea and fresh water differ significantly. Underwater detectors use only sound indication.
Note! Underwater MI can be used on the surface in the mode of a conventional ground metal detector. Searchers only need to adjust the length of the rod and the position of the stop to make it more convenient to use the device
- Special metal detectors:
- security devices for detecting metal products in luggage, clothing or on a person’s body during inspection;
- industrial metal detectors as part of conveyor lines, signaling the presence of metals in products;
- military devices, collectively called mine detectors;
- detectors tuned exclusively to gold objects.
In Fig. Below is a hand-held security metal detector.
Main settings
Based on their properties, metal detectors are divided into 3 main groups: deep, underwater, and ground. From the name it is immediately clear what their features are. Although they often create hybrids, for example, for ground ones - a waterproof reel with a housing. Naturally, these will cost an order of magnitude higher. To make a metal detector yourself, you need to clearly understand for what purposes it will be used; based on this, there are general parameters of the device:
- Depth of action underground, each device has its own “penetration ability”. Of course, this also depends on the density, type of soil, and the presence of stones in it, but this is secondary.
- The diameter of the search zone, you must immediately determine for yourself which range will be optimal, and build on this when choosing or assembling a metal detector.
- Sensitivity of the metal device. Here the question arises for what purpose the device will be used: for treasure hunters, small things will only get in the way, but for hunters for lost jewelry on the beach, it is important not to miss anything, even the smallest thing.
- Metal selectivity. There are devices that only react to certain precious alloys.
- Power and energy saving are a standard feature of any wireless device.
- Brand new models have such a feature as “discriminability,” which allows the device to display the approximate depth, location, and metal alloy on the device display.
Purpose and features of the metal detector
The first attempts to create a detector for detecting metals in various environments were made at the beginning of the 20th century. At first, with its help, factory owners monitored the leakage of parts from production. But subsequently various types of the device appeared, which benefited military and industrial specialists. Too large dimensions made it difficult to widely use the devices, but in the 60s, lightweight models with a simpler structure began to appear, the principles of which have been preserved to this day.
The action of the detector device is based on the force of attraction of metals by 2 magnetic coils, the first of which creates a magnetic pulse, directing it into the soil. The other plays the role of a receiver of the reflected signal from objects located at depth with strong conductivity of electric current, which include almost all metals.
To prevent the emitted magnetic radiation from directly hitting the receiving element of the device, an inductive equilibrium is created in which the system is balanced in such a way that the output signal is 0. Provided that a metal object enters such a balanced circuit, an imbalance occurs, as indicated by the incoming signal .
When the objects you are looking for are in the area affected by the magnetic pulse, a corresponding signal is generated, which is transmitted through the headphones.
Its strength may vary depending on the range or depth of metal fragments.
The sensitivity of a metal detector directly depends on the size of the first coil that creates the magnetic field - increasing its size expands the capabilities of the devices.
Using a simple electronic device, you can find valuable objects and scrap metal that are inaccessible to normal perception in a neutral environment, as well as in moist soil with low conductivity. A metal detector gives a signal about the presence of iron, silver, copper or similar materials in various soils, water, old walls, among various things in a dump and in living organisms.
Using the correct search coil
By default, manufacturers most often equip metal detectors with mono coils, especially devices in the low price segment. Mono coils have an undeniable advantage: they work well on difficult soils and littered areas. In addition, mono coils distinguish between types of metals well.
In field conditions, when it is necessary to scan a large area, it is advisable to use large Double D coils. This way, it’s faster to explore the area, and the depth of the search increases. The larger the coil, the deeper it sees
You should also pay attention to the frequency of the sensor - at a low frequency you can achieve the greatest depth, and at a high frequency small objects are well detected
How to make a metal detector with your own hands with metal discrimination
Metal discrimination is the ability of the device to distinguish between the detected material and classify it. Discrimination is based on different electrical conductivities of metals. The detector's processor analyzes the phase shift between the signals of the two coils and not only distinguishes non-ferrous metals from ferrous metals, but can recognize whether it is copper, gold or silver. The simplest discrimination process is implemented in pulsed devices. They are able to find and distinguish non-ferrous from ferrous metal.
Professional models are equipped with programmable “brains” that are capable of sending a signal only to the desired object, without distracting the operator with other finds
For your information! No matter how professional the device is, do not expect one hundred percent results from it. Many materials have similar electrical conductivity, so the machine can make mistakes.
Detailed information on assembling such a detector is in the video.
Design and principle of operation of the device
Metal detectors on the market operate on different principles. Many believe that they use the principle of pulse echo or radar. Their difference from locators lies in the fact that the transmitted and received signals act constantly and simultaneously; in addition, they operate at the same frequencies.
The principle of operation of the metal detector
Devices operating on the “receive-transmit” principle record the signal reflected (re-emitted) from a metal object. This signal appears due to the exposure of a metal object to an alternating magnetic field generated by the metal detector coils. That is, the design of devices of this type provides for the presence of two coils, the first is transmitting, the second is receiving.
Metal detector circuit
Devices of this class have the following advantages:
- simplicity of design;
- Great potential for detecting metallic materials.
At the same time, metal detectors of this class have certain disadvantages:
- metal detectors can be sensitive to the composition of the soil in which they search for metal objects.
- technological difficulties in the production of the product.
In other words, devices of this type must be configured with your own hands before work.
Other devices are sometimes called beat metal detectors. This name comes from the distant past, more precisely from the times when superheterodyne receivers were widely used. Beating is a phenomenon that becomes noticeable when two signals with similar frequencies and equal amplitudes are summed. The beat consists of pulsating the amplitude of the summed signal.
The signal pulsation frequency is equal to the difference in the frequencies of the summed signals. By passing such a signal through a rectifier, it is also called a detector, and the so-called difference frequency is isolated.
This scheme has been used for a long time, but nowadays it is not used. They were replaced by synchronous detectors, but the term remained in use.
A beat metal detector works using the following principle - it registers the difference in frequencies from two generator coils. One frequency is stable, the second contains an inductor.
The device is configured with your own hands so that the generated frequencies match or at least are close. As soon as metal enters the action zone, the set parameters change and the frequency changes. The frequency difference can be recorded in a variety of ways, from headphones to digital methods.
Devices of this class are characterized by a simple sensor design and low sensitivity to the mineral composition of the soil.
But besides this, when using them, it is necessary to take into account the fact that they have high energy consumption.
Typical design
The metal detector includes the following components:
- The coil is a box-type structure that houses the signal receiver and transmitter. Most often, the coil has an elliptical shape and polymers are used for its manufacture. A wire is connected to it connecting it to the control unit. This wire transmits the signal from the receiver to the control unit. The transmitter generates a signal when metal is detected, which is transmitted to the receiver. The coil is installed on the lower rod.
- The metal part on which the reel is fixed and its angle of inclination is adjusted is called the lower rod. Thanks to this solution, a more thorough examination of the surface occurs. There are models in which the lower part can adjust the height of the metal detector and provides a telescopic connection to the rod, which is called the middle one.
- The middle rod is the unit located between the lower and upper rods. Devices are attached to it that allow you to adjust the size of the device. On the market you can find models that consist of two rods.
- The top rod usually has a curved appearance. It resembles the letter S. This shape is considered optimal for attaching it to the hand. An armrest, a control unit and a handle are installed on it. The armrest and handle are made of polymer materials.
- The metal detector control unit is necessary to process the data received from the coil. After the signal is converted, it is sent to headphones or other display devices. In addition, the control unit is designed to regulate the operating mode of the device. The wire from the coil is connected using a quick release device.
Metal detector design
All devices included in the metal detector are waterproof.
It is this relative simplicity of design that allows you to make metal detectors with your own hands.
Homemade metal detector - pros and cons
Cheapness, the basic advantage of making any products yourself, is relevant for a metal detector. Here are some other advantages of a homemade device:
- best match to search technology for beginners;
- the ability to create a device with a completely individual shape, design and configuration;
- the pleasure of making an effective, efficient device yourself.
Here are the features of the “Pirate” model that users note:
- high battery consumption;
- lack of discrimination, that is, precise sensitivity to ferrous, non-ferrous and precious metals;
- limited sensitivity compared to expensive models.
Despite its shortcomings, the Pirate model is very popular. This is explained by the simplicity of homemade production and the high performance of an inexpensive device.
Recycling experts believe that the discrimination capabilities of a metal detector are not of great importance. All metals found are so valuable that recycling them is always justified. Focusing on finding gold requires not only equipment, but also considerable experience, related knowledge and, of course, luck.