Types of double sockets
An electrical outlet is a device necessary for connecting electrical appliances to the network. The product consists of a body (cover), which isolates the working part from external influences, and a main part with a base and contacts.
Sockets can be not only single, but also double, and even multi-socket, depending on the number of plug connectors. It is a mistake to think that doubling single sockets means getting a double one; in fact, only a monolithic device is considered two-socket.
The disadvantage of double products is the division of electric power into two parts, which should be taken into account when connecting two electrical appliances at the same time.
There are different types of double sockets according to modifications:
- Closed. The openings of the device are covered with special curtains, which is convenient for apartments where small children live.
- Open. Externally, they look like familiar sockets without closing curtains.
Devices can be with or without grounding. If grounding contacts are provided, this will protect connected devices from voltage failures. There are separate types of sockets for installation outdoors and in rooms with high humidity - waterproof. The former are protected from dirt and dust, the latter are protected from water penetration.
Double products are:
- invoices (external);
- hidden (internal);
- standard;
- polar;
- programmed, etc.
Varieties
Sockets are classified depending on their design features:
- Closed and open models. The first ones are recommended for use in children's rooms. The second are classic sockets without closing curtains.
- Options with or without grounding. In the first case, the home owner will provide protection against voltage surges. The devices will be safe and sound.
- Overhead and hidden products. The first ones are installed to replace existing sockets, and the second ones are installed during renovation; their location is planned even when creating the project.
- There are also programmed models, polar or standard. Programmed devices turn on and off according to the set timer. But the simpler the design, the less functionality, the easier their installation. The choice of model directly depends on whether the installation will be done by yourself or with the help of a specialist.
Each type has its own marking, which allows you to choose the appropriate option. For example, “A” indicates that the device is made in the USA, but “B” confirms the presence of a grounding contact. The body of each socket is made of durable thermal plastic. From a decorative point of view, inserts are used; products are made in different colors.
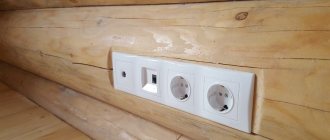
Overhead 2-seater with grounding
The body of this model contains contacts that are necessary to protect electrical appliances.
Such an outlet also protects a person from possible penetration of current, which may accidentally end up on the plastic case. To install such an outlet, no additional renovations are required in the apartment; it can be installed instead of any conventional model.
Double pass-through with lid
The operating conditions of the device also determine its choice. The device case has a lockable lid, which protects the contacts from moisture. This product is marked IP-44. If the socket will be used outdoors, you should pay attention to the product marked P-55. The durable housing protects against moisture and dust.
Indoor installation
Indoor installation requires planning the placement of the device even during renovation work. In such options, the holes are hidden behind curtains, which are moved to the side when connected. Such sockets are grounded, because there may be children in the room. Only when pressed simultaneously, the curtains are activated. Even if you insert a foreign object into the socket, it will not work, so it does not pose any danger at all. This is why closed plan models are so popular among the varieties of double sockets.
Features of installing a socket with two sockets
Before connecting the device, you need to determine where the phase and zero are located. The easiest way is to study the markings of the wires: phase - brown, black, white or red, zero - blue, white-blue, ground wire - yellow-green.
If you don’t trust the markings, you can independently check the location of the phase and zero. You can do it like this:
- Wear rubber gloves.
- Apply a special tester screwdriver to each wire.
- Evaluate the signal from the screwdriver - the light will light up in phase.
Before installing a double socket, you need to de-energize the wiring - turn the switch on the machines or one (necessary) machine to the “off” position. Next, in the place where the product will need to be placed, the voltage is re-checked using a special screwdriver.
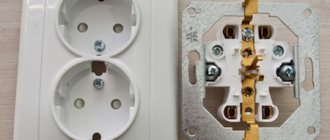
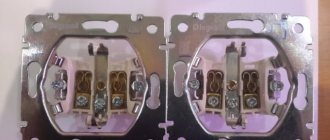
There are some features of installing a double socket as opposed to a single socket. The double socket has one socket box (cup) with two separated terminals, 1 mounting compartment for wires.
The installation diagram is as follows: a grounding cable should be connected to the central or upper terminal, with the phase on the right and zero (neutral) on the left.
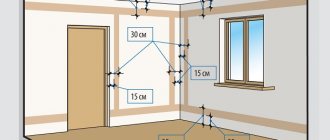
You only need to choose a cable from the same material and with the same cross-section as the main wiring. If you plan to install 2 socket boxes, you will have to drill holes in the wall for them with a drill, maintaining the required distance for the holes. Before installation, markings should be applied to the walls if the old outlet was not there.
How to connect several outlets in a row
Connecting several sockets to one cable is called a “daisy chain” connection. This connection involves connecting several elements of one group (in our case, sockets) into one block. It is worth considering that connecting sockets with a “daisy chain” is suitable for powering electrical appliances and low-power equipment. This type of connection allows you to connect two or more outlets.
According to the location of the power cable, we drill niches in the wall for socket boxes and first level them. After installing the socket boxes, prepare the connecting jumpers (use a cable of the same cross-section as the supply cable). We connect the phase and neutral wires to the terminals of the first socket, as well as similar wires of the “loop” going to the next socket.
It is important to know! When connecting sockets with a “loop,” it is unacceptable to violate the integrity of the ground loop. The connection is made not with a “loop,” but with a separate wire for each outlet.
We fix the connected bases of the sockets in the socket boxes and install the front part, separately for each socket, and in the form of one frame for the entire block.
Tools and materials
The craftsman will need a Phillips and flathead screwdriver, pliers, a device for stripping the braid (for example, a stationery knife), and a level. If you plan to install the device in a new location, you will need a hammer drill to drill drywall, concrete or wood.
To install the socket, additional materials are required:
- insulating tape;
- socket box;
- self-tapping screws
A cable made of the appropriate material will be needed if you have to make a new outlet rather than replace the old one. If possible, it is recommended to lay wires in corrugation - this is an additional fire safety measure.
Final stage
The photo of the double outlets does not show any protruding wires. They are all neatly placed inside. There should be nothing unnecessary under the fastening tabs. Otherwise, the entire insulation system may be damaged. Bend the wires with a regular accordion. The installation is simply perfect in this case.
Then you slowly bury it inside. Everything is fixed using self-tapping screws or fastener tabs. Using a level you can always choose the optimal place. Its auxiliary part is then attached to the installation box.
At the end, all decorative elements must be installed. The socket should lie flush against the wall so that there are no gaps on all sides.
Never forget that although this is a double outlet, the load on it does not exceed the standard 16 Amps. The load cannot be increased 2 twice after connecting. When turning on a variety of electrical appliances, it is worth remembering these data.
Two single sockets are placed side by side if there is no extra space when working according to the European standard. Study the question carefully so that you can do everything yourself later.
Double socket installation sequence
When the connection diagram for a double socket is correctly determined, the location is selected, and the materials are prepared, you can begin installation.
When the product is a solid block, it can even be placed in the former place of a single device, slightly expanding the size of the niche in the wall. This will not cause the need for repairs, but will require careful gluing of the wallpaper.
Removing the old socket
Having once again made sure that the machines in the apartment are turned off, you can begin to remove the old outlet.
The procedure is as follows:
- Unscrew all the screws that secure the product.
- Remove the outer cover of the old device.
- Unfasten the wires, unscrew the fixing tabs.
The new product that needs to be built in should also be disassembled. The front panel must be carefully unscrewed from the working part.
New socket box for double socket
You should pay close attention to the quality of the new socket - it should be high enough, and in this case you can be sure of clear fixation and normal operation of the socket.
The socket box is secured to the wall with side holders, which are sold separately or come in one set. Cheaper socket boxes are attached not with special claws, but with screws.
The procedure for mounting a socket box is simple. The screws on it need to be tightened clockwise, the holders will move apart to the right and left, securing the product itself. But as you work, the glass always weakens, so the best option is to additionally secure it with alabaster.
Instructions for action:
- Dilute dry alabaster powder (you can replace it with cement) to the consistency of sour cream. You need to take a small portion of the powder, since the composition instantly hardens.
- Place the mixture in the place of the future socket box, slightly wetting the niche with water.
- After 20 minutes, you can attach the socket box to the hole in the wall.
- Level the position of the glass using a hammer and level so that it is perfectly level.
- Next, fill the gaps between the product and the wall with a new portion of alabaster.
- Remove excess mass with a knife.
- Secure the glass with screws, making sure not to tighten them too much - this could cause the plastic to crack.
Preparing to connect
To ensure the correct two-pole connection of the wires, you need to open the cable. A sharp knife will help you quickly remove the outer insulation from the desired cable. You should not leave the supply of wires too long, otherwise it will create inconvenience when connecting the outlet.
It is considered optimal to expose the wires from insulation by 1 cm. The total supply of wires usually does not exceed 12 cm. Shorter wires can be extended. Next, you are allowed to proceed to the most important stage - connecting a double socket with grounding.
How to connect wires
At this stage, you need to clearly identify the wires present in the working part of the product, identifying the zero, phase and ground wire in them by color.
The procedure is as follows:
- Loosen the bolts on the terminals intended for connecting wires.
- Insert the socket wires into the contacts.
- Carefully tighten the bolts with a screwdriver.
The main point is to connect the grounding cable to the corresponding wire in the product (there is always a “ground” symbol at its location). It is important not to connect the phase and neutral to the same contact - a short circuit will occur.
Product Installation
Careful laying of the wires in the glass is very important: if this is not done, sooner or later the cable insulation will be damaged and the operation of electrical appliances may be impaired. The wires must be folded without sharp bends. They should not be located in the socket directly under the mounting bolts.
At the end of the work, the socket must be deepened inward and secured with fastening paws or screwed with self-tapping screws. Then you need to give it a level position using a level and connect the caliper to the installation box block.
The last thing to put on is the decorative trim - the new socket with two sockets is ready!
Brief overview of characteristics and prices
Legrand Valena
The domestic electrical goods market offers a wide selection of socket models with two inputs. Products vary in design, technical specifications and prices.
Most popular products:
- Legrand Valena - grounding, screw terminals, 16 A, IP20, 375 RUR;
- Legrand Valena Allure - grounding, spring terminals, protective curtains, 16 A, IP21, 650 rubles;
- Legrand Etika - grounding, screw terminals, 16 A, IP20, 185 RUR;
- Legrand Quteo - grounding, spring terminals, protective curtains, 16 A, IP21, 220 rubles;
- Legrand Quteo - grounding, screw terminals, water protection, 16 A, IP44, 525 rubles;
Schneider Electric DUET WDE000124 - Schneider Electric Duet WDE000120 - without grounding, screw terminals, 16 A, IP20, 110 rubles;
- Schneider Electric Duet WDE000226 - grounding, spring terminals, protective curtains, 16 A, IP20, 130 rubles;
- Schneider Electric W59 - without grounding, screw terminals, 16 A, IP21, 100 rubles;
- Schneider Electric Rondo RA16 - grounding, screw terminals, water protection, 16 A, IP44, 250 rubles;
- Viko Yasemin - grounding, screw terminals, 16 A, IP20, 85 rub.
The product range consists of mechanisms with white and colored covers.
How much does it cost to replace an outlet?
How much does it cost to replace sockets?
| Type of work | Price |
| Replacing the socket (installation in a prepared place (in a socket box)) | from 250 rub. |
| Socket repair | from 150 rubles (determined by the complexity of the situation) |
| Installing an indoor outlet | |
| - into a concrete wall | 650 rub. |
Interesting materials:
How to use bonuses in the children's world? How to use essential oils when washing? How to use gel scrub? How to use apple litter? How to use Yandex cloud? How to use iPad as a monitor? How to use Estelle Chromoenergy Complex? How to use the Fn key? How to use columns in Word? How to use the eraser in Corel Draw?
Adjustment to the interior of the room
When buying a switching device, you need to visualize how it will fit into the interior. It is extremely important that its appearance and colors do not stand out from the general style of the room. Otherwise, the impression of the room will be spoiled.
Socket and switch in loft style Source retro-light.ru
Let's look at the recommendations for choosing for each style:
- Country. Rustic design requires simplicity as well as naturalness. Therefore, the plastic of the switch can be disguised with a leather covering. It may even be artificial.
- Minimalism. Square designs with rounded edges are ideal for the most modest of modern styles. As for color, the priority is grey, black and white.
- High tech. Style loves chrome and glass. Therefore, transparent switches will fit perfectly into the environment. But the design also emphasizes everything new in technology. And touch devices will easily find their place.
- Modern. A bright style requires extraordinary colors, but enclosed in a strict geometric shape. Therefore, green triangles, red squares and yellow circles will be in place.
- Loft. One of the most interesting and popular styles requires deliberate roughness. Therefore, a good solution would be to use devices that imitate industrial ones in the interior. Switches and toggle switches made of metal fit best into industrial design.
- Ethnic. This requires complete naturalness, which is best emphasized by wood. Such as cherry, light maple and dark mahogany. Also, ornaments and patterns are not alien to the style.
- From Empire to Rococo. All trends reflecting historical eras require luxury and pomp. Therefore, the color scheme should only be gold. And if the device is decorated with rhinestones and appropriate painting, then the interior will only benefit.
- Retro. The style loves large sizes and rounded shapes. In addition, vintage is a must. And it can be achieved with a worn effect. The color of sockets and switches should be neutral.
Experts do not recommend making switchgear accents unless the style requires it. Since these items are more practical in nature, often the best solution is to simply disguise them. For example, make it the same color as the wall.
Vintage sockets for retro style Source inteks-elektro.ru