- home
- Rewinding of electric motors
›
Rewinding is a complex and responsible job that must be performed by a professional specialist with sufficient experience and skills in producing this type of service. The production process looks like this: The engine is disassembled, the fan and the motor armature are removed; · The winding parts are removed, the windings are removed, the remaining insulating materials are cleaned off; · Insulation is placed in grooves; · Measure the length of the stator and the width of the insulation groove; · The necessary elements are cut out, the coil template is removed; · Special equipment is used for winding the roll; · Coils are wound with a certain number of turns, which must be distributed evenly; · The coils should not be located on top of each other; · The coils are placed in the stator slots, and insulating material is laid between them; · Frontal strapping is performed; · Phase coils are connected according to the circuit, their terminals are connected in a star, the circuit is aligned; · Ends welded or welded; · The grooves are insulated so that the insulating material does not protrude from them; · Electric motor assembly; · The stator winding is called; · The installation is connected to the network; · Final testing of the devices is being carried out. Rewinding an electric motor is the operation of winding the stator with a round conductor (free winding). It is not recommended to do this alone; for these purposes, we recommend using the rewinding service in Peremotka2.
Features of repairing an asynchronous machine
Engine problems of any type can be mechanical or electrical in nature. In the first case, strong vibration and characteristic noise may indicate a malfunction; as a rule, this indicates problems with the bearing (usually in the end cover). If the malfunction is not corrected in time, the shaft may jam, which will inevitably lead to failure of the stator windings. In this case, the thermal protection of the circuit breaker may not have time to operate.
“Burnt” wires of the stator winding
Based on practice, in 90% of failures of asynchronous machines, problems arise with the stator winding (break, interturn short circuit, short circuit to the frame). In this case, the short-circuited armature, as a rule, remains in working condition. Therefore, even if the damage is mechanical, it is necessary to check the electrical part.
Causes and signs of stator failure
Hand-held grinders, popularly called “grinders,” can fail for various reasons.
The most common problem is the breaking of stator turns, which occurs due to too much load on the device. Now you can correct such a malfunction yourself - rewind the stator correctly. There are often cases when the cause of a breakdown is the failure of the electrical part of the device. Various factors lead to this:
- water entering the surface through which the current passes;
- power surges;
- abruptly pulling the plug out of the socket;
- high overloads and, as a result, overheating.
There is an opinion that it is impossible to rewind the stator yourself. In fact, it is enough to understand the design of the device. If you have experience in such work and the necessary knowledge, you can repair a three-phase starting device at home. Given the preparatory work, the process may take several hours.
Wire winding diagram.
Often the engine fails due to a break in the magnetic circuit, damage to the winding or armature commutator. As the voltage increases, there is an abrupt increase in spark strength. This is usually observed on only one brush. This phenomenon leads to the destruction of the wire insulation on the stator coil. If, when turned on, the disk accelerates very quickly and gains speed, this indicates a turn short circuit in the stator.
Sparks that occur during operation of the collector signal the occurrence of disturbances in the balancing of the armature. Checking the operation of the collector can be done in this way: when turned on, the sound should increase gradually with increasing voltage. There should be no vibrations. If resonance is observed, the electric motor of the angle grinder requires repair.
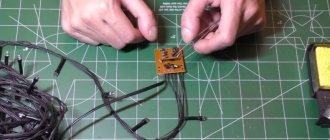
Winding check
In most cases, the problem can be detected by its appearance and characteristic odor (see Figure 1). If the fault cannot be determined empirically, we proceed to diagnostics, which begins with a continuity test. If one is found, the engine is disassembled (this process will be described separately) and the connections are thoroughly inspected. When no defect is detected, a break can be established in one of the coils, which requires rewinding.
If the continuity test does not show a break, you should proceed to measuring the winding resistance, taking into account the following nuances:
- the insulation resistance of the coils to the housing should tend to infinity;
- for a three-phase drive, the windings must show the same resistance;
- For single-phase machines, the resistance of the starting coils exceeds the readings of the working windings.
In addition, it should be taken into account that the resistance of the stator coils is quite low, so to measure it it makes no sense to use devices with a low accuracy class, such as most multimeters. You can correct the situation by assembling a simple circuit using a potentiometer with the addition of an additional power source, for example a car battery.
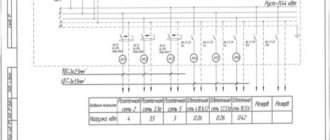
Circuit for measuring winding resistance
The measurement procedure is as follows:
- The drive coil is connected to the circuit presented above.
- The potentiometer sets the current to 1 A.
- The coil resistance is calculated using the following formula: , where RK and UPIT were described in Figure 2. R is the resistance of the potentiometer, and is the voltage drop across the measured coil (shown by a voltmeter in the diagram).
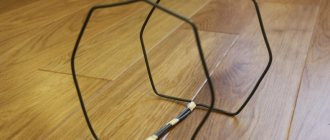
It is also worth talking about a technique that allows you to determine the location of the interturn short circuit. This is done as follows:
The stator, freed from the rotor, is connected through a transformer to a reduced power supply, having previously placed a steel ball on it (for example, from a bearing). If the coils are working, the ball will move cyclically along the inner surface without stopping. If there is an interturn short circuit, it will “stick” to this place.
Steel ball testing
The main reasons for winding wear
Often, rewinding of electric motors is done when knocks and noises appear inside the unit, as well as loss of elasticity and damage to the insulation of the wires. The main causes of such symptoms are:
- the influence of natural factors and difficult environmental conditions - high humidity, temperature changes, etc.;
- dirt, dust, and engine oil getting inside the electric motor;
- improper operation of the motor;
- exposure to vibration and increased loads on the unit.
The service life of an electric motor is often affected by temperature conditions. During overheating, increased overvoltage appears, increasing the winding's sensitivity to external damage. In such a situation, even the slightest physical impact or vibration can damage the wires. Often, rewinding of electric motors is done after bearings break, which after constant overload or prolonged use can simply fall apart.
To prevent such malfunctions of electric motors, it is necessary to periodically disassemble them, clean the winding and, if necessary, coat it with a special varnishing compound that restores the insulation. This is cheaper and faster than rewinding the electric motor after it fails.
Features of repair of commutator drives
This type of electric machine is more likely to experience mechanical failures. For example, brushes worn out or commutator contacts clogged. In such situations, repairs come down to cleaning the contact mechanism or replacing graphite brushes.
Testing the electrical part comes down to checking the resistance of the armature winding. In this case, the probes of the device are applied to two adjacent contacts (lamellas) of the collector, after taking readings, measurements are taken further in a circle.
Checking the armature winding of a commutator motor
The displayed resistance should be approximately the same (taking into account the instrument error). If a serious deviation is observed, then this indicates that there is an interturn short circuit or open circuit, therefore, rewinding is necessary.
Electrical causes of motor damage
The most common factors here are:
- Closing the turns of one winding. The reason may be excessive heating of the wires with a critical increase in load. The shell on the turns is destroyed, and the conductive wires come into contact. The current begins to flow through a shorter section of the circuit with less resistance, reducing the nominal length of the conductor. A multimeter will help to identify such a malfunction;
- Phase short circuit. The reason may also be overheating of the winding. This closure differs from the previous version in that it occurs between the turns of different windings. The circuit breakers should immediately trigger, as if there were a short circuit in the circuit. As a rule, rewinding of electric motors is required in most of these cases.
- Breakage of winding conductors due to exceeding the permissible load and operating temperature. Such a malfunction can be prevented during periodic maintenance of electric motors. Damaged insulation is visible by characteristic traces of melting. The wires underneath may burn out in the near future, after which the circuit will break and the current will stop circulating through the winding. If you do not rewind the electric motor, it will no longer be able to work;
- Problems with grounding or lack thereof. When the insulation of wires is damaged from a closed circuit, the current spreads to all nearby conductive surfaces, including the motor housing. Modern industrial equipment often operates with current levels that are fatal to humans even at the slightest touch. Therefore, grounding electric motors and measuring the insulation resistance of wires must be carried out without fail.
The causes of motor malfunction due to sharp fluctuations in voltage in the electrical network can be placed in a separate category:
- Increase in voltage on all phases. A properly organized automatic protection system will help to cope with this problem;
- Phase imbalance. Often the cause is an unreliable connection of wires somewhere on the supply line after it has been broken and repaired. In such nodes, oxidation and burning of the metal occurs. This zero phase weakens, causing distortion of other phases. There is no 100% protection against such situations.
- Phase failure. The equipment does not tolerate the loss of one of the phases very well. The winding often burns out and to restore it you need to rewind the electric motor.
- Lightning strike. Often entails breakdown, repair and restoration of all electrical equipment connected to a given network;
- Electric motor overheating. To critically reduce the cooling effect, sometimes it is enough to simply cover the side fins of the engine with a cloth. And under heavy loads, even the forced winding rewinding system on an electric motor may not be able to cope with the elevated temperature.
In most of the above cases, rewinding the windings may be the only available way to resuscitate the power unit.
Motor winding data
This is a reference data, so the most reliable way to obtain this information is to consult the appropriate sources. This data can also be provided in the product passport.
You can find advice online that recommends manually counting the turns and measuring the diameter of the wire when rewinding. It's a waste of time. It is much easier and more reliable to find all the necessary information using the engine markings, which will indicate the following parameters:
- rated operating characteristics (voltage, power, current consumption, speed, etc.);
- number of wires for one slot;
- Ø wire (as a rule, insulation is not taken into account in this indicator);
- information on the outer and inner diameter of the stator;
- number of grooves;
- with what step the winding is performed;
- rotor dimensions, etc.
Below is a fragment of a table with winding data for electric machines of type 5A.
Example of a table with winding data
General recommendations
Regardless of whether you do the rewinding yourself or turn to specialists, it is important to consider the following tips:
- For explosion-proof or crane versions, special attention should be paid in terms of details. The manufacturer implements a high level of protection, which should not be violated during repairs;
- point service does not provide the maximum level of efficiency. Stator or rotor rewinding involves changing bearings and checking the condition of the seats;
- Today, high-quality engine processing can be carried out in a couple of days, the main thing is to use proven materials;
- To ensure the same engine power, it is necessary to select a cable with a cross-section similar to the previous one. Thanks to this, it will be possible to wind the required number of turns;
- Before starting work, you should prepare all auxiliary materials, for example, cardboard templates. The size must match the original dimensions of the metal components.
Step-by-step instructions for rewinding an electric motor with your own hands
It is necessary to immediately warn that without special equipment and operating skills, rewinding reels will most likely be a useless task. On the other hand, negative experience is also experience. Understanding the complexity of a process is the best explanation of its cost.
The first stage is dismantling
We present an algorithm of actions for asynchronous machines, it is as follows:
- Disconnect the drive from the network (380 or 220 V).
- We remove the electric motor from the structure where it was installed.
- Remove the rear cooling fan shroud.
- We dismantle the impeller.
- We unscrew the fastening of the end covers, and then remove them. It is advisable to start from the front part; after dismantling it, the rotor will easily “come out” from the rear cover.
- We take out the rotor.
This process can be greatly simplified if you use a special device - a puller. With its help, it is easy to free the motor shaft from a pulley or gear, and also remove the end covers.
Puller for dismantling
We will not provide instructions for disassembling a commutator motor, since it is not particularly different. The structure of an electric machine of this type can be found on our website.
Stage two - removing the winding
The sequence of actions is as follows:
- Using a knife, remove the bandage fasteners and insulating coating from the wire connections. Some instructions recommend recording the wiring diagram, for example, by taking a photograph. There is no particular point in doing this, since this is reference information and finding it out by engine brand is not a problem.
- Using a chisel, knock off the tops of the wires from each end of the stator.
- We release the grooves using a punch of the appropriate diameter.
- We clean the stator from dirt, soot, and impregnation varnish.
Stator freed from the winding
At this stage, we recommend stopping, picking up the housing and taking it to specialists. Independent dismantling will reduce the cost of restoration work. As mentioned above, without special equipment it is quite difficult to rewind reels efficiently. To understand the complexity of the process, we will describe its technology, which will make the choice easier.
Stator rewinding (final phase)
The process consists of the following steps:
- Installation of insulators in each groove (sleeving).
- The thickness of the material and its characteristics are selected from the reference book.
- Winding data is determined by motor brand.
- A special machine is used to wind the required number of turns of loose coils. You can find photos and parameters of homemade manual machines on the Internet, but the quality of their work is quite questionable.
Bulk Winding Machine - The coil groups are placed in the grooves, after which they are tied and connected. These processes are quite complex and are performed manually.
- Impregnation is carried out. To do this, the body is heated to a temperature of 45°C - 55°C and completely immersed in a container with impregnating varnish. It makes no sense to varnish the wires, since in this case there will still be voids.
- After impregnation, the body is placed in a special chamber, where drying is carried out at a temperature of 130-135°C.
- Final testing of the coils with an ohmmeter.
- Assembly and test run (if only the body, but also other parts and fasteners were transferred for repair).
If only the body was submitted for restoration, we recommend checking the coils before turning on the motor.
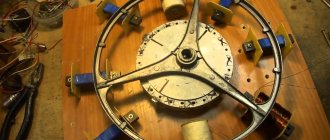
Rewinding motors of drills and grinders
To begin with, the device should be disassembled and the engine inspected. The winding should not be removed immediately: first of all, you need to find out the number of its turns. This is not difficult to do: just separate the top of the coils and cut it off. After this, you need to burn it with a burner. Now you can count the number of its turns.
If you decide to rewind the rotor yourself, then you do not need to remove the collector. It is worth examining it and measuring the value of its resistance in relation to the body (this value should not be less than 0.2 Mohm). The collector should be cleaned of what remains of the previous winding and grooves should be cut in its contact part. This is necessary in order to then insert the ends of the coils into these places and seal them.
After cleaning, the anchor must be sleeved. The sleeves are made of electrical type cardboard, 0.2 millimeters thick, after which they are inserted into the anchor grooves. Only after completing these procedures can you begin to rewind the motor coils.
If it is decided to use circular winding, then the coil should be laid in a sequential manner until all the slots are filled. The laying direction should be chosen in the direction opposite to the clock hand (if the anchor lies with the shaft towards the winder). This type of installation is called “right-hand installation”.
In the collector area, the winding is fastened with a bandage. This should be done using a thick thread of cotton fabric, laid in several tight turns and tied tightly. There is no need to use nylon threads, since nylon can easily melt during operation of the device.
After this, you need to check the product for the absence of interturn short circuits and breaks in the winding. This is best done before the product goes into impregnation, because before impregnation it is much easier to change the winding on the armature.
To secure the resulting winding, you need to impregnate it. This can be done using regular epoxy, designed to be hot cured with the addition of a plasticizer. If this procedure is performed at home, then any varnish can be used. When the impregnation is completed and dried, it is necessary to perform a grooving. How you do this will determine how much the armature will spark. The amount of beating should not be more than 5 hundredths of a millimeter, and the cutter must be properly sharpened to work with copper. After completing all these procedures, you need to re-check the product for short circuits.
Rewinding the armature
The process of replacing the winding of a commutator motor is somewhat similar, with the exception of small nuances associated with the design features. For example, the armature is sent for rewinding, not the housing, provided that the problem does not arise with the excitation coils. In addition, there are the following differences:
- For winding, a special machine with a more complex configuration is used.
- Grooving, balancing of the armature (in the final part of the process), as well as its cleaning and grinding are required.
- The manifold is cut using a special milling machine.
The above processes require special equipment; without it, rewinding electric motors is a waste of time.
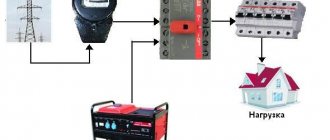
Checking the electric motor after repair
Next we carry out the verification procedure. First, you need to “ring” the device again, as described at the beginning of the article when diagnosing the problem. It is necessary to exclude the possibility of breakage, lack of contact and short circuit of any kind. If the engine passes these checks, it's time to start testing for functionality. To do this, do not immediately connect it to the existing power supply. In industrial facilities, the voltage is 380 V. This is quite a lot. Using a step-down transformer, you should test the operation of the motor.
If it rotates without problems and does not smoke, then the job was done correctly. The engine can be used for its intended purpose.
Thus, the instructions for rewinding an electric motor at home are complete. Good luck to everyone in your new achievements!
Disadvantages of Rewinding Electric Motors
Owners of electric motors sooner or later face the question of whether to rewind the old motor or buy a new one. Repairing old time-tested equipment looks more attractive and will cost less. But there are significant disadvantages here. You can rewind the motor for about half the price of a new unit, but its further service life will also be significantly shorter. The chemicals used in the remanufacturing process can compromise the integrity of the stator insulation, resulting in reduced efficiency and equipment failure. No matter how carefully the handicraft rewinding of turns is carried out, it will still be inferior in quality to the factory version and, therefore, have lower performance characteristics. According to statistics, after rewinding an electric motor loses at least one percent of its efficiency and at least seven percent of its energy efficiency.