A huge number of Russians, Belarusians and residents of other countries still live in Khrushchev buildings. Structural elements, be it foundations, floor slabs, flights of stairs, can last for decades. But communication systems have a significantly shorter resource, and, accordingly, need repair or complete replacement. Electrical wiring requires special attention in Khrushchev. Its replacement guarantees safe and full use of all modern household appliances.
Calculation of wiring and selection of apartment power supply
Before changing the electrical wiring in a Khrushchev building, we should perform at least an approximate calculation. This will allow you to correctly select the wire cross-section, the required number and rated parameters of circuit breakers and, of course, the power supply circuit for our apartment.
Electrical wiring calculation
In order to more correctly calculate the rated power of our apartment’s electrical network, it is necessary to draw up a detailed plan of all possible electrical appliances. In this case, you should take into account not only their rated power, but also their location, as well as the connection method.
So:
- First of all, you should divide all the devices in your apartment into powerful ones, whose rated power is equal to or greater than 2 kW, and low-power ones, respectively, less than 2 kW. To power powerful devices, it is better to provide a separate power supply group with its own circuit breaker in the distribution panel.
- Now we should calculate the total power of low-power devices. In this case, the calculation should be performed based on the most unfavorable conditions. That is, in our case it is necessary to take into account the largest number of operating devices at the same time.
- Now, having calculated the rated power of our electrical network, we have to convert it into rated current. To do this, we use the formula: I=P/(U×cosα), where I is our rated current, P is our rated power, U is the rated voltage, and cosα is the power factor. But in our case, cosα is practically equal to unity, so we neglect it, thereby adding additional margin to our wire.
- As a result, we get the following formula: I=P/U
Based on this, knowing that the voltage in our electrical network is 220V, we can calculate the rated current. Having carried out a simple calculation, we find that an electrical appliance with a power of 1000 W consumes a current of 4.55 A.
To further simplify the calculation and give additional margin to our wiring, we accept this value as 5A.
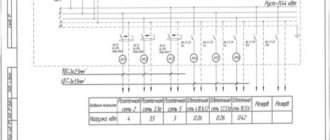
The photo shows the rated currents of wiring of different sections and materials of manufacture
Any electrical wiring in a Khrushchev-era building and its laying pattern largely depend on the type of wire used. After all, it’s no secret that copper wires have a higher throughput, and aluminum wires have less. Therefore, the choice of wire cross-section should be made according to the table below.
Choosing an apartment power plan
Now the electrical wiring diagram in the Khrushchev is selected. This is done based on clause 7.1.18 of the PUE (Electrical Installation Rules), which states that all protection devices in residential premises should not exceed 25A. This point will become the starting point for all further choices.
- So, if the power of all your electrical appliances in the apartment does not exceed 25A, then you can power the entire apartment from one machine using a copper wire with a cross-section of 2.5 mm2 or an aluminum wire with a cross-section of 4 mm2. But in modern even one-room apartments this is unlikely.
- Usually the rated current of the electrical network is more than 25A. Therefore, in this case, we need to divide the meals into groups. The power of each of them should not exceed the specified current. To do this, power groups for sockets and lighting are usually separated. But you can divide groups into rooms or in any other way convenient for you. The main thing is not to “scatter” one group across different parts of the apartment, otherwise problems may arise during operation.
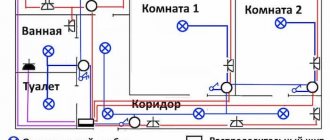
Possible power supply plan for your apartment
- It is also worth remembering powerful electrical appliances, which we excluded at the calculation stage. For them, it is better to organize power from a separate circuit breaker. Moreover, if possible, it is better to do this without additional sockets. The wire cross-section and rated parameters of the switch in this case are selected based on the rated parameters of the electrical appliance according to the same principles as for individual groups.
- If you are planning to install an outlet in the bathroom, then this group should be considered separately. Indeed, according to clause 7.1.37 of the PUE, sockets in the bathroom can only be installed through an RCD (residual current device). In this case, our instructions advise that in the group with the socket in the bathroom, include sockets in the kitchen, where RCD protection will be most relevant. Although PUE does not impose such requirements on kitchens.
- Depending on the square footage and the number of electrical appliances, the electrical wiring diagram in a brick Khrushchev house can contain from two to six groups. It is better to label each of these groups immediately, and visually separate the outlet and lighting groups.
Installation details
The above list requires some specification in order to avoid any mistakes when renovating a two-room apartment.
When developing a schematic diagram of electrical wiring, you need to take into account that the power (socket) and lighting circuits must be independent.
Moreover, it is advisable to even hang sockets on different machines in different rooms of a two-room apartment, and even better if there are main and additional power branches in each of the rooms.
A 25 ampere input circuit breaker for a two-room apartment will be quite enough. Its current safety factor should not exceed 1.5, otherwise the common house circuit breaker may constantly be knocked out or, better yet, the house electrical wiring may be damaged.
According to the energy consumption of different rooms, the types of RCDs and the thickness of the installation wire are selected. A general apartment RCD must be designed for a current of 50 A.
The kitchen, as the most serious consumer of electricity, must have two separate branches of copper wiring with a cross-section of 4 square meters. mm, with a 25 amp circuit breaker and a 30 A RCD installed on them.
For other consumers, a 16 A circuit breaker and a 20 A RCD using a wire with a cross-section of 2.5 square meters will be sufficient. mm.
It is impossible to draw up any intelligible plan (topology) for electrical wiring without a plan for a two-room apartment. It can be found in DEZ or BTI. The drawing should show two or more branches going into each room. Sockets must be powered separately from lighting.
The exception is the bathroom, in which, due to high humidity, there can be no sockets or junction boxes. It is equipped exclusively with a ceiling-type lamp, which has a moisture-proof design and, possibly, a boiler.
The drawing should not contain lines leading to the balcony. This is strictly prohibited by the PEU. Separately, it is necessary to mention the craftsmen who want to do without the coordination and approval of the scheme and plan for modernizing the apartment.
Any experienced inspector will immediately notice violations simply by checking the meter readings. The fines are no longer a joke. Therefore, this issue must be taken seriously.
Electrics in a two-room apartment in Khrushchev 41 m2
Conducted robots.
The issue of changing electrical systems in houses built during socialism is very relevant. If you decide to carry out a major overhaul, you must clearly understand that the existing electrics are not able to cope with the load of modern household electrical appliances. You should take the opportunity to resolve the issue with old communications. Hiring craftsmen must be taken seriously, since the quality of the work performed determines the comfortable living of the family, the safety and security of electrical appliances. The service life of the aluminum wiring has long expired, and major repairs have never been carried out. Unfortunately, it is quite difficult to carry out a complete change of electrical systems in such houses and cannot be done without special equipment.
What to consider when replacing electrics in a 2-room Khrushchev house
The work involves a specific, rather complex algorithm, so it is advisable for you to turn to real specialists. Our electricians have the skills and considerable experience in electrical installation work in two-room Khrushchev-era apartment buildings. The sequence of work is as follows; checking the entire line, searching for weak points, identifying them and discussing them. Next, a plan is drawn up; after the network is disconnected, the old electrical equipment is dismantled and new sockets and switches are installed. Based on the area of apartments and specific layouts, as well as the current state of houses and apartments, our specialists always give relevant advice and help you make the right decision on the purchase of components. For example, installing electrics in a two-room Khrushchev house has its own characteristics due to the fact that the building most often uses an old electrical network. For this reason, a serious plan for preparing projects is required; it often happens that many electrical appliances have to be placed in one room.
Number of points in a two-room apartment in Khrushchev 41 m2
| № | premises | module | Qty |
| 1 | Room 1 | switch | 1 |
| socket | 3 | ||
| output for lamp | 1 | ||
| 2 | Room 2 | switch | 1 |
| socket | 2 | ||
| output for lamp | 1 | ||
| 3 | Corridor | switch | 1 |
| block | |||
| switch | 2 | ||
| socket | 1 | ||
| output for lamp | 1 | ||
| 4 | Kitchen | sockets | 2 |
| output for lamp | 1 | ||
| 5 | Bath | output for lamp | 1 |
| 6 | Toilet | output for lamp | 1 |
| 7 | Connection to machines | 2 |
The table provides a list of electrical work for the apartment as standard (the cost of materials is not included in the price). The price of electrical installation work in a 2-room apartment in Khrushchev 41 m2 is 23,000 rubles. A more detailed price list for electrical installation work, unit prices, can be found here.
The optimal price-quality ratio is the choice of smart people.
All you have to do is call and place an order.
T.
What is a panel house?
Panel houses were built back in Soviet times. They were a kind of economical option because they combined speed of construction and low cost of building materials. The panel structure was erected from reinforced concrete slabs, which were manufactured in special factories by pouring concrete into metal reinforcement. These slabs (or panels) were of two types - for floors or ceilings and for walls.
The panel structure is akin to a house of cards; each wall in it is load-bearing. There can be no talk of any redevelopment here; just touch one wall and the whole house will come together. Nowadays such buildings are rarely erected, and people don’t particularly want to buy housing in panel houses. Still, brick buildings are considered more comfortable for living. They retain heat better, have increased noise insulation, and, of course, it is much easier to carry out repairs and remodeling in them. Especially when it comes to the issue of how to replace wiring.
Wiring options for a panel house
Before changing electrical wiring, clearly decide which method is most suitable for you.
The most affordable option is to lay the wires along the surfaces of the walls and ceilings under the plaster. In this case, the cable is attached directly to the surfaces. You can pre-stretch it into a pipe: steel, electrical, plastic, corrugated plastic, or flexible metallized. Fastening to surfaces is carried out with special clips, clamps or brackets, for which you will need to drill small holes. After the conductors are secured, a layer of plaster is applied. Using this method, you can extend separate lines not only to lighting fixtures, but also to powerful household appliances (air conditioners, water heating boilers).
The disadvantage of this option is that additional monetary and physical costs will be required for plastering the surfaces.
Wiring in a panel house can also be placed on the floor if you later make a concrete screed on top. The conductors are pulled into corrugated pipes, laid on the floor and filled with concrete. The wires are also located in the suspended ceiling. The only drawback is that sockets cannot be mounted on floors and ceilings; you will still have to install them on the walls, and up to this point, trench the surface or lay wires under the plaster.
In this case, the conductors are mounted in pipes or special plastic cable ducts. It is advisable to choose places for installation where the possibility of mechanical damage to the cable box will be minimal. This, of course, is not the best option from an aesthetic point of view, but the installation of such wiring can be carried out when the renovation in the apartment has already been completely completed.
The gating method also remains relevant, only in concrete slabs it will require significant physical and time costs.
Laying wires
Having selected the cross-section of the wire for the hood, stove, dishwasher and decided on the electrical circuit, you need to understand the issue of proper cable installation in the walls.
If you plan to use corrugation (which is recommended), the width of the groove must be at least 20 mm. Open wiring can be placed in special plastic cable channels (usually not used in modern apartment renovations). In all other cases, it is recommended to adhere to the following recommendations:
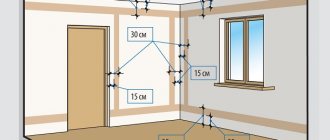
- In the grooves, a puncher makes 6 mm holes in increments of 30-40 cm to secure the wire with special plastic clamps or dowel brackets.
- Before installation, the cable is “stretched” in the corrugation.
- After fixing the wire, the entire electrical system is checked to ensure there is no break.
- At the end, the grooves are sealed with gypsum or plaster mixture.
Lifetime
The service life of electrical wiring is established by departmental building codes. Aluminum wiring should be used for no more than 20 years, copper wiring can be used for up to 40 years.
That is why, when making repairs in an apartment, it is strongly recommended to replace the entire wiring with aluminum conductors with copper wiring.
When constructing new buildings, aluminum wiring is no longer suitable, but in apartments of the so-called old stock, it has most likely served its useful life. Replacing electrical wiring in Khrushchev is mandatory, since such buildings were built more than half a century ago.
In addition, the networks were designed for a load of no more than 3-4 kW, and now, with a large number of household electrical appliances, the electricity demand of one apartment can exceed 10 kW.
You can change the wiring in your apartment yourself, without the help of qualified electricians. To do this, you need to know the requirements of regulatory documents and have some work skills.
Wiring diagram
Replacement begins with drawing up a diagram of new wiring and dismantling the old one.
The wiring diagram must take into account the need for all electrical appliances in the apartment, lighting, security systems (fire, burglar alarms), communication network lines (telephone, Internet, satellite TV).
Power wiring, lighting and wiring with low currents must be laid separately from one another.
Load calculation
When developing a scheme, first of all, the maximum load from all consumers in the apartment is determined. To do this, it is necessary to sum up the power of all appliances, lighting, and electrical floor heating systems. Depending on the obtained value, the cross-section of the input cable to the apartment is selected.
To determine this value, it is necessary to multiply the maximum load by a factor of 0.9, which takes into account the probability of simultaneous activation of the entire load.
After this, the load value is divided by the value of the effective network voltage. Based on the obtained current value, taking it with a margin of 20%, using the table, the cross-section of the main cable is determined.
| Conductor cross-section, mm2 | Current *, A, for cords, wires and cables | ||
| single-core | two-wire | three-wire | |
| 0,5 | — | 12 | — |
| 0,75 | — | 16 | 14 |
| 1,0 | — | 18 | 16 |
| 1,5 | — | 23 | 20 |
| 2,5 | 40 | 33 | 28 |
| 4 | 50 | 43 | 36 |
| 6 | 65 | 55 | 45 |
| 10 | 90 | 75 | 60 |
| 16 | 120 | 95 | 80 |
| 25 | 160 | 125 | 105 |
| 35 | 190 | 150 | 130 |
| 50 | 235 | 185 | 160 |
| 70 | 290 | 235 | 200 |
Switchboard
A switchboard must be provided not far from the front door. Its purpose is to distribute the load across the premises of the apartment. Protective devices for each circuit are installed in the panel.
Bathroom premises are protected using RCDs (residual current devices) or differential circuit breakers. The cable cross-sections of each circuit are calculated similarly to the input cable, taking into account the load in each room of the apartment.
Separate lines
For an electric stove, oven, instantaneous water heater, washing machine (if the power of its heating element is more than 3.0 kW), it is necessary to arrange separate lines from the distribution board. Each line in the apartment must be protected by its own machine.
The diagram should show the wire routes, locations of sockets, switches, their power, installation height from the floor level.
For cable routing, the installation locations of junction boxes are marked.
The installation location of the consumed electricity meter is determined. In an apartment building, as a rule, utility panels are installed for this purpose on the staircase landings in the entrances.
For alarm systems, in addition to wire routes, installation locations for control panels and sensors are determined.
Practical advice. When dismantling old wiring, there is no need to rush to remove wires laid in pipes or voids; they can be used as a conductor for pulling new wiring.
Calculation of wire cross-section by power
Also in the wiring diagram it is necessary to indicate the current strength and materials. To carry out the calculation, you need to use the formula I = P / U. P here denotes the total input power of all equipment that is powered from the network, and U denotes voltage. As practice shows, the current strength for ordinary housing does not exceed 25 A. Based on these data, it is necessary to select the material for wiring:
Cable cross-section calculation table
- wire VVG-5*6 - a five-core cable with a cross section of 0.6 square centimeters, it is used for electrical wiring in houses with three-phase power supply, it connects the electrical panel in the entrance to the main panel;
- wire VVG-2*66 - a two-core cable with a cross-section of 0.25 square centimeters, it is used for wiring the network in houses with two-phase power supply, it comes from the electrical panel at the entrance to the main switchboard;
- wire VVG-3*2.5 - a three-core wire with a cross section of 0.25 square centimeters, it is used for most of the wiring in the apartment, this cable connects the electrical panel with distribution boxes;
- wire VVG-3*1.5 – three-core cable with a cross-section of 0.15 square centimeters, it is used to connect junction boxes with lighting fixtures and sockets;
- wire VVG-3*4 is a three-core cable with a cross section of 0.4 square centimeters, it is needed to connect an electric stove.
two-room apartment in Khrushchev
| № | premises | module | Qty |
| 1 | Room 1 | switch | 1 |
| socket | 3 | ||
| output for lamp | 1 | ||
| 2 | Room 2 | switch | 1 |
| socket | 2 | ||
| output for lamp | 1 | ||
| 3 | Corridor | switch | 1 |
| block | |||
| switch | 2 | ||
| socket | 1 | ||
| output for lamp | 1 | ||
| 4 | Kitchen | sockets | 2 |
| output for lamp | 1 | ||
| 5 | Bath | output for lamp | 1 |
| 6 | Toilet | output for lamp | 1 |
| 7 | Connection to machines | 2 |
The table provides a list of electrical work for the apartment as standard (the cost of materials is not included in the price). The price for replacing electrical wiring in a 2-room Khrushchev apartment of 46 m2 is 23,000 rubles. A more detailed price list for electrical installation work, unit prices, can be found here.
The optimal price-quality ratio is the choice of smart people.
All you have to do is call and place an order.
T.
Disadvantages of partial electrical wiring replacement
If you choose to partially replace the electrical wiring by laying wires in one of the rooms, you will need to power the new lights and sockets from the old existing distribution box. It should be recalled that old electrical wiring was usually made of aluminum wires. If they are directly connected to new copper wires, electrochemical incompatibility will occur, which is unacceptable.
Of course, for this purpose you can purchase special connecting terminals, which are presented in a wide range on the modern electrical market. But you should take into account all possible difficulties associated with their use.
In addition, in the distribution box there may simply not be free space for new connections, or there may be so many old connections that fragile aluminum wires will need to be reconnected.
Certain difficulties will also arise with the uniform distribution of the load and the correspondence of the cross-section of the electrical wires in the wiring to it. If, for example, you replace the old wiring in one of the rooms, increasing the total number of “points” in it and connecting the new wiring to an existing distribution box, there will be a current overload of those wires that power this box.
The thing is that the old wiring in almost all houses is made of only one power supply group made of aluminum wires, the cross-section of which does not correspond to the significant power consumption, as well as the number of modern household appliances.
In this case, it is advisable to power the room by bypassing the distribution box. To do this, it must be connected directly to the circuit breaker in the distribution panel.
But even such a solution cannot be called universal, since wires laid to the electrical panel through the entire house (even hidden in a cable channel) are unlikely to decorate the home. And if there are no plans to renovate the house, it will not be possible to hide the wiring in grooves.
Thus, the disadvantages of partial replacement of electrical wiring include:
- an increase in electrical wiring switching points, which may become a potential source of problems in the future;
- an increase in the number of consumables, since all cables will need to be routed into distribution boxes, and with a complete replacement they go directly to the electrical panel;
- increasing labor costs and, consequently, the cost of replacing electrical wiring in general.
Before you begin a partial replacement of electrical wiring, you should stock up on tools. To perform such work, you will need screwdrivers, a hammer drill, a grinder, a soldering iron, terminal blocks, pliers, a knife, a building level, a spatula, and a phase indicator.
Replacement of wiring must be carried out in such a way that there is no overvoltage in the network and no failures occur. Therefore, each device connected to the network must have enough power.
Power directly depends on the cable cross-section. In order not to make a mistake with your choice, you should do a little calculation. First, add up the power of all household appliances that are planned to be connected to the network. After this, an additional 100 W must be added to each electrical appliance, the number obtained as a result of the calculations divided by 220.
If the final number is in the range of 12-15, then wiring with a cross-section of 1.5 mm2 will be enough to provide all devices with sufficient power. This indicator is the most common. But in some cases the result is higher. There are two options for solving the problem: lay wiring of a larger cross-section or run 2-3 cable lines from the electrical panel. The second option is preferable, since thicker wiring will make the entire system not very reliable and, as a result, the likelihood of failures will be high.
Partial replacement of electrical wiring is carried out in several stages. First, they de-energize the home, then check again that the current is really no longer flowing.
After this, they replace the wiring in the selected room and connect it to the distribution box using terminal blocks. Or, as mentioned above, they power the new wiring bypassing the distribution box, laying the wires directly to the electrical panel.
When all the wires are already connected, they are hidden in decorative boxes. Lastly, sockets and switches are installed.
What tools will you need?
Independent replacement of electrical wiring is carried out using the following tools:
- perforator;
- concrete drill, concrete drill (16-20 mm), core drill (90-100 mm);
- chisel 25-30 mm;
- soldering iron 40 W;
- grinder with a disc for stone;
- screwdrivers;
- pliers;
- side cutters;
- phase indicator;
- tester;
- cord and level;
- flashlight;
- stationery knife;
- putty knife.
Before work, it is important to calculate the number of wires - measure the length from the shield to the connection point, taking into account protrusions, niches and corners.
When and why do you need to change old wiring?
Not all of us live in new buildings; most houses in the country were built more than a quarter of a century ago. Of course, the internal equipment of these buildings has long been outdated. Thus, wires for electrical networks in the last century were made of aluminum, a metal highly susceptible to corrosion. In addition, over time, its structure changes, and old wires become very fragile. And this greatly increases the risk of a short circuit and subsequent fire.
Old wiring has a lot of other problems:
- There is no protective grounding, which is now universally accepted. Instead, there is a solidly grounded neutral. The old wires were routed using the branching method.
- There are no RCDs.
- The number of sockets in old apartments does not meet the needs of residents.
It should also be taken into account that over the past couple of decades the number of household electrical devices in apartments has increased several times. Almost every family has various types of coffee makers, mixers, stereos, laptops, etc.
n. The load on the old electrical networks has increased noticeably and has long ceased to correspond to what was initially included in the project. And this is a direct risk of an emergency and fire.
In many homes, due to old wiring, sockets often spark and fail. When repairing them, the wires break. Due to current leakage, any wall can unexpectedly shock you with an electrical discharge. Sometimes, as soon as you plug in some powerful electrical appliance, the old wires begin to smell like melting insulation. If you notice at least one of these signs, then the old wiring clearly needs urgent replacement. If there are more signs, then you have almost no time left to think.
According to the scale of work, replacing old wiring can be:
- partial;
- complete.
Partial replacement of old wiring is justified if:
- There is damage (mechanical or from fire) to only one line of non-old wiring.
- The load on one or more lines has increased, which the wire is not able to withstand. But the rest of the wiring, like the distribution panel, can still be used.
- A major renovation is planned very soon, you just need to wait a little. In this case, you can make a partial repair of the old wiring.
A complete replacement of the old wiring must be carried out in cases where:
- Its insulation has dried out and cracked.
- If its service life has expired. For aluminum it is 20 years, for copper – 30.
- There are old sockets in the apartment or house.
- The old wiring can't handle the new power. For example, thin wires cannot cope with the load from electrical appliances that are simultaneously turned on in the apartment.
If houses built two decades ago need replacing old wiring, what can we say about Khrushchev-era buildings, many of which are “over fifty”? The old wiring was made of aluminum wire, which was not even protected by corrugation. However, it makes no sense to blame the designers: in the last century, apart from a TV and a refrigerator, a chandelier and an iron, apartments often had no other electrical appliances. And they didn’t need a powerful network.
Over time, electric stoves, microwave ovens and kettles, washing machines and dishwashers, vacuum cleaners and food processors were added to the standard set - and the situation changed dramatically. Turn on a couple of such devices at the same time in an old apartment - and the traffic jams instantly pop out. In addition, every time the network is overloaded, there is a risk of fire.
The principle of electrical installation in a panel house
All cables are laid in panel channels that were made at the factory. These channels are specially made for easy installation of wires, and they are also placed only in certain places. In order to find longitudinal holes, you should be guided by switches and sockets. Where this fittings are located, there are channels. There is no other way to move them except to groove and knock out new holes.
Wires for chandeliers are laid through channels that are located in the ceiling. They are also installed in small spaces between the ceiling panel and the wall in those places where the ceiling molding will eventually stand. However, when replacing electrical wiring, it is necessary to take into account that even in houses of the same type or in the same house, but on different floors, the wiring can be done completely differently. This phenomenon is inherent due to the fact that several teams of electricians could work at one construction site and install cables in different ways.
Based on this, you cannot rely on the fact that the wiring requirements have been met, for example, that the switch is located under the distribution box, or that all wires are routed exactly vertically or horizontally. Such simple rules can be broken, so you should be careful and careful not to damage the old wires
In such situations, experience will help; it is important to always check before dismantling something and make sure that the cable will not be damaged
The seams located between the panels on the ceiling or those between the wall and the ceiling are also used, as shown in the photo below:
The meter is usually installed on the staircase. After all, it is very difficult to recess it into the panel so that it does not stick out. However, it can be placed on external walls or in storage rooms. Usually, a cable is laid from the meter, which is located on the landing, into the apartment to the distribution board.
Cable routing methods
To choose the right wiring option for your apartment, you need to take into account the technological features of each room.
Bathrooms are characterized by the presence of powerful consumers and high humidity. To eliminate the slightest possibility of electric shock, it is necessary to connect each device through a separate circuit breaker with the mandatory use of grounding. Sockets must have a protective cover to prevent water from entering them.
The kitchen requires a fan layout, since this room contains many household appliances located in different places. For powerful products (air conditioner, oven), a separate line from the installation box should be provided.
The lighting group includes central chandeliers and spotlights. Depending on the configuration and area of the room, one or two main lamps are installed in it. A two-phase line is supplied to the switch. Next, a single wire is connected to each device, forming a closed circuit.
You can create a diagram using one of the following methods:
- Consistent. Consists of fragments located one after another. Node blocks are not used. The advantage of this option is the savings in materials, since they are consumed to a minimum. There are also disadvantages - the load on the line is distributed unevenly, and if the integrity of one element is damaged, the entire system is de-energized.
- Parallel. A separate node is set up for each direction. The scheme involves a large consumption of cables and mounting boxes. The advantage is its reliability - if one direction fails, the rest continue to function. From one of them you can extend an extension cord to the devices.
- Combined. This combines parallel and sequential methods. Parallel is used to supply current to boxes, distribution to ceilings and walls. Lighting fixtures and sockets of the same group are connected in series.
The choice depends on the area of the room, the number and power of consumers.
Distribution panel
As a rule, previously in panel houses the electric energy meter and the input machine for the apartment were installed on the staircases. Now one circuit breaker is not enough; the panel is assembled from residual current devices (RCDs) and individual circuit breakers for each group of consumers.
In principle, the counter and the input machine can remain on the site. Moreover, this is required by the energy supply organization in order to easily take readings from the meter.
You can assemble the rest of the distribution panel yourself and install it at the entrance to the apartment. In this case, it is best to use a metal or plastic special box, that is, you will have a mounted switchboard. In a panel house, making it hidden is very problematic, just imagine the size of the niche that will need to be hollowed out in a reinforced concrete slab. Choose among the materials at your discretion.
A plastic box will be more practical, it weighs less and has a more attractive appearance in terms of aesthetics. The metal box is characterized by durability and reliability. Think over the cable branching diagram from the input panel in advance.
This scheme is also convenient because if there is a need for repair work on any of the branches of the electrical network, it will be enough to turn off the required circuit breaker, and not leave the entire apartment without voltage.
Let's sum it up
Even a home handyman who does not have such experience can carry out electrical wiring in an apartment. The main thing here is compliance with the PUE standards and electrical safety rules. It should be understood that electricity is not something to joke about, and the slightest mistake made during the work can turn into a real problem over time. And, of course, you need enough free time - such a task cannot be completed quickly, especially if there is no experience at all.
WAGO connections are neat and do not require additional insulation
We hope that the information presented in today’s article was interesting and, most importantly, useful to our dear reader. If you have any questions on the topic, feel free to ask them in the discussions below. The Homius.ru editors will be happy to answer them as soon as possible. Do you have experience in installing electrical wiring yourself in a private house or apartment? In this case, please share it with other readers - it will be very useful for beginning home craftsmen. And finally, we suggest watching a short but quite informative video on today’s topic.
Watch this video on YouTube
Previous Engineering 12 effective ways to reduce your energy bills Next Engineering Socket with a timer: how to use a smart device at home
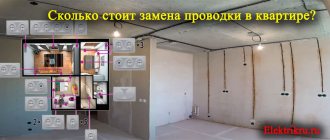
How much does it cost to replace electrical wiring in an apartment?
When replacing electrical wiring in an apartment, the cost of the work depends primarily on what kind of sockets and switches you plan to make - hidden or external. In the first case, wiring (as well as sockets and switches) is carried out by gating the walls. In the second case, a cable duct, corrugation, and the like are used.
Have you decided and are going to hide the wires? Then it is important to know that gating involves carrying out rough work that must be completed before finishing (puttying, wallpapering). While external wiring will not affect the finishing of the room in any way.
When replacing electrical wiring in an apartment, the price of the work depends on the following:
- Technologies for laying wiring (sockets and switches): hidden or external.
- The number of groups (machines), which is determined by the number of rooms and, accordingly, sockets.
So, you have decided how you will route the electrical wiring. Then you need to calculate the required footage of the groove or cable channel. In addition, the material of your house plays an important role - concrete slabs or brick.
If you decide to invite specialists to replace the electrical wiring in your apartment, the cost of the work is calculated individually. To do this, the master needs to see the project, look at the “field of work,” agree on deadlines, payment, and the like.
The bathroom is characterized by high air humidity and a splashed floor, which makes it necessary to take special electrical safety measures. In addition, a body steamed in hot water has a radically reduced resistance to electricity: the circuit current in this case can exceed 5A, which is deadly. The severity of electric shock depends on the time of contact and an RCD will not help in this case.
At the same time, the bathroom contains powerful consumers of electricity, including a washing machine and a water heating tank.
The operating rules for electrical installations allow the installation of sockets in the bathroom using an isolating transformer or RCD, however, to ensure complete safety, it is recommended to take the following steps:
- Electrical wires from the water heater and fan must be replaced with longer ones. The length of the cords should be sufficient for them to pass through the hole in the wall and reach the sockets in the adjacent room (most often the kitchen). The boiler does not come with a cord, and in the case of a fan, re-equipping the device only risks losing the warranty, which is of little importance due to its low cost. The wires must contain three cores and a protective conductor.
- Buy an extension cord without a cord, but with a grounding switch for three sockets. The extension cord is equipped with a three-core cord.
- Wires from electrical household appliances are supplied with European standard plugs. The cords are placed in a polyvinyl chloride casing.
- The water heater plug is permanently connected to the outlet.
- The extension cord is fixed in the bathroom with self-tapping screws.
- The washing machine is connected via an extension cord on a permanent basis. The remaining sockets can be used for local lighting, hair dryers and other small household appliances.
- The extension cord in the next room is switched on as needed.
So, with these simple steps you can avoid the presence of exposed wire ends in the bathroom, which will significantly increase the safety of residents.
How to draw a plan yourself
If you want to independently draw a plan for the placement of sockets, switches and junction boxes in each room of a two-room apartment, we advise you to consider the following points:
- There is no need to connect the entire group of sockets or lighting line to one circuit breaker. It is advisable to “split” the power and lighting lines into several groups yourself. For example, one machine is responsible for the light in the hallway and bathroom, and the second is responsible for the lighting in the living room, kitchen and bedroom. At the same time, the socket line diagram in a 2-room Khreuschevka building should be similarly distributed into several groups. About how to divide wiring into groups. We covered it in a separate article.
- In order to independently draw a design diagram for electrical wiring in a two-room apartment, use a photocopy of the housing plan. In this document, all room dimensions are maintained according to actual values, so in the future, during installation, you will not have any difficulties with marking the walls.
- The installation height of sockets and switches is not standardized by GOST standards and PUE rules, so you can choose the most suitable distance from the floor for your conditions.
- Each room must have its own electrical box, with the exception of the bathroom. Due to the high humidity in the bathroom, it is better to place the junction box in the corridor and from there carry out the wiring for sockets and lamps.
- As a rule, developers do not provide electricity to the balcony. This is already done by the homeowner himself. If, when replacing electrical wiring in an apartment, you decide to make light on the balcony with your own hands, you can bring out a separate wire from the junction box of the next room, and not directly from the apartment panel.
- The panel must be equipped with automatic protective equipment - an RCD and a circuit breaker, which will protect the wiring in a two-room Khrushchev house from short circuits, current leakage and overvoltage of the electrical network.
- If the room is winding (like the hallway in the second of the diagrams we provided below), it is better to install several lamps controlled by a two-gang switch. Otherwise, the lighting in the apartment will not be good enough.
So we have provided recommendations for drawing up an electrical wiring diagram in a two-room apartment in a panel house, now I would like to show two standard projects that you can take as an example in your case.
Stages of work
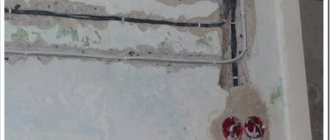
Replacing the electrical wiring in your apartment yourself requires a lot of work with a hammer drill and construction dirt. Usually, indoor wires are laid in a hidden way in grooves in the walls, which you have to do yourself. It will be necessary to tap even in a panel house; it is not always possible to insert new cables into existing cavities in the panels. Often these channels are filled with concrete in some places.
How to hide cables without gating walls
Removing old wiring
Before dismantling the old wiring in the apartment, it must be completely de-energized by turning off the general apartment switch in the panel on the floor. After this, you should check the presence of voltage in the sockets using an indicator screwdriver or a voltmeter. Only after checking can you begin further work on replacing cables.
Marking and preparing walls in the apartment
To simplify the installation of wiring throughout the apartment, you should first mark on the walls all wiring lines and installation locations for sockets, distribution boxes and switches. Then you can begin to groove and cut out holes for the socket boxes.
Marking walls for electrical wiring
Electrical wiring
It is recommended to do internal electrical wiring in a wooden house in an open way with wires laid in cable channels. And in apartments it is customary to install it hidden. It is then easier to cover such wiring with decor, and the risk of damage to it subsequently is minimal. Fixation of electrical wires in the grooves is done with dowel clamps or gypsum mortar.
Placement of electrical appliances in the corridor
Installation of protective systems
In many old high-rise buildings, it is basically impossible to lay a three-core wire with a grounding conductor from the panel to the apartment. This is not provided for in the project. But in some apartment wiring there is a two-wire one, but it can be easily changed to a modern three-wire one. You just need to connect everything correctly in the panel on the floor.
The possibility of converting the Soviet TN-C electrical wiring to a more reliable version TN-S or TN-CS should be checked with the housing office electricians. Changing anything on the floor panel yourself is strictly prohibited. You can do this grounding in a private house yourself; in an apartment building everything is much more complicated.
The calculation of the parameters of RCDs and automatic devices should definitely be entrusted to a specialist in this field. Mistakes here can lead to serious problems.
Connection diagram for the security system in the apartment
Connection to the panel
If you have an electrical design completed by professionals, then it is not difficult to assemble protective devices based on it in a panel on the floor. However, it is best to entrust this task to an invited electrician, who will also then ring the system to check its functionality and the absence of short circuits.
Statement of a question
If the house is old and more than 30 years old, then the electrical wiring in the apartment must be changed without fail and as soon as possible. In the Soviet years, it was all made of aluminum wires and according to the TN-C scheme (with a solidly grounded neutral). This option was the cheapest and easiest to implement, and it was used everywhere.
But over time, it became clear that the aluminum conductors, which are under a constant voltage of ~220 V, gradually degrade and become brittle. The inevitable consequence is short circuits and fires.
Plus, the TN-C grounding circuit itself is not very practical in terms of safety. If the PEN conductor breaks, protection against electric shock in such a network actually ceases to exist. Therefore, at the first opportunity or during major repairs in the apartment, such wiring should be completely changed. Moreover, not only electrical wires must be replaced, but also the distribution panel and switches with sockets.
Electrical wiring options