Connecting an outlet is a procedure that has to be performed during construction and major repairs of residential, administrative and commercial buildings. To carry out this activity, there is no need to call a professional electrician; everything can be done with your own hands. The main condition for carrying out work on the line is strict adherence to safety measures. Devices can only be connected after the apartment has been de-energized. You also need to familiarize yourself with the possible connection diagrams for sockets and the rules for their placement.
Types and characteristics of socket boxes
Modern sockets, both in appearance and in the installation method, differ significantly from those installed in Soviet-era houses. If previously they were simply embedded in the wall without the possibility of replacement, today installing them and, if necessary, changing the socket is not particularly difficult.
A socket box is a mounting device designed for reliable fastening of electrical installation products for hidden wiring.
Regardless of whether the installation of a single or a group of socket boxes is carried out, before their installation, the walls are chipped
When buried in a brick or concrete wall, these mounting boxes or glasses are secured with alabaster
The socket box is fastened to partitions and false walls made of plasterboard using adjustable spacer legs
Almost all building materials and slab options used in rough wall cladding are suitable for installing socket boxes in them
In the line of products for hidden wiring you can find options for arranging log and timber buildings
Socket boxes are used for installing single switches, power points and socket blocks
During operation, it is easier to tighten the “loose” mechanism in the socket box. With its use, installation is carried out faster and more accurately
Selecting a socket box based on wall material
The main selection criterion is the material of the walls into which the socket boxes will be installed.
On this basis, there is the following classification of boxes:
- structures intended for installation in walls made of solid materials: concrete, reinforced concrete, aerated concrete, brick;
- glasses for walls made of composite materials: plasterboard, plastic boards, chipboard, plywood and others.
In the first case, the socket box is a round glass without any additional elements. It is fixed to the wall using mortar.
There are mounting holes in its walls or bottom for electrical wiring. When installing a socket box, it is enough to remove the jumpers and push out the plug.
Socket boxes with side docking units allow you to quickly and easily install two or more sockets at once
To install several sockets located nearby, you can use glasses, on the side of which there is a fastening mechanism. The socket boxes are connected to each other using special grooves and combined into blocks.
Drywall boxes contain special plastic or metal clamping tabs designed to secure elements into hollow walls. The clamps are attached to screws, which rotate to adjust their position.
When the screw is turned, the foot rises or lowers. Clockwise rotation brings the clamping element closer to the wall and secures the glass in the drywall
What shapes are the products produced in?
Round socket boxes have become most widespread. It is very easy for them to make a hole in the wall using a variety of tools.
Round glasses can be used both for mounting a single socket or switch, and they can be combined into groups, connecting to each other using docking units.
Square boxes, although not used as often, have certain advantages. Their volume is much larger, so you can hide a lot of wires in them.
They are often used to install elements of the “smart home” system. There are single and group square-shaped socket boxes designed to install up to five sockets.
There are also oval boxes on sale, which, like square ones, have a large internal space. They are convenient because you can immediately connect a double socket to them. All the products described above are mounted in walls and used for hidden wiring.
There is another type of mounting boxes that stand somewhat apart - plastic linings or, in other words, multiboxes, designed for open installation on the baseboard. They are designed for one or more outlets and are usually square in shape.
This type of installation of plastic overlays can only be used on dismountable plastic skirting boards
External socket boxes have two modifications - designs with installation to the middle of the baseboard or to the floor. Since multiboxes are mounted on top of the baseboard, their distinctive feature is their aesthetic appeal and original design.
Installation box size
An important parameter of socket boxes is their dimensions, which are selected based on specific installation conditions. The fork dimensions are 60-70 mm in diameter and 25-80 mm in depth.
Standard designs have external dimensions of 45 x 68 mm, but it must be taken into account that the internal depth in this case will be 40 and the diameter 65 mm.
When installing several round socket boxes in a group, one of them, which has an increased depth, can, in addition to its main purpose, serve as a distribution box
Glasses of increased sizes, the depth of which is about 80 mm, are advisable to use when there is no distribution box in the electrical wiring, and its functions are performed by the electrical outlet itself. As for square products, as a rule, they have a size of 70x70 or 60x60 mm.
Material for making mounting boxes
The most popular are socket boxes made of non-flammable plastic. They can be installed in concrete walls and structures made of composite materials.
There are also metal boxes, which were used everywhere in the past, but today they have almost been replaced by plastic products.
Metal socket boxes are usually installed when installing electrical wiring in wooden houses. They are made of galvanized or non-ferrous metal and cannot be welded, so the connection to a metal pipe is made by soldering.
For safety reasons and fire prevention, when installing electrical wiring in wooden houses, it is necessary to use metal socket boxes
Electrical equipment, light, lighting
Content
Socket and its varieties: an electrician’s view
Despite the fact that the design of the socket is, at first glance, simple, it is necessary to distinguish between the following types of sockets:
However, contrary to the opinion of amateurs, the appearance of the sockets is not their only difference. Sockets of all types also have internal design differences. This is due to the desire to improve the design of the outlet, making it safer.
Important! Type C5 sockets are characterized by the simplest design, on the inside of which two transition contacts are attached to a plastic or ceramic base and attached to the electrical wiring. The operating principle of this type of socket is based on the closure of two transition contacts, which occurs when you insert the plug into the socket.
Triple rosette: main varieties
As for modern modifications of triple sockets, there are:
Important! Experts advise purchasing sockets that have a square shape on the inside of the front panel, as they are a more universal model.
It must be remembered that manufacturers produce frames of various shapes and colors. More expensive models are sold separately: one box contains the inner part with contacts, and the other contains the outer part along with the frame and decorative cover.
Installing a triple socket: preparations
Expert opinion
Viktor Pavlovich Strebizh, lighting and electrical expert
Any questions ask me, I will help!
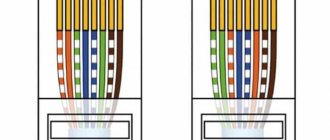
For the TIA EIA-568A standard, a green-white wire is connected to the first pin of the connector, then green, orange-white, blue, blue-white, orange, brown-white and brown in ascending order. If there is something you don’t understand, write to me!
Features of a socket with a switch
Triple socket with switch
Devices for three consumers with a shutdown button are convenient because the switch de-energizes part of the electrical circuit. This eliminates short circuits or the accumulation of static electricity. The special feature of the device is a one-piece body with three sockets and a power button.
The combined designs differ:
- versatility - can be installed on concrete, stone, wood and plasterboard walls;
- economical - a minimum of installation trenches and holes is required;
- ease of connection - a common wire is pulled, rather than a separate cable for each point;
- speed of surface marking due to the same sizes of products;
- the ability to simultaneously control light sources and turn on electrical appliances.
If one element fails, the entire unit must be replaced.
At what height should sockets be installed?
The installation height of sockets is determined based on purely practical considerations. It is necessary to take into account user convenience, the length of the power cable for heavy devices (refrigerator, washing machine) and safety. Sockets break down from time to time and need to be replaced or repaired. When preparing installation, you should remember this.
The distance to the sockets from the floor is usually from 30 to 80 cm. When installing at a low height, you should take care of the safety of children by choosing devices with special curtains. The upper point of the outlet location is not determined by the standards.
But you need to know that there should be at least 15 cm from the floor slab to the socket, and at least 10 cm from the edge of the window opening. A socket block installed away from the window is better protected from temperature changes, from water, dust and other atmospheric factors.
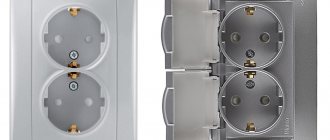
Triple socket design
Euro socket triple open installation
The products are made on the basis of a housing and a working part - terminals with springs for the plug and contacts, a grounding device. Modern European sockets can withstand currents of up to 16 A, standard ones - up to 6 A. Sockets in one housing are distinguished by a large diameter of round holes for plug rods. The device cover is made of heat-resistant plastic, the core is made of ceramic. For installation, a special horizontal and vertical panel is used.
The modules are located on a common frame or on 3 autonomous ones connected by a common panel. Today, two modifications of the triple socket block are used:
- C5. Design without grounding in a square housing. It is placed under old Soviet devices and connected to a 220 V network.
- C6. Euro socket that can withstand voltage of 230-380 V. Compatible with equipment with Euro connectors and plugs.
The blocks are suitable for arranging two types of wiring. The internal one for a hidden highway is mounted using a cylindrical socket box in the walls. The external one is suitable for an open power line, installed on a plate socket box on the surface.
Depending on the manufacturer, the triple module has a width from 212 to 220 mm, a height from 72 to 80 mm. The size of the device together with the overhead frame is 160 mm in height.
Common types
Ratio of power and current
Manufacturers produce products that have a wide range of applications, designed for use in certain conditions.
Based on the number of consumers, products are divided into single and double. To create blocks of 3-5 points, sources are combined into one system.
Regarding the ability to withstand loads, the devices have the following power ratings:
- weak - 1.7 kW;
- medium - 3.4 kW;
- strong - 6.6-10 kW.
The most popular products in everyday life are those designed for a voltage of 230 V and a current of 16 A.
According to the level of protection against electric shock, products are divided into conventional and grounded. Protected sockets have external contacts that are connected to a separate terminal to which the ground wire is connected.
5-pin socket plug
Since devices and equipment with certain properties are used in various spheres of life, the sockets have a configuration corresponding to them.
The number of connectors is as follows:
- 2 - phase and zero;
- 3 - 2 phases and zero;
- 3 - phase, zero, ground;
- 4 - 2 phases, zero, ground;
- 5 - 3 phases, zero, ground.
An important characteristic is the level of protection of sockets from moisture. This indicator is marked on the product body with the letters IP and numbers.
Table of degrees of protection
The classification according to the degree of protection is as follows:
- IP 0-24 - no;
- IP 25-40 - against splashes;
- IP 41-54 - from weak water flows, equipped with a lid;
- IP 55 + - absolute, have a sealed plug.
The main difference between the products is the way they are placed.
Connecting electrical points
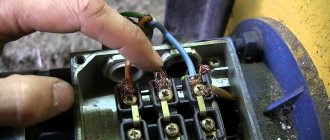
Connection of socket boxes for triple sockets
The structure should be connected taking into account the wire cross-section. When installed externally, the ability of the wiring to withstand 3 consumers is checked. The presence of separate socket boxes provides for the laying of additional cables vertically or horizontally. After these works:
- Separate socket boxes are connected to the cable terminals and pressed using clamps.
- The ends of the conductors are twisted into the device.
- The central part is installed and the overhead cover is fixed.
When installing an outlet to an existing group, the machine is replaced.
Open and closed wiring
The difference between the methods is noticeable to the naked eye. The closed wiring is located inside the wall, for which grooves (grooves) are punched or cut into it, in which the connecting wire is hidden under a layer of putty. Open wiring is laid along the surface of the wall, on which it is held in special fasteners or laid in plastic guides - cable channels.
Accordingly, if you can see the wires that fit into the outlet, then the wiring is of an open type. Otherwise, closed wiring is used, for the installation of which the walls were cut.
These two methods of connecting an outlet can be combined with each other - if the old points are connected in a closed way, then nothing prevents you from connecting a new one in an open way. There is only one choice - in wooden houses the socket can be connected exclusively in an open way, just like all other electrical wiring.
Open wiring - advantages and disadvantages
An analogy with the most common extension cord (surge protector), which is essentially an additional branch of the electrical network, but is connected not to a junction box, but to an outlet, will help you understand why open wiring is good.
- You don't have to cut the wall to install a new outlet. This is especially true for those premises that have already been renovated.
- Installation does not require tools such as a wall chaser or a hammer drill.
- In the event of a breakdown, you don’t have to open the wall - all the wiring is in front of your eyes.
- Installation speed. Even after all the work has been completed, adding another point to the existing wiring is a matter of several minutes.
- If desired, you can quickly completely change the wiring - ideal for temporary connection schemes.
- There is a high probability of external influence on the wiring - children, pets, you can simply accidentally hook it. This disadvantage is mitigated by laying wires in cable channels.
- Exposed wires spoil the entire interior of the room. True, it all depends on the design abilities of the owner of the room - cable channels will fit perfectly into modern design solutions, and if the room is made in a retro style, then special wires and other accessories are produced for this.
- The need to purchase special fasteners, even if cable ducts are not used - in wooden houses, open wiring should be laid at a distance of 0.5-1 cm from the wall surface. Wires are often laid inside iron pipes - all these requirements are aimed at increasing the safety of using open electrical wiring.
As a result, this connection method justifies itself if for some reason there is no point in laying the wires to the outlet inside the wall. Besides the fact that the wiring will be visible, there will be no differences in the operation of the outlet.
Hidden wiring - pros and cons
Despite some significant disadvantages, it is used almost everywhere - the advantages of its use still outweigh.
- The wires to the socket fit into the wall, so wallpaper or other finishing can be done freely on the outside.
- Meets all fire safety requirements (in concrete buildings) - even if a short circuit occurs, there is no fear of a fire from the wires in the wall.
- There is a very low probability of damage to the wiring - it can only be damaged when drilling walls.
- For installation you need to cut the walls.
- It is difficult to carry out repair work.
- If the walls are finished, then after installing an additional outlet you will have to redo it.
The disadvantages are leveled out by preliminary calculations - if you plan in advance where and which block of sockets should be installed, then problems usually do not arise in the future.
Safety during socket installation
The process of installing and connecting the outlet must be safe and quite aesthetic. Professionals recommend installing sockets at a height of about forty centimeters from the floor, although most often people install them at a height of about a meter.
Children should not have any access to sockets, so it is worth installing sockets with a protective cover that a small child will certainly not be able to break into.
Why double socket?
It is very difficult to find any disadvantages to the decision to install a double socket. Almost the only argument that is given against it is most likely expressed simply “out of harm” and says that connecting it to the network increases the risk of overload - except for families that have electricians, no one will even think about whether it will “pull” or one point two powerful electrical appliances.
In practice, to connect such devices that consistently consume high amperage current, separate sockets are made, so under normal conditions, several factors must come together to cause a long-term dangerous overload, the combination of which seems very, very unlikely.
What is the average outlet designed for?
The first point is the current strength that the outlet can withstand - usually this parameter is indicated on its cover, less often - on the inside. Old Soviet devices, which are now increasingly rare to find (they are replaced almost primarily because of the need to connect modern Europlugs), are mostly designed for a current of 6 Amps. Modern ones, even of mediocre quality, are already marked with 10 (if it is without grounding) or 16 Amperes.
What these numbers mean, the school formula for calculating the power of electric current will help you find out - even humanists should understand it. P (power) = I (current) * U (voltage), and given that the voltage in the household network is always constant and equal to 220 Volts, it is quite simple to calculate what the current marking indicates.
- 220 Volts * 6 Amps = 1320 Watts = 1.3 kW
- 220 Volts * 10 Amps = 2200 Watts = 2.2 kW
- 220 Volts * 16 Amps = 3520 Watts = 3.5 kW
Power of household electrical appliances
You can clearly imagine where you can safely connect a double socket by comparing the most commonly used electrical appliances:
Taking into account the recommendations of the PUE: how to properly connect powerful kitchen electrical appliances, boilers and air conditioners - a separate line is always connected to them, it is very difficult to imagine in what situation the installation of a double socket will entail the simultaneous inclusion of two devices with a total power of more than 2.2 kW. Using an iron at the same time as a vacuum cleaner or hairdryer is quite problematic - only a microwave and an electric kettle remain, but together they work for a maximum of 5-8 minutes, and the safety margin in electrical engineering is not an empty phrase. Plus, for such electrical appliances they usually install good 16 Ampere sockets.
detailed instructions
Advantages and disadvantages
Several sockets are used to install household appliances in the kitchen or room.
- air conditioners;
- fans;
- local heaters;
- devices for hair, nails and appearance care;
- humidifiers and air ionizers, many other products.
here
- low price;
- ease of use;
- easy installation;
- in case of malfunction it is easy to repair;
- can be installed in socket boxes of single predecessors, so changing a single socket to a triple socket will not be difficult;
- does not require additional wiring;
- have a secure fastening;
- reliable.
- Multi-section block ones are characterized by large dimensions, which often leads to their mechanical breakdowns, since the load from several appliance plugs increases.
- It is necessary to calculate the maximum permissible load. If you connect 3 powerful electrical appliances at once, the socket, contacts and all wiring to the distribution box may burn out, which requires labor-intensive repairs.
- Since the weight of three forks of different devices will constantly affect the entire structure, over time the decorative coating and the plastic body will deteriorate. This may cause a short circuit.
Important To prevent these shortcomings, before installation it is necessary to correctly calculate the power of the devices connected to it and take a small reserve. All fastenings of elements should be done with high quality.
Prepare for installation
Before you start work, it is worth determining the place where you will place the outlet group. If this place is the kitchen, then the socket should be placed just above the countertop, thereby ensuring that the cord from any kitchen equipment will successfully reach the socket.
If you plan to place sockets in the living room, it is best to do this behind the TV, which will hide all the wires.
Speaking of the bathroom, it must be taken into account that the sockets must be located at least 0.6 meters from the bathroom and be waterproof.
How to install it yourself?
Installation requires strict adherence to several steps:
- markings;
- drilling a recess for the socket box;
- installation of the device;
- assembly.
Wall marking
Attention It is necessary to use a building level (up to 1 m long) to align the device strictly vertically and horizontally. This guarantees easy connection.
postpone
Detailed instructions on how to make a socket in the wall yourself
Drilling a hole
The deepening is done like this:
- You need to hold the drill perpendicular to the wall, drill to the depth of the socket with a margin of approximately 0.5 cm.
- Using a chisel and hammer, the middle part of the brickwork or concrete is removed.
- When installing in a sheet of drywall, use the appropriate nozzle.
- Drilling is performed similarly to concrete or brick surfaces, but the excess remains inside the crown. If there is no such tool, then a hole is cut in the plasterboard using a stationery or shoe knife.
2
Fixing a socket box in a concrete wall
- A box is inserted into the brickwork or concrete and fixed to alabaster or mortar.
- When mounting in a plasterboard sheet, you need to insert a socket box into the hole, and then tighten the screws that hold the sliding legs. It is necessary to tighten it with such strength that the fabric does not crumble and the device does not wobble.
Important Before installing the box in a niche, you must cut a hole in it for the wiring that will be connected to the terminals of the socket core.
- If it is alabaster, then it will take about 2-3 hours for the solution to harden.
- If there is a different type of mixture, drying will take longer.
Connection diagram
First determine the exact location and orientation of the triple socket block
- To fix triple sockets in the kitchen, you need to choose a place where several household appliances will be located - usually above the countertop, so as not to use tees or extension cords.
- If the installation is carried out in a room, install it closer to the TV or computer - so that the screen masks the structure.
- When installing in a kitchen or bathroom, where there will be high humidity and microclimate fluctuations, it must be mounted no closer than 0.6 m from the water source and no lower than 0.5 m from the floor. This will ensure the safety of the devices.
Connection diagrams
Even a novice master will not face any special difficulties, everything is very clear, but it is better to consider the features of each option.
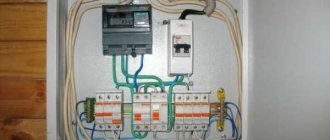
Single-phase network without grounding
The diagram is indicated by numbers:
1 - general machine;
2 - the one that turns off the phase on a specific line;
3 - zero bus;
4 - distribution boxes, separate for each outlet;
5 - cables.
Any electrical specialist knows that the phase should be located on the left, but owners often break this rule. If there are problems in the electrical network, they create additional difficulties for themselves when diagnosing, as well as in the case of self-repair.
Single-phase network, but with grounding
In this case, only one element is added, number 6, this is the main grounding bus for the protective conductor (PE). It is indicated in green.
There is another option, used for outbuildings if they have open wiring. In this case, the grounding runs along the floor - along the perimeter of the walls, and a separate wire leads to the sockets below. There are no other differences in the eyeliner.
Features of connection in three- and four-wire networks
The presence of a three-wire network in a house means that in addition to phase and neutral, there is a ground line. To connect to such wiring, you need to purchase sockets with three terminals. Phase and zero are attached to the extreme contacts, and ground is in the middle.
Four wires mean that two phases are supplied to the house. The second conductor can be used to directly connect double points. When connecting to a single socket, it is advisable to insulate and bend the second phase, since two wires will not fit into one hole.
Possible connection methods
There are several ways to achieve the result, but it all depends on the potential load on such outlets.
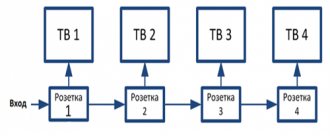
Loop - sequential method
If it is necessary to install blocks consisting of several sockets, all elements are connected using the daisy chain method. The phase is connected to the second device with jumpers, then the next device is switched in the same way. Do the same with zero contacts.
The method is quite simple, but not without its drawbacks. Thus, poor contact in one of the intermediate sockets automatically causes the following elements to fail. Checking and tightening the terminals will help you avoid trouble; the operation must be planned and carried out at least once a year.
If the terminals allow, then instead of separate jumpers it is better to use a solid wire. The insulation is removed from a small area, then it is bent into a loop, clamped into a terminal, then the next sockets are “straightened” using the same method. The reliability of all elements of such an electrical network is a big plus of this method. The disadvantages - the need to calculate the length of the wire, relatively long, more difficult work - are still insignificant.
A much bigger disadvantage is the impossibility of simultaneous operation of several powerful devices, since the maximum current value for one outlet is 16 A. If several “serious” pieces of equipment are involved in the work at once, then the power cable simply may not withstand the increased load.
Star - parallel connection
In this case, all sockets in the room are connected with a separate, “own” wire, suitable for the distribution box, where the main cable is connected from the panel. This method does not limit the operation of the sockets, since even if one of them fails, the rest will remain in working order.
The biggest disadvantages are wire consumption and labor-intensive work. You can save money if you lay a wire of a thicker cross-section to the central contact from the shield, and thinner wires for connection to sockets. However, this option is called differently - mixed method.
Combined compromise
When connecting sockets in this way, the main cable is laid to the junction box and then to the nearest socket. On this last segment, branches are made for the remaining devices. The advantages are cable savings and greater reliability of the electrical network, since the option ensures autonomous operation of the devices.
The second solution is to lay two cables from the junction box at once. One of them is for a cable that powers, for example, 4 out of 5 sockets. The second is intended for the fifth group, which is going to be used to operate particularly powerful equipment.
How to properly connect a socket from an outlet
General diagram for connecting a group of sockets with a cable
The most popular way to connect sockets is to install jumpers between their terminals.
The advantages of this solution are the following:
- ease of implementation;
- there is no need to groove walls for a new line;
- speed of implementation;
- minimum consumption of materials.
There are also disadvantages:
- a large number of connections contributes to heating the circuit;
- there is a risk of wires coming loose and short circuiting;
- You will still have to drill and cut - you need to make channels and a hole for the glass.
If you carefully perform each stage of the work, the structure will be strong and safe.
Installation of a socket box
Using a triple socket in the kitchen
Installation of the block begins after choosing the location of the structure:
- in the kitchen, for one-time connection of equipment, it is better to place the device above the countertop;
- in the bedroom, a three-module product can be installed behind the TV - the wires behind the screen will be invisible;
- When installed in a bathroom, a sealed moisture-resistant block is required, located 60 cm from the water.
After choosing the installation area, you will need to prepare tools - a level, tape measure, marker or pencil, a hammer drill with a crown attachment and an attachment for making grooves.
Carry out installation work before the room is finished.
Marking the wall surface
Marking the wall for wiring
The geometry of the structure and the convenience of organizing wiring depend on the correctness of the markings. To mark installation points, start from the number of sockets in the block. When working, use a level - it will ensure that the device is level.
The distance of the socket from the floor is 20-40 cm. Between the centers of the socket boxes is 72 mm. Otherwise, it will not be possible to fit the decorative panel accurately. The groove is done strictly horizontally or vertically - it is better to draw the outline of the hole.
Drilling holes in the wall
Strobe with hammer and chisel
You can make seats for the socket by punching with a hammer drill with different attachments. A hammer, chisel and several screwdrivers are used to refine areas.
Drilling is carried out in stages:
- Use a drill or hammer drill with an attachment to make a round hole. The crown should be completely immersed in the wall.
- The groove is led strictly vertically or horizontally.
- The width and depth of the channels are made according to the cross-section of the cable or the dimensions of the corrugated pipe.
- The remaining concrete is removed with a chisel.
- For plasterboard or other soft materials, use a special attachment or a sharp construction knife.
- Three holes are made for the wires on the back of the socket box body.
- 2 holes are drilled between them for auxiliary wires.
The permissible cross-section of the cable for the socket is not less than 2.5 mm2.
Fixing a socket box in a concrete wall
Installing a socket box in a niche and fixing it with a solution
To ensure that the triple socket box sits tightly in the socket, white alabaster is used. Due to the rapid setting of the material, the mixture is prepared in small portions. Density is controlled visually.
The landing niche for the socket box is coated with the solution from the inside and its fastening is checked. The product will sit firmly on a dense mixture. If it fails, add more alabaster and reapply the composition. After installation, the solution should dry for 2-3 hours. The outer layer of the material is leveled with sandpaper.
Before placing the socket on the alabaster, check the horizontal and vertical position of the mounting screws.
Preparatory work
We are talking about installing a triple internal socket. Again, there are two installation methods:
- with one socket box;
- with three sockets.
Whatever the choice, it is necessary to mark the installation location. Some people recommend using a level, however, if the floor is not level, the structure will look uneven. Therefore, it is better to make the socket for the socket a little larger so that it can be adjusted. If you decide to install a triple socket in one socket box, then you need to measure the dimensions of the socket box, make an allowance and drill a hole in the wall.
When installing three single sockets, you need to put a socket box under each of them. This requires special precision. It is necessary not only to set the level, but also to calculate the distances so that each of them fits into its own slot on the front panel.
It is necessary to fasten the socket box firmly, even a small looseness can destroy the plaster, and it will be unpleasant for yourself. You can secure it with dowels if you have the skill, as you can destroy the socket box. However, it would be more practical to use screws; who knows, you may have to change or remove them.
Stores sell sets of screws and sleeves. We place the socket box in the hollowed-out nest and mark the place for the fasteners. We drill a hole according to the diameter of the sleeve (a little smaller, but not more) and insert the sleeve; it should hold firmly. When tightening the screw, the sleeve will be pressed even more tightly to the wall. If the wall is brick, you can use a regular drill, although if you have one with soldering and the required diameter, it’s better. For concrete, it’s definitely worth taking a brazed drill, since they are now freely sold.
Wire preparation
It's time to think about laying cables or wires. To do this, you need to decide what you will use. According to the rules, each outlet must have its own wire. If the sockets are equipped with grounding, then an additional conductor is needed. The grounding wire is used without insulation.
It would be nice to have one or two cores in stock. When connecting a triple socket, one of the wires can be damaged. Aluminum wire, especially if cut, breaks easily. You can make a mistake and cut it shorter than necessary. During operation, due to heavy load, the wires may burn. Then the reserve core will come in handy more than ever.
A little more about the material of the current-carrying conductor. Earlier it was said about the need to think about what load the outlet will operate under. This is also true for wire. There are many reference books and tables for calculating the cross-section of a conductor depending on the current passing through it. A stranded conductor carries much more current than a single-core conductor of the same cross-section. Based on this, you can decide what will be used - wire or cable.
After you have bought everything you need, draw a line on the wall from the main electrical outlet or box to the made socket.
Remember, the line must go strictly vertical or horizontal. Hollow out the path so that the cable or wires go completely under the plaster. If there is a suspicion that there will be wiring nearby, it is necessary to turn off the power to the apartment.
This is possible in the case when the gasket is made to a box that is located nearby, but slightly to the side.