In many ways, the comfort of living in an apartment or house depends on the type and quantity of household appliances and electrical appliances installed in it. The lack of sockets is becoming a common phenomenon, causing the use of many extension cords and tees. These actions help solve the problem, but have side effects - wires get tangled under your feet, additional pads spoil the interior of the room. In some cases, a double socket will help solve the problem of a lack of connection points. Modern products are compact, sufficiently powerful and presentable in appearance. There is no need to invite specialists to carry out the re-equipment of electrical equipment. You can do the work yourself after familiarizing yourself with the safety precautions and the rules for selecting and installing electrical appliances.
Installation of the socket block
Internal sockets can be single or double.
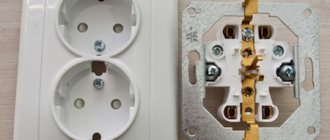
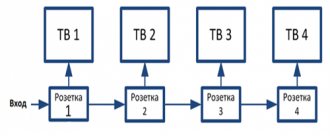
But if you need to place an internal socket with three or more sockets in one place, then you need to use an outlet block. The socket block is a special single sockets that are combined into a single structure by a common frame.
A separate socket box is installed for each socket of the block. The power cable is connected to only one socket in the block, and the rest are powered by jumpers.
Socket block connection diagram
Below is a photo of socket boxes in drywall for installing a block of sockets. In adjacent socket boxes, remove adjacent plugs for cable routing:
The photo below shows an example of a Sedna socket for a socket block:
And this is what the frame for a socket block with four sockets looks like:
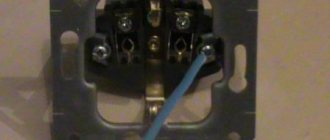
As mentioned above, to connect the sockets in the block, jumpers from the cable cores are used:
Jumpers - phase, neutral and grounding for connecting sockets in the block
Connection points for the cable cores in the socket:
An example of connecting sockets in a block. The power cable goes to the first socket, and the 2nd, 3rd and 4th are connected by jumpers:
All sockets are installed and connected:
Installation of the front panels of sockets and the frame is completed:
Versatility
Nowadays, sockets with two or three seats appear almost everywhere. This is noticeably better than single samples, where tees then need to be inserted. They are reliable, high quality and simply comfortable. At the same time, you do not need to significantly change the electrical wiring, which reduces your costs in the end. Manufacturers have now released closed and open versions onto the market. All you need to do is choose the right overhead double socket.
Most often the situation is as follows. Friends have come to visit you. They all urgently need to charge their tablets, cell phones and laptops. The number of connectors needed is significant. You can't please everyone with single sockets. This is why experts recommend installing a double internal socket everywhere.
Tips for choosing double sockets
When choosing double sockets, pay attention to the quality of their workmanship. The product must be made of sufficiently thick plastic and not have any defects, cracks or chips
Pay attention to contacts. They must be made of thick metal.
Check the contacts for flexibility; the best double socket will be the one whose contacts do not bend, but spring. If after bending the contact remains in a bent position, this is a poor-quality and unsafe socket. In a high-quality socket, after bending, the contact will return to its original position.
- Connection diagram for a pass-through switch: operating principle and installation options for a special type of switch
- How to select and install an electrical distribution panel - tips for assembling and installing the main elements yourself
- Types of distribution boxes for electrical wiring - design, installation and rules for laying electrical cables
You can also check the contacts with a magnet. High-quality sockets use contacts made of non-magnetic alloys. If the contacts are magnetic, this is a poor-quality socket.
The key parameter is the maximum permissible power passing through the outlet. Consider the power of the connected devices.
Typically, household outlets are rated at a maximum of 3.5 kW (16 A). The power of the devices should not exceed the maximum permissible throughput of the outlet.
Step-by-step instructions for replacing a regular electrical outlet with a double one
1.
First of all,
turn off the electricity supply
. Turn off the switch (or unscrew the plugs) on the electrical panel in the apartment or on the staircase.
Make sure there is no phase voltage in the socket. To do this, take an indicator screwdriver and touch its metal tip to the metal contacts of the socket one by one.
Your finger must be pressed against the metal contact on the indicator body, otherwise it will not work. If the light does not light (provided that the indicator is working!), you can start working.
2.
Using a screwdriver, unscrew the screw on the protective decorative cover of the old outlet and remove the cover.
3.
Unscrew (loosen) the two screws of the spacer legs by 3-5 turns.
If the socket is screwed to the socket box, then unscrew the screws holding the socket in the socket box.
Remove the socket from the socket box, carefully pulling out and straightening the electrical wires.
4.
Remove the screws that secure the wires to the outlet and disconnect the outlet.
5.
Take the new double socket, unscrew and remove the decorative cover from it.
If you had a grounded outlet installed, then install a double outlet also with grounding. If the socket that was installed did not have a grounding wire, then buy a double one without a grounding wire.
Screw the 2-color (yellow-green) wire to the ground terminal, connect the remaining 2 solid wires (usually white and blue) to the socket terminals using a screwdriver.
In the event that you have installed a socket without grounding, and there are only 2 wires in the socket box, you will need a double socket without grounding. Screw both wires to the power contacts of the socket.
6.
Install the socket into the socket box, carefully laying the wire in the socket box so that it does not fall under the spacer tabs securing the socket. Align the socket and secure it in the socket box using spacer tabs (which rest against the walls of the socket box) or, even better and more securely, using mounting screws. Replace the protective decorative cover of the outlet.
7.
Turn on the voltage and check the functionality of the outlet using any electrical device.
That's it, your new double socket is installed in place of the regular single socket and is ready for use. If, in the process of replacing the socket, you need to replace the socket box, you can also do this yourself after
reading the relevant article
Press the ↓↓↓ button
and share with your friends if you find this article useful!
As they say, nothing lasts forever and even the best quality things fail. Everything breaks down, wears out, fails, goes out of fashion, or simply loses its relevance. Sockets and electrical networks are no exception. Many residential buildings built during the Soviet era have worn-out electrical wiring and loose sockets. There is often a temptation to improve the situation during repairs, so that both the quality and appearance correspond to the modern style, and simply because sockets often fail without surviving a short circuit.
The location of the socket on the wall has also undergone changes. If previously they were usually located at a height of about 1 m above the floor, now it is fashionable to place them at a level of 40 cm from the floor level.
When the question arises of how to change an outlet, several options for solving the problem immediately appear in your head. Of course, without the necessary experience, there is only one way to correct the situation - calling an electrician or an all-knowing neighbor. But since this trouble is an everyday matter, it makes sense to delve into the basics of the principles of electricity and figure out the task at hand.
Installation instructions
device Installing a European socket:
- Remove the electrical tape. We measure the depth of the hole intended for the cable. If the size does not match, you need to peel off the protective layer of rubber. The exposed cable should protrude quite slightly from the hole;
- Using the clamping screw, insert the first wire. The fixation must be very reliable. If this does not happen, the outlet will stop working quite quickly. To do this, the cable must be pulled carefully, it should not move from side to side;
- We repeat the same procedure with the second wire . We must not forget to be careful when exposing wires.
- If equipment with grounding was purchased, a special cable is required . It is not available in all homes. In new houses or apartments after renovation, such a cable is usually present. The cable is inserted into the upper hole of the mechanism. If the house is old and there is no grounding wire, then this step is not required. It must be taken into account that equipment without a grounding wire will not be able to supply electricity to all types of plugs. Therefore, it is worth thinking about carrying it out;
- The main network connection is complete. Next, you should install the mechanism in the hole in the wall and secure it using quick claws. A protective plastic panel is installed on the outside.
Installation requiring a new socket box:
- A new box is required when it is impossible to fix the tabs on the old socket. It was stated above that during dismantling it is checked whether the new box fits into the old recess. Therefore, at the installation stage, the new structure must fit perfectly into the wall. In order for the socket box to hold tightly, you need to fill it with a special solution, such as glue.
- The fixation of the new mechanism depends on the design. These will be quick tabs or screws that are screwed to the box itself.
- We expose the wires . This is done as in the first option.
- We connect the cables to the common mechanism. The protective frame is not removed and remains attached to the equipment.
- We fasten the screws on the top and sides. We install the outer plastic panel and frame. Installation is complete.
Device installation features
A double socket has one socket box with two separated terminal blocks and one mounting part for wires.
If desired, the installation of an electrical point can be done on your own, without resorting to the services of a specialist.
The use of jumpers is allowed only if it is planned to connect not very powerful devices to the electrical points. When connecting powerful equipment, technicians recommend connecting two outlets in parallel, creating a branch of wires for each point.
But in any case, to prevent emergency situations, the total load on this type of outlet should be no more than 16A.
If it is necessary to install a socket with two different socket boxes, the niches for their installation will need to be pre-drilled with an electric drill, while maintaining the same distance between the holes.
Additional functions
- The socket may have additional protection that will protect children from using it for other purposes.
- The socket may have a cover. This is in demand when the socket is installed in places where a large amount of moisture accumulates: in the bathroom, shower, sauna, bathhouse.
- Socket with timer. The socket is capable of turning off the operation of the electrical appliance itself according to the period of time for which it is programmed.
- Socket with switch. You can turn off a working device without removing its plug from the socket, but by clicking the switch. As a result, the socket and plug will last much longer.
- Illuminated socket. Useful in the dark, when it is difficult for a person to get a plug into an outlet without additional lighting.
- Sockets may have different wattages, which are indicated directly on the device itself. When installing, you need to take this into account, since when you connect a powerful electrical appliance to an unsuitable outlet, a short circuit may occur and the outlet may fail.
- Low power sockets are intended mainly for telephone communications and the Internet.
Types of double sockets
An electrical outlet is a device necessary for connecting electrical appliances to the network. The product consists of a body (cover), which isolates the working part from external influences, and a main part with a base and contacts.
Sockets can be not only single, but also double, and even multi-socket, depending on the number of plug connectors. It is a mistake to think that doubling single sockets means getting a double one; in fact, only a monolithic device is considered two-socket.
There are different types of double sockets according to modifications:
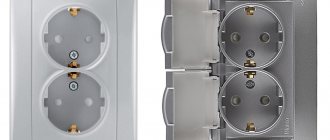
- Closed. The openings of the device are covered with special curtains, which is convenient for apartments where small children live.
- Open. Externally, they look like familiar sockets without closing curtains.
Devices can be with or without grounding. If grounding contacts are provided, this will protect connected devices from voltage failures. There are separate types of sockets for installation outdoors and in rooms with high humidity - waterproof. The former are protected from dirt and dust, the latter are protected from water penetration.
Double products are:
- invoices (external);
- hidden (internal);
- standard;
- polar;
- programmed, etc.
Types of sockets and their characteristics
Since you have decided to replace sockets, it is worth studying their varieties in more detail. You may want to choose outlets with additional capabilities, but to do this you need to be aware of their existence.
Grounded socket
Grounding is a great advantage for connecting and operating electrical appliances, because it is an additional safety factor. But in order to buy sockets with grounding, you need to be sure that your electrical network has a grounded wire. Otherwise, there is simply no need to spend money on sockets with this property.
For powerful electrical appliances, grounding is extremely important. After all, a small household device without grounding can give you a slight electric shock, but as a result of an electric shock from a powerful device, you can suffer more seriously, and even lose your life.
Surface or built-in socket
A built-in socket is more difficult to install, but it takes up virtually no space. These are the familiar types of sockets that are built into the wall and have a socket box. They are used for both external and internal wiring.
The surface-mounted socket is easy to install, because you don’t have to make a large hole in the wall for the socket box. To install such a socket, you need to drill 2 holes in the wall, onto which the socket will be attached using dowels. Such sockets are not very common due to their highly protruding design.
Double and triple sockets
In order for several household appliances to work simultaneously, which is no longer something unusual, double or triple sockets are installed. Their connection and cost are not much different from single sockets, but are convenient for all family members.
Fixing in the wall
It is important to securely secure the socket box in the wall hole to prevent the socket from being pulled out during operation. For this, it is best to use alabaster, which you can buy in the store.
Dilute it with water to form a thick paste, then spread the mixture into the socket hole. After this, insert the socket box into the wall on the alabaster and be sure to level it. For the mixture to dry, you need to wait an hour and a half and only then install the socket. It is attached to the socket box with claws and screws - the socket is inserted and the fastening bolts are tightened. The final stage is the installation of the decorative panel.
Electrical markings
Any quality work begins with accurate markings. Most often, professionals use laser levels and axle builders for this.
With their help, you can quickly and accurately mark the centers for all the sockets in the room. It would seem that a couple of millimeters will not play a decisive role here. What's wrong with one block at the beginning of the room being slightly higher than the other at the end.
However, very often in apartments you come across wallpaper with horizontal or vertical stripes. And these stripes will clearly show when the socket box is not installed level.
The same can be said about the seams on the tiles.
Therefore, place all socket boxes in the room in the same plane. The recommended distances are as follows:
for sockets – 30cm from the floor
for light switches – 60-90cm
everything above the countertop, in the bathroom or kitchen – 110cm
After all the centers of the socket boxes have been marked, then proceed to marking the mounting points for the lamps, both on the walls and on the ceiling.
At the same time, you can mark out places for hanging plasterboard structures. Since in the future, when all the cables and corrugations are on the ceiling, marking the fasteners for drywall will not be very convenient.
But it’s worth bothering with all this if you will also be installing the structures.
After all this, proceed to making marks for the corrugation fasteners. The most important thing is that they do not interfere with each other.
Usually, competent marking, even with the use of modern measuring instruments, takes a full day of work. Prepare yourself in advance for exactly this period. If you are in a hurry, it will definitely backfire on you during further installation.
Connecting double sockets
Next, you should connect the wires to the socket terminals. Correct sequence of actions:
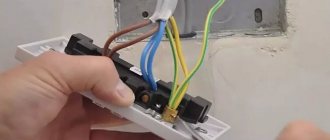
Release about 10 cm of the wire from the outer insulation for ease of work. If the wire is not enough (this is important when replacing sockets), it should be increased. Do not twist the wires, as this may cause heating and a fire.
It is best to connect the wires with special terminals; soldering is also acceptable. Strip the ends of the cores from the insulation by 1-1.5 cm.
Determine the phase, neutral and ground wire. Usually the wires have different colors. Zero usually has blue insulation, grounding is yellow-green, phase is brown.
Screw the wires to the appropriate terminals. A double socket uses only one cable, the wires of which connect both outputs.
Next, you should fix the socket in the socket box with the supplied fasteners and install the front panel. At this point, the installation of the double socket is considered complete.
What should you prepare to replace an outlet in an apartment?
Replacing a socket with your own hands cannot be done without tools. You should worry about their availability in advance so as not to be distracted while doing this work. These tools primarily include:
- indicator screwdriver. VIRA brand indicator screwdrivers are very convenient when replacing sockets;
- a regular screwdriver. It is advisable to stock up on both a flat and a cross-shaped model in advance;
- pliers necessary to hold individual elements;
- wire cutters;
- knife for removing insulation.
When thinking about how to change an outlet from an old one to a new one, you should take into account that this work will involve performing some additional operations, which will require:
- drill with a drill bit for concrete;
- chisel with hammer;
- a socket box of a size corresponding to the dimensions of the socket unit;
- gypsum or other similar composition.
Principle of operation
Unlike a standard two-gang switch, the pass-through switch does not have an “on” and “off” position. Due to the different principle of operation of the mechanism, each key in it controls a changeover contact, that is, voltage is supplied to one outgoing contact and the power is simultaneously turned off from the other outgoing terminal. Two two-key devices control two different lamps/groups of luminaires from two different locations in the room.
The main feature of installing a pass-through switch with two keys is that one four-wire cable or two two-wire cables are laid between such switches. At the same time, it is enough to lay a two-core cable between single-key pass-through switches.
Drilling out socket boxes
Next begins the noisiest and dustiest part of electrical installation work - drilling and chipping.
In order to minimize the amount of dust, construction vacuum cleaners are used.
In addition, each tool in this case must have an outlet with a pipe or a dust removal device.
Small hammer drill, medium hammer, large hammer, wall chaser, all of these tools must have dust removal, otherwise your vacuum cleaner will be of no use.
First, the centers of the socket boxes are drilled out using a d-6mm drill. Then, based on the material of the walls, a tool is selected for arranging niches for socket boxes.
It could be:
medium hammer drill with diamond bit
large hammer drill with impact bit
wall chaser with a cut 60mm deep
How to install it yourself?
Installation requires strict adherence to several steps:
- markings;
- drilling a recess for the socket box;
- installation of the device;
- assembly.
Wall marking
Attention It is necessary to use a building level (up to 1 m long) to align the device strictly vertically and horizontally. This guarantees easy connection.
postpone
Drilling a hole
The deepening is done like this:
- You need to hold the drill perpendicular to the wall, drill to the depth of the socket with a margin of approximately 0.5 cm.
- Using a chisel and hammer, the middle part of the brickwork or concrete is removed.
- When installing in a sheet of drywall, use the appropriate nozzle.
- Drilling is performed similarly to concrete or brick surfaces, but the excess remains inside the crown. If there is no such tool, then a hole is cut in the plasterboard using a stationery or shoe knife.
2
Fixing a socket box in a concrete wall
- A box is inserted into the brickwork or concrete and fixed to alabaster or mortar.
- When mounting in a plasterboard sheet, you need to insert a socket box into the hole, and then tighten the screws that hold the sliding legs. It is necessary to tighten it with such strength that the fabric does not crumble and the device does not wobble.
Important Before installing the box in a niche, you must cut a hole in it for the wiring that will be connected to the terminals of the socket core.
- If it is alabaster, then it will take about 2-3 hours for the solution to harden.
- If there is a different type of mixture, drying will take longer.
Connection diagram
First determine the exact location and orientation of the triple socket block
- To fix triple sockets in the kitchen, you need to choose a place where several household appliances will be located - usually above the countertop, so as not to use tees or extension cords.
- If the installation is carried out in a room, install it closer to the TV or computer - so that the screen masks the structure.
- When installing in a kitchen or bathroom, where there will be high humidity and microclimate fluctuations, it must be mounted no closer than 0.6 m from the water source and no lower than 0.5 m from the floor. This will ensure the safety of the devices.
Installation steps - do everything in order
The double socket connection diagram consists of the following steps:
- A suitable place is selected on the wall. Typically the outlet is located near an electrical distribution box or a wire running in the wall.
- Its base is outlined with a pencil. At the marked place, using a hammer drill, make a recess sufficient to fit the inner housing (glass) of the socket.
- A hole is made in the glass through which the wires are brought out, and then it is fixed with cement or alabaster. The solution is given time to harden. You can also secure the glass using dowels, which will speed up installation time.
- The socket is unscrewed using a screwdriver. The outer panel is separated from the inner mechanism.
- The wires located in the glass (socket box) are shortened with pliers. Using a knife, the insulation is removed from each wire to a length of 0.8 to 1 centimeter. The edges of the cores are folded up for ease of assembly.
- The phase and neutral are attached to different terminals of the mechanism (side), and the grounding is strengthened in the central connector.
- Then the mechanism is secured in the glass with special screws (fastening). They are on the sides.
- The front panel is installed on top and clamped with screws.
- The machines are turned on, the socket is checked for operation. A simple table lamp is used as a testing device, and not some expensive household appliance like a TV or computer.
This completes the installation work. If the quality of the installation is in doubt, you should contact a professional electrician. He will inspect your work and make sure that operation will not lead to electric shock.
Serial connection of sockets
Installing and connecting sockets and switches with your own hands is a simple process that can be performed with certain knowledge. When installing electrical wiring in an apartment, you need to know what the socket connection diagram is.
In addition to installing simple single-phase electrical outlets with or without grounding, three-phase electrical outlets are required for individual electrical appliances operating on a 380-volt network. Currently, the most common are socket blocks of several units or a block of socket and switch.
All units of the socket group are connected only using a parallel connection; they cannot be connected in series in the block. Of the parallel connections, the most popular is connecting the socket with a cable.
Connection diagram for socket and switch: loop, series, parallel
Let's look at how to connect an outlet or a multi-unit unit. You can connect electrical outlets in parallel via a junction box or using terminals; this method is also called a daisy chain connection. When connecting electrical outlets with a cable, the cable is connected to the first unit of the block, and the cable for the next block is powered from the last.
For a daisy chain connection, mandatory independent disconnections of the socket are required. To do this, the conductors are connected to the neutral conductors through terminals or soldering. Zero and phase are connected to the first electrical outlet. A clamp is placed on the grounding wire, from which a grounding wire is supplied to each of the units.
To connect the second socket block, you need to connect the phase and working zero from the last unit of the first block, and the ground wire into the compressor.
Now let's look at connecting a conventional single-key switch. To do this, we connect the phase wire to the switch using a clamp marked with an English “L” or an “outward” arrow; connect the neutral wire to a clamp with an “inward” arrow or the letter “N”. We screw both wires securely. Since grounding is not used in switches, we cut off the excess wire and insulate it.
Another pressing question: “How to connect a switch from an outlet”? To do this, it is better to use a block consisting of an electrical outlet and one or more switches. A new cable is laid from the junction box. One core of the cable carries the phase to the switch, and the other leads the working “zero” to the socket. The remaining conductors pass to the lamps through switches. 3-wire wires (zero, ground and phase) are laid from the junction box to the lamps.
Options for arranging two outlets from one
Having decided to independently install an additional electrical outlet, you will need to learn how to correctly install a new outlet from an existing outlet and familiarize yourself with the recommendations and advice of experienced craftsmen.
If you do not have confidence in your own abilities, then it is better to invite an electrician who has considerable practical experience behind him.
When installing an additional outlet yourself, you have to decide what it will be like:
- a new point , a couple of meters away from the existing one;
- double model instead of single;
- a whole block of 3-6 points.
Depending on your individual needs, you should choose the most appropriate option. If there is simply not enough one more electrical point to turn on all the necessary devices, then it is more convenient and easier to install a dual model.
Even a beginner who has no experience or special knowledge of electrical installation work can implement such a solution. But if this is your first time connecting sockets, we recommend that you first study the following material, which provides step-by-step instructions on connecting electrical points.
The electric stove requires a separate power cable that can withstand a large load
When you move the sofa in the room and change the location of the TV, or buy a PC for older children, you can’t get by with a double socket. You will need to install an additional one or two new ones.
And if the power consumption needs are higher, but the thickness of the wire cross-section allows it, it is best to install a block with 4-6 slots. This solution can fit harmoniously into the interior without cluttering the walls with unnecessary details.
Main varieties
grounding
- C5 – standard, for Soviet-style plugs and without a ground wire. They are less common on sale, but can often be found in apartments where renovations were last done at least two decades ago.
- C6 are more modern, contain different types of grounding, and are equipped with wider holes for the plug pins. Available in a very wide range with the ability to choose a suitable design.
Depending on the modification of the outlet, the following categories are distinguished:
- with a circuit breaker that trips in response to overloads;
- without grounding or with it;
- overhead or built-in;
- external (external) with a protective cover;
- internal, designed specifically for connection when organizing hidden wiring.
Advice Triple sockets with a common socket are more compact, easier to install, but less safe and convenient to use.
Selecting the cable cross-section and connecting it
The cross-section of the cable cores is selected depending on the planned load (in kW) and the core material. It is not at all necessary to do all the wiring with a cable with the same core. You can save money without compromising safety. To do this, a cross-section is selected for each section depending on the power of the devices that will be connected here. Their power consumption is summed up, about 20% of the reserve is added, and the cross section is selected based on this value in the table.
Table for selecting electrical cable cross-section depending on the load
To connect the power supply in a wooden house, fire safety requirements are also added. The main thing is that the wire sheath must be non-flammable. Such wires have the letters “ng” in their names. To ensure the required degree of protection, double (VVG) or triple (NYM) cable insulation is also required.
To ensure that electrical wiring in a wooden house is done correctly with your own hands, it is best to use cables with multi-colored cores. Then you will definitely not confuse zero with phase or ground. Typically the colors are distributed like this:
- “earth” - yellow-green;
- "zero" - blue;
- “phase” – brown.
If you buy a cable made in Europe, the colors are different:
- “earth” - yellow-green;
- "zero" - white;
- "phase" - red.
New socket
First, a standard socket box is installed. It is always the key to a securely fixed socket. It is often also covered with alabaster or putty to increase the adhesion strength to the wall. Then all the cables are connected. The outer insulation is removed with a knife and a heel.
There is no need to leave too much wire. They have no purpose here. It will only interfere with the installation of the entire mechanism. The margin should not exceed 10 centimeters. If the wires were short, then they can be extended. Then strip the insulation from the conductive wires.
Double sockets with cover are no different from other versions. Only outwardly they look more aesthetically pleasing. Here the wires are connected in exactly the same way. The phase wire is always brown, the neutral wire is blue, the ground wire is green-yellow.
We unscrew the screws and install all the wiring in place, then tighten everything well. It makes no difference which terminal to install phase or zero on.
The most important thing is that they do not connect to the same contact. In this case, a short circuit may occur. The grounding connection is attached to the center contact, which is located on the bracket. Nearby you can see a grounding sign.
Connection diagram of switches to the network
Connection diagram for single-key light switch
Connection diagram for a two-key light switch. The black phase wiring is connected with a screw to the block terminal marked with the letter L (phase). The blue neutral wire connects to the terminal marked N. The cable should be screwed tightly, but not too tightly so as to break it.
Useful: Microwave motion sensor: circuit and connection to Arduino
Connecting the phase conductor to the switch
Screwing the phase conductor
Connecting the neutral conductor to the button
Typically, a grounding conductor is not required for mounting the switch, so its tip is insulated and inserted into a small clamp (or tightly wrapped with electrical tape using this method).
Insulated end of grounding conductor
Errors when wiring the socket
And although installing an additional outlet is a simple task, beginners often make mistakes. Such an unfortunate misunderstanding as incorrect installation of a new electrical point can result in major troubles.
Therefore, it is important to pay special attention to the most common mistakes and try to avoid them. First, you need to use a wire to connect the new outlet that is the same thickness as the existing one. Otherwise, there can be no question of correct operation
Otherwise, there can be no question of correct operation
First, you need to use a wire to connect the new outlet that is the same thickness as the existing one. Otherwise, there can be no question of correct operation.
Secondly, it is advisable to use wires from the same material - if the socket is powered by a copper wire, then the second one from it should also be connected using a copper wire of the same diameter.
Image gallery
Photo from
Screw terminal block
VAGO spring type terminal block
PPE cap for fastening the twist
VAGO splitter clamp
The third mistake made when connecting independently is violating the order of connecting the wires. To prevent this from happening, you need to clearly understand the purpose of each and correctly determine the place of its attachment.
For convenience, it is advisable to look at the old one by disassembling it before purchasing a new outlet. This is done strictly after turning off the power supply.
You should pay attention to the presence of a grounding wire - if there is none, which is often found in Khrushchev-era buildings and other old buildings, then it is better to take the wire for the new outlet without ground. How to proceed if you connect a grounded socket is written here
The fourth mistake is an incorrect or insufficiently strong connection of the wires to the working mechanism of the socket. Here, without experience, it is quite difficult to find a balance.
Therefore, in order to minimize the amount of work ahead, it is advisable to conduct a rehearsal for connecting the wires on a spare section of wires. You can use a light bulb to check the quality of the bond.
You can choose the most convenient option for fastening the wires together - you need to buy original terminal blocks or other products, fearing counterfeits
The fifth mistake was when the wire was run diagonally. This is unacceptable, and it is prohibited by electrical wiring standards - the wire should be laid vertically. Although home craftsmen are not yet capable of this.
You should not do this - if cosmetic repairs are carried out in a couple of years, then finding the exact location of the wire will be extremely problematic and it can be accidentally damaged.
The wires in the contact of the working mechanism should also be secured efficiently. You will need a screwdriver for this.
The sixth mistake, or rather, a nuisance, is an unsuccessfully chosen design of the decorative overlay of the socket. This point will not affect the performance of the mechanism in any way - it will only be conspicuous, standing out from the general design concept of the room.
To avoid such dissonance, you should select in advance the most suitable model that can harmoniously fit into the existing style composition.
It is now easy to choose a socket model that is suitable in color and shape - manufacturers are vying with each other to offer the most sophisticated options
It is important that the product does not turn out to be a fake. Knowing the main problem areas of the upcoming work on installing an additional outlet, it will be easier to avoid common mistakes
Of course, these nuances do not concern the work of professional electricians - the experts will do everything right the first time
Knowing the main problem areas of the upcoming work on installing an additional outlet, it will be easier to avoid common mistakes. Of course, these nuances do not concern the work of professional electricians - the experts will do everything right the first time.
Should I wire the socket from the socket or not?
The option of installing an additional outlet will help get rid of quarrels between family members who require electrical points to turn on various household appliances.
This problem arises especially acutely in the kitchen with the purchase of new equipment - a blender, mini-processor, yogurt maker, bread maker, multicooker and other appliances.
It turns out that the existing sockets can no longer cope with their responsibilities - their number is physically insufficient to meet the needs of all households. On our website there is a whole article dedicated to the selection and placement of kitchen outlets.
Therefore, it would be advisable to decide to install an additional outlet from an existing one.
A technically equipped kitchen needs a sufficient number of electrical connection points. This should be remembered at the stage of drawing up an interior design project for the future premises.
But here you may encounter a real problem - it is not always possible to complete such a task. There are a number of restrictions when it is categorically impossible to carry out such a modernization of the existing electrical network:
- if you need an outlet for an electric stove;
- when you decided to connect a boiler with the washing machine;
- if the total power of the devices is more than 2.2 kW.
In houses or apartments where the owners purchased a new electric stove to replace the old gas stove, a new outlet will be required to connect it. In such a situation, it is impossible to wire another one from a regular outlet to turn on this powerful device.
Here you will need to install a separate branch from the distribution box, or even better, from the panel. Yes, and a residual current device for powerful equipment needs to be installed. In order to learn about the rules for connecting an outlet for an electric stove, we recommend reading this material.
Another unfortunate example is when the bathroom only has an outlet for the washing machine. But over time we purchased a boiler. Read on to learn how to properly position and connect sockets in the bathroom.
These devices cannot be plugged into one double socket at the same time - the wiring may burn out. It will always be problematic to control the order in which the boiler and washing machine are turned on.
The result of a network overvoltage can be disastrous - it’s good when the problem was discovered in time or the circuit breaker tripped and a fire was avoided
It is also necessary, even before starting work on installing another outlet, to calculate the expected power of the devices that will simultaneously be included in the new block of outlets.
Often they plan to upgrade the connection point to the electrical network, which is fed by a wire with a cross-section of 1.5-2.5 mm2. Therefore, the total power of the devices can be slightly more than 2 kW.
You cannot turn on a dishwasher, an oven and a heater, or a boiler and a washing machine at the same time in such neighboring sockets, powered from one core.
How to properly connect a double socket
When doing a major renovation, people often start with the wiring. With a large number of electrical appliances, the question often arises - how to connect a double outlet to create more comfortable conditions. Their installation helps to avoid unnecessary communications, as well as additional sources, connections: tees, extension cords and carriers.
It often happens that connecting a double socket can cause some difficulties. This happens when there are no minimum skills or mistakes made in a hurry. To prevent this from happening, you need to prepare everything in advance and make sure that all the parts are available and that the outlet itself is in working order. In addition, there are many nuances that can affect a malfunction or short service life.
How to steal electricity through grounding. How to steal electricity from an apartment
In Russia, illegal connection to the power grid is quite common, through which electricity is stolen. Electricity is stolen from private and apartment buildings. There are several ways to steal electricity from the network.
Methods of theft:
- Remake the counter;
- Affect the operation of the meter.
With certain skills and knowledge of the design and operation of meters, you can remake them in such a way that they begin to count electricity by 30 - 50% less. For this purpose, these devices are equipped with additional elements.
For example, if the meter is electronic, additional transistors and electronic devices are soldered into its circuit, with the help of which the meter is remotely controlled.
If the device is mechanical, then in this case, the operation of its mechanical parts is changed. For example, they reduce the number of teeth on a gear.
Note! You are responsible for illegal connection to the power grid. If electricians discover an illegal connection to the electrical network, then a huge fine will be imposed on the consumer.
There are several ways to influence the operation of the meter. But in most cases, you will need access to the electrical elements of the device. In older models, it was possible to change the polarity of the connection, due to which the counter began to spin in the opposite direction.
To bypass the meter, some craftsmen will shorten the phase input and output of the meter with a jumper. Thus, the phase bypasses the counting mechanism of the device.
Older models of devices were stopped mechanically, using various wires or plates.
You can influence the operation of the meter using a powerful magnet. But it is worth noting that modern models are equipped with additional protection.
Security and Tools
- Laying the cable and installing the power point is carried out after the machine or plugs are completely turned off. Using the indicator, make sure that the device is de-energized. It is better to use two indicators at once to guarantee verification results and to avoid undesirable consequences.
- The condition of the distribution box to which the source socket is connected and the power point itself are taken into account. Damaged copies are not used for work.
- The wall where the wiring is already installed is not chiseled, drilled, or cut.
- It is forbidden to cut live wires with wire cutters.
- Any contact between the screwdriver and the phase or neutral cable leads to a short circuit in the network.
- Sockets are installed at a height of 0.5-1 m from the floor, but not lower than 30 cm from the baseboard, placing one point for every 6-10 square meters of the room.
- Calculate the power of connected devices by adding them together. The result is compared with the total network throughput.
Attention: Do-it-yourself installation of wiring and a network socket is carried out provided that the installation and configuration of the distribution panel in the house or apartment was carried out by a professional. Connection without special education is dangerous to life
To add an outlet you will need
- marker;
- ruler;
- level;
- pliers;
- screwdrivers, one of which has a current indicator.
how to install a socket in drywall To cover the gap between the wall and the box you will need
- narrow spatula;
- container for construction mixture;
- primer.
Open and closed wiring
The difference between the methods is noticeable to the naked eye. The closed wiring is located inside the wall, for which grooves (grooves) are punched or cut into it, in which the connecting wire is hidden under a layer of putty. Open wiring is laid along the surface of the wall, on which it is held in special fasteners or laid in plastic guides - cable channels.
Accordingly, if you can see the wires that fit into the outlet, then the wiring is of an open type. Otherwise, closed wiring is used, for the installation of which the walls were cut.
These two methods of connecting an outlet can be combined with each other - if the old points are connected in a closed way, then nothing prevents you from connecting a new one in an open way. There is only one choice - in wooden houses the socket can be connected exclusively in an open way, just like all other electrical wiring.
Advantages:
- You don't have to cut the wall to install a new outlet. This is especially true for those premises that have already been renovated.
- Installation does not require tools such as a wall chaser or a hammer drill.
- In the event of a breakdown, you don’t have to open the wall - all the wiring is in front of your eyes.
- Installation speed. Even after all the work has been completed, adding another point to the existing wiring is a matter of several minutes.
- If desired, you can quickly completely change the wiring - ideal for temporary connection schemes.
Flaws:
- There is a high probability of external influence on the wiring - children, pets, you can simply accidentally hook it. This disadvantage is mitigated by laying wires in cable channels.
- Exposed wires spoil the entire interior of the room. True, it all depends on the design abilities of the owner of the room - cable channels will fit perfectly into modern design solutions, and if the room is made in a retro style, then special wires and other accessories are produced for this.
- The need to purchase special fasteners, even if cable ducts are not used - in wooden houses, open wiring should be laid at a distance of 0.5-1 cm from the wall surface. Wires are often laid inside iron pipes - all these requirements are aimed at increasing the safety of using open electrical wiring.
Despite some significant disadvantages, it is used almost everywhere - the advantages of its use still outweigh.
Advantages:
- The wires to the socket fit into the wall, so wallpaper or other finishing can be done freely on the outside.
- Meets all fire safety requirements (in concrete buildings) - even if a short circuit occurs, there is no fear of a fire from the wires in the wall.
- There is a very low probability of damage to the wiring - it can only be damaged when drilling walls.
Read more: How many amperes are in an outlet?
Flaws:
- For installation you need to cut the walls.
- It is difficult to carry out repair work.
- If the walls are finished, then after installing an additional outlet you will have to redo it.
Connection materials
The wire for connecting the electrical point must be made of the same metal as the main cable. For example, when using an aluminum cable, the jumper must also be made of aluminum.
To ensure an even distribution of incoming electricity, the cable used for connection must have the same cross-section as the main wiring in the room
To install a double socket you also need:
- flat and Phillips screwdrivers;
- braid stripping tool;
- pliers;
- insulating tape.
For safety reasons in case of fire, it is recommended that any electrical wires be laid in corrugation. This solution is also convenient because it does not require breaking through the wall, and also simplifies the replacement of damaged wires during subsequent operation.
Necessary equipment
Socket
It is best to choose new samples. Namely European production. In them, the forks are held more firmly, and the structure itself is very stable. Devices made in Russia are also of good quality.
It should be noted that if the apartment has old Soviet-style sockets, then replacement must be carried out. Such equipment can fail at any time.
Socket box
As a rule, they have a standard diameter of 7 cm. Larger options are also available, but they are required for old-style sockets. Therefore, if drilling the wall is not included in the plans for repairing the socket, you need to measure the hole before purchasing the socket box.
The material used for using this electrical equipment varies. Is it plastic or metal. If the wall is concrete, brick or any other non-combustible material, then you can safely install metal socket boxes. Wood, plywood or plasterboard are very fragile. Therefore, to install an outlet in such rooms, you need to use a plastic base.
Screwdriver
Basic equipment for installation and dismantling. All sockets are attached with bolts and screws, which is why it is impossible to imagine such a repair without a screwdriver.
Insulating tape
Used as wire insulation to eliminate the risk of electric shock. Required for extending old wires.
Voltage indicator
It is necessary to check whether there is voltage left in the circuit. Both contacts need to be checked. If the indicator has not changed, then you can safely get to work.
Gloves
Both fabric and rubber samples are used. In the case where there is absolutely no voltage, you can use the first option. Rubber gloves are used if there is no voltage indicator available, because rubber practically does not conduct electric current. It is inconvenient to work in them.