Electrician in the house
Encyclopedia about electricity from A to Z
Masters catalog
Find the best master or company in your city
How to insulate the wire: heat shrink tubes
How to insulate the wires? This question inevitably came before each of us, regardless of whether we are connected with energy or not. Someone's extension cord was frayed, someone unsuccessfully drove a nail into the wall, someone's wire simply broke along the insulation. Any of these injuries requires immediate attention, as delay can be very costly.
Damaged wiring can lead to electric shock, sometimes even fatal, and short circuits in wiring are statistically the cause of more than 90% of fires in our country. So let's look at this issue.
- Products intended for wire insulation
- Types of damage and methods for eliminating them Abrasion of the main insulation of the wire
- Mechanical damage to the wire
What kind of varnish can you use to insulate wires?
About 95% of all enamel-insulated wires are produced using synthetic varnishes that form high-strength enamel coatings. The most common varnish in the manufacture of wires is Viniflex varnish (VL-931).
Interesting materials:
How to chop greens? How do chickens sleep? How to like a comment on YouTube? How to easily and simply knit a snood? How to easily unscrew the nut on an angle grinder? How easy is it to win at being a fool? How did Lermontov get to the Caucasus? How to lie in an MRI? How to catch a ruff on a donka? How to catch rudd in spring?
Types of damage and ways to eliminate them
Well, now let's figure out what you can use to insulate wires, and in what situations to use this or that material. To do this, let's look at the most common types of damage to wire insulation.
Abrasion of the main wire insulation
One of the most common problems with wire insulation is various abrasions, breaks, and even biting by pets. Let's figure out how to act in each of these situations.
We repair extension cords
- Let's start with the most common problem that can often be found with extension cords. Due to long-term use and frequent movement, abrasions occur on the insulation.
- Extension cords are typically double insulated, and minor fraying of the outer sheath is not a big deal. But if the outer shell is even completely worn out in some places, urgent measures need to be taken.
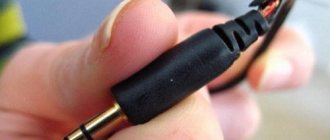
- If the damage to the shell is local, then heat shrink should be used to cover the damage site. You can also use electrical tape, but this option is less aesthetically attractive.
Note! If there are abrasions on the wire along its entire length, then we advise you not to engage in “patching holes”, but to replace the wire completely. As a last resort, you can use heat shrink along the entire length of the wire. Although the price of this action is unlikely to be cheaper than completely replacing the wire.
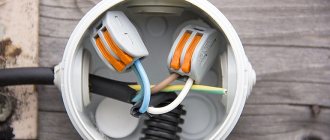
We put heat shrink on the wire
- A common problem is broken insulation at the connection points of a plug or switch. Often this is again additional insulation, but its damage indicates that the main insulation is now subject to increased wear. And it is quite possible that the next time you plug the plug into the socket, it will “short” right in your hands.
Changing the plug on the wire
- To eliminate this possibility, it is necessary to either replace the plug or switch, or carefully insulate the damaged area with electrical tape. Moreover, make the number of layers that will transfer the bend of the wire to an undamaged area, as in the video. Heat shrinkage will not achieve this effect.
The cat chews the wire
- If a pet has worked on the wire, then before insulating it, you should check its functionality. In this case, you need to bend it and tug it to make sure that the conductor itself is not damaged. Although in an ideal case, you need to take a multimeter and check the integrity of the circuit.
- If the conductor is intact, then inspect the wire itself. If the damage is visible only on the additional insulation, then you are incredibly lucky and you can simply use heat shrink to cover the damage.
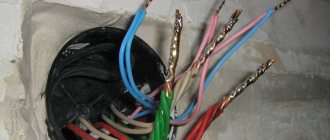
Damage for which each wire should be insulated separately
- When copper is clearly visible in places of damage and not only the additional, but also the main insulation is damaged, then the situation is much worse. If there is a lot of such damage, it is easier to replace the wire. One or two such damage can be insulated with your own hands.
- To do this, remove a layer of additional insulation from the damaged area. Using tape, we insulate the main shell of each core separately. After this, using heat shrink, we form a layer of additional insulation around the damaged conductors.
Mechanical damage to the wire
But sometimes conductor defects can be more significant - burning at the connection points, mechanical damage as a result of external influences or a short circuit, and even melting due to overheating of the wire. All this requires emergency intervention.
Burnt out socket
- Let's start with the option when your socket burns out, which leads to charring of the ends of the wire. In case of any, even slight heating and damage to the socket, you should check the quality of the connection of the wire to its terminals. And even if they are well pressed with screws, this is not an indicator of high-quality contact. You should always disassemble it and inspect the connection point.
Always check the quality of fastening of the wires to the outlet
- As for wires, it is better to use heat shrink to insulate them. Moreover, the burnt insulation must be completely removed from the wire. But sometimes, as a result of heating, the wires themselves are damaged, and what remains suitable for further use is not enough to reconnect. In this case, the wire should be extended.
- Extension can be done by soldering or by using a screw terminal. Insulating PPE caps for twisting wires are not suitable here, because using them can damage the wire, which is already not in the best condition.
- Another scenario could be damage to the wiring, either due to a short circuit or due to mechanical damage to the wire. For example, you decided to hang a picture, and according to the law of meanness, you hit the wire with a puncher.
Disconnect the wire to the fault location in the junction box
- No matter how much we would like it, we cannot leave everything as it is. Even if you are ready to do without the electrical point to which the wire went. After all, the conductor is damaged, and any overvoltage, water ingress or just time can lead to a short circuit. And this, in turn, leads to a short circuit.
- If you decide to do without this electrical point, then in the junction box you should disconnect the wire feeding it. If you still intend to carry out repairs, then there is no way to do without expanding the place of damage in the wall. We need to release at least 1-2 cm of wire on each side of the damage site.
- These two pieces can only be connected using the extension method. Therefore, we again have to remember the method of soldering wires. If other methods of connecting wires are used, this will require the release of significantly larger amounts of wire on both sides. It is best to insulate the damaged area using heat shrink.
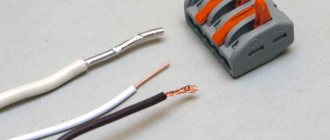
Sleeves for pressing wires with insulation
- Although in some cases it is possible to use compression sleeves and the pressing method. Moreover, to minimize subsequent operations, insulated sleeves can be used.
- After the connection is made, you can additionally insulate the wires with sealant. They can also hide the place of damage in the wall. It will provide waterproofing of the wire in case of moisture penetration.
Note! Not just any sealant is suitable for insulating wires. After all, it must not only not allow water to pass through, but also have stable dielectric properties. Therefore, the possibility of using it as a dielectric should be checked according to the product data sheet.
The photo shows a wire with melted insulation
- Well, the last issue we will consider is damage to the insulation due to heating. This is possible when the temperature of the conductor rose above permissible limits, but the insulation survived and only deformed.
- Typically, such deformations occur over significant lengths of wire, and the best way to get rid of it is to replace the wire. But it is worth getting rid of such a wire, since overheating of the insulation negatively affects its insulating properties. As a last resort, heat shrink can be used to isolate damaged areas.
Preparation of the treated surface
Not only the service life, but also the safety of operation depends on the quality of preparatory measures at the site where the insulating layer will be applied to the conductor. To remove damaged insulation, it is better to use a specialized tool. This will prevent damage to the protective varnish and the surface of the conductor itself, but its cost is quite high. It is not advisable to purchase such a tool for one-time work.
The following are the most affordable methods for stripping insulation at home:
- It is recommended to use a soldering iron to clean the protective coating of old wiring. After warming up the tool, the required surface is heated until the insulating shell melts. Later it is removed using gloves.
- Removing insulation using a knife with a sharp blade (a stationery knife is recommended). The knife must be held parallel to the current-carrying conductors, preventing it from being raised to a vertical position. After making a longitudinal hole, the insulation is carefully removed and cut off.
Stripping wires from insulation
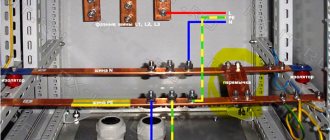
General understanding of insulation resistance
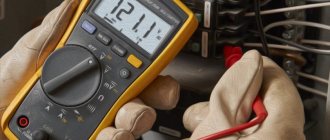
The determining indicator that influences the formation of leakage currents and the formation of single-phase or phase-to-phase short circuits of conductors is the insulation resistance. It shows how insulated the conductor is from the ground and neighboring conductors.
Depending on the brand of cable used, standard resistance values are provided. They may vary based on specific climatic conditions. A megger is used to record the readings. In order to identify weak points, the specified value is periodically monitored. The timing of the inspection is established in accordance with the PUE. Extraordinary insulation tests are carried out in the following cases:
- during commissioning;
- after repair work;
- in case of contact with the protective layer of water or when it overheats.
Measuring insulation resistance
For high-quality formation of a protective coating of current-carrying conductors, it is recommended to use appropriate types of insulating material. In this case, be sure to follow safety regulations. For short-term insulation of conductors, you can use tape.
Liquid insulation coating
Liquid insulation for wires is used to restore the protective layer of conductors that are operated in conditions of high humidity or in direct contact with water. Polyurethane compound is used as an insulating material. It is poured into a pre-prepared coupling through a special bandage. In this case, rubber seals are installed at the ends of the coupling.
Liquid electrical insulation for wires
Precautionary measures
Before you begin insulating the wires of the electrical network and household appliances, you must make sure that the network is de-energized. It is recommended to turn off the voltage using a special circuit breaker. Next, use a flat screwdriver with an indicator to check the presence of voltage at the output - the place where the work will be carried out.
Schematic electrical diagrams, connecting devices and pinouts of connectors
In electrical engineering, it is often necessary to mark or insulate a piece of cable, various types of cable connectors, strengthen wire connections, protect elements from moisture, and so on. This is a simple matter. All you need to do is have some insulating tape, wrap it in the right place and you're done. But as usually happens, you have to write about such simple things in great detail, since both beginners and fairly experienced electricians make a lot of mistakes.
This article will look at two methods of insulating wires using vinyl insulating tape and heat shrink tubing. You will learn how to do it right and wrong, what tools are needed and some “company secrets”.
Video
The procedure for applying the protective layer of electrical tape depends on the type of surface being treated. If you plan to insulate the junction of two conductive wires, it is recommended to adhere to the following sequence:
- Twist and solder.
- The electrical tape is applied at an angle, catching a small portion of the main insulation towards the end of the twist.
- At the next stage, you will need to carefully bend the twist so that it is parallel to the main protective coating.
- Another layer of electrical tape is applied, but this time towards the factory insulation.
- The applied electrical tape is pressed with hand force and the excess material is cut off.
To restore the protective coating on a solid conductor, it is recommended to perform the following steps:
- The tape is laid at an angle, capturing part of the main insulation towards another undamaged area.
- Next, the insulating material is applied in the opposite direction.
- The electrical tape is carefully pressed with your hands, followed by removal of excess material.
Expert opinion
It-Technology, Electrical power and electronics specialist
Ask questions to the “Specialist for modernization of energy generation systems”
How to insulate wires - how to properly insulate the wires yourself We’ve sorted out the properties of rag and plastic insulating tape, now let’s discuss which is better to use for insulating wires in home electrical wiring: rag or plastic. Ask, I'm in touch!
Wire insulation - selection of materials and procedure
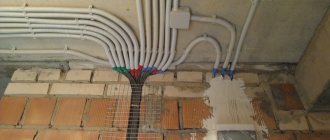
When installing electrical wiring, it is important to know how to properly insulate the wires. Some shells are created temporarily. For example, during installation of a chandelier, zero and phase are output, the ends are wrapped with electrical tape for safety purposes
There are times when durable cable insulation is needed. Then they do without electrical tape - use more reliable materials
For example, during the installation of a chandelier, zero and phase are output, the ends are wrapped with electrical tape for safety purposes. There are times when durable cable insulation is needed. Then they do without electrical tape and use more reliable materials.
The main thing is safety
Before insulating the wire, you need to make sure that all safety regulations are followed:
Cables laid underground or outdoors must be solid - connections are allowed only in sealed junction boxes.
Materials
Today, the following types of cable insulation can be distinguished:
Insulation for wires and cables is selected depending on the location and purpose of its use. Is it possible to insulate wires with tape? No - this material is not intended for such purposes.
Choosing heat shrink
Everything is clear with electrical tape - there are two types of products made from different materials. You just need to decide on the color. And heat-shrinkable tubes are a relatively new product for our market. Therefore, you need to know how to choose the right electrical insulating material and how to use it.
The main parameter is the dimensions before and after compression. Manufacturers indicate them in two ways:
The main thing is that after compression the tube is smaller than the diameter of the wire. Then it will be possible to create a tight connection.
Other parameters HERE:
Procedure for working with different materials
How to insulate wires with electrical tape:
It is unknown how long a wire insulated in this way will last. It is better to use more reliable methods of protection.
I insulate the wire using heat shrink:
The procedure for forming an insulating coating using heat shrinkage
The process of installing a thermal tube begins by putting it on one of the ends of the wires being connected. Only after this they are twisted. It is recommended to select the size of the heat shrink so that approximately one centimeter of the main insulation is covered.
Subsequently, the insulating tube is pulled over the connected area and heated. To do this, you can use a hair dryer or a lighter. It is recommended to heat from the edges to the center.
Note! The heat shrink should not be allowed to overheat, otherwise it will lose its insulating properties.