Chasing load-bearing walls for wiring is now popular among construction crews for the simple reason that they manage to earn good money with professional tools from this labor-intensive and very dusty operation.
Apartment owners are interested in the beautiful design of their premises. But they do not always realize the risks and problems that are created by illiterately cut building elements during the redevelopment of premises.
The article analyzes methods for safely making grooves in walls for electrical mains based on current building regulations.
Is it possible to make grooves in floor slabs?
groove floor slabs
Absolutely forbidden!
Interesting materials:
Which welding machine to choose for your home? Which TV to choose for a small room? What thickness of electrode should I choose for welding? What thickness of corrugated sheet should I choose for the fence? What thickness should I choose for drywall? Which iPhone color should a girl choose? What color of sofa should I choose with beige wallpaper? What color of sofa should I choose to go with gray wallpaper? What color of sofa should I choose for a bright room? What color of facades should I choose for a small kitchen?
CS-CS.Net: Laboratory of the Electroshaman
Collapse of house floors
Now I will try once again to touch upon one burning topic, to which quite a few pages have already been devoted to “our” IISS forum. The more I work with electricians or respond to this forum, the more my collection expands and is replenished with all sorts of hellish perversions and the results of the work of jamshuts, chureks and even Russian-speaking brigades, which act on the principle “except for scrap - no reception”, destroying and breaking like a brand new new building , and panel houses that have stood for 30 years. Yes Yes! Today I will talk specifically about them, because as practice has shown, this topic is not particularly covered on the Internet. To put it very briefly, I would like to show what the one who starts renovations in panel houses “ends up with.”
First, let me remind you that it would be quite a good idea to
Preparing the wall surface
The base must be level and clean. It should not contain greasy stains or dust. It is best to clean the walls with a slightly damp brush, which will remove most of the dirt. Try to limit the use of chemicals to a minimum, only for removing greasy stains.
Then the wall should be well primed over the entire surface. However, it is not necessary to use expensive primers. Typical popular primers are quite suitable.
Many manufacturers offer primers designed for a specific type of wall (brick, concrete, blocks, etc.). Regardless of the type, it must be remembered that the purpose of using a primer is to equalize the absorbency of the wall over the entire surface and improve the ability to bind it to the adhesive solution.
What does the law say?
Moscow Government Decree No. 508-PP dated October 25, 2011 “On the organization of reconstruction and (or) redevelopment of residential and non-residential premises in apartment buildings” in paragraph 11.12 states:
{It is not allowed} to install grooves in horizontal seams and under internal wall panels, as well as in wall panels and floor slabs for placing electrical wiring and piping (in apartment buildings of standard series).
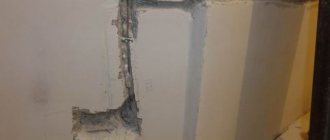
This wording makes it clear that it is impossible to tap load-bearing walls and floor slabs for wiring. It is possible to lay the cable in grooves made in partitions that do not play a load-bearing role. You can also install routes on the floor or ceiling.
What consequences do you face for violating the law? In Article 29 of the “Housing Code of the Russian Federation” in paragraph 3 everything is clearly stated:
The owner of a premises in an apartment building that has been unauthorizedly reorganized and (or) redesigned, or a tenant of residential premises under a social tenancy agreement, a rental agreement for residential premises of a social housing stock, which has been unauthorizedly reorganized and (or) redesigned, is obliged to bring such premises into the previous state within a reasonable time and in the manner established by the body carrying out the approval.
Grooving load-bearing walls is considered as a “redevelopment” or “reconstruction” of a room, so the grooves will have to be sealed (without the cable placed in it) and put everything in proper condition. It is also worth noting that a complaint to the housing inspectorate can easily be filed by a neighbor, whom you will probably “annoy” with your noise.
Installing a socket in a concrete wall, a hole for a socket in concrete
Installing a socket in a concrete wall is a difficult and responsible job that requires maximum attention and certain knowledge. You need to take safety precautions especially seriously.
Installation of sockets, depending on the method of laying the wires, can be external or internal. The external type of installation is almost never used today due to its unaesthetic appearance and reduced level of safety. The external method involves placing the wiring directly on the surface. In some situations, external wiring is disguised in some kind of protective frame.
Preparation stage
Before you begin installing sockets in concrete, you need to decide on the installation location, as well as prepare the tools and materials that will be needed during the work. When installing sockets in residential premises, it is worth remembering two main factors:
When laying electrical wiring, you need to remember some rules:
Before starting work, you need to prepare a workplace, as well as tools that will be useful during installation.
After mastering some rules and preparing the instrument, we proceed to the next step.
Marking
The center of the future outlet is marked as a marking on the concrete plane. If a block consisting of several sockets is mounted, then the center of each element is marked.
To maintain the evenness of the marking axis, it is better to use a ruler or a flat level, and then mark the center point of each socket. In this case, the center of the first rosette is marked and the standard center distance (7.1 cm) is marked from it.
Making holes on a concrete wall
This stage is the most difficult and painstaking, especially if the concrete wall is strong and difficult to drill. There are several ways to drill holes for a socket, depending on the availability of the appropriate tool.
You should not focus too much on the clear round shape of the hole. It’s okay if the installation space is a little square, because the rest of the space will in any case be covered with a special solution for a strong and reliable fixation of the socket box.
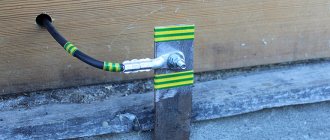
It is important to note that when installing a block of several sockets, it is necessary to drill grooves between them to lay the wiring that will connect all the elements.
Installation of a socket box
One of the simplest steps is installing socket boxes in concrete. This process is simple, but you need to remember that the upper edges of the plastic socket box must be flush with the surface of the concrete wall. It is unacceptable for it to protrude or fall to some distance.
Before installing the mechanism, you need to prepare the hole. To do this, prepare a gypsum or cement mortar and apply it to the inside of the hole. The layer should not be applied very thick, but only so that the socket box is securely fixed in the hole. All the necessary wiring is threaded into the socket box and brought out. After this, it is mounted into the concrete wall and adjusted flush with the plane.
It is advisable to remove the remains of cement or gypsum mortar that come out of the socket box during installation not immediately, but after partial drying (4-5 minutes) for a more reliable and durable fixation of the structure. We trim the remaining mortar with a spatula, and also cover up all the remaining unevenness and voids between the frame and the wall. The process of complete drying of the solution will take from 1 to 24 hours, depending on the type of solution and its quantity.
Connecting electrical wiring
This procedure is not complicated, because you just need to connect a couple of wires, but the main thing here is not to make mistakes.
The first step is to turn off the electricity in the entire room for safety. We take an indicator screwdriver and touch each wire to make sure that the wires are de-energized and do not pose a threat.
Next, remove approximately 2-3 centimeters of insulating winding from the ends of the wire. After this, the exposed area is bent into a ring, and in the case of a stranded wire, it must be divided into two parts so that it acquires a V-shape. The exposed core of the wire needs to be slightly flattened with pliers to increase the contact area with the terminal.
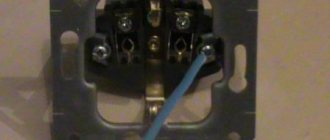
There are only three terminals on the socket itself: two conductive and one grounding. The wires in all three terminals are clamped with bolts. When using wiring with standard color markings, you need to connect the yellow-green wire to the ground terminal, the blue wire is connected to zero, and the remaining wire to phase. It is quite difficult to confuse the connection sequence, because there are not many options, but still, you need to be careful.
bus schedule 5 dacha Zhigulevsk
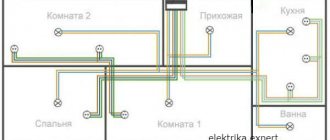
The unit is connected using a solid cable or a star. The first option involves moving contacts from one socket directly to the next element. The star method involves laying a wire from each socket to a common point, and then connecting phase to phase, and zero to zero. It is worth noting an important point that the rules for electrical installations strictly prohibit the installation of grounding with a loop. In this way, only phase and neutral can be connected, and grounding must be connected using the star method.
Completion of work
When the wiring is already firmly positioned in the contacts and securely screwed in, the socket itself is inserted into the socket box. The wires are laid so that they are parallel to the back wall, after which the entire structure is pushed into the hole.
Fixation of the internal mechanism is carried out thanks to the spacer legs. In order for them to move apart and fix the entire structure, you need to tighten the bolts located on the front part in a clockwise direction. To loosen the mechanism, the bolts are rotated counterclockwise. If the legs interfere with the installation of the structure, then they can be slightly tightened with a regular rubber band or thread.
The final step is to install the socket face. They come in a wide variety of types, but they all have holes for fastening, located in the center. Just install the outer frame and tighten 1-2 bolts. After all the above steps, turn on the electricity at the site and check that the outlet is working correctly.
Installing sockets in concrete is possible on your own, but to do this you need to have at least basic skills and follow safety precautions.