- home
- Construction and renovation
- Electrics
>
>
⬎
Socket boxes are required in almost all places where electrical appliances are installed. The final appearance of the installed sockets, switches and other installation products depends on how smoothly one or more socket boxes are installed. Of course, the evenness of the installation of the socket box does not 100% decide the final result - a socket or switch can be perfectly screwed even into a crookedly “grown” socket box. However, this does not mean that you can be irresponsible about “smearing” round installation boxes
(this is the official name for socket boxes).
A crookedly installed socket box can cause a lot of suffering during the final installation of installation products. Therefore, smooth installation of installation boxes is strongly recommended.
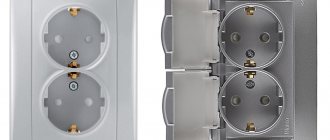
By the way, socket boxes do not always have a round shape - there are square installation boxes designed for four modules, two in a row. And in general, there are rectangular models that, according to their purpose, replace several single socket boxes in a row. However, the most common are the round ones, so we will focus on them.
At first glance, installing a socket box in a concrete wall seems simple. In principle, this is true; anyone can “smear” the installation box. The only point that many people have difficulty with is the evenness of installation, especially of several combined socket boxes.
The method that I want to describe is far from new. These few additional operations will allow you to efficiently install several socket boxes in a row in any walls - concrete, brick, aerated concrete.
The first stage is marking
, you need to mark the horizontal and vertical axes of each socket. When installing several boxes in a row, you need to maintain the correct distance between them so that future outlet or other modules are installed correctly. The optimal distance between axes (centers) is considered to be 71 mm, however, there are products whose connecting elements contain a distance of 70-72 mm. When installing 2-3 socket boxes, this does not matter much, but for 5 boxes in a row, every millimeter is important.
Before installing 5 points in a row (vertical or horizontal), you should clarify the specific size of the installed electric points of a particular series. The best way is to assemble the socket boxes on the table in a row using connectors (usually included with the boxes) and screw all 5 sockets (or switches). Then you will know whether the axle size is correct or not. Often, 5 socket boxes in a row may not correspond to the size of five sockets. If there is no opportunity to try on the sockets, a distance of 71 mm is maintained between the axes.
If the outer width of the box is 70 mm. (with a front border) - such socket boxes can be installed without problems with a distance between the axes of 71 mm. If the width is 72 mm, then it will be difficult to “narrow” the axes of the boxes. For 2-3 modules in a row, you can maintain a distance of 72 mm, but for 5 in a row it is better to choose other products.
So, the axes are marked - socket boxes can be mounted in both vertical and horizontal rows. But some series of rosettes are not designed to form vertical rows (rare, but it happens), so you need to clarify this point.
The second stage is the selection of holes
for installation. In concrete, this can be done with a diamond bit for a high-speed drill or grinder. An easier way is to drill holes in a circle with a small drill and knock out the middle with a hammer drill. The optimal hole diameter is 75 mm. - then any socket box will fit in freely and there will be a gap for putty. The depth of the hole is about 50-60 mm, the box must fit completely into the wall. A cleanly installed socket box should be flush with the final putty of the walls or slightly recessed relative to the plane of the wall.
For brick, plaster and other softer walls (relative to concrete), a hammer drill bit is suitable. This crown can also drill concrete walls, but then its service life is greatly shortened. In brick walls it is drilled with impact, in foam concrete and plaster - in drilling mode without impact.
When the hole is made, a socket box (or a group of socket boxes) is fitted into it; if everything fits in without problems, it is swept and primed.
The next stage is creating a pattern
. Many installation boxes are equipped with connecting elements for combining into groups. Connectors can be structurally part of the socket box or equipped with a separate part. In our installation method, connectors are completely unimportant, they may not exist at all. The role of a reference template that maintains the required distances between the mounting screws is played by a homemade pattern.
Any piece of profile, for example PN27X28, is suitable for making patterns. Holes for the fastening screws of each socket box are marked and drilled in the profile, so that there is a distance of 71 mm between the left screws of the first and second boxes (and all subsequent ones). Well, the distance between the screws in one box is 60 mm.
The pattern profile must be longer than the entire group of socket boxes so that there is room to attach to the wall. For this, holes are also drilled in the profile. Next, all the boxes are screwed into the pattern from the flat side; for this, screws are used that come with the socket boxes.
The assembled structure is tried on in a pre-prepared recess. Nothing should prevent the profile from fitting tightly to the plane of the wall.
Well, the final operation is smearing
. A wide range of materials is suitable for fixing socket boxes in concrete, aerated concrete and brick. This can be a gypsum mixture: alabaster, thick fugen, rotband or goldband and others. Cement mixtures, including tile adhesive, are also quite suitable. The most important thing is that thanks to the template, the putty does not need to set quickly.
Even when the template is not secured to the base, it is still very useful: several boxes will not form a crooked line when pressed into the solution.
The putty is filled into the prepared hole and the socket boxes are pressed in from above. It is necessary to press until the plane of the template profile fits snugly against the plane of the wall. The pattern is aligned to the horizontal axis of the group of socket boxes (or to the vertical axis when forming a vertical row) and, after drilling holes, it is fixed to the wall. All excess putty that has come out from under the boxes is removed with a small spatula. Putty will also definitely get inside the socket boxes - it can be removed without problems after removing the template.
When applying it, it is important to ensure that not a single socket sticks out from the plane of the wall. If some boxes fell a little deeper than the plane of the wall (which is unlikely), it’s okay.
After the putty mixture has set, the template-pattern is unscrewed, and the remaining sagging is cleaned off with a spatula. Installation completed!
For those who love “reliable reliability”, we can recommend additional reinforcement of the fastening using self-tapping screws. A hole is drilled in the wall right through the bottom of the socket box and a self-tapping screw with a plastic dowel is screwed in. In walls made of foam concrete and aerated concrete, there is no need for preliminary drilling - the self-tapping screw is screwed in just as it is. It is convenient to use self-tapping screws with a press washer.
Whatever one may say, the putty mixture usually gives some shrinkage, so the place where it is put in requires finishing putty. Therefore, the best solution for electrical installation would be to install it before finishing the walls with putty.
Tip: Mounting screws get lost all the time when it comes to final installation of outlets and switches. Therefore, it is recommended to tighten the screws in place immediately after removing the template. And so that they do not interfere with the finishing puttying, the screws are tightened deeper than the plane of the wall.
How to seal a socket box?
It is advisable to buy socket boxes that are tightly fixed to each other (with a latch), this is very convenient if you are installing a block, two or more, but to secure it, the most convenient way is to buy some rotbunt, mix a thick mixture, and smear the socket box, after 10-20 minutes the solution will set in 40 minutes.
How to seal an old socket box?
Unscrew the screws and remove the socket box. You can seal the hole from the old socket with alabaster, gypsum, gypsum putty, plaster and also gypsum, or with cement-sand mortar. You can blow it out with polyurethane foam, then trim the foam and putty it through a sickle mesh. "Rotband", maximum layer up to 50 mm.
Is it possible to trim the socket box?
Polyvinyl chloride is a relatively soft material and can therefore be cut. Apply markings to the socket box and saw off the excess free edge with a hacksaw. This must be done by first removing the glass from the recess in the wall, so as not to damage the wallpaper or finishing material with a hacksaw.
How to secure a socket box for concrete?
You can install socket boxes on alabaster, putty or plaster. The hardening time of the plaster is approximately four to five minutes.
How to dilute alabaster for Podozetnik?
Alabaster (gypsum) hardens quickly. It must be diluted with water in small portions and used within 2 minutes. For me, the grocery plastic container in which they sell herring or salads was ideal.
How to turn off the outlet in the apartment?
If the socket is overhead, the dismantling process will look like this:
- Turn off the voltage.
- Check the absence of current using a screwdriver with an indicator.
- Remove the bolts and remove the cover.
- Disconnect the power and ground wires.
- Remove the base by unscrewing the screws securing it.
- Carefully remove the wooden part.
How to repair a hole in the wall after drilling?
In order to seal holes from drilling, you need to remove the dowels, for this you need:
- screw in the self-tapping screw 10-15 mm so that it is fixed, but does not spread the dowel;
- Grab the head of the fastener with pliers, swing the plastic or wooden chop from side to side, and pull it out of the wall.
How to make a socket if it falls out?
To ensure that the socket no longer falls out or wobbles, it is recommended to glue a piece of plasterboard sheet in place using alabaster or gypsum putty. When the solution hardens, you need to cut a small strip from a sheet of plasterboard, place it under the damaged area and screw it in with self-tapping screws.
How many wires should there be in a socket?
Well, first of all, there must be three wires in the outlet. In new houses, this wire should be yellow with a green stripe. If all the wires are the same color, then you can only determine whether you have a ground wire using a megger. Using the voltage indicator we find the phase wire.
How to seal grooves in a wall with electrical wiring
An integral part of the installation of hidden wiring are grooves. These are special channels (trenches) made on ceilings and walls; electrical cables are laid in them. After completing the installation work, the recesses in the walls must be sealed using a hardening, non-flammable mixture.
- Features of laying grooves for electrical wiring
- How to seal grooves in a wall with electrical wiring
- Concrete
- Brick
- Monolithic wall
- Materials for sealing grooves
- Tools and materials
- Preparatory work
- Main process steps
Features of laying grooves for electrical wiring
Strobe in concrete for electrical wiring
Different materials behave differently when chipped. The most difficulties arise when making grooves in concrete walls; in this case, wall chasers and hammer drills are used. If we are talking about a brick wall, you can do without gouging with a trench; the cables are attached to the wall with dowels.
If it is necessary to pre-place the wiring in a metal casing, horizontal gouging of the channels is carried out using a grinder or chisel. Brick walls, if they split, do so at the seam. This is due to the fact that cement mortar is more pliable and softer than brick.
Basic rules and features of gating:
- The depth of vertical trenches should not exceed 1/3 of the wall thickness.
- The recesses are carried out strictly horizontally or strictly vertically; tilts are permissible only if there are uneven slabs of the house.
- The depth of horizontal grooves should not be more than 1/6 of the thickness of the ceiling.
Chasing of load-bearing walls is strictly prohibited.
How to seal grooves in a wall with electrical wiring
To decide what is better to seal the grooves after laying the wiring, you need to familiarize yourself with the features of working in walls made of different materials. To seal the holes, you need a spray gun, a tank for mixing mortar, a trowel, a brush and a spatula.
Concrete
Wetting the groove channels before coating with primer and subsequent sealing
Before you start sealing the grooves, you need to generously moisten the hole itself and the area around it with clean water using the following working equipment:
- a piece of foam rubber or sponge;
- spray;
- wide brush with synthetic bristles.
The trenches are first primed and then sealed with a building mixture. It is applied using a spatula with wide cross strokes. After the substance has hardened, the excess is removed with an iron spatula. Movements should be stroking and smooth. After complete drying, the surface is puttied.
Brick
Sealing grooves for wiring in a brick wall
Carrying out work in brick walls is accompanied by a large amount of dust. Before you start sealing the grooves, you need to remove dust and treat the working surface with clean water.
It is recommended to seal the furrows with alabaster or gypsum mortar. If the groove is deep, it is acceptable to use small pieces of stones soaked in mortar. Next, the remaining voids are carefully filled with mortar using a trowel.
Monolithic wall
The work in this case is similar to work in a wall made of concrete or aerated concrete. The recess is filled with viscous putty. The solution fills the cavity as tightly as possible.
If necessary, the construction mixture is applied in several approaches. After complete drying, the surface is leveled with a spatula.
Materials for sealing grooves
Before caulking the grooves under the wiring, you need to select the appropriate material:
- Gypsum plaster. Used in rooms with high humidity, complete drying time is 24-26 hours.
It is important that the wire is intact and not insulated in several places. It is strongly recommended not to use foam or sealants to seal holes.
Tools and materials
Tools and materials for sealing grooves
Before starting construction work, you need to make sure that you have all the necessary working arsenal, including building materials, at hand. To properly seal trenches you will need:
- Reservoir for mixing the solution.
- Several metal spatulas 10-15 cm wide and about 120 cm.
- A brush that is sized to fit the groove.
- Construction plaster or alabaster, designed for reliable fixation of wiring.
If the room is characterized by high humidity, it is additionally recommended to purchase gypsum plaster.
Preparatory work
Preparatory work includes turning off the power supply and checking that there is no voltage. As much dust and dirt as possible is removed from the finished grooves and treated with clean water and primer. To do this, use a sponge, a spray bottle and a brush. Even the most inaccessible places need to be treated.
The work is characterized by increased danger, so it is recommended to purchase safety glasses and gloves.
Main process steps
Gypsum plaster should be applied from. Remove excess solution using a trowel, holding it at an angle of 90°
After completing the preparatory work, check that the wiring placed in the grooves does not protrude beyond the vertical/horizontal surface. In places where the wire is not recessed enough, you need to go through it again with a construction tool.
Sealing is carried out using the following technology:
- Dilute the construction mixture in accordance with the instructions for use included in the package. It is better to prepare it in portions, since the substance hardens quickly. Apply to the surface in areas of spot fixation.
- After the plaster has hardened and securely holds the wiring, the plaster is mixed. Each type has its own layer thickness limit. If a layer thickness of more than 500 mm is required, the process is carried out in several stages.
- Apply the viscous mixture with a small spatula perpendicular to the groove and cable. It is sealed and leveled until the sealed groove begins to coincide with the surface of the wall.
- If homeowners continue to paint the surfaces, the sealed areas are additionally treated with strips of fiberglass, reinforcing tape, construction tape or sickle tape. Another layer of plaster is applied on top; this is important to take into account when leveling the surface.
- After all layers have dried well, you can begin re-priming the surface. If the plaster shrinks slightly, do not worry, this is a normal process.
The final stage of all work is final putty work to level horizontal and vertical surfaces. If you further plan to apply ceramic tiles to the walls, finishing work is not necessary.
How to install socket boxes in concrete walls
An auxiliary but integral element of the electrical system are socket boxes. They are used both in industrial and domestic facilities to accommodate hidden wiring. It allows you to hide wires and contacts not only of sockets, but also of switches, motion sensors, dimmers, terminal blocks, and regulators of various built-in devices (for example, an infrared ceiling heater, heated floors). Correct installation guarantees reliable fixation of the device, and since the box is made of plastic - a dielectric material, it also guarantees additional insulation between it and the wall.
Instructions for preparation before electrical installation
Preparatory activities imply not only taking a number of pre-installation actions, but also purchasing certain materials and tools in advance. To work you will need:
- alabaster/plaster;
- primer;
- putty knife;
- hammer/drill;
- drill/drill 8 mm thick;
- diamond bit for concrete, 68-70 mm in diameter (provided that the socket box is standard);
- special spatula or chisel + hammer;
- building level;
- marker/pencil;
- ruler/hard tape measure;
- indicator screwdriver;
- sandpaper;
- cable/wire products;
- the electrical device itself (if it is a socket, then preferably with a ceramic base) and a box of the appropriate size.
Having acquired the necessary tools and materials, it is necessary to begin preparatory work by marking the area where the device will be located. For this purpose, the middle of the future outlet, switch or other device is drawn on the concrete wall with a pencil or marker. If you plan to install a block, then the center of the outermost fixture is initially marked on the surface. A level line is subsequently drawn through it, equal to the length of the entire device. Using a tape measure or ruler, marks are made on this line for the remaining electrical installation products.
Material for fixing socket boxes to the wall.
Hello, masters. Tell me the optimal material (price-quality ratio) for quick and reliable fixation of socket boxes in drilled holes (diamond bit, walls - concrete and brick). Share your personal experience. Thanks in advance.
Masters online: 533 Orders per week: 2,005 Offers per day: 736
KRASS with a green ring at the spout in a tube for a gun for plastic and tiles
It is advisable to buy socket boxes that are tightly fixed to each other (with a latch), this is very convenient if you are installing a block, two or more, but to secure it, the most convenient way is to buy some rotbunt, mix a thick mixture, and smear the socket box, after 10-20 minutes the solution will set in 40 minutes. It will dry and stick tightly to the wall.
For me, the most optimal material is Rotband; it takes about 15-20 minutes to adjust the sub-assemblies in the wall. Disadvantages of alabaster - instant fixation, about 1 minute.
I support the above options with rotband; first remove dust and prime with primer or water.
I have been working with alabaster for 40 years and I don’t think about switching to other materials. It sets in 4 minutes. During this time I have time to level the socket block. The main thing is to mix it correctly. The concentration should be like that of very thick sour cream; if it is thinner, it will be worse. You need to knead as much as is required for one block of socket boxes. First, freeze the socket panels to a level, and then you can putty them for finishing. A little training and everything will work out, especially since the material is cheap. And one more subtlety - you need to freeze it from the ends and where there are no holes for wires. If you attach a block with tucked wires, they will push it out of the solution and interfere
I support! Alabaster is the ideal material. Mine is even cleaner: it sets in 2.5 minutes. When you have experience, managing to set up a block of up to 5 socket boxes is not a particular problem.
I join the fans of Rotband. Sometimes (in its absence) I use any gypsum plaster (Prospectors, Osnovit, etc.). Alabaster is bad not only because it sets quickly, but it is also low-plasticity and fragile. If you fix the socket box under the socket only on alabaster, then if you frequently pull the plug out of the socket, the latter may fall out along with the socket box. I additionally attach it with a 6 mm plastic dowel with a washer and a screw in the center of the socket box. My socket boxes do not fall out even if I pull the plug from the socket every day without holding the socket cover. I first remove dust and moisten the hole with water. I fix it in the center after the Rotband has dried. If I install a group of socket boxes, for example 4 pieces, then additionally for temporary fixation I put pebbles in the voids on Rotband. It turns out something like a monolith. Then I coat the top with Rotband (with a spatula - I have 3 of them).
On my own behalf I would like to add about alabaster. Since I’m not a pro and I don’t know how to work very quickly, I just dilute it with milk.)))) The survivability time increases by a factor of two, if not more.
You can also add either PVA, or a little Fugen or Rotband to the alabaster. Depending on the amount of additive, the setting time increases. Milk can be produced by a fungus. It's organic.
Vlad, you're scaring me again. Should I now go sniff the sockets for a suspicious smell?)))))
Believe, it’s warm now, everything dries quickly enough, so most likely everything will be fine. But for the future, do not add milk to the plaster.))) As a last resort, use a primer.
The nuances of installing a multibox on a plinth
What should you do if your house has already undergone high-quality repairs, but you need another point to connect electrical household appliances?
In this case, it is not at all necessary to rip off the new wallpaper and ditch the wall; you can make a socket directly on the baseboard.
Multiboxes fit all types of standard single sockets. They can accommodate not only electrical, but also telephone sockets, as well as Internet cable connectors.
However, it should be noted that this method can only be used on collapsible plastic skirting boards with a cable channel. Before installing the socket box, it is necessary to lay the wire inside the baseboard.
To do this, remove the cover from the part where the socket will be located. This operation is performed from a corner or from a nearby plug; simply pry the cover with a screwdriver and carefully remove it.
Cut the baseboard so that there is a gap the width of which matches the size of the plastic trim. Insert the multibox into it, thread the wire through the hole in its body, and secure the socket box with dowels.
Installation technologies
In concrete and brick
If you need to install a socket box in a concrete or brick wall, you need to proceed as follows:
- Make markings on the surface using a building level and a marker in accordance with the electrical wiring diagram in the house. The height of installation of sockets can be chosen at your discretion; SNiP and GOST standards do not stipulate this point. All you need to do is put a cross in a suitable place (the center of the future hole), lean the socket box in the center and circle it with a marker.
- Using a hammer drill and a suitable crown, drill the groove 4-5 mm deeper than the height of the glass you are going to install. If you don’t have a special cutter at hand, simply drill a group of holes in a circle using a drill with a Pobedit drill bit and knock out the core with a chisel and hammer. Another way is to carefully make a square hole with a grinder and a diamond blade.
- When you manage to make a round groove, clean it from the inside, then try on the socket box so that it fits well into the seat and there are no installation difficulties in the future. Immediately cut a hole in it for the wire entry and insert the wires inside.
- Dilute the solution to smear the socket box into a concrete or brick wall. A good solution can be made from gypsum putty, alabaster and water.
- Wet the hole and use a spatula to apply the solution inside, as shown in the photo. After this, carefully fix the glass flush with the wall, making sure that the screws on the sides are positioned strictly parallel to the floor (otherwise the socket will not be able to be installed level).
- Caulk the edges and remove any excess solution so that the glass is clean and ready for further electrical work once the putty has set.
In this simple way, you can independently install a socket box in a wall made of brick, concrete, foam block or even aerated concrete. Be sure to watch the video instructions provided below to clearly see the essence of the installation.
In drywall
Attaching a socket box to a plasterboard partition is much easier. Here you no longer need to dilute the solution and knock out the core of the groove with a chisel. As we said earlier, there is a special glass with presser feet that can easily fix the socket box in the drywall.
In order to install a glass in a plaster wall yourself, you need to follow these steps:
- Apply markings on the surface by analogy with the previous technology. We looked at the markings of a plasterboard wall in detail when we talked about how to install a socket in plasterboard.
- Cut a hole in the bottom for the wires and insert the product inside the groove.
- Tighten the screws on the sides until the box is tightly secured inside.
That's all you need to do to install a socket box in a plasterboard wall with your own hands. As you can see, everything is very simple and even a novice electrician can install the product. We draw your attention to the fact that if the gypsum partition is additionally tiled, you need to act a little differently. The video below shows the technology for attaching a glass under ceramic tiles.
In the tree
Well, the last mounting option is in a wooden wall. If you decide to conduct hidden wiring in a wooden house, which is very strange and unsafe, you will need to make grooves in the wood for installing metal socket boxes.
In this case, you can use a special wood crown and a chisel, but we still strongly recommend installing open electrical wiring, because in this case, there will be no need to groove wooden walls or lining.
Introduction
Frequent disease of rosettes
There can be many reasons for the appearance of a defect of this kind - from poor-quality repairs to a tight socket that follows the plug of an electrical appliance when it is disconnected from the network. The main consequence is that the socket box begins to fall out constantly. The adjusting screws holding it in place don't help.
There is a way out - fix the socket box with liquid nails. Absolutely any modification of them is suitable for this operation, starting with the cheapest variation.
Liquid nails - universal glue
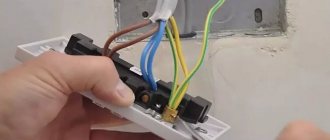
Step No. 1 - de-energize the outlet and disassemble it
Removing the socket cover
Working under voltage is life-threatening. Therefore, before starting repairs, you need to worry about turning off the power supply. It will also not be superfluous to check the absence of voltage with an indicator screwdriver - there can be many switches, and you can make a mistake when turning off the machine.
After making sure it is safe, unscrew the decorative panel from the socket. This is where the disassembly ends. We gained access to the electrical outlet, and this is more than enough.
Retaining clamps do not work
We make sure that the socket box cannot be secured with original fasteners.
Step No. 2 - applying Liquid Nails glue
Do not skimp on glue - apply it thoroughly, with a reserve
The versatility of liquid nails lies not only in the fact that they are capable of gluing dissimilar materials, but also in the fact that the adhesive layer can be very thick.
Step No. 3 - installation of a socket box
After applying the glue, carefully, trying not to get dirty with the adhesive, insert the socket back into the wall socket. We press it tightly against the wall.
Criteria for selecting an installation box
The socket box for the hidden wiring power point is a plastic box that resembles a wide and short glass. On its walls there are perforations marking hatches for entering wires into the device. There are devices for fixing the socket box in a solid or hollow wall and screws for attaching the socket mechanism.
The design is simple, but a future electrician selecting a socket box for the upcoming installation should take into account:
- The type of material from which the wall being constructed is constructed. Most often, the box is screwed to a solid wall with self-tapping screws through the holes intended for screwing them in. In a hollow partition made of plasterboard slabs, fastening is carried out by screw adjustment of the spacer tabs. There are universal socket options with both fixation formats. However, it is better to use spacer tabs when arranging a plasterboard partition, because in a brick wall they will not provide a strong enough fastening.
- Shape and dimensions of the socket box. Most sockets offered for sale are designed for easy installation in a round box with a diameter of 68 mm, but square installation boxes are also often found
- The cross-sectional area of the wires connected to the outlet. The fact is that between the socket mechanism and the bottom of its plastic “cup holder” the reserve loops of two power and one grounding conductors must fit.
Experienced electricians strongly advise stocking up on twenty cm of wire in case of repairs, replacements and other electrical installation operations. The minimum, but not very desirable margin should be at least 10 cm. Every time any work is carried out on the socket mechanism, the wires will be trimmed and their ends will be stripped. As a result, the stock gradually “melts”.
Due to the lack of length, the wire will have to be extended: twisted, soldered, welded, etc. Extending the wire using any of the above methods not only strains the performer and takes time, but also changes the characteristics of the current-carrying component at the connection point.
The supply of wires must be formed into loops or “soft” folds. The formation of sharp creases is extremely undesirable. The loops should be placed at the bottom of the installation box so that the wire sections stripped of insulation do not touch.
The current-carrying cores of wires with a cross-section of 2.5 square meters or more of the specified size are quite rigid. Rolling them up and laying them in loops under the socket block will be very problematic if the internal depth of the socket box is 15-30 usable cm. This means that to install an socket connected to a source with a thick cable, a deeper socket box will be required.
Gypsum set retarders - from milk to plasticizer - Blog Stroyremontiruy
Gypsum is used in many construction works, where it acts as an additive to accelerate the hardening of various mixtures and solutions. Sometimes alabaster is used in its pure form, helping to quickly secure a wire in a groove, secure a socket, or perform other work.
The main advantage of the material is the speed of setting, but often this advantage becomes a disadvantage and it is necessary to slow down the setting of the gypsum. For this, organic or inorganic retardants are used, which are bought at a hardware store or found in the kitchen.
When to slow down the setting
Slowing down the setting of alabaster is important when a large amount of work is being performed and there is no desire to dilute the plaster a hundred times in small portions. For example, you need to seal the grooves throughout the room, but Rotband (a gypsum mixture with polymer additives) is not at hand. You can dilute 100 grams of alabaster, but this volume will be enough for 5 minutes of work. If you use a retarder, then dilute 1-2 kg of material at once and perform a multiple greater amount of work in one approach.
So, the main task of slowing down the setting is to increase the volume of mixing the gypsum mixture and to complete a larger piece of work from one batch .
General rules
Before using retarders, we recommend that you follow the general rules for mixing alabaster, otherwise no additives will help. Here are tips that will come in handy when working with plaster:
- Knead only in clean plastic containers,
- Use a clean mixing tool
- First, water is poured into the container, then alabaster is poured.
If there are remnants of old mortar on the tool or in the mixing container, the plaster will set 2-3 times faster. If you first pour gypsum into the container and then pour water, the hardening will also go faster.
General markup rules
Any installation diagram drawn up in advance must be transferred to the wall as a marking. The installation height is determined from the floor level in the given room to the center of the box. In this regard, before drilling a hole and installation, its exact location is determined. Marking is done using a pencil or marker. You will also need a small building level.
Upon completion of the marking, the vertical and horizontal lines will intersect in the center of the future hole. Before you start drilling, attach the socket box to the wall on the open side and trace its outline. If you plan to use a crown, then there is no need to outline anything. A hole up to 7 cm deep and 6 mm in diameter is drilled at the central mark. Next, a drill fixed in the crown is inserted into it, and the main hole can be drilled.
There are general rules for the placement of plug-in sockets that are suitable for most rooms. The most important requirements on which the correct installation of socket boxes depend are the following:
- General purpose sockets are installed at a height of 30 cm from the final floor covering.
- For refrigerators, washing machines, and other household appliances, the distance to the outlet is 1 meter.
- A block of sockets mounted above a bedside table or tabletop is located at least 10 cm above their surface.
- Between the socket boxes located next to each other, a distance of 71 mm is maintained, which is mandatory for the subsequent installation of standard sockets.
Dimensions can be determined on site on an individual basis. This applies, for example, to modern wall-mounted TVs. In this case, the future socket box in the wall is selected in the most convenient place. The PUE requirements prohibit the laying of cable lines and the installation of sockets on external walls that are in direct contact with the street.
How to cover a wiring groove in a wall with your own hands: a step-by-step guide
- How hidden wiring works
- In the kitchen
- In the bedroom
- In the living room
- In the children's room
- In the bathroom and toilet
- In the back room
- The nuances of laying grooves for electrical wiring
- Methods for sealing grooves in a wall with electrical wiring
- Concrete wall
- Monolithic
- Brick
- Is it possible to lay grooves in a load-bearing wall and on the ceiling?
- Step-by-step guide to sealing gates with your own hands
- Required materials for caulking
- What tools are needed?
- Preparation stages
- Possible problems during the work process
- Tips and tricks from experts
An important part of the work on laying wiring in an apartment is gating. At this stage, channels are formed into which electrical cables are placed. After completing the installation work, the grooves are sealed. For this purpose, fire-resistant hardening mixtures are used.
How hidden wiring works
When laying cables in grooves, take into account the layout of sockets, switches and lighting fixtures in the rooms.
In the kitchen
According to the requirements of the PUE, when laying wiring, the following rules must be observed:
- cables must be laid at a distance of more than 60 cm from the floor and water pipes (the same applies to sockets);
- a distance of 60 cm should also remain from gas communications.
At the lower level, wires are laid for sockets to which devices are connected for a short period of time.
In the bedroom
The wiring in such a room is laid taking into account the comfort of using sockets. It is recommended to place power points near the bed or bedside table. If there is a desk, additional cables are laid for 2 sockets. The power point for the TV is installed at a height of 1.3 m.
The eternal question: install socket boxes before or after plastering
If the surface is covered with plasterboard, there is no such problem. What to do when installing socket boxes in a brick or concrete wall?
In fact, from a technical point of view there is no difference. You can accurately calculate the planting height: the main thing is that the socket box does not stick out, even by 1 mm. If the edge is recessed by 3–5 mm, this is not a problem. The mounting pad of the socket will rest against the wall, and use longer screws for fastening.
The problem is rather psychological - it’s a shame to drill into a plastered surface.
When choosing a sequence (before or after plastering), one nuance should be taken into account: if the edge of the installed socket boxes protrudes above the plane of the wall, how will you apply the plaster evenly?