The power supply of any room must ensure the ability to quickly connect electrical installations (including household appliances). For this purpose, sockets placed on the walls are used. Since the connection of sockets to the power cable must be reliable and safe, the Electrical Installation Rules (ELR) require that each socket have a housing that provides protection against electric shock. Sockets designed for wall-mounted installation (including outdoor) have their own housing that meets safety measures. For devices built into the wall, installation of socket boxes is provided.
Receptacle boxes serve multiple functions
- Structural: the box must be firmly fixed in the wall, and securely hold the socket itself.
- Electrical safety. Boxes for brick, concrete and plasterboard walls are made of dielectric materials and prevent electrical potential from reaching the load-bearing structures from the contacts.
- In addition, the outlet itself is protected. Moisture, dust, and foreign objects do not penetrate inside the case.
- Fire safety. If a fire occurs inside the socket, the flame does not penetrate beyond the socket box.
- There is also an aesthetic component. When installing socket boxes in a brick or concrete wall, the seat looks neat. A flat surface is obtained around the outlet.
Types of socket boxes
Due to the rapid development of the field of electricity and appliances, the need arose to create new types of socket boxes.
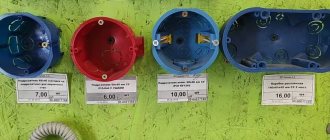
It is worth saying that this device has many models, so they are classified according to a number of parameters, which include manufacturing materials, shapes, depth and fixation system, that is, installation method.
According to materials they distinguish
- Plastic socket box. It is convenient and easy to use, and is also not subject to fire, which makes it the most attractive option for installation on a wooden surface.
- Metal socket box. This model has long lost its popularity, but is still sometimes used by owners of wooden houses. Their disadvantage is electrical conductivity, which makes these devices dangerous to human health.
- Wooden socket box. These models are also not popular, because wood is highly flammable, so their use is only permitted in open types of electrical wiring.
According to the forms, it is customary to distinguish
- Round socket box. The most common models, because their installation makes it possible to install entire groups of devices in the form of a switch and socket. Holes for this type of device are made very simply, so they are very attractive to the consumer.
- Square socket box. These models are used by owners of smart home systems or dimers. Such a box can accommodate up to four mechanisms, while you have the opportunity to route the wires so that there is some reserve left.
- Oval socket box. These are the most spacious models that can support up to five mechanisms. Therefore, making a hole for mounting such a device is a little more difficult.
By mounting methods
- Socket boxes that have spacer legs.
- Socket boxes that have ears for self-tapping screws.
- Socket boxes that have permanent connecting tunnels.
In terms of depth, devices with depths of forty, forty-two, forty-five, sixty and sixty-five millimeters can be distinguished. It is also worth mentioning double socket boxes, which are a combination of two devices.
Diameter
For round boxes for concrete, manufacturers have developed a different classification system:
- Diameter of the socket . Denoted by the letter D. The most popular parameters: 60 , 64 , 65 , 68 , 70 and 75 mm . In order for a socket or switch to fit perfectly inside the casing, it must have a similar mechanism diameter.
- Depth . Denoted by the letter H. Typical sizes: 40 , 42 , 45 , 60 and 62 mm . There are products with a depth of up to 80 mm . They are needed for internal placement of terminal blocks if the wiring is not equipped with junction boxes.
When installing oval and composite socket boxes, it is necessary to take into account such a parameter as the center-to-center distance - the “distance” between the centers of the axes.
This is the distance that needs to be measured between the drilling holes when installing the box. According to the standard, it is equal to 71 mm , but some are larger or smaller.
How to install in concrete walls
It should be noted that the installation of such devices is not very difficult. When learning how to install a socket box in concrete type walls, you need to study the step-by-step instructions.
In general, this process consists of several stages:
- Creating holes for the fixture using a crown or drill, the diameter of which should be from sixty-eight to seventy-two millimeters. You need to go fifty millimeters deep into the wall.
- Knocking out and clearing the niche of concrete material.
- Removing irregularities using a chisel.
- Cleaning the hole using vacuum cleaners.
- Creation of special mixtures that use putty and gypsum.
- Moistening the niche.
- Preparing the installation box. Multibox assembly.
- Place the solution in the hole and lay the device itself.
- Cleaning off the remaining mortar using a spatula.
You will notice that these activities are quite simple, so you do not need the help of a specialist. The only nuance is the level of the device, which must coincide with the wall.
Dimensions
In the case of using square-shaped products, the dimensions of concrete socket boxes are determined by the following characteristics:
- Width and height.
- Depth.
- Mounting distance.
For example, dimensions 68×68×43 indicate that the length and width of the box are 68 mm , and the depth of the concrete socket is 43 mm . These parameters should be selected for the specific outlet that you plan to install.
There is such a dimension as the mounting distance - the exact “distance” between two holes for mounting the socket mechanism.
How to install in ceramic walls
Ceramic tiles have gained popularity quite a long time ago; every day, consumers are increasingly using them to decorate walls. Installing a socket box in such a wall has several features. It consists of stages:
- Creating markings for the future hole.
- Creating holes, while leaving some margin (usually seven millimeters).
- Installation of the socket box in accordance with the level of the walls, using glue, which is applied in layers of two to three millimeters.
Installing fixtures in ceramics requires special attention, because tiles are a rather fragile material.
Functions of mounting boxes
Many owners doubt the advisability of using a socket box for concrete and believe that it is quite possible to do without it. They cite the fact that many sockets installed directly in a concrete wall serve well for a long time. However, in such cases there is always a certain risk and there is no complete guarantee of electrical and fire safety.
To resolve this issue in favor of mounting boxes, it is necessary to consider the purpose of these products and the functions assigned to them:
- The mounting box, fixed into concrete or into a brick wall, in turn, firmly holds the socket fixed in it.
- Ensuring electrical safety. Socket boxes, which must be installed in concrete, brick and plasterboard, have dielectric properties, preventing voltage from the socket contacts from reaching the metal wall structures.
- The socket itself is also protected from dust, moisture and small foreign objects getting inside the housing.
- A possible fire inside the socket is localized in the socket box and does not spread beyond the boundaries of the product.
- Standard sizes make installation of socket boxes more accurate. As a result, the socket cover comes into contact with a completely flat surface, without cracks or gaps.
How to install in plasterboard walls
One of the most popular materials is drywall. Installing socket boxes in this material also has several nuances.
The process occurs in stages, that is:
- Creating markings for the future hole.
- Creating landing niches using a drill or screwdriver, the diameter of the crowns should be sixty-seven millimeters.
- Removing side plugs.
- Combining structures using adapters that are mounted in landing niches.
- Removing partitions that are located between the niches using a stationery knife or nail file.
- Installation of parts into landing niches.
- Pulling cables, installing the unit.
- Screwing the fasteners using a screwdriver.
- Checking fixture levels.
Using log overlays
Decorative overlay for a rosette on a log
Through drilling through solid wood is a very difficult and expensive process that is simply impossible to do on your own. This requires special equipment and skills to make precise horizontal and vertical channels over long distances. It is much easier to take the path of less resistance using the technology of laying electrical wiring in walls made of concrete and brick. We are talking about laying grooves in which a corrugated steel tube will be laid.
The problem is that the channels cannot be sealed with putty or mastic. For this purpose, special plastic linings are used that reliably imitate natural wood. To reduce the amount of work, the cable is laid under skirting boards and platbands. Finally, one horizontal groove is made, which, after securing the cable in it, is covered with a cover plate. A hole in the shape of a glass is made in the cover itself. After installing the socket housing, it is closed with a lid.
The best manufacturers of socket boxes
Each manufacturer produces socket boxes with their own characteristics and differences from others.
Among the most proven on the market are:
- Russian manufacturer Schneider Electric.
- Russian manufacturer Hegel.
- French manufacturer LeGrand.
- Swiss manufacturer ABB.
- Korean manufacturer DIAM.
- Chinese manufacturer Feron.
Some nuances
It should be noted that the consistency (fluidity) of the prepared mixture plays an important role when sealing. If the mixture is thick, it is unlikely that you will be able to completely coat the box. In the case of cement, it will be difficult to sink the socket box to the required depth; you may have to knock it down with a hammer and there is a risk of splitting the product. In the case of plaster, you simply may not have time to complete the required steps - insert, cover and level. Gypsum alabaster has proven itself best. The required consistency of the mixture is determined experimentally (individually) - the same consistency of the mixture in two different people can give different results.
I do not recommend using gypsum plaster (Rotband, Teplon) to seal boxes. Working with such material is quite troublesome:
These two reasons take a lot of time. You can use gypsum plaster to smear boxes when there is nothing else at hand.
Photo of installation of socket boxes
Features and key requirements for wiring in a wooden house
Based on many years of experience of specialists, the features and requirements for electrical supply include the following requirements:
In the event that a short circuit occurs, the project must take into account and prevent the occurrence of ignition of the wiring, or minimize this possibility in order to prevent the fire from spreading to the wooden walls of the building;
The possibility of contact between wires and wooden walls should be excluded Source rinnipool.ru
- Wires used for wiring electrical networks must have a safety margin necessary to withstand extreme loads. Also, the possibility of heating the connections and cables themselves should be eliminated;
- The laying of the electrical supply must comply with safety standards to prevent even accidental human contact with live lines.
Preparation for installation
Before you begin installing devices, you need to prepare tools and consumables. To fix the box in the wall you will need mortar and a pencil. Other helpers are power tools for cutting recesses with a set of bits.
- Replacing the timing gear
- Fire hydrant. What it is.
- Car electrical system breakdown
