When drilling holes for wiring, sockets, socket boxes and switches in concrete walls, ordinary tools cannot withstand such a load, so special crowns for concrete sockets are used.
There are several types of crowns of different designs, used depending on the density of the material and working conditions. Such crowns can be used not only in the case of a concrete wall. They cope well with other hard objects - brick, stone. Therefore, a concrete crown is considered a universal tool and has a wide range of applications.
Preparing the walls
Many people have begun to finish these surfaces with plasterboard en masse, since in this case it is possible to significantly speed up repair work, as well as make them even without the use of bulk materials, which, in case of significant defects in the walls in old buildings, will require the use of a significant amount.
You can install plasterboard sheets on a profile that is 5 cm wide, leaving sufficient space for further placement of insulation, sound insulation and wires. When carrying out this work, there is also a need to install socket boxes.
Note! If you have little understanding of electrical engineering, it is best to resort to the services of specialists who can install electrical cables efficiently, since mistakes made during independent installation may in the future cause a short circuit that can lead to a fire. It is advisable to purchase socket boxes together with drywall, since in this case it will be possible to save a significant amount of time by selecting suitable mounting boxes
It is advisable to purchase socket boxes together with drywall, since in this case it will be possible to save a significant amount of time by selecting suitable mounting boxes.
Ordinary plasterboard sheets easily ignite in a fire. The only exception is fire-resistant material, which is mostly pink or red in color and has special markings.
For this reason, when purchasing socket boxes, you also need to pay attention to their fire safety standards
Important! When choosing sockets for installation in plasterboard structures, it is necessary to consider only those products whose rim is made of metal, which, if the voltage is too high, will ensure the passage of current through itself and tripping of the fuse protection in the panel. In addition, there will be a power outage, which will eliminate the possibility of possible negative consequences
In order to still carry out high-quality installation of the socket box in plasterboard, it is necessary to prepare the walls properly:
- First of all, it is recommended to apply putty, thanks to which the surface becomes more durable and begins to hold its shape well during drilling.
- Next, after the putty composition has hardened, it is necessary to carefully open the material with a primer. After the applied mixture is absorbed, the drywall will stop crumbling during further processing.
Having completed these steps, you can begin to determine the future locations of the mounting boxes.
Installation without reference to a profile
Sometimes it happens that the calculations are made incorrectly and after drilling in the hole for future sockets, a profile is visible, due to which it is impossible to push the block through and securely fix it in the recess. In this case, the crown is replaced with an ordinary metal knife or chisel and the holes are made manually, removing 5-10 cm of the visible profile.
Incorrect installation, in which the profile prevents the placement of the socket box in the prepared hole.
The frame of the structure will not suffer from this, but the sheet of drywall itself may be deformed, and due to the inconvenient viewing angle there is a risk of injury. When cutting the profile, it is recommended to wear special installation gloves - they will protect your hands from unwanted cuts.
Self-installation of socket boxes in drywall
In modern construction, gypsum boards - plasterboard sheets - are often used. This material is used for the installation of hollow walls and interior partitions. The installation scheme for electrical installation equipment has changed accordingly. In particular, additional fittings for electrical sockets and switches.
Previously, these elements were mounted in the wall; for this, the installation box was inserted into a drilled hole, where it was fixed with mortar. This option is not suitable for hollow structures, so special socket boxes designed for drywall have appeared on the market.
Note that the socket box is a mandatory element when installing electrical equipment. It is used for installing sockets, switches, dimmers, and thermostats. In addition, they can be used for unsoldering electrical wiring.
The work process is intuitive, however, there are certain nuances that will be useful for the home craftsman to know. Let us immediately clarify that expensive equipment or special skills are not required to install socket boxes in drywall.
I am glad to welcome you, friends, to the blog “Electrician in the House”. In today's episode we will examine in detail the topic of how to install a socket box in drywall.
Dimensions of socket boxes for drywall
Before starting to describe the installation process, it makes sense to understand the features of the product. Let us immediately note that a regular socket box is not suitable for installation in plasterboard partitions; only a certain type of product intended for such cases is used here. Among the reputable manufacturers, the following brands can be distinguished:
These products are classified by planting depth and outer diameter. These parameters are labeled H and d2 respectively. The standard diameter of the socket box for plasterboard is 68 mm. In addition, models with external diameters of 60, 64, 65, 70 and 75 millimeters are available.
If we talk about planting depth, here you can find the following sizes: 40, 42, 45, 60 and 62 millimeters
Socket boxes are selected individually, depending on the installation location. If possible, and the thickness of the partition allows, we recommend choosing models with a seating depth of 60-62 mm. Such designs are much more convenient when disconnecting wiring, especially if the circuit excludes the installation of junction boxes. In this case, the wires are disconnected in the socket box, so every extra millimeter will play a decisive role.
In addition, in products with a large planting depth it is much easier to connect wires and install electrical equipment.
In today’s article, as an example, I will use socket boxes for plasterboard Schneider Electric modification IMT35150. These products have a standard outer diameter (68 mm), the seating depth is 45 mm.
The housing of the Schneider Electric IMT35150 socket box is made of non-flammable plastic. It uses a combined polypropylene + fire retardant material that can withstand temperatures up to 850°C. The case is quite durable, equipped with a wide front edge. There are plugs of various diameters designed to accommodate wires of any cross-section.
To fix the socket box in the partition, two metal tabs are used. The use of metal clamps provides a large area of adhesion to the surface, without damaging the plasterboard coating. To fix the legs, screw self-tapping screws are used, which, when tightened, securely press the box to the surface.
For variety, let’s look at Polish socket boxes for plasterboard from Pawbol Euproduct. The plastic feels very dense and reliable. Only here thin metal legs are used
Combined crowns/bridges –
Such crowns are called metal-plastic (Fig. 14-15). They, like cast crowns, are made using a solid casting method from a cobalt-chrome alloy, but the front surface is additionally lined with white plastic. Their advantages include acceptable aesthetics. The price for metal-plastic crowns will be from 7,000 rubles per unit.
Disadvantages of metal-plastic crowns –
Combined bridges –
Because The metal frame of metal-ceramics, as well as solid-cast bridges, are made on the same cast metal frame - different types of crowns can be combined in one bridge. For example, you need to make a bridge of 3 units supporting teeth 5-7. In this case, the nearest 1-2 crowns falling into the smile line can be made with metal-ceramic, and the distant crowns can be made of solid casting (Fig. 16).
Dentists and dental technicians are not very fond of such designs, because... this reduces their cost. And if they tell you that this cannot be done, then this will only indicate the doctor’s reluctance.
Dimensions and features of socket boxes for drywall
There are currently many product options on sale, the main difference being the dimensions. The most common parameters:
- The depth of the installation box is H. Measured in millimeters. There are values from 40 to 62 mm, the most convenient size is 6.2 cm. This is explained by the fact that the volume of such a part allows you to place the wires when installing the main part, rather than pulling them out from under the frame. But the depth must be consistent with the opening of the sheathing.
- External diameter – d. Products with a diameter of 68 mm are in demand, but there are options from 60 to 75 mm. It is taken into account that it is this indicator that determines the dimensions of the mounting hole that is drilled in the gypsum board slab.
Despite the variety of materials and manufacturers, the dimensions of all round socket boxes intended for installation in plasterboard are clearly fixed, according to GOST.
The installation data of the selected element is indicated on the reverse side. Also, among the designations inside or outside there should be indicators of the melting point, highlighting the flame-resistant material.
Socket boxes for drywall have the following features:
- The presence of two legs (brackets) at the edges. They ensure reliable installation and prevent the box from falling out. The fixing parts can be made of plastic or metal. The second type is an excellent solution if the tab opens only after being installed in the hole when screwing in the screw. The bracket must have sufficient contact surface.
- Variety of shapes. There is a square, round or rectangular variety, which makes it possible to choose a suitable element.
- Several plugs. They are located on the back or side of the product and are opened only before installation, taking into account the cable access point.
Unlike devices built into concrete walls, parts for gypsum board sheets have 4 visible screws on the outside: two move the legs, and the rest are needed for laying the metal strip.
What is a crown?
A dental crown is designed to restore the shape of a tooth and its functionality. It strengthens the tooth, preventing it from decay, and also makes it more attractive.
Externally, an artificial crown is difficult to distinguish from a natural tooth, especially for products made from modern materials.
Such products can be either single or part of a bridge. In order to attach a crown to a tooth, preliminary preparation is required. To do this, the tooth tissue is ground down, giving it the desired shape. The amount of dental tissue removed depends on the type of crown used.
When installed on a tooth, the edges of the prosthesis in question sink approximately half a millimeter under the gum. In addition, you can also put a crown on an artificial tooth root - an implant.
Peculiarities
Of course, installing sockets in drywall is much simpler when compared with other materials, but, with all its advantages, it also has imperfections. In particular, it crumbles extremely easily and when working with it, the use of ordinary self-tapping screws is not allowed.
Also, when working with drywall, the use of impact power tools is unacceptable - all work is done using a drill and a special tool for drywall (for example, knives or jigsaw files).
When installing sockets in drywall, you should use specialized installation boxes called socket boxes (cups). Installation boxes for plasterboard walls differ from concrete auxiliary equipment in the presence in their design of special fasteners that are pressed against the plasterboard.
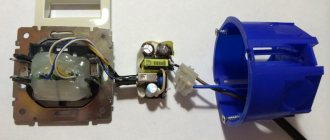
Socket boxes for drywall are produced, as mentioned above, with a special method of fastening. Outwardly, they look like a plastic glass. There are 4 screws on the front side. Two of them are higher than the others. They are necessary for attaching the steel frame of the socket itself.
Other screws, which are located just below, are responsible for mounting the socket itself into the drywall. At the bottom of the glass there are specialized holding clamps. Their location can be adjusted with these screws. When the screw is tightened, the foot is attracted to the gypsum board. This device ensures reliable installation of the socket box and guarantees that the electrical socket will not jump out of the wall at the first opportunity.
There are two methods of installing electrical wiring and sockets in gypsum boards:
- at the stage of construction of the structure;
- at the finishing stage.
This is interesting: The thickness of plasterboard - the minimum size of plasterboard for a wall, what is the width of the sheet and what is best for wall covering
General idea of the crown
The design of the crown is very simple. This tool is an attachment to an electric drill or hammer drill. It consists of a shank and a round cutting head. There is a pilot drill in the center. The crown can be collapsible or solid.
To cut a round hole, just hold the shank of the nozzle in the chuck of the power tool and start drilling the socket boxes. When the cutting part of the crown completely enters the wall material, drilling is stopped. The cut circle remaining inside the wall is knocked out using a hammer and chisel.
How to choose the right one
Before purchasing this or that model, you need to decide on some features. Firstly, in which wall you plan to install it:
- Solid walls (concrete, brick, gas, foam blocks). For such floors, the most ordinary concrete socket box is suitable, without any additions.
- Hollow walls (plasterboard, chipboard, plywood, etc.). They will require socket boxes with special clamping claws.
There are also universal models that, if necessary, can be used for any walls.
Secondly, you need to calculate how many sockets will need to be installed at one point. In addition to single socket boxes, you can buy double, triple, etc.
Third, choose the desired shape and size. The standard shape is round, but square ones are also available. You need to know the following about sizes:
- Diameter of the outer part. There are 60 and 68 mm.
- Installation depth. There are also two types - 40 and 45 mm.
The most popular dimensions are 68x45. They accommodate most manufactured sockets and switches.
Diamond bit for hammer drill
The diamond bit for the SDS+ hammer drill is essentially a leader for inexpensive repairs with huge potential. The service life of such a crown is 100 socket boxes in heavily reinforced concrete; this number includes two or three reinforcement bars that you can cut with it. The cost of one hole is about 40 rubles, the time is about 8-12 minutes.
Pros: relatively inexpensive, suitable for a small hammer drill, can cut reinforcement, dry cutting, cuts without impact (less noise), good survivability.
Disadvantages: in a panel house - useless, requires a fairly good hammer drill: the Chinese one will not be able to handle a large volume, red brick and wet plaster will get very stuck.
Installation of socket boxes in drywall
Fixing the mounting modules is not particularly difficult if the work is divided into stages.
Wall marking
The correct location of the power supply system for electrical equipment depends on this event. Process diagram:
- Since the wiring runs behind the plasterboard surface, the layout of the outlets must be thought out in advance. When drawing up, the location of interior items and devices that require power is taken into account so that the connection points are conveniently distributed.
- According to the diagram, the seat is determined. From the reference point, which can be the floor, the edge of a wall or another object, several points are marked, using a level they are brought to one position and connected.
- On the resulting line you need to make a notch - the center of the future hole.
- If you need to secure several boxes in a single block, then a distance of 71 mm is set aside from the first point. It is taken into account that this distance is suitable for products with a diameter of 68 mm.
To avoid mistakes that will lead to distortion of the mounted structure, it is advisable to check the correctness of the markings.
There are several tools for making round holes in drywall, but the toothed attachment works best
Creating holes
After marking all the surfaces with a drill and a set of drywall bits, seats are made for the socket boxes. The nozzle is selected based on the diameter of the selected module. Alternatively, you can use a ballerina or cut out the area by hand.
Drilling a hole with a crown is much faster and easier, so this is the optimal solution. Work technology:
The centering drill is set along the notches on the main line. Deepening is carried out without haste at low speed
It is important to ensure that the nozzle does not move to the side, so the tool must be held perpendicular. After the crown teeth have passed the coating, the speed is increased. If you plan to create an elongated module, then drilling is carried out along the remaining points. When sawing by hand, the edges are not always perfectly smooth, so they will need to be modified
When sawing by hand, the edges are not always perfectly smooth, so they will need to be modified.
Box installation
Installing a socket box is not difficult if the product is of high quality and the previous work was completed without errors. Procedure:
- The wires are brought out, the plugs on the body through which the cable is passed are disconnected.
- Inserting the module requires no extra effort. If the legs in the structure do not recline, then the product must be placed sequentially, slightly bending the bracket.
- If several modules are installed, then after drilling the partitions between the holes are cut off. Using a connector, the elements are joined and placed in the connector.
- The box is leveled, the mounting screws are screwed in. The tightening should not be too strong so as not to push through the drywall.
Installing the box is carried out in 2 stages and does not cause any particular difficulties even for beginners, the main thing is not to pinch the screws, otherwise the presser feet will break
After checking the level, you can connect and install the filling.
Installation methods and types of tools for its implementation
There are three ways to install socket boxes:
- linked to a profile;
- without connection to the frame;
- installation of a socket block.
Before choosing the installation method, prepare the tools, in addition to the crowns and socket boxes, use a drill, a screwdriver and the outer part of the socket.
Additionally you will need:
- building level;
- ruler or tape measure (to control the distance between block socket boxes);
- pencil for marking;
- a construction vacuum cleaner, which is used when making holes with a drill in drywall, so that less dust collects and does not clog the lungs.
For precise marking, a laser level is used, which will allow you to carry out work with minimal deviations in calculations.
Type of marking made using a level
How to install a socket box in a wall?
Any installation always begins with markings, so before installing the socket box in the wall, you need to correctly mark its location. We measure the required distance from the floor: sockets are usually placed at a height of 30-40cm, switches - 90-100cm, although there are exceptions. Draw a cross with a pencil and start drilling.
How to make a hole for a socket box in drywall?
If you plan to install a socket box on a plasterboard wall, then take a core saw with a diameter of 68 mm and drill a hole. Then we insert the socket box into the wall and secure it. To do this, we tighten the screws, and they, in turn, press the socket box to the sheet of drywall using paws. Sometimes the resulting hole is chamfered to slightly deepen the socket box. If this is not done, the socket may not fit flush against the wall.
How to make a hole for a socket box in a wall made of plaster, brick and concrete?
To drill a hole in a solid brick or plaster wall, you need a special concrete bit. It is inserted into the hammer drill and drilling is performed. In this case, it is advisable to use a combined chiselling and drilling mode. You can drill a hole in a plaster or brick wall using a simple hammer drill.
The technology for drilling a hole for a socket box in a concrete wall is performed in the same way as in plaster or brick. However, for this you will need a more powerful hammer drill.
What to do if there is no crown?
How to install a socket box in a wall without this crown? Very simple! We outline the socket box with a pencil and begin to make holes along the contour using a hammer drill. Then we insert a peak or spatula into the hammer drill and begin connecting the holes. Thus, the recess we need is hollowed out. We take the socket box and try it on: it should be flush with the wall or can be slightly recessed. If it sticks out, you need to hammer it further. When the recess is ready, screw the socket box to the wall using a dowel and a self-tapping screw.
It is not difficult to cut a hole for a socket box in drywall without special devices. To do this, holes are made along the marked circle with a small drill, and then a hole is cut out using a hacksaw file.
How to run a wire into a socket box?
Before installing the socket box into the wall, you need to make a hole in it for the wire. The holes are already marked on the body of the socket box, so you just need to cut out the excess with a knife or carefully break it out. You need to cut from the side from which the wire will enter. Then everything is simple: we wire the wire so that it extends 15-20 cm.
How to cover the socket box in the wall?
The hole that is hollowed out in the wall is always slightly larger than the socket itself. Therefore, after installation, it needs to be caulked around it. In addition, you will also need something to fix the socket box in the recess. Any dry gypsum-based mixture is suitable for this. I prefer to use alabaster for a number of reasons. In many construction stores it is sold in small packages - 1-3 kg. Costs 20 - 40 rubles. Nothing by today's standards. The complete hardening time is approximately ten to twenty minutes, which allows you to soon use an outlet or switch.
How to install socket boxes evenly?
The technique of fixing the socket box in the recess using alabaster is very simple. Having prepared a mixture of water and alabaster, we apply it inside the recess, and then we need to press the socket box there. Next, using a level, rule or metal corner, we align the plane of the socket with the plane of the wall.
Recommendations for selection
First of all, you should clarify the dimensions of the socket box: as a rule, they are standard, but there are exceptions. In particular, if you need a hole of a larger diameter, you need to buy a 70 or 75 mm crown. The cost of non-standard options practically does not differ from the usual 68 mm, it mainly depends on the quality of the material and thread used.
But it’s better to make a big mistake and seal the cracks with concrete mortar than to try to insert a socket box into a narrow and unsuitable niche. For one-time work, it is allowed to use inexpensive crowns with pobedit edges. In this case, it is better to choose products from a domestic manufacturer rather than a Chinese one; the low cost does not justify the abrasion or knocking down of elements during the first drilling.
Products from Zubr or Praktika have good recommendations. They can last longer provided that they are periodically cooled while drilling into concrete and that the type of attachment matches the material being processed. This type of crown should not be used to create holes in walls with metal reinforcement.
For professional needs, it is better to choose high-quality standard SDS Plus diamond-coated tools. In addition to higher efficiency, they are characterized by the ability to self-heal and are practically not subject to wear.
Products from European manufacturers have good reviews: Makita, Bosh, Hilti. But the price of such crowns for making socket boxes is appropriate: up to 10 times higher than Russian ones. The number of segments for drilling also matters: the more there are, the more efficient and faster the concrete is drilled.
What to pay attention to
- Only a specialist can choose a crown correctly, but if the following rules are taken into account, a beginner can cope with this task:
- Decide on the base in which the hole for the socket box will be drilled. Thus, for reinforced concrete, the nozzle for ordinary concrete, plasterboard or other materials is not suitable.
- Specify the maximum drilling depth, as well as the diameter of future socket boxes, switches and other devices. Otherwise, it may turn out that the diameter of the hole does not fit the dimensions of the devices.
- An important criterion when choosing a bit is the operating speed, as well as the maximum value of revolutions per minute of rotation.
- Attention should also be paid to the need to cool the mechanism, as well as the possibility of doing without it.
- You can analyze crowns from different companies.
When choosing a crown, you should not save, because a cheap product will not cope with the task at the same level as expensive analogues, and the socket may not work out at all. There are many fakes on the construction tools market, which can also be bought at a low cost.
Remember that sprayed crowns are very expensive, so purchasing one will be justified in case of a large volume of concrete work. It is irrational to take high-quality products if you have a weak and cheap hammer drill. This combination is extremely unprofitable, since drilling a socket box requires high power and high speed of the tool itself.
Author: Sergey Vladimirovich, electrical engineer. More about the author.
How and when to make holes in gypsum boards
It is necessary to know in advance exactly where the power cables are connected. You can make marks on a sheet of drywall in advance so that you later know where to make the hole. It is best to put a cross, which will mark the center of the future hole.
A drill with a special bit will quickly and accurately drill the required hole. You need to keep the tool level and perpendicular to the plasterboard wall. However, there are some nuances. This scheme is good when it comes to interior partitions, because due to the frame, they have enough space to fit a socket box.
There should not be a profile at the socket level. Typically, the installation depth for a socket box is considered to be 45 mm. If the frame made for drywall is very small, then installation will be impossible without drilling the wall. I’m glad that most often people already make the right frames from metal profiles so that they don’t have to hammer into the wall.
If profiles were not used (glue or foam was used to install gypsum boards), then you will have to cut drywall to install the wires. In this case, the process will be no different from installing an outlet in a regular wall.
Here's how to make a hole in drywall for an outlet.
A hole can be made not only with a crown. Using a compass, a circle is drawn on the sheet to indicate the location for the hole. Then, using a drill with a regular drill bit, holes are made along the inner border of the circle. Next, the core is carefully cut out with a knife, and the protrusions are trimmed with the same knife. The hole will come out a little clumsy. However, you do not need to buy a crown, and all the irregularities will be hidden by the rosette.
Installing socket boxes in drywall with such a simple hole will not cause additional problems. Fixation will be successful if the holes are of the required diameter, despite the fact that the circle is not ideal. Regardless of how the hole was made, it is necessary to remove the chamfer around the circumference with a knife. The glass should fit tightly into the hole and not stick out of it.
Diameter of crown for socket
Before you go to the store for a crown for socket boxes, you need to accurately determine their size and diameter. If the crown is purchased incorrectly, the technical hole made in the concrete wall may turn out to be either too large or, conversely, too small.
The most common size, which is considered standard, has a diameter of sixty-eight millimeters. This is what most switches and sockets are manufactured for. However, you can find sockets and switches with other diameters on sale, and therefore, even at the preliminary stage of repair, you should accurately determine what materials will be used and, based on this, purchase everything you need.
You should also pay special attention to preparing the cutting tool for work. The crown must be assembled in accordance with the instructions, otherwise you may cause serious injury during operation. Before starting work, it is recommended to carefully study the instructions that come with the crown. Assembly of the crown begins with the preparation of a pobedit drill.
It must be inserted into the cartridge and securely secured using the appropriate bolts. Next, you should strengthen the bowl under the drill itself along the thread. All elements of the crown should fit tightly in place and not dangle. If the assembly is not complete or of poor quality, then during the work you can break individual elements of the crown or cause serious injury to yourself.
Drilling process
When the drill bit is completely assembled and checked, you can proceed to the concrete work itself. It is best to do the main work using a hammer drill, and if you don’t have one, you can use a powerful impact drill. It is not recommended to use an ordinary drill, as in this case the work will be ineffective and will take a huge amount of time.
To begin with, certain marks should be made on the concrete base in given places, along which the centering drill will subsequently be positioned. After this, you can start drilling the base of the concrete wall with a crown. To do this, place the drill on a pre-made mark and start drilling.
The tool should be held as tightly and level as possible. Work must be carried out in a respirator and special construction glasses, since when drilling a lot of harmful dust is generated in the space. Upon completion of work with concrete, the cutting tool should be correctly returned to its original state.
To begin with, the nozzle should be given time to cool completely, otherwise, when dismantling it, its cutting tip may simply fall off. To do this, the cutting attachment is removed from the hammer drill, and all cement dust and dirt are removed from it. You should also pull out its middle part and this can be done most easily using an ordinary metal chisel or hammer.
This way the cutting attachment will be prepared for further use. When choosing a cutting attachment for working with concrete, you should not purchase cheap options, for example, those made in China. Despite their affordable cost, in most cases they fail after drilling the first technological holes in the wall.
Also, when working with cutting tools, it is imperative to adhere to safety requirements. Despite the fact that concrete is a fairly durable material, it is possible to make the necessary technological holes in it with a properly selected special cutting tool without much effort in the shortest possible time.
Adviсe
In order for the installation of sockets in drywall to be carried out as correctly as possible, it is advisable to adhere to the following recommendations:
- Take into account the presence of empty space between the drywall and the main surface of the wall (it must be at least 4.5 cm and the glass must be placed freely at the base). You can deepen the base using a hammer drill or chisel.
- Even at the stage of assembling the gypsum plasterboard structure, in the place where the socket is planned to be installed, it does not hurt to bring the wiring out with a margin of 20-30 cm.
- When installing several devices, use a building level to correctly mark and install sockets.
- Electrical wiring inside the structure should only be carried out while protecting the electrical wires from possible mechanical influences (in a corrugated sleeve) in order to minimize their damage during installation or operation.
- It should be taken into account that when creating holes you may come across the metal profile on which the gypsum board is based. To prevent this from happening, use a powerful magnet. Place it against the wall and move along the surface to find out whether there is a metal profile behind the ceiling.
- If you still come into contact with a metal structure, then you should not despair. Since there is no need to move the holes for the sockets to another location. The fragment of the profile that interfered with the work is cut off using iron scissors or knocked out (bent) with a simple chisel.
When making repairs, you most likely have thoroughly calculated everything. But after a certain period of time, you may need to install an additional switch, you will need to hang a picture or change the location of wall lights. And then chaotically laid wiring can turn out to be a serious problem. Because using a hammer drill or electric drill can easily cause damage to hidden electrical wiring and cause a short circuit. To avoid such surprises, place the electrical wiring parallel to the floors, adding a few 90-degree turns. It is advisable to record the laying diagram: sketch out a plan, a sketch, or simply take a photo, at least on your phone. Then, in a few years, you will be able to drill into walls at any point without any obstacles or doubts without any undesirable consequences for electrical wires.
Mounting a socket into a plasterboard wall is quite simple and can be done with your own hands. Following all the above recommendations, such a procedure as installing electrical sockets in a wall made of gypsum plasterboard will be implemented most correctly and in the shortest possible time.
To learn how to select and install a socket box in drywall, see the following video.
Drilling steps
When drilling holes in concrete structures, a certain procedure must be followed. It includes the following steps:
- Selection of suitable crowns and tools.
- Applying preliminary markings.
- Removing interior items from the room that may become dusty. Heavy furniture can be covered with fabric or film.
- Use of protective equipment: respirator, overalls, glasses, gloves.
- Enabling drilling mode on the hammer drill panel.
- Drilling holes according to the markings. The tool should be positioned level and without distortion; there is no need to press it into the material.
- Any fragments remaining in the hole can be removed with a chisel or hammer.
What to look for when purchasing
To select a socket box, the following factors are taken into account:
- Material. Due to the fact that the fastening technology involves built-in installation, the product should not melt or ignite when heated. Electrical wiring is prone to fire, especially at joints, so it is better to give preference not to cheap plastic parts, but to products made of propylene or other non-flammable materials.
- Correct form. Low-quality products may have distortions and displacements of the walls, which does not allow the socket to be correctly inserted into the box.
- Movement of the propellers. To securely attach the installation module to the drywall, the self-tapping screws must attract the tabs well, preventing slipping or twisting.
- Availability of quick-removable plugs. A ready-made hole for the cable eliminates the need to form it yourself.
- The ratio of the sizes of the box and the socket box. To supply all the parts without complex adjustments, it is better to give preference to one manufacturer.
- Possibility of using a connector. This part allows you to quickly create a double or triple block by joining single boxes.
Among the variety of socket boxes for drywall, round models are considered the most functional, since most of them have special connectors that allow you to assemble blocks of unlimited sizes.
High-quality products must have the necessary safety and compliance certificates.
Safety precautions at work
When drilling into concrete walls is quite dangerous, it is very important to follow certain safety rules:
- You should not drill into the walls with cutting elements after the plaster has been applied - you can hit a whole bunch of different cables.
- Use an impact drill or a so-called two-handed hammer drill to avoid injury.
- You also need to lean on something when you use special bits; under no circumstances lean on the steps of a wooden ladder, otherwise, due to the inertia force from the hammer drill chuck, it is quite possible to fall and get injured.
- Never press the hammer drills hard against the wall; increase the feed gradually.
- The use of crowns should be preceded by a thorough study of safety regulations.
Remember, the quality of the work performed depends not only on the tools, but also on the professionalism and experience of the workers
It is very important that all work is carried out only by specialists, because there are many nuances in this work
Installation of a socket box in a concrete base
If you have already decided where your sockets will be located, you can begin installation work, which consists of several stages.
Before installing the socket box in concrete, markings are made, then a hole is made in the wall and a gypsum solution is prepared.
Step 1 - marking the wall
The sequence of marking work is as follows:
- Using a tape measure, measure the distance from the floor to the intended installation location of the socket box;
- if the floor covering has not yet been laid, then you need to add another 5 cm;
- using a building level, draw two lines: horizontal and vertical with an intersection point at the place where the box will be installed;
- Place the glass against the wall and trace it with a pencil.
If two or more socket boxes are to be installed, then first draw a horizontal line using a building level. It should be located at the distance from the floor where the sockets will be placed.
Find the center of the first box and draw a vertical line through it. Then set aside exactly 71 mm and draw the second vertical. The center of the second glass will be located in this place. The marking of the following socket boxes is done in the same way.
Step 2 – punching a hole in the concrete
There are several ways to make holes in a brick or concrete wall. The simplest of them is using a concrete crown with pobedit teeth, which, when cutting into the wall, makes a circle of the required size.
In the center of the crown there is a drill bit made of pobedit for making a central hole.
Since standard socket boxes have an outer diameter of 67-68 mm, a crown with a diameter of 70 mm is suitable for the job. The nozzle is put on a hammer drill or drill, placed on the marked line and a hole is made.
Then the nozzle is pulled out, and the entire remaining layer of concrete is knocked out of the hole with a chisel and hammer.
If you don’t have a concrete crown, you can make a hole with a drill with a Pobedit drill bit. First, a central hole is drilled to the entire depth of the nozzle, and then holes are made along the circumference line with the same drill.
The more of them, the easier it will be to hollow out a hole of the required diameter and depth with a chisel and hammer or hammer drill.
Another way is to make a square hole using a grinder with a diamond blade attachment. First, the central lines are cut, and then along the entire perimeter of the socket box. The process, as always, is completed with a chisel and hammer.
Step 3 - installing the box into the wall
After the hole is made, you need to clean it well and insert a socket into it for fitting. It should fit freely in width, and in depth there should be a margin of approximately 5 mm for the solution.
If everything worked out as it should, then now you need to make a passage from the top or bottom of the hole (depending on the location of the electrical wiring in the room) for laying the wire.
The socket box also needs to be prepared. We turn it over with the bottom side where the slots for the wires are and cut one of them with a knife. We run the wire there and insert the box into the wall to check.
To secure the glass, prepare a solution from plaster or alabaster, which should have the consistency of sour cream. It is worth considering that the solution made from these materials hardens very quickly, and you have no more than three to four minutes to complete the process of installing the socket box. After five minutes the mixture will no longer be suitable.
Two minutes before placing the box in the wall, the hole is moistened with water. After the liquid is absorbed, a layer of gypsum is applied to its walls with a spatula. A wire is threaded into the glass, its back part is also smeared with the solution, and the socket box is inserted into the hole.
Adjust the position of the box so that its edge is flush with the wall and the screws are horizontal.
Step 4 - combining several socket boxes
How the marking of two or more electrical outlets is carried out was described above. Holes are made using the same methods as for a single box. The only difference is the need to connect the holes together. This can be done with a chisel or grinder.
Before installation work, the socket boxes must be joined to each other using a side fastening element. Installation into the wall is carried out similarly to the installation of a single glass.
An important point that you must pay attention to when attaching a block of boxes is the strict alignment of the socket boxes horizontally while fixing them in the wall with gypsum mortar. It is necessary to carry out this part of the installation only using a building level
Types of crowns for concrete
To work correctly with concrete or other material being processed, you need to select the appropriate type of tool.
- When choosing a crown, you need to consider the following conditions:
- properties of the material being drilled;
- drill power;
- working conditions.
- Depending on the material used, they are classified:
- Crowns made of carbide steel with pobedit edges (budget option).
- Diamond coated.
- For stone and concrete made of tungsten carbide alloys.
- Based on the standard of fastenings, the following types are distinguished:
- triangular;
- hexagonal;
- SDS Plus;
- SDS Max.
The most popular shank mount is the SDS Plus standard; this technology corresponds to the connectors of all modern rotary hammers. The diameter of the fastening part is 10 mm, the depth of immersion in the cartridge is 40.
Carbide (pobedite)
Crowns for socket boxes with carbide tips (surfacing) are most often used. They are cheaper than other crowns and are used for drilling under normal conditions, at home for personal use.
Such a crown is created by applying soldering of a durable alloy to the cutting surface of the tool. The peculiarity of such drills is that the soldering tips fly out during drilling when they hit the reinforcement. Therefore, they are not suitable for areas of concrete with reinforcement.
This is the most popular type of crowns, popular in everyday life under normal drilling conditions. On the cutting edge of such a nozzle for socket boxes there are solderings made of pobedit (an alloy of tungsten and cobalt). Their advantage is their low price and large assortment, which includes fairly high-quality products from Russian manufacturers.
The disadvantage is the high risk of edges flying off during concrete drilling, especially with Chinese drill bits. Moreover, it increases when working with reinforced sections. But with proper use, cooling breaks and changing attachments while drilling metal, Pobedit bits for socket boxes will last quite a long time.
Tungsten carbide
Crowns for socket boxes with tungsten carbide coating are used for drilling ceramic tiles except concrete, stone and brick. This type of tool is very convenient for working with different materials at the same time: it does not need to be changed and you can go straight, for example, from drilling concrete to creating holes in ceramic tiles, and then to working with brick or stone.
This tool combines the properties and technical characteristics of several crowns. The tungsten carbide bit has a hex shank and is used for drilling with a conventional drill. Its power must be 800 W or more. The only significant drawback is that this type of crown fails when it comes into contact with reinforcing bars or metal elements.
Suitable not only for drilling concrete, but also other hard surfaces: brick, stone, ceramic tiles. When working with various materials, there is no need to replace nozzles, the only thing is that they fail at the slightest contact with the fittings.
This bit is suitable for drilling concrete with a drill (provided its power is at least 800 W); most often it has a hexagonal shank. In fact, this is a universal product with a very budget price (from 800 rubles). But, unlike diamond-coated crowns, they are subject to wear without the ability to self-heal, and periodically there is a need for sharpening or complete replacement.
Diamond
The strength of such a crown is similar to a diamond wheel - it cuts concrete just as well. This product is most effective for drilling concrete and reinforced concrete. A high-quality tool of this type has a high price, but this is justified by durability, savings in labor costs and time. This crown is ideal for performing large volumes of work.
The cutting surface of this tool is coated with industrial diamonds and is capable of cutting through reinforcement. It is suitable for working in very difficult areas. When working with it, it is still recommended to avoid areas with metal - this will prolong its working capacity.
The cutting edge of this variety is coated with industrial diamonds, which allows it to be used even on reinforced areas. But its main purpose is to work with concrete; in order to extend the life of the tool, it is still better to replace the attachments when drilling metal. They are purchased mainly for rock drills or drilling rigs, most have an SDS Plus shank.
- In comparison with carbide types, a diamond crown for a rosette in concrete has the following advantages:
- Obtaining a neat hole with ideal geometry, without chips and other drilling defects.
- There are no restrictions on penetration depth.
- Versatility and multifunctionality: diamond attachments for socket boxes work well not only with concrete, but also with any other hard materials.
- Minimum level of noise and vibration, which is especially important when carrying out repairs in apartment buildings.
- High drilling speed is the main advantage; even when working with thick slabs of concrete, the process of creating a high-quality hole for a socket box rarely requires more than 5 minutes.
- Low level of dust generated.
Diamond bit for concrete - nuances of use
Before starting the drilling activity, you should select the required size of the bit for the rosette in concrete and assemble it.
- Assembly involves performing the following operations:
- Fixation with a guide drill bolt.
- Attaching the cutting bowl to the shaft thread.
- Checking the strength of the assembly and the absence of backlash.
- When creating a cavity using an assembled crown, follow these steps:
- Make markings and mark the coordinates of the location of the future outlet or switch.
- Drill a hole in the center of the cavity with a regular drill.
- Fix the assembled bit in the power tool chuck and insert the centering drill into the drilled channel.
- Turn on the electric drill or hammer drill and, using little force, drill a hole to install the socket box.
When performing work, it is mandatory to use personal protective equipment - goggles and a respirator. After drilling, remove the drilled part and allow the equipment to cool.