Drill is a power tool that is found in almost every home. As a rule, inexpensive models that are not intended for intensive use are purchased for household purposes.
Unlike professional power tools, they have a short service life and break down quite often.
One of the weakest points in a household drill is the start button. During operation, the main control element often oxidizes or burns out contacts.
If at some point the drill stops responding to the start button or begins to work intermittently, do not rush to send the tool for repair.
Replacing the button in a drill is so simple that even a novice technician can handle it. And so that no questions arise during the repair process, we have prepared simple and understandable instructions for you.
First, it should be noted that the elements are identical for all drills, regardless of brand and model, so the instructions below are universal.
Possible tool malfunctions - we carry out repairs ourselves
If your tool begins to work worse, or even stops performing its direct duties, it’s time to diagnose the problems and try to deal with them. First, we check the wire for damage and the voltage in the outlet, for which you can plug in any other device - a TV or a kettle.
If you are inspecting battery-powered devices, they should be checked using a tester - in this case, the voltage indicated on the case should have a similar value to the battery voltage.
If the voltage is less, you will have to replace the batteries with new ones. If the battery is working normally, the power supply is normal, look for hardware problems. The most common breakdowns are:
- Problems with engine operation;
- Brush wear;
- Problems with the button operation.
Knowing how the electric drill button is connected, you can quickly solve the problem. In addition, a problem with the operation of the drill can also arise due to the dustiness of the tool, because the drill “takes” wood, brick, and other materials. This means that you should take care to clean the device after each use - this is the only way to reduce the risk of malfunctions due to contamination of the tool. That is why, after you have carried out renovations in your apartment, immediately clean the drill.
Drill button connection diagram - how to fix the problem?
Unfortunately, to check the functionality of the tool, a tester will not be enough for you, which is due to the fact that most of the device’s buttons are equipped with smooth speed control, and therefore a regular tester may give you incorrect data. In this case, you will need a special connection diagram for the drill button. Often in instruments one wire is connected to a terminal, and therefore pressing the button simultaneously leads to ringing of the terminals. If the light comes on, everything is fine with the button, but if you notice a malfunction, it’s time to replace the button.
How to connect the drill button yourself?
Despite the fact that this process is quite complicated, you can do all the work yourself, following some important rules. For example, remember that opening the case may cause all parts and loose parts to simply fall out of the case. Naturally, this should be avoided, because then it will be quite difficult to assemble the device together. To do this, you can smoothly lift the cover, noting the exact location of the spare parts on paper.
The button is repaired as follows:
- First, the clamps for the casing are hooked, after which it is carefully pulled together;
- All rusted and darkened terminals are cleaned of carbon deposits, for which you can use alcohol or sandpaper;
- We reassemble the tool, making sure that all parts of the device are in place, and check the functionality of the drill - if nothing has changed, we change the part;
- We fill the speed regulator with a compound, and therefore if a part fails, we simply replace it;
- A frequent breakdown is the abrasion of the working layer under the rheostat - it’s better not to repair it, it’s just a waste of time, it’s better to buy a new one and replace it.
Many people are interested in where to get such a scheme? First of all, it should come with the instrument when you purchase it, but if there is no diagram or you have lost it, you will have to look on the Internet. After all, only with its help will you be able to carry out repairs competently, without errors. By the way, the speed control button and the reverse control button are located in different places, and therefore you will have to check them separately.
Manufacturing a soft start socket
The most important requirement for such an outlet is its mobility. Therefore, you will need a carrier.
With its help, you can smoothly launch the tool anywhere - in the garage, at the dacha, during the construction of your house in different areas of the construction site.
The first step is to disassemble the carrier.
The main power wires in it can be either soldered or connected to screw terminals.
Depending on this, your additional outlet will also be connected. This should be an additional socket near the carrying case in order to be able to simultaneously connect the instrument in different modes.
By the way, if you mistakenly turn on an angle grinder or circular saw that has a factory built-in soft start into an outlet that is also equipped with such a soft starter, then surprisingly everything will work. The only thing is that there will be a delay in starting the saw or turning the disk for a couple of seconds, which is not very convenient to use and can be puzzling if you don’t get used to it.
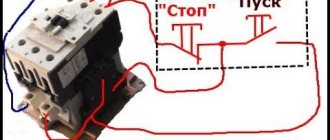
Here are real tests of such a connection, carried out by one master from YouTube BaRmAgLoT777. His comment after such tests on a Dremel type engraver, a Bosch drill, a Makita router, and an Interskol circular saw:
Next, to assemble the socket, take a stranded copper wire with a cross-section of 2.5 mm2 and strip its ends.
Then you need to tin the contact pad on the carrier where this wire will be soldered.
Securely solder the cable cores to these pads.
Carefully lay out the wires and close the extension cord.
Take a square external socket for installation on the outer surface of the walls, and try on a soft starter unit in its housing. Since it has compact rectangular dimensions, it should fit there without any problems.
Mount and secure the socket body on the same platform as the extension cord.
The PP block is connected to the gap of any wire, phase or neutral. Do not confuse it, phase and zero are not supplied to it at the same time, i.e. 220V.
It is installed on one of the wires.
Also for this BPP, there is no difference on which side to make the entrance and on which side to make the exit. The twists are soldered and insulated with heat shrink.
After that, all the insides of the socket are assembled into a housing and all that remains is to close the entire structure with a lid.
At this point, the entire reworking of the carrying case and the manufacture of the socket can be considered complete. It will take you no more than 15 minutes.
Checking the electric motor: causes of breakdowns and repairs
There are several reasons for damage to the armature or stator of a drill. First of all, this is illiterate operation of the device. For example, many users simply overload the tool, working without interruption. This leads to the fact that the drill motor does not have time to “rest”. The second reason lies in poor coil wire, which is often found in cheap models. That is why breakdowns of cheap tools are much more common. In this case, repairs must be carried out using specialized tools. And it will be better if you entrust this work to professional specialists.
However, if you decided to carry out the repairs on your own, you will definitely have a question - how to do everything right? As you already understand, an electric drill “suffers” from damage to the armature and stator, and this can be checked with several signs, for example, when the tool suddenly sparks during operation. If there are no “bright” signs, you can use an ohmmeter.
The stator is changed like this:
- First, carefully disassemble the device body;
- Remove the wires and all internal parts;
- After finding out the causes of the breakdown, we replace the spare part with a new one and close the housing again.
Disadvantages of power tools and service life
It is well known that not every tool is equipped with such soft start circuits. They mainly come in expensive models from well-known brands Bosch, Hilti, and DeWalt. Moreover, both in the network line and in the battery one.
A power tool without such a device has a bunch of disadvantages:
- armature sparking on the commutator with armature lamellas burning out
- brushes burn out and wear out faster
- rotor and stator windings fail more often
- current surge into the general electrical network
- gears hitting each other and operating faster
- dangerous jerk when starting, tearing the tool out of your hands and increasing the risk of injury
When working with a miter saw with a PP, the blade will not stray from the prepared cutting point. Which is important for non-professional carpenters.
If at your dacha or in your house at the initial stage of construction there is no electricity yet and you use a generator, then sooner or later you will understand that without a soft start unit (soft start unit) with sharp initial currents, the generator will not last long. Therefore, such a thing can save not only the tool, but also emergency power supplies.
You can, of course, independently build a BPP into the inside of the same grinder or trimmer, but not everyone wants to disassemble the equipment and tinker with the insides.
Plus, opening a new case will void the warranty. Therefore, the best use for the KRRQD12A unit is external connection.
Just keep in mind that it is suitable for commutator motors. For asynchronous ones, a frequency generator with different regulation principles is needed.
This box is designed for a current of 12 Amps.
There is also a more powerful 20A model.
What is typical is that they have the same dimensions, but the difference in price is a couple of tens of rubles.
It would seem better to take it, but for a standard 16A socket the first option is more profitable. There will be no desire to connect a more powerful load and thereby burn all the contacts.
DIY craftsmen, of course, assemble similar circuits with their own hands, based on VTA 12-600 or other thyristors, capacitors, a dinistor and a couple of small resistors. You can find many examples of schemes on the Internet.
But for the average user of the instrument, it is much easier to buy all this in a ready-made compact case. You can order a similar block using the link here.