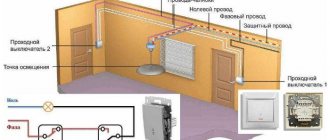
Nowadays, even preschool children actively use the Internet. Therefore, in houses and apartments, several digital devices are often simultaneously connected to the World Wide Web. Basically, the connection to the network is carried out using Wi-Fi technology. However, to use the wireless protocol, you need to install a router that connects to the Internet via a wire.
Typically, electrical cables in apartments and houses are laid in a hidden way. The wires are connected to sockets. Through them, devices are connected. To connect to the World Wide Web, sockets of a different standard are used. They are called information or computer end elements of the network.
Internet sockets are available with different connectors. They have an unusual shape, a large number of wires, the connections of which are made in a special way, and not by soldering or twisting. Therefore, it will be useful to know how to connect an Internet outlet and the corresponding connector. This will allow you to do the work yourself. As a result, you will be able to save money, since you will not have to seek help from specialists.
RJ-45 connector: connector description
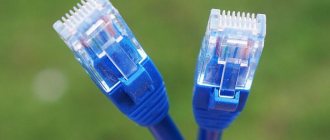
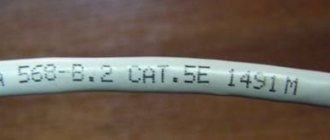
Twisted pair is an Internet cable. It is he who is first installed in a private house or apartment, so that digital devices can subsequently be connected to the World Wide Web. The Internet cable usually ends in a small plastic connector. It's called a connector. There are several types of computer connectors. Among them, the most common is the RJ-45 connector. Experts often call the information connector for connecting an Internet network “Jack”.
The connector has a transparent body through which multi-colored wires are visible. In addition to connecting to the Internet, RJ-45 connectors also allow you to connect computers with each other and with modems via cables. In this case, the connection of the connector to the cable differs in each case in the order of arrangement of the multi-colored wire strands. The distribution of conductors by color in professional language is called pinout. Knowing the exact sequence of wiring the colored wires, you will be able to correctly install the RJ-45 socket.
Types of certificates
To avoid mistakes when choosing, familiarize yourself with the certificates and standards for HRH in advance.
- CE - product compliance with European Union standards; the presence of the “CE” mark guarantees the quality and characteristics of the product.
- VDE certification was approved in Germany on the basis of the Institute for Testing Electrical Engineering, Electronics, and Information Technology. The quality standards for products with this certification comply with German standards.
- The OVE standards of the Austrian Electrotechnical Association, founded more than 100 years ago, today set the world's highest standard for certification of electrical equipment.
- The NF certificate is issued by the French testing bureau. This standard involves quality assessment by an independent body, and its full compliance with the standard of safety, quality and effectiveness in France.
Internet cable connection diagram by color
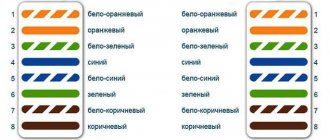
When connecting an Internet cable, one of two schemes is used: T568A and T568B. They are equivalent, but differ in the layout of the colored wires in pairs. In Russia, type “A” distribution is almost never used. In the Russian Federation, the second color-based Internet cable connection scheme is used - type “B”.
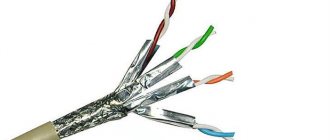
An Internet cable can have 2 or 4 pairs of wires. The speed of information transfer through a two-pair wire is a maximum of 1 Gb/s, and in a four-pair cable it is already 1-10 Gb/s.
Now apartments and private houses are mostly equipped with 2-pair cables with 8-pin connectors. After all, most providers offer to use the Internet at a speed of no more than 100 Mb/s. However, it is possible that the service provided will improve thanks to new technologies. This will allow ordinary users to receive and transmit data over the Internet at speeds of several Gigabits. Therefore, when making a new connection, it is better to immediately install a 4-pair cable into an apartment or private house. Thanks to such twisted pair, when increasing the speed of information transfer, you will not have to lay a new wire.
To transmit a signal, the connector uses contacts: 1, 2, 3, 6. A conductor of a certain color is connected to each of them. If the connection is made according to the T568A scheme, information is transferred using white-blue, blue, white-brown and brown wires. When the connection is made using the T568B standard, the signal is transmitted through a white-orange, orange, white-green and green conductor. The listed cores are connected respectively to contacts 1, 2, 3 and 6 in the connector.
Security code
The IP code is a European system that helps determine the degree of protection of a device from external influences. It uses a two-digit system, the first characterizes the possibility of foreign objects and dust getting inside. The scale starts from 0, where there is no protection, to 6, where there is complete protection from dust. The second number ranges from 0 (no protection from moisture) to 8 (withstands prolonged immersion in water).
IP20 is the typical level of protection for indoor devices. In case of high humidity in the room, it is better to choose a device with degree of protection IP44.
Crimping twisted pair connector
The multi-colored wires of the Internet cable are crimped into the connector using special pliers. They allow you to simplify the connection of a twisted pair cable to a connector. Their cost varies from approximately 200 rubles to 1500 rubles. If you don’t plan to crimp connectors every day, feel free to take the cheapest option or you can ask your friends.
The process of connecting an Internet cable to a connector is as follows:
- Insulation with a length of 70 to 80 mm from the end of the wire is removed from the twisted pair.
- Multi-colored conductors connected in pairs are untwisted, straightened, separated on different sides and laid out in accordance with the “B” standard. If a shield wire is present, it is not used. You just need to bend it to the side.
- The spread out multi-colored conductors are clamped between the index finger and thumb. The wires must be laid out evenly and tightly.
- Aligned conductors are cut with wire cutters. Their length should be from 10 to 12 mm. It is recommended to attach the connector to check. This will ensure that the internet cable insulation starts above the tab-like latch on the connector cover.
- The conductors cut to length along with part of the twisted pair insulation are inserted into the connector. In this case, the connector must be kept with the latch down, and each core must be located in its own separate track. The multi-colored wires are inserted into the connector all the way. They should rest against its opposite edge.
- The connector is inserted into special pliers. In this case, you need to hold the Internet cable at the edge of the connector.
- Without sudden movements, the arms of the pliers are brought together. If the RJ-45 is positioned correctly in the tool, no excessive force will be required. Otherwise, it is necessary to rearrange the connector in the pincer socket.
As the handles are brought together, protrusions in the tool push multi-colored conductors toward the microscopic blades of the connector. Sharp edges cut through the insulation on the conductors. The result is a reliable connection. If problems arise with it, which happens extremely rarely, the fixed “Jack” is simply cut off and a new connector is installed by performing the steps described above.
Video tutorial on crimping a connector:
Bottom line
Construction or renovation of a house or apartment involves electrical installation work. Not everyone knows how to connect sockets. If you have no experience, it is advisable to call an electrician; he will not only make the task easier, but also tell you where to buy and how to install this or that socket.
Everyone determines the selection criteria themselves; after reading the description and reviews of the product, you can easily cope on your own. Many websites offer product comparisons and make it easy to find out how much each product costs.
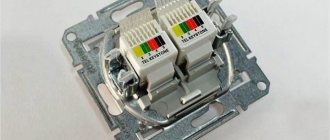
Types of Internet outlets
Manufacturers produce two main modifications of Internet sockets:
- Product for indoor installation. It is fixed in the wall. To do this, first fix its mounting box made of plastic. The contact part of the device is installed into it. Then the entire structure is covered with a decorative plastic panel.
- Product for outdoor installation. Outwardly, it looks like a regular telephone socket. The product for outdoor installation has a small double housing made of plastic. Its back part is fixed together with the contact plate on the wall. Then the twisted pair connection is made. At the end, the outer part of the housing is fixed.
The two types of Internet outlets differ in appearance. However, they have the same principle of connecting to twisted pair, which was described above.
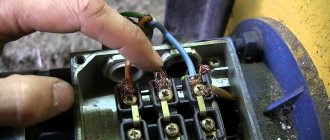
Installation of the terminal block and mounting of the cover plate
After checking the signals, we move on to the final part of installing the Internet outlet.
To do this, carefully hide the rest of the wires and return the terminal block with the connected conductors back to the socket of the socket, tighten it with the fixing bolts to the built-in “glass”.
The terminal block should “sit” tightly in the socket, there should be no protruding or kinked wires.
If the terminal block does not fit into the recess of the wall, then you can cut out the back part of the mounting “glass”. Usually, when installing the terminal block, a couple of mm are missing
Once again, we check that the connection is correct; to do this, we connect a device, for example, a laptop, and see if it detects a connected local network or the Internet.
If there is no connection on the device, we return to the pinout point and re-check the correctness of the actions performed, as well as the quality of the compression. It often happens that one of the cables is simply not sufficiently pressed into the terminal block. To do this, you just need to recess the core clamp more tightly.
After an additional check of the network’s functionality, we trim off all remaining protruding wires and proceed to installing the cover plate. The cover is usually equipped with several plastic latches.
It is enough to accurately place it on the socket of the socket and press until you hear a clicking sound. That's it, the Internet socket is installed and ready for use.
If the signal does not pass through when checking the connection, you need to check the quality of the contact. It is possible that it is simply weakly clamped
How to connect a computer wall socket
Manufacturers produce information sockets with tips. They are placed inside the products. They allow you to learn how to connect an Internet cable to an outlet. Manufacturers place a colored sticker inside the product body with a diagram of how wires are connected to terminals according to standard “A” and “B”.
To connect an Internet outlet in Russia, scheme “B” is used. To begin with, the case is fixed to the wall so that a twisted pair can be inserted from below and a connector can be connected from above. Then perform the following actions:
- Insulation approximately 50-70 mm long is removed from the end of the Internet cable. In this case, you must not damage the protective layer on the conductors.
- The twisted pair is inserted into a plastic clamp and fixed so that only multi-colored wires remain below the fastening element. In this case, the cable is secured along the edge of the main insulation of the wire.
- Multi-colored conductors are connected to microknife contacts in accordance with the connection diagram of the Internet outlet. You need to try to reach each of the cores to the bottom of the contact. If you succeed in doing this, then you will hear a click. This sound means that the conductor is installed correctly and its insulation has cut through. If clicks are not heard, each multi-colored wire is forced down to the bottom of the contact assembly using a flat-head screwdriver. You can also use the non-sharp side of the knife.
- The protruding ends of the connected conductors are cut off.
- The internet socket cover is placed on a fixed base with a connected contact group.
Even an inexperienced person can connect an Internet outlet. The job is usually completed in a few minutes. Short video instruction:
Checking Wiring Signals
It is worth mentioning separately the possibility of checking the presence, and most importantly the correctness, of signals passing through the 8 cores of a twisted pair cable. This can be done using a regular electrical tester.
But first you need to have a patch cord (ready-to-use wires at both ends of which are mounted, again according to a direct pinout pattern, RJ-45 connectors) and a second unmounted Internet socket or keystone.
You can buy a regular patch cord either in a store or make it yourself (connectors using a direct pinout diagram). Standard length patch cords range from 0.3 m to 5 m
We first mount the second end of the laid wire into an unmounted socket/keystone, into which we insert one end of the patch cord.
We switch the tester to the sound signal mode and compare the corresponding channels of the connectors on the patch cord and in the Internet outlet. We receive a sound signal that indicates the presence of a connection.
Not every electrical tester has a beep mode. Therefore, to check, you can switch to resistance mode and monitor the data on the digital panel
There is also the option of checking signals using special cable testers, but this requires another ready-made patch cord that works in a direct manner. We insert one end of each patch into sockets (new and temporary), and insert the other two into the tester cable.
Light and sound on the tester panel indicate the presence or absence of a signal on a particular twisted pair core. We look and check the signal.
Some cable testers, in addition to checking the presence of a signal, provide information about the cable category. This function is quite useful for premises certification
Ideally, we will receive 8 light and sound signals in sequence on the cable tester. In these two ways, you can check the correctness of the pinout and the presence of a full signal for data transmission via twisted pair.
How to connect an internal Internet socket
Before starting work, you need to disassemble the computer socket. This is necessary to gain access to the contact group. This part of the product with microknife contacts is made of plastic or ceramic. Multi-colored conductors are connected directly to it. After this, the housing is assembled. The difficulty of the process lies in the fact that information sockets from each manufacturer are disassembled and assembled differently.
Connecting a legrand internet outlet
French Legrand computer sockets are in great demand. Often users install the Valena RJ45 model. Therefore, they are interested in how to connect a Legrand internet outlet in this design.
During installation, the front cover of the product is first removed. Then the white plastic impeller turns in the direction of the arrow. This will allow you to gain access to the plate with the contact elements. Then the cable is threaded through the hole on it. After this, all that remains is to connect the Internet outlet according to the T568B scheme. The color marking of the conductors, which is applied to the contact plate, will help to perform the operation.
Connecting a Schneider Internet outlet
Another French company produces high-quality information sockets - Schneider. They are installed in apartments, offices and private houses. Therefore, many users want to know how to connect a Schneider Internet outlet.
Installation begins with removing the decorative panel. Then, using a knife or small screwdriver, press the latch on the connector mechanism. This will allow you to open its cover with microknife contacts. Then an Internet cable is threaded through a special hole without the main insulation at the end. Next, you need to connect the Internet outlet according to diagram “B”, securing the multi-colored conductors to the corresponding terminals.
Connecting a Werkel internet outlet
Computer sockets of the Swedish brand are also popular among users of the World Wide Web. The products differ in design. Therefore, users need to understand how to connect the Werkel Internet outlet.
To begin work, you need to turn the lock on the back of the product counterclockwise. Thanks to this action, the panel cover with contacts will be disconnected. Then the end of the twisted pair is passed into a special hole, which is located in the center of the removed cover. After this, all that remains is to connect the Internet outlet according to the “B” type diagram.
Connecting a Lexman Internet outlet
To connect digital devices, users often also install Lexman sockets. They are affordable and of good quality. Therefore, you need to find out how to connect a Lexman Internet outlet.
First you need to remove the front panel of the product. To do this, two side latches are snapped off. Then the central part is removed. Then the cover is lifted over the terminals. Now all that remains is to connect the Internet outlet according to the diagram that complies with the “B” standard. To avoid errors, you need to take into account the information on the colored stickers placed on the product. After laying the conductors, the cover is lowered onto the terminal block and the socket is assembled in the reverse order.
Checking the network functionality
Now we can check how successfully we connected. To do this, you need to connect your laptop or PC one by one to all the sockets that we installed and try to access the Internet. If any of the outlets does not work, you need to check:
- correct connection of the outlet itself;
- correct connection of the cable to the router (including the quality of the connector crimp);
- integrity of the wire along the way from the router to the outlet.
There is another way to find out the performance. If your router has LAN connection indicator lights (they are usually located on the front panel), then you can connect PCs or laptops to each outlet (either simultaneously or one by one). If the corresponding LAN indicator lights up, everything is fine, there is contact. If not, you need to check for problems.
It is best to check the signal before installing the front panel and decorative plate of the socket.