A wired Internet connection is considered more reliable than switching devices via Wi-Fi. Twisted pair transmits the signal stably, despite distances and interference, which are often critical for a wireless network.
Sometimes you need to extend or repair the Internet cable, but you don’t have time to wait for a technician to arrive. Agree, in this case the ability to build a network cable yourself will come in handy.
We suggest you figure out how to connect twisted pair cables to each other, which method is the most reliable, and which method is suitable as a temporary solution.
What are internet sockets used for?
Review and configuration of the D-Link Dir-320 modem
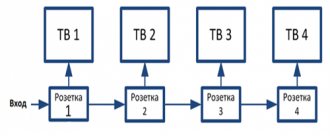
To connect to the network, the master lays a long electrical cable, which is attached to the panel, and the other end is connected to the computer. You can hide the wire in the baseboard or put it behind furniture. But what to do if we are talking about more than one device that requires connection (TV, set-top box...)? Based on this, it is better to think about how to connect the Internet cable in the future and conduct hidden wiring.
Important! A typical router typically has 4 outputs. Based on this, you need to lay the same number of network cords in the rooms. Assemble the crimped ends together and connect them to the LAN port.
Direct connection
Before crimping the Internet cable, it is stripped of external protection. You can easily get rid of the first layer thanks to a special thread on the wire. Unwind and straighten small elements.
The next step is to measure the length for cutting. To avoid mistakes, use an adapter. Only a small portion of the outer protection should enter the connector. Inside it there are divisions intended for each individual wire. The outer shell should fit under the adapter clamp. The connector must touch the insulated part of the wire.
The last stage is fixing the cord in the contacts of the adapter. For this you will need a crimper.
Application options for Internet sockets
The area of use of the information outlet is very extensive. They are widely in demand in specialized premises:
- in offices and classrooms;
- Internet clubs and electronic libraries;
- workshops for repair and maintenance of gadgets and computer equipment.
What are the differences between 3G and 4G networks: features, advantages and disadvantages
Note! The presence of twisted pair connectors is a prerequisite for server rooms. This ensures the connection of computer stations for work.
The rapid development of technology is driven by consumer needs. Search tools are in great demand in the field of education, from kindergarten to college.
For workers who deal with computers and other office equipment, the presence of this kind of socket is mandatory.
Another example where their installation is considered a prerequisite is corporate or government services (banks, storage facilities, courts, etc.). In this way, information leakage is prevented as much as possible.
twisted pair
This type of cable communication is used when creating computer or Internet networks. Due to the low cost and ease of installation, this type is used in offices, telephones, and apartments. Consider what kind of twisted pair cable circuit it has.
There are single-pair and multi-pair products. In the first case, two braided conductors are used inside; in the second case, more than two pairs of conductors are used.
You can crimp a twisted pair network cable (do crimping) in several stages. First, it is cleared of external insulation, after which it is straightened and untwisted. Next, install the connector and clamp it.
What types of internet sockets are there?
Internet socket rj 45 can be found in two different versions:
- Outdoor. This type of socket is installed on the wall. These sockets are used when the network cable runs along the wall.
- Internal. These sockets are installed in the wall. If your twisted pair wire is hidden in the wall, then for convenience and beauty use an internal socket.
Both options can be easily disassembled into several parts. One half of the case performs a protective function, the second half is designed for mounting on or into a wall. There is also an internal part, it is needed to connect the socket to the wire. It is equipped with thin contacts, with their help, with a slight pressure, the insulation of the twisted pair is cut and a reliable contact appears.
You can find single and double RG-45 sockets on sale. Internet sockets, depending on the manufacturer, will differ visually and in quality, but functionally they are all the same.
Crimping theory
And now we are approaching the crimping procedure. But there is still something to clarify, the final frontier.
You have all seen the connector at the end of a twisted pair cable, which also goes into the network connector of a network card or router. This plug has a special marking. The one that is mainly used now in the home local network is RG-45. A little about the connector design and connection.
- The twisted pair is installed in the connector socket.
- The twisted pair wires are routed through special grooves in the connector.
- The contact mechanism of the connector is knives. In store condition, they are separated, providing a path for the cable wires.
- When crimping, apply pressure to the knives, and they cut through the sheath and ensure tight contact with the wire cores.
- On the other hand, the contacts of the knives remain open - they provide a connection to the network adapter when connected.
Here is a picture of how the knives work:
And here is the connector in an enlarged view (the same wire tip or “jack”):
This connection is reliable and transmits the signal perfectly. But beginners may not be able to do enough at first - and either there will be no connection, or it will be established at a low speed (this is one of the reasons for the decrease in speed on the network). The best way to fix it is to squeeze it harder again, or re-press it again. In practice, at our university this procedure did not work out for everyone the first time - so everyone starts somewhere.
Does Wi-Fi cause cancer?
According to our statistics, only 7% of users know the correct answer to this question YES NO Reply
Classification of sockets for Internet connection
It is known that when carrying out renovations in an apartment, electrical wires suitable for sockets are hidden in the walls or behind decorative coverings. In exactly the same way, the wiring for the Internet connector should be securely hidden so as not to spoil the interior of the rooms.
Internet sockets installed in an apartment or private house are manufactured according to a different standard and are called computer or information sockets. These products have different designs, but the most common are models equipped with an RJ45 connector (universal standard).
Connectors (contact blocks) installed in Internet sockets from different manufacturers are shown in the photo below.
Please note: The simplicity of the design of such a product allows you to independently connect it to an existing Internet network, without the help of specialists.
The features of this type of sockets include not only their unusual appearance, but also the presence of a connector with a large number of contacts, as well as a special connection method. Accordingly, Internet sockets are classified (by type of connector). In addition to the option already discussed, there are the following connection designs: RJ11, RJ14 and RJ48.
The first two names are positioned as special type connectors with 6P4C format contacts. They provide a reliable connection between the cable and the actuator. Their case is equipped with a special latch that prevents the case from accidentally falling out of the Legrand socket. The RJ14 connector, along with RJ48, is classified as an interface used for connecting to various models of computer equipment.
Any model of Internet outlet comes with the manufacturer’s instructions:
- Schneider Electric Unica –
- Legrand –
- Lezard
Depending on the method of installation on apartment walls, Internet sockets can be built-in or surface-mounted. The first ones are intended for hidden wiring and are recessed deep into the wall along with the supply cable. In this case, their front plane is located on the same level with the wall surface. Overhead products are attached to a smooth wall or any other hard surface using hardware included in the delivery set.
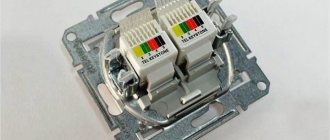
Surface socket
Depending on the number of sockets available on the front panel, such products can be single or double. In all of the listed models, the so-called “twisted pair” is used as a connecting wire.
Crimping sequence for 8-core twisted pair + circuit
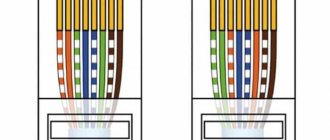
There are two standards for crimping 8-core twisted pair cables: T568A and T568B. Below is the accepted pinout for these standards.
Standards: A) T568A B) T568B
Now let's move on to the process of crimping the UTP cable. The sequence of actions is as follows:
- It is necessary to prepare the end of the cable for crimping. For molding, it is necessary to remove a layer of external insulation, approximately 25.0-30.0 mm. This can be done using a stripper or a universal crimper. The cable is laid in an appropriate platform equipped with a knife, and after squeezing the handles, a circular movement is carried out with the tool to trim the outer insulation. Removing insulation using a stripper
- We straighten the wires in accordance with the selected diagram and cut off the excess.
Do the pruning - Insert the wires into the connector. Each of the wires must reach the end of the channel. In this case, the fixing “tongue” should press the cable in the insulation. Correct and incorrect crimping is shown below.
Rice. 8. A – correct crimp, B – incorrect - We install the connector with the inserted wires into the corresponding socket of the crimper and squeeze the handles of the tool until a characteristic crack is heard. Crimping the connector with a crimper
Screwdriver crimping
We will briefly talk about this method, although we do not recommend using it, but if there is no tool, then this option may be the only alternative. If we take the instructions described above as a basis, then it will be changed only in the fourth paragraph. Using a flat screwdriver we press the knives into the connector (8 pieces).
Screwdriver as a crimping tool
Then we clamp the plastic tongue that secures the cable. We recommend preparing several connectors for this process; as practice shows, without experience, breaking the connector during the “barbaric” crimping process is easy. https://www.youtube.com/watch?v=rNNckAnvFX4
Preparing to install a power outlet
First you need to buy the computer socket itself. You can take any one. If you want something of higher quality, beautiful and usually easy to install, don’t skimp (don’t buy the cheapest ones). I have a Makel socket. Inexpensive. Something around 130 UAH. (340 rubles). There are many more good options from Schneider, Legrand, VIDEX, VIKO, Werkel, Lezard. There are double sockets, with and without frames. Here's mine:
A twisted pair cable of category CAT5E, or the more advanced Cat.6, is laid to the socket. This is a four pair shielded cable. The socket must correspond to the cable category. The outlet has this information. I have a CAT5E cable and the socket is also CAT5E. The maximum cable length is 100 meters.
This means that on one side the cable is connected to a computer outlet, and on the other side it is usually crimped into an RJ-45 connector and connected to a router, modem, or switch.
In this article I will not write about how to crimp a network cable. We already have two instructions on this topic:
- How to crimp a twisted pair cable into RJ-45? DIY network cable
- How to crimp a network cable without a tool (screwdriver)
And this article may also be useful: how to extend the Internet cable (network cable).
All this network equipment can be purchased in specialized stores. Also, computer sockets, network cables, and connectors are usually sold in digital equipment stores.
The network cable must be laid in a regular socket box. In which, after connection, our socket will be installed and secured. If you have not yet laid a network cable, but are planning to do so, then leave a supply of cable. It seems like 1 meter is recommended. But it seems to me that this is too much. I think 50 centimeters will be more than enough.
One more thing: the way you connect the power outlet may vary depending on the manufacturer. It is the process of connecting a twisted pair cable and fixing it (clamping) in the socket module. To connect such sockets, no special tool is needed.
Crimping procedure
Now let's move on to the correct way to crimp the cable. Be careful when working - the main thing is not to damage yourself, and the connectors are cheap)
Step 1. Remove the insulation
First, remove the insulation from the wire - you can carefully pry it off with scissors or use a stripper on a crimper - insert it, turn it, and the wrapper comes off. It is fragile and can be removed quite easily. You don't need to remove much insulation - a couple of centimeters from the end is enough. If anything happens, you can trim everything later. The pliers have special marks indicating at what level the coating should be cut.
Step 2. Straighten the wires
Now we take our wires, straighten them and arrange them according to the pinout diagram. From the recommendations - try straightening them with a pencil or hand - they become smooth and closely spaced to each other - which is what we need.
Step 3. Trim
Now is the time to cut and straighten our wires. We cut it either with wire cutters, or with the same pliers, or even with a knife. Leave about a centimeter of clean wire. With practice, you will learn to accurately check the distance.
Step 4. Getting into the connector
The hardest part. Now we need to insert our design into the connector. When inserted, the connector is positioned with the leg down. Why is it difficult - the wires try not to fall into their grooves, they crawl into neighbors, bend, and get tangled. Here the recommendation - patience and once again paying attention to the pencil treatment - helps.
Step 5. Insert all the way
After the hit, we press on the cable so that the wires go all the way. In this case, the wrapper will be hidden in the connector itself. If the wrapper does not fit into the connector, fractures are possible in the future. If the opposite turns out to be short, the wires will not reach the knives. So everything is done with experience and by eye.
Step 6. Crimping
Now is the time to tighten our knives - the methods were discussed above, but it is better to use pliers. Take it and live it.
Step 7. Check and refinement
Be sure to check the connection on your computer or router before putting away your tools. Sometimes it may not work out the first time. The easiest way to correct the situation before getting upset is to squeeze the knives again, but harder. It helps a lot.
If there is no connection, pay attention to this:
- Are the wires routed exactly according to the diagram? Didn't they fly out? Look through the connector.
- Have the wires reached the stop of the connector? Were the knives able to reach them?
The rest can only be attributed to cable failure.
Initially, before crimping the network cable, you can install these casings. They perfectly protect against bending near the connector, but in practice everything works without them. There are a lot of species, that’s not what the article is about. For reference.
How to connect an internet cable to a power outlet
Now we come directly to how to connect the Internet outlet. Let's start with the varieties. Like regular electrical sockets, information sockets come in two modifications:
- For indoor installation. A plastic mounting box is built into the wall. The contact part of the socket is then inserted and secured into it, and everything is covered with a plastic decorative panel on top. Computer socket RJ45 internal
- For outdoor installation. This type of socket is very similar in appearance to the usual telephone sockets: a small plastic case that is mounted on the wall. It also consists of several parts. First, the housing with the contact plate is mounted, then the wires are connected, and then everything is closed with a protective cap.
Outdoor Computer RJ-45 Outlet - Wall Mount
According to the number of connection points, there are single and double computer sockets.
Although computer sockets differ in appearance, the principle of connecting conductors is the same. There are special contacts equipped with microknives. The protective sheath is cut through the inserted conductor. As a result, the metal of the microknife contacts fits tightly to the metal of the conductor.
Inside each outlet there is a hint on how to place the wires when connecting the Internet cable. Manufacturers stick on the color scheme that we saw when crimping the connector. There are also two options - “A” and “B”, and we also use option “B”. An example of color coding on the body of a computer socket
The case is mounted on the wall, usually with the cable inlet up and the computer connector down. The next steps are simple:
- Remove the protective insulation from the twisted pair by about 5-7 cm. This must be done carefully so as not to damage the insulation of the conductors.
- In the photo you can see that there is a small plastic clamp on the board. A conductor is inserted into it and secured so that the piece stripped of insulation is below the clamp. Connecting a 4-wire wall outlet
- On the case you see microknife contacts. Connect a wire of the desired color to them and insert it, trying to reach it to the very bottom of the contact group. When the conductor passes the knives, a click is heard. This means that it is in place and the insulation is cut through. If you fail to achieve a click, after everything has been routed to the contacts according to the colors, take a regular straight screwdriver with a thin blade and force the wires down. The same can be done with the back (non-sharp) side of the knife. Eight conductors are connected according to diagram “B”
- After all the conductors have reached their place, the excess (protruding pieces) is cut off.
- Put on the lid.
Connecting a twisted pair cable to an outlet is really a simple procedure. Even the first time it will take a few minutes. You can see again what they do and how in the video. It first shows the connection of an Internet cable with 4 wires, then with 8.
Sometimes you have to get up in bed to turn off the light. But you can control lighting from several points. How - read the article about connecting pass-through switches.
We won’t describe the installation of the plastic box - that’s a different topic. Let's look at the features of connection and assembly. The main problem here is how to disassemble computer sockets. When connecting conductors to them, you need to get to the contact part: a small ceramic or plastic case with built-in microknife contacts. The conductors are connected to this mounting plate, and then the housing is reassembled. And the whole problem is that different manufacturers assemble/disassemble them differently.
For example, from the popular manufacturer of computer sockets Legrand (LeGrand), in order to get to the connectors in the Legrand Valena RJ45 computer socket, you need to remove the front cover. Under it you will find a white plastic impeller (as in the photo), with an arrow on it. How to disassemble the RJ-45 “Legrand” internet socket
You need to turn the impeller in the direction of the arrow, after which you will have the housing and the contact plate in your hands. It has color-coded conductors. The connection is no different, except that first you need to thread a twisted pair into the hole on the plate, and then separate the wires.
For clarity, watch the video.
Another popular manufacturer of such equipment is Lezard. His system is different. The front panel and metal frame are fixed with small bolts. They are easy to unscrew, but the internal contact plate is held in place by clamps. When assembling and disassembling Lezard computer sockets in the right places, you need to press out the contacts with a screwdriver. How to disassemble a Lezard internet socket
To remove the plastic contact group from the housing, you need to press the latch located on the top. After which you will have a small box in your hands. But that's not all. It is necessary to remove the plastic cover that covers and presses the conductors. Remove it by prying up the side petals with a screwdriver. The plastic is elastic and the effort required is quite decent. Just don't overdo it: it's still plastic. After that, the wiring is standard: according to the markings on the sides (do not forget that we are using diagram “B”).
And again, to reinforce the material, we recommend watching the video.
If you know how to connect an Internet outlet, it’s not difficult to figure out even an unfamiliar model. And now you can upgrade your network yourself (increase the length of the twisted pair, move the computer to another location, make another connection point, etc.), without involving specialists. One more question remains: how to connect double sockets. Two cables are connected to them and then the color scheme is added. This is possible when your network is formed by a modem or two Internet lines are connected. Is it possible to connect both inputs with one cable? It’s possible, but you need to avoid getting confused in the color designation of the wires in the further wiring of the network (remember which color you used instead of which).
Can RJ45 be reused
The connector is a disposable product and its reuse is not recommended. Theoretically, you can gently squeeze out the veins. If part of the wiring remains in the channel, it needs to be removed. All these operations will take a lot of time, there is no need to talk about their effectiveness.
In what cases is re-use acceptable? It is not permitted in any situation. Replacement is necessary when it is necessary to restore the quality of communication. If you decide to carefully remove the RJ45 to reuse it, this will not lead to the desired result. No matter how carefully the information is processed, the Internet will slow down. It is better to crimp the wire with a new product; it is inexpensive.
Crimp the network cable yourself
After installing the RG-45 outlet, you will need a patch cord to connect the Internet to the computer from it. It’s good if your computer is located a meter from the outlet, then you can simply buy a ready-made patch cord. But if the distance is 5 meters or more, buying such a length will be problematic.
Therefore, we recommend that you crimp the patch cord yourself; our article will help you with this: the procedure for crimping a twisted pair cable, all the diagrams. You can also watch on our website detailed instructions with a video on how to crimp a twisted pair cable yourself with and without a tool.
Wire selection and standards
In the last section I mentioned the categories of twisted pair, here we will consider this point in a little more detail. After all, the anatomy and transmission speed on the cord also depend on the category.
I recommended that you take category 5, but category 6 (CAT5, CAT6) is also suitable. All options are shown in the following table:
It will be important to choose a cable for the required speed. And this also depends on the number of wires inside. It usually happens like this:
- 2 pairs (4 wires) – up to 100 Mbps
- 4 pairs (8 wires) – from 100 Mbit/s
Typically, ISP technology limits you to 100 Mbps internet speed. But soon this threshold will be passed. What do I mean - usually there will be exactly 2 pairs on the Internet cable, but on home cables (from the router to the computer) there are already 4 pairs.
4 pairs, or 8 wires
Algorithm for laying Internet cables in walls
The most correct, but at the same time difficult to implement solution for laying an Internet cable in a home (office) environment is to install it inside the walls. The advantages of such wiring are obvious: the cable does not get tangled underfoot and does not affect the decorative design of the room. A significant disadvantage of in-wall installation is that in the future there may be problems with access to the cable for repair or maintenance. But with proper cable routing along grooves in a corrugated PVC pipe, you can not only minimize the risk of a malfunction, but also provide relatively easy access to the twisted pair without complex dismantling work.
Before you start laying the Internet cable, it is worth marking the places where it will be located. Remember that unshielded twisted pair cable is made of copper, which is very sensitive to electromagnetic interference. Try to keep the distance between computer and electrical wiring at least 50 cm.
- We outline the route. When planning a place for a groove for future wiring, keep in mind that the Internet cable has a certain limitation on the bending radius. Specific values can be found in the specifications of the selected cable.
It is better to lay the twisted pair in a protective corrugated hose, and make the groove taking into account its size
- Choosing a cable. The most significant quality characteristic of a twisted pair cable is reliability. Access to the cable after its installation will be significantly difficult, so it is advisable not to skimp on quality. To connect to the Internet, UTP of the fifth category and higher is most often used. You need to select a specific cable model based on its main technical characteristics:
- minimum permissible bending radius (the smaller it is, the easier it will be to install in the walls);
- maximum permissible tensile force (the higher this value, the easier it is to insert the cable into the corrugation, and in case of technical problems, subsequently remove it from the groove);
- warranty (for quality products the warranty period can be up to 25 years).
- We do installation. The cable is placed in a corrugated pipe of the required diameter (it must move freely inside it). Then the corrugation is secured in the groove with a plaster screed. Next, you can begin finishing work. As a result, an Internet socket will appear at the cable output. However, before that it is worth pinouting it.
At the exit from the wall, a standard socket box is installed, in which the housing and socket mechanism are fixed
Let's sum it up
In this collection, we have collected all the necessary information, thanks to which it will not be difficult to crimp a twisted pair cable for one or another connection scheme with your own hands, using the necessary tools. The main thing is to adhere to the basic rules; it wouldn’t hurt to repeat them again:
- The crimping must be done in accordance with the color scheme.
- It is important to follow the cable cutting rules. Let us remind you that the wires must rest against the stop of the channels. The clamp must secure the cable without removing the insulation (see Fig. 8).
- The crimping procedure allows for direct and reverse methods, but it is unacceptable to connect a four-wire and two-wire connection circuit.
- Although smart hubs allow you to combine direct and cross-connection methods, it is recommended to stick to one type of standard.
- Checking the cable with a tester allows you to quickly detect the problem.
- A high-quality tool guarantees an appropriate result. You can also purchase Chinese crimpers, but in this case the quality of crimping and the service life of the tool will be up to the manufacturer.
How to connect an internet cable to a power outlet
Now we come directly to how to connect the Internet outlet. Let's start with the varieties. Like regular electrical sockets, information sockets come in two modifications:
- For indoor installation. A plastic mounting box is built into the wall. The contact part of the socket is then inserted and secured into it, and everything is covered with a plastic decorative panel on top. Computer socket RJ45 internal
- For outdoor installation. This type of socket is very similar in appearance to the usual telephone sockets: a small plastic case that is mounted on the wall. It also consists of several parts. First, the housing with the contact plate is mounted, then the wires are connected, and then everything is closed with a protective cap.
Outdoor Computer RJ-45 Outlet - Wall Mount
According to the number of connection points, there are single and double computer sockets.
Although computer sockets differ in appearance, the principle of connecting conductors is the same. There are special contacts equipped with microknives. The protective sheath is cut through the inserted conductor. As a result, the metal of the microknife contacts fits tightly to the metal of the conductor.
How to connect a computer wall socket
Inside each outlet there is a hint on how to place the wires when connecting the Internet cable. Manufacturers stick on the color scheme that we saw when crimping the connector. There are also two options - “A” and “B”, and we also use option “B”.
An example of color coding on the body of a computer socket
The case is mounted on the wall, usually with the cable inlet up and the computer connector down. The next steps are simple:
- Remove the protective insulation from the twisted pair by about 5-7 cm. This must be done carefully so as not to damage the insulation of the conductors.
- In the photo you can see that there is a small plastic clamp on the board. A conductor is inserted into it and secured so that the piece stripped of insulation is below the clamp.
Connecting a 4-wire wall outlet - On the case you see microknife contacts. Connect a wire of the desired color to them and insert it, trying to reach it to the very bottom of the contact group. When the conductor passes the knives, a click is heard. This means that it is in place and the insulation is cut through. If you fail to achieve a click, after everything has been routed to the contacts according to the colors, take a regular straight screwdriver with a thin blade and force the wires down. The same can be done with the back (non-sharp) side of the knife. Eight conductors are connected according to diagram “B”
- After all the conductors have reached their place, the excess (protruding pieces) is cut off.
- Put on the lid.
Connecting a twisted pair cable to an outlet is really a simple procedure. Even the first time it will take a few minutes. You can see again what they do and how in the video. It first shows the connection of an Internet cable with 4 wires, then with 8.
Sometimes you have to get up in bed to turn off the light. But you can control lighting from several points. How - read the article about connecting pass-through switches.
How to connect an internal Internet socket
We won’t describe the installation of the plastic box - that’s a different topic. Let's look at the features of connection and assembly. The main problem here is how to disassemble computer sockets. When connecting conductors to them, you need to get to the contact part: a small ceramic or plastic case with built-in microknife contacts. The conductors are connected to this mounting plate, and then the housing is reassembled. And the whole problem is that different manufacturers assemble/disassemble them differently.
For example, from the popular manufacturer of computer sockets Legrand (LeGrand), in order to get to the connectors in the Legrand Valena RJ45 computer socket, you need to remove the front cover. Under it you will find a white plastic impeller (as in the photo), with an arrow on it.
How to disassemble the RJ-45 Legrand internet socket (Legrand)
You need to turn the impeller in the direction of the arrow, after which you will have the housing and the contact plate in your hands. It has color-coded conductors. The connection is no different, except that first you need to thread a twisted pair into the hole on the plate, and then separate the wires.
For clarity, watch the video.
Another popular manufacturer of such equipment is Lezard. His system is different. The front panel and metal frame are fixed with small bolts. They are easy to unscrew, but the internal contact plate is held in place by clamps. When assembling and disassembling Lezard computer sockets in the right places, you need to press out the contacts with a screwdriver.
How to disassemble a Lezard Internet socket (Lezard)
To remove the plastic contact group from the housing, you need to press the latch located on the top. After which you will have a small box in your hands. But that's not all. It is necessary to remove the plastic cover that covers and presses the conductors. Remove it by prying up the side petals with a screwdriver. The plastic is elastic and the effort required is quite decent. Just don't overdo it: it's still plastic. After that, the wiring is standard: according to the markings on the sides (do not forget that we are using diagram “B”).
And again, to reinforce the material, we recommend watching the video.
If you know how to connect an Internet outlet, it’s not difficult to figure out even an unfamiliar model. And now you can upgrade your network yourself (increase the length of the twisted pair, move the computer to another location, make another connection point, etc.), without involving specialists. One more question remains: how to connect double sockets. Two cables are connected to them and then the color scheme is added. This is possible when your network is formed by a modem or two Internet lines are connected. Is it possible to connect both inputs with one cable? It’s possible, but you need to avoid getting confused in the color designation of the wires in the further wiring of the network (remember which color you used instead of which).
How to crimp an RJ45 connector
The order of connecting the wires of the Internet cable by color
In order to correctly connect an information socket, you will first need to understand the markings of the twisted pair wires connected to it. To get acquainted with the connection principle, it is more convenient to consider a typical connection of a twisted pair cable with 4 wires to a socket with an RJ45 connector. The switching order for both standards (“A” and “B”) is shown in the figure below.
Procedure for crimping 2-pair twisted pair
It clearly shows which wire needs to be connected where to make the correct connection. It is also important to understand the following points regarding the number of wires in the Internet supply cable:
- Firstly, it can be not only 2-pair, but also 4-pair (the first is used at data transfer rates of up to 100 Mbit/s, and the second - at the same rate up to 1 Gbit/s).
- Secondly, today, in most cases, information flows are supplied to private consumers at speeds of up to 100 Mbit/sec. However, with the development of Internet technologies, sooner or later they will be calculated at higher values. That is why prudent users expand their home network in advance by laying a cable of 8 rather than 4 conductors.
- And thirdly, when the speed increases to 1 Gbit/sec, the information consumer will no longer need to redo anything. Previously connected equipment will automatically work with a large number of information channels (conductors).
Additional information: The difference in price between 4-core and 8-core cables is very small, and the sockets and connectors for them are already designed for maximum capacity.
But if the home network is already wired with a 4-core (2-pair) wire, you can use the same type of connectors.
Only in this case, after the first 3 conductors connected in the socket according to scheme “B”, two positions are skipped, and the green wire is brought in and fixed to the sixth contact (see photo on the right).
Only in this case, after the first 3 conductors connected in the socket according to scheme “B”, two positions are skipped, and the green wire is brought in and fixed to the sixth contact (see photo on the right).
After we have managed to establish the exact order of connecting each of the 4 supply wires, it’s time to move on to considering the question of how to crimp them correctly.
How to properly crimp a twisted pair cable into a connector
Before you familiarize yourself with the procedure for crimping an RJ 45 connector with pliers, you will have to understand the features of cable products intended for transmitting signals through information channels. The first thing to understand is that an Ethernet cable may or may not have an outer protective sheath.
The cable has an overall braided shield as well as an overall foil shield. But the twisted pairs are not shielded.
The cable has overall shielding and braiding. Twisted pairs are protected with foil.
The latter is made of aluminum foil or in the form of tinned copper mesh (braid). There are two types of such protection: general for all wires and covering each individual pair. Before starting the operation, you will need to remove the protective sheath, which will provide access to the twisted pairs.
Crimping principle
The essence of this operation is to correctly (according to the standard scheme) connect the wire of the connected device to the connector inserted into the Internet socket.
The fact is that any twisted pair must end with an RJ45 connector, to the grooves of which the cores of the network cable are connected. They, in turn, end with copper contact plates, across which there are special metal busbars.
When crimping with crimping pliers, the knives in them pierce the wire insulation, which allows reliable contact of the core with the copper plate. The quality of the resulting connection is comparable to conventional soldering, which is achieved only if the installation operations are carried out correctly.
Crimping procedure
Crimping of twisted pairs is carried out according to standard schemes, the slightest violation of which will lead to an undesirable result.
For crimping you will need special pliers of a special design with a socket for RJ45. Experts call them crimpers . When carrying out work, the connector with wires is inserted into the socket, after which the crimper is compressed until it stops. The figure on the right shows a universal crimper for crimping 8P8C/6P6C/6P4C/6P2C connectors.
Sequence of operations
In the process of crimping contacts, the most important thing is to perform the operations extremely carefully, trying not to damage the insulation of the twisted pair. In addition, you need to correctly distribute the conductors on the contact pad of the RJ45 connector. To do this, you will have to take into account the following points:
- to remove the insulating layer from a twisted pair, you can use a regular stationery knife or a special device for removing insulation;
- with its help, the outer sheath is only slightly cut, after which the cable itself is carefully bent at the point of the cut;
- if this is not done, it can be damaged, since the protective coating contains chalk (because of it, the insulating layer becomes fragile and breaks off if strongly bent);
- To remove insulation from individual wires, you can use side cutters or wire cutters (some experts use tailor's scissors for this).
Please note: With their help, it is possible to carefully remove the insulation and evenly trim the wires before laying them in the Internet connector.
All subsequent operations are carried out in preparation for final crimping. To do this you will need to do the following:
- First, the network wire is cut from the switched twisted pair cable to a length sufficient for cutting.
- Then its ends are carefully aligned.
- To remove the insulating coating, a shallow cut is made (at a distance of approximately 15 mm from its edge).
- Then the cable itself is carefully bent at the place of the cut (first in one direction, and then in the other).
- Next, the piece of insulation that has separated during bending is removed from it, and the screen underneath is cut off.
At the final stage of cable preparation, the twisted pair conductors are once again aligned (prepared for crimping). They are then laid out according to the selected switching pattern, after which they proceed directly to crimping. To do this you need to do the following:
- Insert the prepared ends as far as possible (they should rest against the far side of the RJ45 connector).
- Next, if necessary, cut off the excess conductors to length and align them again.
- Then you need to place the connector itself into a specially shaped socket on the pliers.
- After this, you will need to forcefully squeeze the handles of the crimping device while holding the Internet cable with your other hand.
- In this case, the latter is pressed against the connector socket, but not very tightly, so that the wires themselves do not bend.
Crimping the connector with a crimper
Upon completion of all these operations, it is necessary to check the resulting connection for reliability. To check, you can use a regular multimeter or a probe (a simple device for checking the “continuity” of the integrity of the wires.
Additional information: Specialists use a special device for these purposes, but at home, as a rule, they do without it.
Once again making sure that the wires are connected correctly, you just need to insert the finished connector into the network connector and, if necessary, configure the device. When the network connection icon appears, you can be sure that everything is done correctly, including crimping the twisted pair. If it does not appear even after several setup attempts, this means that you should start crimping the wires again.
Step-by-step instructions for crimping an RJ45 connector
Detailed step-by-step instructions for connecting a twisted pair cable to an RJ45 connector are presented in the photo gallery.
Signal check, testing
After pinouting the Internet socket and the RJ-45 connector at the opposite end of the cable, you should make sure that the installed line is working. The test is best done with a special device called a cable tester.
It is better to check the functionality of the socket using a specialized device.
It consists of two parts - a signal generator that transmits short electrical pulses using encrypted codes, and a receiver that processes these codes. The generator connects to your router, and the receiver connects to an internet outlet.
After the transmission of electrical signals, they are compared. If all connections are working properly, two green LED lights on the generator and receiver housings light up sequentially. If there is a break somewhere on the cable or a short circuit is visible on the Internet outlet itself, then one or both LEDs will not light up at all.
Ticks
When crimping an RJ-45 plug and a twisted pair cable, it is better to use special pliers - a crimper. Translated, this term means “squeeze”. Advantage of using the tool:
- the device has a convenient shape and is easy to use;
- with its help you can safely perform the crimping procedure;
- The crimper saves you time, because with its help you can carry out several stages without using additional equipment.
The procedure can be divided into several stages:
- Get rid of the old connector. In the future, it will be useful as a sample of core pinouts.
- It is important to strip the conductors from the outer sheath. Measure the length from the cut edge, then insert the wire
- Cleared area. Next, bite the cord using a crimper.
- Unravel the colored veins. Cords that are too long should be shortened.
- Place the wiring in the correct sequence.
- The cores are inserted into the connector so that the outer braid fits into the inner part.
- The cord is placed together with the connector in the crimping area. After this, you should clamp them with a crimper.
- The final stage is to check the quality of the work performed and the functionality of the product.
The already crimped wire must be inserted into the port, and then the connection must be checked. If you notice that the LAN or WAN port light blinked, after which an Internet connection appeared, the device appeared on the network, then the procedure was completed correctly.
Checking the network functionality
Now we can check how successfully we connected. To do this, you need to connect your laptop or PC one by one to all the sockets that we installed and try to access the Internet. If any of the outlets does not work, you need to check:
- correct connection of the outlet itself;
- correct connection of the cable to the router (including the quality of the connector crimp);
- integrity of the wire along the way from the router to the outlet.
There is another way to find out the performance. If your router has LAN connection indicator lights (they are usually located on the front panel), then you can connect PCs or laptops to each outlet (either simultaneously or one by one). If the corresponding LAN indicator lights up, everything is fine, there is contact. If not, you need to check for problems.
It is best to check the signal before installing the front panel and decorative plate of the socket.
Alternative to crimper
A screwdriver can serve as a replacement device. The sequence of actions in this case is similar.
Practice shows that crimping a cable is not difficult; even a person without experience can cope with this procedure. It is only important to understand which wiring of cores will be used during the work process.
An ordinary screwdriver is not inferior to a professional device. The difference is time. Using a crimper, you will crimp the abel much faster.
Common mistakes made when connecting RG45 sockets
When someone connects for the first time, it is possible to make a mistake. As a result, there will be nothing to work. Below we present the most common mistakes that many make.
- If you decide to install according to color scheme “B”, then do not forget that the purchased network cable is usually crimped according to scheme “A”. This scheme is the most common in our country.
- When cutting the protective sheath of the cable, be careful not to damage any of the wires. There are often cases when the core does not seem to have been cut, but is damaged, and when installing the socket into the wall, the damaged core breaks.
- There is a possibility of purchasing a defective internet socket. No one is immune from this. We recommend purchasing from trusted companies; the seller will advise you at your request.
- The wire was inserted poorly into the slots. Many simply don’t keep up. Therefore, do not be afraid to use force; the wire should fit well into the gap.
Errors
To make sure that you did everything correctly, you can connect the network cable to the gadget, for example, or to another device to check its functionality.
Then make sure that the wires in the Internet cable connector have been inserted correctly and in the correct order.
The network cable is crimped using a crimper. It is important to check the tightness of the wires until the adapter contacts. If you find an inaccuracy, then it is better to cut off the connector. After this, it is important to crimp the Internet cable again.
You can crimp the Internet cable yourself. If, after the end of the process, the supply of the connection occurs intermittently, then the connector is checked again. If everything works, the device appears on the network, then you did everything correctly.
Possible problems and how to fix them
Now let's look at the most common problems.
Incorrect wire connection
If you have connected the wires incorrectly, then either your Internet will work too slowly (about 10 times slower than it should) or will not work at all. Incorrect connection of wires can be corrected only by dismantling the socket:
- Remove the decorative and front panels, pull out the terminal block.
- Open the cover and carefully check that the wires are in their proper places. It is very easy to confuse the connection according to marking A with marking B and connect half of the cores according to one standard, and half according to another.
- Correct the connection if necessary.
The wires were cut before the latch closed
If, after thinking about it, you accidentally cut off the wires before you pressed them with the clamp, that’s okay. You need:
- Remove the wires from the socket.
- Strip the cable a couple of centimeters higher.
- Redistribute the cores as required.
- Close the cover/lock.
- Cut off excess pieces of wire.
Sources
- https://Vpautinu.com/internet/rozetka
- https://lanportal.ru/lan/kak-podklyuchit-internet-rozetku.html
- https://FishkiElektrika.ru/kak-podklyuchit-internet-rozetku-k-vitoy-pare-instruktsii-i-shemy
- https://help-wifi.com/poleznoe-i-interesnoe/montazh-kompyuternoj-setevoj-rozetki-rj-45-svoimi-rukami/
- https://kak-sdelano.ru/elektrica/kak-podklyuchit-internet-rozetku
- https://itmaster.guru/nastrojka-interneta/internet-na-pk/kak-podklyuchit-internet-rozetku.html
- https://stroychik.ru/elektrika/podklyuchenie-internet-rozetki-rj-45
- https://camodelkin.ru/izolyaciya/kak-podklyuchit-internet-rozetku.html
Cable extension
When organizing a network signal output point (Lezard sockets with an RJ45 connector, for example), situations are possible when the existing wire needs to be expanded. A similar problem often arises if you need to extend the line to a loggia or balcony. There are several options for solving this issue (connecting a piece of cable). This:
- Using an electric soldering iron.
- Use of a special connector.
- Ordinary twist.
The most suitable method for home use is the use of the soldering method, which allows you to do without the labor-intensive operations of organizing a connector connection. In this case, each of the cores is first soldered to its continuation, and then the soldering area is wrapped with insulating tape.
If you use a special connector (a kind of adapter), you can get a connection that is as reliable as soldering. Such a transition element consists of two connectors (twisted pair connectors), into which articulated network cables are inserted on each side. The RJ45 connectors at the ends of the cables are pre-crimped in the same way as discussed above.
If you use a special connector (a kind of adapter), you can get a connection that is as reliable as soldering. Such a transition element consists of two connectors (twisted pair connectors), into which articulated network cables are inserted on each side. The RJ45 connectors at the ends of the cables are pre-crimped in the same way as discussed above.
Twisting to lengthen information conductors is used extremely rarely; it is only suitable for a temporary solution to the problem that has arisen. The Internet signal when using this type of connection will be weakened and may disappear regularly.
Crimping without specialized tools
In the absence of a special tool, crimping can be done using a flat-head screwdriver. A person who chooses this method will need several connectors in case he does not calculate the pressure force. It is impossible to crimp the wire manually, without using improvised means.
If the technician is inexperienced and does not know how to properly crimp a 4-core Internet cable, he will need a self-crimping connector. Using the device, it will independently terminate and connect shielded cables. The connector is equipped with guide inserts designed to fix the cable.
Straight and cross crimp
To connect an apartment or house to the network, two types of patch cords are used, each of which corresponds to a specific group of communication devices. Direct patch cords are used to pair equipment with a network card. The ends of the cable are connected to the connector in the same way, according to the T568A or T568B scheme.
Electronic devices of the same type are connected using crossover or crossover patch cords. To connect two computers, one end of the connecting cable is crimped according to the T568A scheme, and the T568B scheme is used to crimp the second.
Note! In direct crimping, both ends of the wire are crimped in the same way. Cross crimping involves working in accordance with both generally accepted standards.
How to crimp VICO?
I personally installed these models in my home to connect the TV via a router to the Internet. The principle there is approximately the same as in previous versions, but there is a small feature that I would like to talk about. The “wiring” diagram is the same as “B” and it is located below (if you look at the picture, then from above):
- Brown
- White-brown
- Green
- White-green
- Blue
- White-blue
- Orange
- White-orange
Now comes the important point. Since the knives inside are arranged differently, you shouldn’t insert all the wires at once - some may fly out during crimping or get into an adjacent groove. So you can do it simply:
- Insert the first two wires
- Then you slam a plastic lid on top to crimp it.
- Next, open the cover and make sure the wires are crimped.
- Well, then the rest of the wires.
This is advice for those who have just started crimping these sockets and have not gained the skill to crimp all 4 pairs at the same time - this way there will be less swearing and nerves. As soon as the socket is crimped, insert it into the base and screw it to the box with self-tapping screws.