Today, wind energy is certainly a recognized global player. It provides about 7% of all electricity generated on the planet, and the growth rate of wind turbine capacity again exceeded 10% per year. It is likely that by 2030 the share of wind power plants in global generation will be one seventh - even despite the protests of European burghers, which have practically frozen the growth of aeolian energy in, for example, the lands of Germany.
This rapid development is seriously at odds with the ideas about wind turbines that are still found in Russia: they say that their energy is expensive, and there is almost no land left for wind turbines in Europe. In fact, we are still at the beginning of the growth of this sector, and it is unlikely that there will be room for it in the foreseeable future. Let's try to figure out why.
Advantages of a homemade generator
Much lower energy costs are not the only advantage of using a wind generator. There are a number of advantages that determine the choice of a specialist:
- A large number of available video lessons on how to work with a detailed description of each stage. You can use pictures and diagrams of a wind generator as models to work with.
- Available materials for making a generator (an old metal container, tool sets, a battery can be found in the household of every zealous owner). You can make a high-quality wind generator with your own hands from a car generator.
- Today, a number of models are known, the operating principles of which are strikingly different from each other.
- Small buildings on the site do not violate the regulations of the legislative framework, but at the same time they can provide energy for most of the household appliances in the house, garden, and utility area.
In terms of independent operation, wind generators are easier to build than water models.
Legislative regulation of construction
All buildings on the territory of residential buildings must be regulated by legislation. Wind generators with a power of up to 1 kW and a mast height of up to 15 meters do not require a special construction permit.
No harmful waste is generated during operation; generators of this type do not change climatic and geomagnetic parameters. This means that there can be no claims from environmental organizations.
An exception may be situations when operating blades generate noise that exceeds the permissible values. But this issue can be resolved by changing the design characteristics of the installation.
Parameters evaluated before installation
High-quality operation of the device is the key to successfully providing a cottage or home with electrical energy, and, therefore, a justified investment of the efforts and resources of the master.
Before installing the generator, a number of parameters should be assessed, both from the side of the installation itself and from the site of the intended installation of the structure.
An analysis of the condition of the soil and nearby buildings is required. There should be no devices near the wind generator that could be easily damaged by the blades.
Note!
- DIY induction heater ♨️ - reviews of the best manufacturing options. Varieties of homemade device designs + step-by-step master class (160 photos)
- Do-it-yourself Gauss cannon: TOP-130 photos of the best ways to create it yourself. Design features + master class for beginners
- DIY clamps - a step-by-step master class for beginners. Schemes for manufacturing different designs + 170 photos
The area with the installation located on it must be protected from children and unexpected guests. On the part of a homemade wind generator, the following characteristics are subject to evaluation:
- Mast height (we are talking about a legislative issue).
- Dimensions of blades, their design.
- Device power. Wind generators can be used even for a small private house.
- Noise from a working structure.
- Safety for air frequencies.
The technical condition of all component parts must be assessed for the integrity, safety, and serviceability of each element. Optimal work can be done by first drawing up instructions and a plan diagram on how to make a wind generator with your own hands.
From the boss to the megawind turbines
This question was answered almost a century ago in the USSR. Then our country found itself in a unique situation: many specialists from industry and energy left it. It turned out to be extremely difficult to train new personnel: schools and universities fell victim to continuous reform, during which they abolished (until the Stalinist thirties) the lesson system and other “outdated” concepts. In addition, the Soviet Union was under a serious blockade: the most advanced technologies of the time, including power turbines, could not be imported.
The situation was extremely difficult: without engineers, coal production fell sharply, and it was not possible to restore it to the pre-revolutionary level until 1928. The authorities began to look for alternatives to such complex technology as coal mining. Vladimir Lenin considered it peat and at one time even pine cones, which were supposed to be used to heat steam locomotives (“Glavshishka”). As you can easily guess from general physical considerations, peat and pine cones could not solve the problem - so the search for alternatives continued.
Windmill in Crimea, 1930s ©Wikimedia Commons
By 1931, the Central Aerohydrodynamic Institute (TsAGI) created and deployed in Crimea the first wind turbine on the planet with a capacity of 100 kilowatts. Judging by the picture above, this installation was larger than a typical 1999 wind turbine. At the same time, it had a completely modern layout: three blades with a horizontal axis of rotation, automatically oriented with the wind. The center of its rotor was covered with an aerodynamically efficient fairing (a rare phenomenon at that time), which reduced turbulence near the blades, which significantly reduced the impact of wind turbines of that time.
In the West, the leaders in wind energy at that time were Germany and Denmark, but the largest local wind turbines had only 50-70 kilowatts with a blade span of up to 24 meters - and they did not have effective fairings on the central part of the rotor.
However, the TsAGI wind turbine was supposed to be just the beginning. The famous pioneer of astronautics Yuri Kondratyuk created a project on a much larger scale. On the Bedene-Kyr plateau (Quail Mountain, 1300 meters) in Crimea, it was planned to build a 165-meter monolithic reinforced concrete tower. Two sets of blades with a diameter of 80 meters each were mounted on it - and the upper edge of the upper blade reached 200 meters in height. Above sea level, thanks to the mountain, it rose one and a half kilometers, which should have given a high average wind speed. The power of the colossal megawind turbine was estimated at 10-12 megawatts. In other words, it was an analogue of General Energy's Haliade-X - only not in 2022, but in the 1930s.
It is worth noting that the unusual design was created by an unusual person. Yuri Kondratyuk is the legal name of a white officer, whose real name was Alexander Shargei (he stole documents for Kondratyuk in an unknown way in the confusion of the Civil War). In general, he was mainly interested in astronautics, but work in the “flying” areas would make his biography subject to verification by the relevant authorities. Therefore, Kondratyuk dealt with less “stellar” issues and tried to avoid arrest.
Alexander Shargei (known in the USSR as Yuri Kondratyuk) / ©Wikimedia Commons
The cosmic scope of the project had enormous economic significance. Compared to the 100-kilowatt TsAGI wind turbine, the new skyscraper wind turbine was at least 100 times more powerful, but cost only an order of magnitude more. This meant that the electricity from it should have been much cheaper - at the level of thermal power plants. And this is extremely important, since by the 1930s the USSR not only returned lessons to schools, but also generally established power engineering, and also restored coal mining. That is, wind energy could only be economically meaningful - and its wind turbines had to become gigantic. Alas, the suicide of Sergo Ordzhonikidze, People's Commissar of Heavy Industry, in 1937 put an end to the project: it was he who “moved” the idea of the false Kondratyuk.
©Wikimedia Commons
And it’s a shame: the megawind turbine project was well-developed. As is easy to see in the illustration, it was developed by V.N. Nikitin, who later participated in the design of the Ostankino TV tower, with which the windmill project of the 1930s has some similarities both in the internal design and in the external appearance.
From a modern point of view, the theses of those who closed the project after Ordzhonikidze’s death looked funny. “This is a desire for gigantomania!” – one speaker categorically characterized the project, chopping the air with his hand. “There are no similar developments even abroad!” – another echoed him. Now there are such projects abroad, and the desire for huge turbine sizes is the only way to ensure low cost of their energy. Moreover, Russia again has to develop giant wind turbines today, but, of course, imported ones.
The device of a traditional generator
To assemble the structure correctly, you need to know all the components:
- Blades that act as a kind of propeller.
- A turbine with a rotor that provides rotation.
- Generator.
- There must be an inverter to convert mechanical wind energy into electrical energy.
Another mandatory element is the wind generator battery. This or that part can be presented in various variations, but the principle of the device is the same for all models.
Model from a car generator
There are several fundamentally important points regarding the assembly of this type of device. To achieve good efficiency of the device, you need to remake the generator and equip it with permanent magnets.
The driving elements should be created taking into account the power of the motor; if the workpieces are very heavy, then the wind generator may jam at low speeds. A large-diameter pipe made of duralumin is ideal for constructing blades; this material is characterized by high durability.
The fastener must be as reliable as possible, this concerns not only the tightening components, but also the racks, their rigidity is adjusted according to the load of the device.
Advice! It is difficult to do without preliminary balancing of the blades; to lighten some parts of the structure, you can use sandpaper or a grinder with a grinding wheel.
Operating principle of the generator
The operating principle of this type of installation is quite simple:
- Gusts of wind rotate the blades at a certain speed.
- Next, the received energy is converted into direct electric current using an inverter.
Energy is spent to ensure the operation of household appliances, lighting in the area, and for any other needs (depending on the required power).
Note!
Do-it-yourself electric scooter - a master class with step-by-step instructions for doing it yourself. Tips and simple patterns for beginners + the best photo reviews
DIY rocking chair: TOP-120 photos of the best manufacturing options. Master class on creating a rocking chair at home
- Smokehouse from a gas cylinder - the best master class on making a homemade smokehouse with step-by-step photo diagrams for beginners
Selecting a generator by power
To purchase an autonomous installation, it is necessary to correctly calculate the power of the wind power plant, which will be sufficient to meet all the economic needs of one private home.
Portable or home appliances produce about 15 kW, which is enough for an average single-family home.
If one station is supposed to supply your own farm, a small-scale production facility or a retail outlet, then you need to choose more efficient wind turbines with a power of 15 to 100 kW.
Main types of wind generators
Homemade installations differ from each other in a number of parameters:
- According to the number of blades and the material for their manufacture.
- According to the location of the axis of rotation relative to the axis of the earth.
- According to the step principle of a working screw.
Today, based on various combinations of these characteristics, the following types of generators are distinguished:
- Rotary type design.
- Axial installations on magnets.
Both installations differ in design, but in general they allow you to provide a site or small building with sufficient electricity.
Rotary installations on site
Such designs are quite economical, easy to use, and do not require special tools for installation. There is no noise coming from the operating blades, especially if the blades are made of fabric material.
A significant disadvantage is the high probability of damage to the structure from a strong gust of wind.
Flaws
- The power of such wind turbines sometimes does not fully meet the electricity needs of the farm.
- Insufficient protection from gusts of wind. The design of the installation is such that it can be overturned by strong winds.
Check it out here too!
Homemade lanterns with your own hands: step-by-step instructions on how to make a beautiful and effective lantern (110 photos)- Grout - use, reviews, leading manufacturers
Replacing a pressure tap - a step-by-step description of how to change a pressure tap with your own hands (80 photos + video)
Axial installations on site
With the advent of magnets on the construction and industrial markets, axial wind generators have gained popularity among craftsmen. To work, you will need a hub from a car wheel and a certain set of tools.
Note!
Do-it-yourself compressor: TOP-130 photo reviews of finished compressors. Step-by-step instructions + diagrams and drawings
- Do-it-yourself spot welding - the best master class on making homemade spot welding with step-by-step photo diagrams of do-it-yourself work
- Do-it-yourself tennis table: TOP-150 photos of the best manufacturing ideas. Master class on creating a tennis table at home
A 220-volt wind generator with magnetic coils is very popular today.
Materials for generator blades
At home, you can make blades from the following materials:
- Fiberglass.
- Plastic.
- Wood.
- Metals with low weight.
Blades made from old PVC pipes are a universal material, characterized by strength and durability. They are affordable and easy to build. For the optimal design, it is enough to draw the selected shape on the pipes, and then cut out each blade according to the drawing.
Aluminum rotor blades are lightweight but sufficiently durable. This material is considered traditional for the manufacture of wind generators. A special advantage is the maximum possible service life of an aluminum product.
Both materials presented are used to create rigid rotor blades. Modern fiberglass is used to make sailing blades.
For beginning craftsmen, working with the material may seem quite complicated, but the efficiency of the generator will quickly pay for all the difficulties and investments.
Types of structures along the axis of rotation
Depending on the location of the rotating part of the generator relative to the plane of the earth’s surface, two groups of structures are distinguished:
- Vertical installations. The blades rotate in an axis perpendicular to the horizon. Such designs are particularly sensitive to the slightest gusts of wind, but have low power.
- Horizontal installations. The blades rotate in a plane parallel to the earth's surface. They are less sensitive to air currents, but have sufficient power to convert kinetic energy into mechanical energy.
You can make both a vertical and a horizontal wind generator with your own hands.
Is it beneficial to use alternative energy sources?
At the moment, the cost of “clean energy” is several times higher than the cost of energy obtained by traditional methods. (Of course, we receive the energy itself for free, but the initial investment in the purchase and installation of a power plant is very large!).
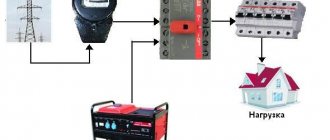
That is, if you have a choice between connecting to an electricity supplier and installing a wind power plant, then the first option will be more profitable. On the other hand, if your property is located far from power lines and connecting to them will cost a lot of money, then it would make more sense to build your own wind farm for your home.
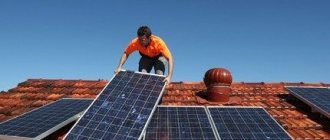
But be sure to add another, independent energy source (diesel generator, solar panels)! In case of calm weather or a breakdown of the windmill, you should always have a backup option.
Construction of a rotary windmill
Today there are a huge number of models for independent work. But as an example, we should consider a rotary installation with a vertical type of rotation. Materials required for work:
- An old metal barrel or drum with a washing machine that is out of order.
- Car generator.
- Acid battery (if desired, you can use a gel battery model).
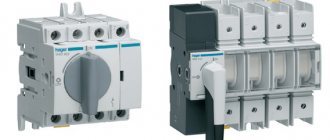
- Switch in the form of a button.
- Clamps, wires, bolts, nuts.
- Relay from the car to control the battery charge.
- A grinder is necessary for cutting metal surfaces. In some hard-to-reach places, you will need metal scissors.
- A set of additional tools: a construction pencil and a tape measure for marking, a set of drills, screwdrivers.
You will also need a part for mounting a mast, the height of which does not exceed 15 meters. The blades can be manufactured in two different variations: removable and continuous models.
The removable version can be a sailing or rigid type. Continuous blade models are always rigid and are a continuation of the metal container.
The simplest wind power plant
To manufacture a wind generator, you will first need drawings indicating the dimensions of the installation.
A rotary wind turbine with a vertical axis of rotation and a power not exceeding 1.5 kW can provide electrical energy to a small house, as well as illuminate a garden plot.
What is needed to make such a wind generator? The blades of this wind power plant are made from a bucket, a small metal barrel or a pan of non-corrosive metals.
- In addition, you should prepare:
- Car generator with 12V output voltage – 1 pc.;
- Car battery - pcs.;
- Push-button switch 12V, semi-sealed;
- A converter that converts a voltage of 12 V to a voltage of 220 V, with a power of 0.7 - 1.5 kW;
- Automotive battery indicator lamp relay;
- Bolts, washers, nuts;
- Clamps – 2 pcs., for attaching the generator;
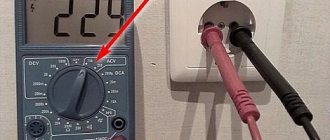
- Multimeter;
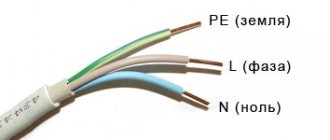
- Electrical wire with a cross-section of 2.5 square meters. mm and 4 sq. mm;
- Scissors for cutting metal or grinder;
- Drill;
- Locksmith tools and accessories.
How to make a simple wind generator with your own hands, spending little money. Apply markings to a bucket, small barrel or pan, dividing the existing container into 4 equal parts. Then we cut out the wind turbine blades using a grinder or scissors.
Check it out here too!
- Crochet a crop top: patterns and ideas
How to make a homemade metal detector - the best diagrams, instructions. Review of proven options for creating a simple do-it-yourself metal detector
- How to choose a washing machine: advice from professionals, the main subtleties of choosing a reliable and high-quality machine. Types, types, programs and functions
To cut painted sheet metal or galvanized steel, only scissors are used, since when using an angle grinder, the material being processed overheats.
Holes for the bolts should be drilled in the pulley and the bottom of the container. With a wide variety of existing blade designs, the most affordable one is selected.
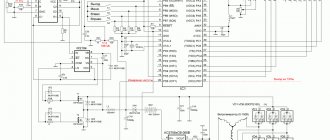
Using clamps, the generator is attached to the mast. Then, in accordance with the diagram, an electrical circuit is mounted, and the wires are fixed to the mast.
When connecting the battery, a wire with a length of 1 m and a cross-section of 4 square meters is used. mm. For network consumers, wires with a cross-section of 2.2 sq.m. are sufficient. mm.
- With a converter power of 1 kW and a battery with a capacity of 75 Ah, the installation will provide alarm, video surveillance and site lighting.
- Does not require large capital investments.
- The design parts are easily accessible and in case of breakdown they can be easily replaced with new ones.
- Does not require systematic maintenance, does not produce excessive noise, and is quite reliable.
Instructions on how to make a wind generator with your own hands
- Decide on the generator model.
- Download diagrams and drawings.
- The prepared metal container is divided into four parts (or another quantity, depending on the number of blades in a given model). You can often find a DIY wind generator made from a washing machine drum.
- For marking, use a construction pencil or marker, tape measure.
- Future blades should be placed at regular intervals to ensure optimal rotation of the rotor.
- Metal blades are cut using a grinder or metal scissors (the choice of tool depends on the material used - galvanized steel, tin, aluminum).
- The blades are not cut all the way through to leave the fasteners.
- Holes of equal diameter are made along the contour of the bottom of the container and along the pulley, located at strictly equal intervals. The clarity of the location of the holes affects the quality of rotation of the rotor.
- The blades are bent, positioning them perpendicular to the circumference of the container. In this case, it is necessary to calculate the angle of inclination, on which the area of exposure to air flows directly depends.
A reconstructed container with blades is installed on the pulley. Mount the rotor on the mast using nuts and clamps as fastenings. The electrical circuit for high-quality operation of a home wind generator is assembled according to a pre-prepared diagram.
Making a mast
To lift and fix the main structure to a certain place, you will need to create a stable mast.
For its manufacture, a metal pipe, channel or corners are often used.
- Wooden elements will not be able to last long enough even after treating the surface of the parts with special liquids; the strength will also be low.
- It is not necessary to weld workpieces at the installation stage, because special equipment for this purpose may not be available.
- Often, all frame parts are assembled using nuts and bolts, as well as other equally practical fasteners.