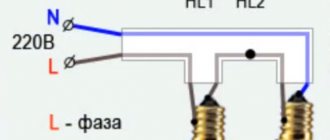
The performance of routine household duties is greatly facilitated by numerous technical devices and equipment. “Tireless workers” illuminate the premises, wash, whip, bake, and wash dishes for us. However, simply buying them is not enough; the equipment needs to be connected correctly, you must agree.
Remember how many negative emotions are caused by a triggered machine that disconnects the line due to overload at an extremely inopportune moment. A damaged boiler, computer, or refrigerator brings quite a bit of pleasure. But the listed troubles can be trivially prevented and eliminated altogether, with which we are happy to help.
To do this, you just need to find out how parallel and serial connection of sockets for home appliances is made, in which cases the “loop” and “star” circuits are used. This article will introduce you to this very useful information.
Connection methods
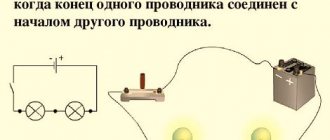
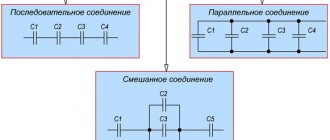
You can connect the sockets in series, parallel or in a ring.
To achieve the optimal price-quality ratio, different connection methods are used, taking into account the power and type of electrical appliances. The choice of a specific method depends on financial capabilities. It is better not to skimp on network elements or professional services. Even if there is no furniture in the apartment, house or country house, the wiring must be of high quality.
The essence of the method: a separate wire is connected to each access point. As a rule, it is supplied from the room's distribution panel, but for particularly powerful devices it is better to connect the electricity access point directly to the panel.
Advantages: parallel connection of sockets assumes that if one of the network elements fails, the rest will continue to work, since they do not depend on it. This method allows you to power the most powerful devices, while connecting sockets in series creates a load limit on each point of the block.
Costs are higher. In a small apartment this does not greatly affect the budget, but when creating a network for a large house, parallel connection of sockets significantly increases the cost of the project. It is worth considering not only the price of the cables themselves, but also the cost of the electricians. Burnout of the central contact, which is supplied to the distribution box, will disable all connected sockets.
When using the parallel method, it is advisable to avoid connecting wires; each line should be a single cable. If this is technically impossible, you should use special jumpers.
The essence of the method: connecting two or more sockets to each other. A wire is laid from the panel or junction box to the first point, and a jumper is installed from its contacts to the contacts of the second, and so on until the last device. The method is used to install socket blocks and move the network access point to another location.
The advantage of the method is low wire consumption. Connecting sockets with a cable takes less time from specialists. Disadvantages of this method:
Safety rules prohibit connecting powerful devices to an electrical outlet connected in this way. Their prolonged operation will lead to overheating of the wires. If high-quality automation is installed, the site will simply lose electricity. Otherwise, a fire will occur. Experienced electricians say that connecting sockets with a cable is one of the most difficult tasks that can be encountered when creating home wiring. The work requires accuracy and a clear understanding of what you are doing.
It is worth connecting sockets with a cable in cases where you need to create an outlet block for low-power devices: lighting fixtures, TV, laptop charger, etc.
The essence of the method: the main cable is laid from the main panel throughout the apartment and returns back - a ring is created. From this main line, branches are created to distribution boxes. Rings are also made from them, already in separate rooms, to which sockets are connected. This scheme is unusual for Russia and is rarely used.
The advantage of the method is that if the wire burns out, the network still works early, the current comes from the other side. But the cable consumption in such a scheme is the highest.
In their pure form, parallel or serial connections are rarely used. There is no need to create access points everywhere in an apartment or on the territory of a country house that can withstand high loads. Such expenses are rational only if the owner suddenly wants to swap the bathroom and living room.
The essence of the method: the main cable is connected to the distribution box of the room. A cable is supplied from it to the outermost access point, and from this access point a wire is supplied to the remaining devices.
increases the reliability of a system that uses daisy chain connections; conductor savings.
The disadvantage of this method is the large number of jumpers and twisted wires. You need to carefully calculate the wiring to know which devices can be connected in the room and which ones should not be connected.
Combined method
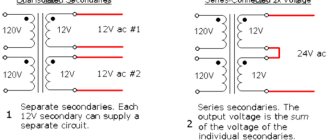
In some cases, it is necessary to simultaneously increase the capacity and voltage of the battery. For this, two combined connection methods are used:
- First, several batteries are connected in series. In this way, the required operating voltage is achieved. At the second stage, parallel switching of several batteries obtained by connecting batteries in series is carried out. Several series circuits are created to achieve the required capacity.
- The second method involves parallel switching batteries with the required capacity, after which they are connected in series to achieve the required current.
The combined method is used extremely rarely, as it involves the use of several power sources
When choosing the most suitable batteries, attention is paid to their technical condition, capacity and voltage of the generated current.
Connection methods
There are two main schemes for connecting sockets in an apartment. Radial, which is also called an “asterisk”, provides for the supply of a separate line to each outlet. This method requires additional financial investments, since you will need a lot of expensive cable. Difficulties arise if the apartment has already been finished and the walls have to be tiled. The advantages of the method are simplicity and reliability. It is recommended to be used for connecting powerful electrical appliances.
The second method is parallel or daisy chain, when several points are connected to one line at the same time. This scheme increases savings, but reduces the safety and reliability of electrical wiring. Use it if you need to connect power to a group of outlets. Individual sections can be formed depending on the location of the devices.
Features of terminology
Parallel and series connections, for example, in electronics (connection of radio components) are not the same as parallel and series connections of sockets in electrical wiring. And confusing these concepts is a grave mistake that will lead to emergency situations in practice.
Much more accurately, the types of connection of sockets are conveyed by the terms star and loop, which are named so because of the visual similarity of the connection diagrams. Below we will look at why they are called that way.
Parallel connection of sockets in a modular block
There is a socket module in which a parallel connection of sockets is made. Of course, they are all sold already assembled, but I would like to disassemble and explain the connection principle itself. To connect the wires to the socket block, you must first remove the cover by unscrewing the screws securing it.
If you now look closely at the design of the socket, you can see that the terminals of the receiving holes are connected to each other in parallel. To supply voltage to all terminals, just connect the wires to any pair of them.
Let's look at how the wires are connected in such a block. We remove all installed wires and, for clarity, take multi-colored ones: brown wire - phase, blue wire - zero.
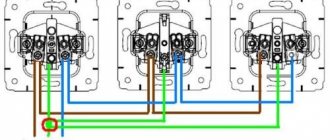
As you can see in the photo, the block consists of four sockets. Each outlet, like any other, has two contacts. Our task is to connect all the outlets so that they work independently of each other, and this can be done by using.
It's actually quite simple. Let's assume that the right contact of the socket is zero, the left is phase. We connect a blue wire to the right contact of each socket: from the first to the second, from the second to the third, etc. We similarly connect the brown wire to the left contact of each socket.
This outlet module is equipped with grounding contacts. The grounding wire is connected to them using a bolt and washer, so we will twist it into a ring. We will leave the phase and neutral wires straight, since the wires in the socket contacts themselves are fixed using a pressure plate
When connecting, you need to pay attention to the color of the wire insulation.
The yellow wire is usually connected to the ground terminal, blue and brown are connected to the “phase” and “zero”. If the grounding wire is stranded (consists of many thin wires), then after folding it into a ring it is advisable to tin it. Otherwise, individual wires may stick out from under the washer and screw, and contact will not be complete. The same applies to the “phase” and “zero” wires.
After removing the insulation (about 1 cm long), they must be twisted with pliers and tinned. When purchasing modular-type sockets, as in the example, it is advisable to check the correct connection and reliability of the contacts before installation. If necessary, the contacts need to be tightened.
Having connected the conductors to the terminals, it is advisable to attach the wire at the branching point to the body of the socket so that it cannot be pulled out. The mounting method may vary depending on the design of the outlet. You can use an adhesive plaster or a metal plate with holes along the edges. Some sockets are equipped with a special clamp for this.
In conclusion, you need to check the correctness of the connection by connecting an electrical appliance with a Euro socket to each pair of receiving sockets. At the same time, the ease of switching on/off is also checked.
If the plug is inserted and removed with excessive force, you need to bend the grounding pins that protrude on the sides. Before installing the cover, you need to cut a side hole for the wire. Usually there is already a mark for it in the lid. You just need to cut out the designated place and, after installing the cover in place, screw it in place.
Connecting sockets with a cable
Sometimes it becomes necessary to install an additional outlet, connecting it in parallel to the already installed one. This connection scheme is more economical than laying a separate wire.
In this case, the wires from the new socket must be connected to the terminals of the installed socket so that the “phase” is connected to the “phase” and the “zero” to the “zero”. Usually in sockets the phase wire is located on the right.
When connecting electrical devices and connecting wires to each other, you need to make sure that the metal of the wires being connected is the same. Those. a copper conductor must be connected to a copper conductor, and an aluminum conductor to an aluminum conductor.
When copper comes into contact with aluminum, oxidation of the metals occurs (in the form of a white coating), which ultimately leads to a breakdown in contact. If the condition of identical metal of the connected wires cannot be ensured, you need to tin the contacting ends of the wires (this will not save you from oxidation, but will slow down its process). We'll talk about how to do it with a train in the next article.
Similar materials on the site:
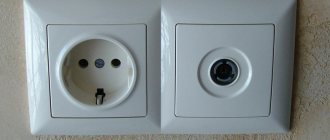
Double and triple sockets
Electrical sockets are connected after a location has been chosen, a wire has been laid there, and sub-socket boxes have been installed. After this, turn off the machine or unscrew the plugs to relieve the voltage and check for its absence. Then the wire is stripped. And only after that the connection is made. The cores can simply be inserted into terminals or their ends can be bent into rings of small diameter. If you are connecting an outlet with grounding, then the third, grounding conductor must be connected to a specific terminal. Before doing this, you should make sure that it is grounding. At the last stage, the electrical outlet is installed in the socket box and the cover is screwed on.
When connecting a double or triple electrical outlet, it is correct to connect the wires to different plates that conduct current, and not to one. The question of how to connect a grounded outlet can be answered in the same way as described above. The grounding conductor is also connected to the grounding terminal.
For a three-phase outlet, a separate four-wire wire is laid and an additional circuit breaker is installed.
When the question arises about which method of connecting sockets to choose. You can connect each socket to a separate electrical wiring line, or you can connect several sockets to one line by connecting the sockets with a cable. In this article we will consider cases when you can use the method of connecting sockets with a cable
. We will also present the advantages and disadvantages of this method of connecting sockets.
Connecting sockets with a cable involves connecting several plug sockets to one electrical wiring line. In this case, the wiring line is connected to the first outlet, from the first outlet the wire goes to the second, from the second to the third, etc. A significant drawback of this method of connecting sockets is its unreliability. Let us give an example that will show why this connection method is unreliable.
Three sockets are connected by a cable, with a wire going from the first socket to the second, and from the second to the third. The sockets have two pairs of contacts, that is, the power wire is connected to one contact, and the wire that powers the next socket is connected to the second contact of the socket.
You plug in a heater into the third outlet, which consumes ten amperes of current. In this case, the current flows along the path: third socket - second socket - first socket - electrical wiring line. The first and second sockets remain free, that is, household electrical appliances are not currently turned on in them. But current flows through them, which is consumed by an electrical appliance plugged into the third outlet.
If you plug another heater into the second outlet, then a total current will flow through it, that is, twenty amperes. In addition, this current will flow through the first outlet. Typically, the receptacle is rated for a current rating of 16 amps. Consequently, the first and second sockets may be damaged, since they will carry a current that is higher than the rated value.
Based on the above, we can conclude that the use of the method of connecting sockets with a cable is allowed in the case when the total load of the connected sockets is small, that is, not higher than the nominal value of one of the sockets.
For example, in one room you need to install six plug sockets to connect computers. In this case, the total power consumption is small. That is, when all computers operate simultaneously, the load current that flows through all sockets will be small. In this case, the advantage of this method of connecting sockets is that it saves money on wiring, since to power the sockets it is enough to run one wiring line, install one, and also power the remaining sockets from the first one. But it should be remembered that the reliability of the wiring diagram is reduced.
If it is necessary to install several sockets into which powerful household electrical appliances will be connected, then each socket should be connected to separate electrical wiring lines. In this case, more money will be spent, but the socket connection diagram will be reliable.
We connect a three-phase 380 volt outlet ourselves
Often in manufacturing plants, during construction or in offices, powerful electrical appliances are used that require three-phase power supply at 380 V. And if connecting a regular outlet to a single-phase power supply is quite simple, then connecting a three-phase connector has its own nuances, since a four- or five-core cable (with grounding)
Therefore, in order for the connection to be safe and not lead to failure of electrical equipment, it is important to connect all conductors correctly and not confuse phase and neutral
What sockets are used when connecting 380 volt electrical appliances
In our country, two types of sockets are mainly used: PC32 and 115 (125) 3P+PE+N, as well as their foreign analogues:
- PC32 type connectors are used exclusively for non-movable electrical appliances, such as electric stoves, stationary water heaters, machine tools, etc.
- Sockets 115 (125) 3P+PE+N are suitable where mobile electrical equipment is used, for example in workshops or at construction sites. In this case, the devices are connected to the network using a flexible copper cable. This type of connector can also be used to power stationary devices.
It is advisable to install imported sockets if the design of the room requires it, or if the plug on the power cord of the electrical appliance has the appropriate configuration.
Note! When choosing an outlet, you need to take into account the amount of current for which it is designed. This value must be no less than the current consumed by the electrical equipment used
General connection provisions for all types of three-phase sockets
When installing a three-phase outlet, you must:
- Turn off the power supply and check the absence of voltage using an indicator screwdriver or tester.
- In random order, connect three phase conductors A, B and C to the contacts with markers L1, L2, L3. The location of the phases is unimportant, since only the direction of rotation of the connected electric motor depends on it. If the rotor rotates in the wrong direction, then it is enough to rearrange any two phase wires at the terminals of the electromagnetic starter of the device or in the machine.
- Connect the zero to the contact marked N.
- Connect the protective ground wire coming from the ground loop to the contact with the PE (ground) marker.
In the case when a four-pin socket is used to connect stationary electrical equipment, the device is grounded by a conductor not connected to the plug connector. The grounding stranded copper cable is connected directly to the metal body of the device under a bolt in a place marked accordingly. The wire cross-section should be the same or larger than that of the power cable.
Connecting a PC32 type socket
The process of connecting connectors of this type does not differ from the algorithm described above. Three phase conductors are connected to contacts L1, L2, L3. Zero is connected to terminal N, and the grounding conductor is connected to terminal PE.
Connecting a socket type 115 (125) 3P+PE+N
To avoid confusion, it is better to start connecting this outlet with grounding. The corresponding contact is located at the bottom, next to the guide groove, thanks to which the plug will always be oriented correctly when inserted into the connector.
The neutral terminal N is located to the right of the PE contact. The core of the working zero is connected to it. The remaining three terminals (L1, L2, L3) are connected to the phase conductors in random order.
As you can see, connecting a three-phase outlet is not so difficult and is accessible to anyone with technical skills.
Disadvantages of Electrical Daisy Chaining
Many electricians believe that this method of connecting sockets is unacceptable according to the PUE:
- According to electrical rules, it is impossible to carry out wiring with a break in the PE conductors, since they will remain ungrounded.
- Low level of reliability. Complex calculations must be made before work is carried out if there are any conflicts with overloading due to capacity. The worst thing that can happen when there is a short circuit is a fire in the system.
- You can connect sockets using a daisy chain method if you plan to use low-power electrical appliances; to work with another device you will need a separate outlet and power cable. In this case, the main advantage is lost - efficiency.
In addition, the volume of energy consumption for household needs is increasing. It is necessary to carry out other electrical installations, calculate its reliability, and select sockets with other parameters.
Basic standards for the physical part of socket installation
When installing an outlet, you need to know what to connect, where, what the electrical wiring has to do with it, what you cannot do with your own hands, and what you should never do. Right? Sorry, no – wrong! Despite the fact that a socket is primarily an electrical product, it is the physics of installation and fastening of this terminal product that is very important.
Let's (without electricity for now) see what errors can lie in wait in this simple, but very well detailed workflow:
- The main fastening element of the socket is the supporting frame. This is a metal square on which the filling is mounted;
- Fixation in the wall is carried out due to spacer brackets
(inside the socket) and
locking screws
, with which the frame and socket box are connected into a single whole; - The socket box
is securely fixed to the wall.
What are the main mistakes that novice electricians make when performing the task of how to properly connect an outlet? You are right, they start with the problem of how to connect the wires to the outlet, which sometimes leads to big problems with cleaning.
What happened in this case? It's simple. The socket was not secured; after the plug of the mixer, where the meat for the dog’s porridge was ground, was pulled out, the socket was pulled out along with the plug. This led to a cataclysm. The socket fell into the mixer bowl, which led to the following consequences. The hairdryer, broom, massager and beer on the floor are not exhibits. The family was going to the bathhouse when the mixer bowl exploded, causing all this destruction.
The socket burned out and so did the wiring, causing problems on the circuit connected to it. How to solve intractable problems in the electrical network. The good thing is that no one was hurt. This is what the outlet looks like now. Obviously this is a dummy.
Before connecting the wires to the socket, make sure that you understand exactly how to securely attach it to the socket!
Before you begin wiring, make sure that the outlet box is securely installed in the wall, that the spacer brackets will secure the inside of the outlet, and that the locking screws will allow you to secure the frame. Otherwise, when you pull out the plug, you risk pulling out the socket from the wall
, and you have already seen the consequences.
When thinking about how to choose the right retaining screw, give preference to a longer and thinner screw. A thick one can destroy the plastic glass of the socket box, which is why there will be no fixation.
How everything works
Anyone with basic skills can now connect an outlet from a switch.
We will try to talk in detail about all the problems that may arise in such situations. An electrical outlet should under no circumstances become a source of all sorts of dangerous situations. This is especially true for houses and apartments where there are many energy-intensive appliances. Here you will have to seriously understand the entire structure. You must become familiar with the entire switchgear.
The socket is equipped with decorative elements that are secured with screws. There is also a sub-socket and block on which the frame, grounding, front panel, protection curtains, phase, protective mechanism and housing are located. Don't forget about the fastening tabs, contacts and terminals.
Selecting a device for installation
The market offers a wide range of different models of sockets, both universal and special. And only a small part of them can be used in everyday life:
- C1A is a distribution device that does not have the possibility of grounding. Works with direct current no more than 9A, and alternating current up to 15A. Maximum voltage up to 250 volts.
- C2a - sockets with lateral grounding contacts, the design provides a contact for connecting a PE wire. Designed for connecting energy-intensive consumers such as electric stoves and washing machines to the network.
- C3A - The grounding contact is made in the form of a pin; it differs from the option described above only in the design of the grounding contact.
- C5 is a classic type of Soviet sockets. A square with a cylindrical cutout for an electrical appliance connector. Nowadays they are losing their relevance, since there is no possibility of connecting modern European plugs for electrical appliances. Can withstand current up to 7 amperes.
- C6 - modern Eurotype sockets. Installation is carried out on top of the wall when the junction box is located on top of the mounting hole.
The choice of a specific outlet model depends on the purpose and operating conditions. In rooms where there is high humidity and there is a risk of moisture getting into the outlet, a special model with protection parameters from moisture and dust is required. The level of such protection is determined by the markings on the case.
Kinds
A new outlet is selected based on a number of important technical parameters.
type of instalation
There are two options:
- mortise: installed in a hole drilled with a crown;
- overhead: screwed onto the wall with self-tapping screws.
Mortise ones in combination with hidden wiring (cables are hidden in grooves and sealed with mortar) are installed in residential and other premises with high aesthetic requirements.
Invoices with open wiring are used in garages, country houses, etc. - they are easier to install.
Presence of grounding contact
Grounding household electrical appliances is desirable because it protects the user from electrical injury. But it can only be implemented in houses with a grounding system organized according to new standards (type TN-CS).
In older houses with a TN-C system, grounding is not connected to sockets; therefore, you should purchase a product without a third contact.
Even if the house has a modern TN-CS grounding system, you should not rush to buy an outlet with a grounding contact. Since it was decided to power the new point from an existing outlet, you first need to make sure that a 3-wire wire is connected to it.
If it is connected with a 2-wire wire, then even if there is a grounding contact on it, there is no point in buying a socket with grounding.
Socket diameter
There are two types of sockets:
- Soviet model;
- Euro sockets: with sockets of increased diameter.
The choice of outlet depends on the type of plug on the electrical appliance. The error is not critical: there are adapters for connecting Soviet-style plugs to European sockets and vice versa.
Terminal type
This determines the quality and reliability of the contact in the socket. If the contact is poor, the wire becomes very hot, which can lead to burnout or fire.
Sockets are equipped with three types of terminals:
- flat spring. The most reliable variety;
- screw with pressure plate. To fix the wire in the terminal, tighten the screw against the copper plate. The terminals are flat spring, inferior in reliability, but quite acceptable;
- screw without pressure plate. The option where the cores are simply pressed with a screw is the worst; purchasing such a socket is not recommended.
Preparation
The ground wire is always yellow-green. Never use it for other purposes. Phase wire - white, red, brown; zero - blue, black. Unfortunately, some electricians adhere to other traditions. In old Soviet houses, generally all the wires are white. It will be convenient for you if the neutral and phase wires are located equally on all sockets. For example, the neutral wire is always below or to the left.
It is customary to place the socket so that the contacts are at the bottom. This makes some sense: in the event of a roof leak, water flowing down the wires will collect in the form of drops on the bend below and will not immediately reach the live contacts.
We begin connecting the outlet by preparing:
- tools (screwdriver, indicator screwdriver, long-nose pliers, wire cutters, possibly a crimping tool (crimper, press pliers), building level);
- consumables: suitable wires, terminal blocks, possibly sleeves or cable terminals;
- flashlight.
Turn off the main switch!
Select the exact location for attaching the socket. It is impossible to solve this scientifically, only for reasons of convenience and possible movements of the sofa, table, cabinet... We mark the places for the mounting screws. Construction level - to help. However, you can get by with a modern smartphone with a suitable downloaded program.
In our case, we now need to cut the wire in the right place. We estimate the length for the bend and 1 cm for the terminal. Let's have a snack. (Measure seven times - cut once!) We strip the wire from the top braid, We strip the ends of the wires by 1 cm. (The photo is incorrect - the ends are too short.) This is quite convenient to do with a stationery knife. You can extend the blade just enough to cover the thickness of the insulation without damaging the wire. A special tool is, of course, convenient, but it is only necessary for professionals for daily work.
Stripping the wire with a special tool
We bend. It is more convenient to work with a soft multi-core wire, and more reliable with a thick single-core wire. The example uses copper wire with a cross section of 2.5 square millimeters.
Installation of branches in a socket box
In order to fully comply with the requirements of the PUE and at the same time not incur too much cost for laying a separate PE conductor to each socket, you can make branches directly in the socket box. For this purpose, special terminal blocks or crimp sleeves can be used.
The main advantage of terminal blocks is that there is no need to use special tools for their installation.
Such products are installed very quickly and easily. In addition, each of them can be easily dismantled for repair or maintenance of the connection points of wiring elements. In turn, the advantages of crimp sleeves include a higher quality of electrical connection, as well as their low price. When using terminal blocks or crimp sleeves, you must be very careful carefully, since you will need to compactly arrange all the resulting connections in the socket box. Some experts recommend not limiting yourself to making a branch for the ground wire, but connecting the phase and neutral to the socket contacts in the same way. Phase and neutral wires can be connected directly to the socket contacts.
The quality of such a connection is largely determined by the type of contact. Standard bolt clamps are often not able to provide sufficient reliability of the connection of two wires inserted into them at once. Therefore, for devices intended for connection with a cable, it is necessary to use terminal blocks. Another option is to use high-quality devices equipped with several clamps for each terminal.
Safety precautions
- use high-quality tools with good insulation;
- wear protective clothing and shoes with rubber soles;
- perform actions only during the day in good lighting;
- turn off the power in the electrical panel to avoid electric shock;
- make sure that no one turns on the electricity: hang a warning sign on the panel, personally warn your neighbors;
- make sure that there is complete absence of wiring in places where it is planned to drill and groove walls for electrical wiring and socket boxes;
- It is good to tighten all screws in the terminals so that there is no sparking or heating in such connections;
- carry out work in a dry room.
To install a triple socket you will need to perform the following work:
- Preparation;
- marking walls;
- drilling a hole for the box;
- the installation itself.
Parallel connection of sockets in a modular block
There is a socket module in which a parallel connection of sockets is made. Of course, they are all sold already assembled, but I would like to disassemble and explain the connection principle itself. To connect the wires to the socket block, you must first remove the cover by unscrewing the screws securing it.
If you now look closely at the design of the socket, you can see that the terminals of the receiving holes are connected to each other in parallel. To supply voltage to all terminals, just connect the wires to any pair of them.
Let's look at how the wires are connected in such a block. We remove all installed wires and, for clarity, take multi-colored ones: brown wire - phase, blue wire - zero.
As you can see in the photo, the block consists of four sockets. Each outlet, like any other, has two contacts. Our task is to connect all the sockets so that they work independently of each other, and this can be done by using a parallel connection of sockets.
It's actually quite simple. Let's assume that the right contact of the socket is zero, the left is phase. We connect a blue wire to the right contact of each socket: from the first to the second, from the second to the third, etc. We similarly connect the brown wire to the left contact of each socket.
This outlet module is equipped with grounding contacts. The grounding wire is connected to them using a bolt and washer, so we will twist it into a ring. We will leave the phase and neutral wires straight, since the wires in the socket contacts themselves are fixed using a pressure plate
When connecting, you need to pay attention to the color of the wire insulation.
The yellow wire is usually connected to the ground terminal, blue and brown are connected to the “phase” and “zero”. If the grounding wire is stranded (consists of many thin wires), then after folding it into a ring it is advisable to tin it. Otherwise, individual wires may stick out from under the washer and screw, and contact will not be complete. The same applies to the “phase” and “zero” wires.
After removing the insulation (about 1 cm long), they must be twisted with pliers and tinned. When purchasing modular-type sockets, as in the example, it is advisable to check the correct connection and reliability of the contacts before installation. If necessary, the contacts need to be tightened.
Having connected the conductors to the terminals, it is advisable to attach the wire at the branching point to the body of the socket so that it cannot be pulled out. The mounting method may vary depending on the design of the outlet. You can use an adhesive plaster or a metal plate with holes along the edges. Some sockets are equipped with a special clamp for this.
In conclusion, you need to check the correctness of the connection by connecting an electrical appliance with a Euro socket to each pair of receiving sockets. At the same time, the ease of switching on/off is also checked.
If the plug is inserted and removed with excessive force, you need to bend the grounding pins that protrude on the sides. Before installing the cover, you need to cut a side hole for the wire. Usually there is already a mark for it in the lid. You just need to cut out the designated place and, after installing the cover in place, screw it in place.
Connecting sockets with a cable
Sometimes it becomes necessary to install an additional outlet, connecting it in parallel to the already installed one. This connection scheme is more economical than laying a separate wire.
In this case, the wires from the new socket must be connected to the terminals of the installed socket so that the “phase” is connected to the “phase” and the “zero” to the “zero”. Usually in sockets the phase wire is located on the right.
When connecting electrical devices and connecting wires to each other, you need to make sure that the metal of the wires being connected is the same. Those. a copper conductor must be connected to a copper conductor, and an aluminum conductor to an aluminum conductor.
When copper comes into contact with aluminum, oxidation of the metals occurs (in the form of a white coating), which ultimately leads to a breakdown in contact. If the condition of identical metal of the connected wires cannot be ensured, you need to tin the contacting ends of the wires (this will not save you from oxidation, but will slow down its process). We will talk about how to parallel connect sockets with a cable in the next article.
Similar materials on the site:
- Double switch connection diagram
- Pass-through switch connection diagram
DIY socket installation
There are two types of line laying, hidden and surface. The main parameter when choosing will be the characteristics of the room in which the installation will take place.
Surface wiring is mounted on top of the wall using different mounting methods. The advantages of this option are:
- With external installation, less effort and money will be required for cosmetic repairs and hiding traces of the line.
- You don't have to make a groove in the wall.
- Requires less time for installation.
Flaws:
- Lack of aesthetics when laying a line over a wall, even when using boxes and cable channels.
- Such wiring will be influenced by external factors and there is also a risk of damage to the wire.
When arranging wiring using the open method, there are different options for laying the wire, along the surface of the ceiling or wall, in special boxes, baseboards and plastic or metal corrugations.
The sockets are connected in series using a cable or using the star method using a junction box. The choice depends on the possibility of the cable, ease of installation and the required power supply to electrical appliances.
To install a hidden socket, first a groove is made in the wall where the wire is installed, then the socket box is installed. To install it, you will need a cylindrical recess in the wall; this is done using a specialized drill bit, the so-called crown. To do this you need:
- Mark the location of the future location of the outlet, observing electrical safety requirements: from the ceiling at least 150 mm, from the installation sites of gas equipment to power supply networks - at least 500 mm.
- Attach the bit to the drill and start drilling according to the markings.
- Finish the drilling process when the base of the crown rests against the wall.
- Using a chisel or hammer drill, remove the core of the hole.
- Align the back of the hole.
Next, you need to try on the socket box. If it fits into the hole and is held tightly, you need to remove the plugs and insert the cable inside, and then fill the entire back side of the socket box with alabaster solution and finally secure it in the hole until the solution dries.