Home » Electrical wiring » Sockets » Plug socket design
Typically, when designing sockets, a modular method is used. In this case, developers design the socket mechanism as a separate unit. In the future, it can be installed for any standard devices. Each socket has a decorative module, which can be easily replaced if necessary. When choosing a decorative case, you should pay attention to personal preferences, as well as the features of the interior. The design of the outlet depends on the model you decide to choose.
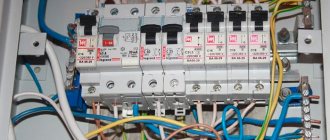
Socket device from Schnaider Elektric
In this article we explained what elements a socket consists of. Thanks to this, you will not have any additional questions during installation.
What types of socket terminals are there?
According to the method of fastening, sockets are divided into products with screwless (automatic) and screw terminals. Let's consider these options in more detail.
Screw terminals
The wire is clamped with a screw, located between two contact plates. As a result, when a load occurs, it heats up, and when it disappears, it naturally cools down. In this case, the metal, as is known, expands when heated. Therefore, this process, and then the narrowing of the wire, constantly “swings” the terminal. After a certain time, the contact between the terminal and the wire deteriorates, and carbon deposits appear, which subsequently leads to breakdown of the socket. For screw terminals, it is best to use aluminum wires. While functioning, they begin to deform over time (professionals call this process “estrus”). And then the weakened contact sparks and heats up. But to solve this problem, you just need to “tighten” the screw in time, and the socket can function again without problems for some time.
But you also need to remember if low-quality products are used, or the installation was not carried out professionally, and also when using a large number of devices through tees with one socket (or when working with several extension cords), a fire may occur. It is for this reason that since 1967 the use of screw terminals has been prohibited by law in Germany. In the Russian Federation, such products are quite widely used, but with a clear recommendation that all screw terminals must be tightened at least once every 6 months, to which many users, of course, do not respond.
Automatic terminals
They have a specialized tooth that is bent inside the product. The wire is pressed against it by another spring. Installation using this screwless clamp is quite simple. First, the wire is stripped to the required length and inserted into the terminal. It is clamped automatically. To remove this wire back, you just need to press the button - and it will go out without any resistance. In this case, it is impossible to pull out the wire without pressing this lever. Of course, automatic terminals are a little more expensive than their screw counterparts, but they are easy to maintain and do not require periodic (every six months) tightening of the wiring. In addition, reliable contact between the terminal and the wire is guaranteed. Typically, copper wire options are used for these types of clamps.
Device of plug sockets
The design of electrical sockets consists of a contact block assembly, a decorative cover and a socket box. The block is equipped with:
- Fastening lugs. They can be stationary or movable. The movable legs are expanded using screws.
- Contacts. They are identical in design and can be phase, neutral or ground.
- Terminals for further connection of wires.
Contact blocks in a socket
Notes:
- Installing blocks with movable legs is quite difficult, but thanks to this design, in the future you can independently adjust the position of the block in height. When purchasing, you need to make sure that the paws are double-toothed. If the block has single-toothed legs, then it may soon become loose.
- The terminals can be attached to the contacts with screws or be integral with the contacts. The second option will be more reliable. Before installation, you will need to sort out the first ones, lubricate the mating parts with conductive paste and tighten the screws tightly.
- Terminals on the wire side can be screw or with “brush brushes”. Many experts recommend regularly tightening the screws on the terminals, as they can become loose.
Now you know the structure of an electrical outlet. Now it's time to learn about the working principle of clamp terminals.
What are the advantages of automatic terminals?
Screwless clamp technology is an effective, instant and safe method of making an electrical connection in a socket, which even a non-professional can successfully handle. This method significantly reduces the time required for connection and eliminates the need for preventative maintenance, while ensuring high-quality contact.
Simple and effective installation There is no need to tighten the screws when connecting. Installation is carried out instantly, as already mentioned, with one click of a button. This eliminates problems typical of screw mechanisms due to excessive or, conversely, insufficient tightening. In addition, there is no need to constantly tighten a loose connection. When the wire is fixed with a clamp as a result of installation, the contact becomes securely fastened.
Resistance to a variety of influences The risk of breaking or weakening of the connection due to shock or vibration completely disappears.
Installation conditions
Sometimes installation conditions force electricians to attach not one, but two wires to one terminal. Therefore, two places for wires were provided in the spring terminals. When connecting wires in pairs, you must ensure that their diameters are the same. If they differ, it will be only slightly. If this is not done, then the cable may not fix well and the fastening will be unreliable. For example, it will be difficult for you to clamp a wire with a cross-section of 1.5 mm² if at the same time you are trying to connect a cable with a cross-section of 2.5 mm².
Many people probably know that to connect devices you need two single-core or one double-core wire. Therefore, each outlet must have two insulated terminals. If your wiring has three cores, then it also contains a grounding conductor. If your house has such wiring, then it is better to use sockets that are grounded. According to safety rules, all electrodes must be located in the structure of the device. This is to ensure that the ground electrodes on the plug come into contact before the pins on the plug make contact.
The wires must be connected correctly
Usually these are two metal plates that are very similar to the pin from a power plug. The electrodes are connected to a terminal to which the grounding wires of the electrical wiring are connected. The installation of a kitchen outlet may differ from usual.
How is the installation process carried out in screwless terminals?
This usually happens like this:
- With your thumb we press on the outer part of the terminal, which, moving away, frees up the opening for the wire.
- We insert a wire into the opening (any type of wire with a cross-section from 0.2 to 1.5 millimeters is used).
- Release the terminal. Returning to its original position, it clamps the wire, ensuring its secure fixation.
This procedure takes three times less time than working with a screw mechanism. At the same time, the reliability of the connection is much higher than that of its analogue.
Screw terminals in socket
Typically, the socket design involves the use of a spring terminal. It is with their help that the process of connecting wires is greatly simplified. Smart sockets also have a spring terminal in their design.
Fastening the wire using clamp terminals
To connect the wire, you just need to insert the bare end into the hole on the body. The spring, which is located inside the terminal, will fix the wire and press it against current-carrying parts. With this mechanism it will be difficult to control the clamping force. If it weakens during the installation stage, then you will not be able to notice it in the future. Therefore, the best option is terminals that are secured with screws.
What else should you consider when purchasing screwless terminals?
Availability of all necessary certificates. When purchasing this product, special attention should be paid to its quality. Ask for the necessary certificates and study them carefully. It's better to spend more but buy good equipment. You cannot skimp on your safety.
Buy products from well-known brands in the market. Typically, such products are high quality and reliable. For example, the products are trusted by consumers all over the world, who appreciate their safety, reliability and durability.
Buy only from well-known companies with a solid reputation. Today there are many fakes and low-quality products. By collaborating with a company that is known and respected by customers and partners, you protect yourself from possible problems in the future.
Types of sockets by installation method
Built-in . The most common design of sockets involves installation in a special socket box hidden in the wall. Only the socket body and contact output remain outside. Models with grounding additionally have grounding antennae.
Invoices . This type of sockets is used when it is necessary to lay external wiring. Here, all the filling is completely contained in a protected housing. The wire is inserted inside through a special hole. It is much easier to damage such an outlet simply by passing by. However, for fixing somewhere in the garage or on wooden walls it is a very good thing.
Both overhead and built-in sockets are available in single, double, triple or quadruple types. There are a huge variety of each type on sale, so you can easily choose the appropriate option for your apartment.
- Exploitation
Is it necessary to install grounded sockets in the apartment?
Additional functions
Protection
- From external factors. The cover (rotating, rising up) protects the contact group of the socket from moisture and dust. Such products are recommended for installation outdoors, in damp rooms, near water sources. The cover has a slot for the wire, and after inserting the plug, the panel tightly covers the socket. Moisture and dust cannot get inside. An excellent solution for use outdoors and in industrial premises.
- From children. Sockets of this group are divided into two types: with rotary and pressable curtains. Access to the contacts is limited, and in order to insert the plug, you must perform certain actions (press or turn with force).
Convenience
- Built-in extension cord. There is a coil in a niche in the wall, and one or more sockets at the end of the wire.
- Timer. Devices that turn off a household appliance are mechanical or electronic, with a programmer. There is no need to worry about turning on your household appliances when you are away from home - at the right time, the outlet will turn off the power itself.
- Remote control. A smart plug makes life easier. When returning home, before leaving for the dacha, you can turn on the electric heater in advance from your mobile phone.
- USB connector. There are 1–5 ports on one socket panel. There is no need to install separate USB hubs in your apartment.
- Combined switch. With its help, it is easy to control lighting and household appliances without leaving your place.
Power control
It is advisable to use these sockets in buildings with worn-out wiring when it is impossible to install protective devices.
- With RCD. The socket will provide protection to the user in case of increased leakage current due to a violation of the line insulation.
- With automatic protection. Protects against voltage surges and high values. If there is no stabilizing device in the house, such an outlet is an excellent solution for powering “sensitive” equipment with electronic “stuffing”.
Choosing such a simple product as a socket requires knowledge and consideration of many nuances. It is advisable to consult a professional.
Types of electrical outlets
Electrical sockets are overhead, built-in and portable. Regarding the latter, it will be enough to say that they are designed as a portable device with a dielectric housing that protects it well from the influence of the external environment. Such housings are used on various types of electrical extension cords. Typically, a power plug is installed at the other end of the extension cord.
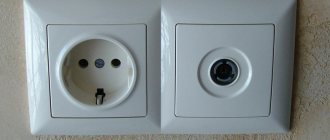
Surface socket
Surface-mounted sockets are mounted on open electrical wiring, when the wires are laid along the surface of walls, ceilings and other building structures. These sockets are attached to the wall in the right place using self-tapping screws or screws passed through mounting holes in the bottom of the socket body or in a monolithic base. The wires are fed to the terminals through an opening in the side wall of the housing.
Although the fastening method used in overhead sockets is quite simple, it ensures reliable fixation of the sockets on the supporting surface. More often, some difficulties with fastening arise when installing built-in sockets. There are two reasons for this. Firstly, their installation and fixation mechanism are really more complicated than those of overhead ones. Secondly, built-in sockets are used for hidden electrical wiring, which is used almost everywhere. Higher demands are placed on built-in sockets and the quality of their installation.
Built-in socket
The built-in socket is installed so that its functional module (mechanism) is completely hidden in the wall. Only decorative overlays remain on the surface. Such a socket is fixed in the wall using spacer tabs and self-tapping screws passed through the holes in the mounting plate. Many people are familiar with the situation when, when turning off the power plug, the socket falls out of the wall and hangs on the wires. Such a nuisance most often occurs with built-in sockets, ineptly secured using only claws.
It's always unpleasant when something doesn't go well. And it’s doubly offensive when simple and seemingly more than reliable things fail, such as sockets. In fact, everything has its own trouble-free operation life, and so do electrical outlets. Under the influence of electromagnetic fields, plastic parts undergo slow destruction and lose their strength, and electrical contacts deteriorate over time. Over long periods of use, screw connections become loose, sockets become loose and even fall out of the wall. In the end, they simply become unusable, and we exclude them from being useful things. Such sockets must be replaced.
But often the cause of malfunctioning sockets is errors during their installation or improper operation. In this case, you can try to repair them. Let's consider several typical situations. If, after connecting electrical appliances, especially powerful ones, the outlet emits a strong smell of burnt plastic, this means that somewhere in the outlet there is a bad electrical contact that generates too much heat. After unplugging the plug from the outlet and waiting 30 seconds, touch the pins on the plug. If they are hot, this indicates that, most likely, the receiving sockets of the socket have lost their elasticity and do not fit tightly to the pins of the plug. This is also indicated by the darkened edges of the holes for the plug in the front panel of the socket due to high temperature.
If the pins are only slightly warm or completely cold, then contact failure should be looked for at the point where the supply wires are connected to the socket. It is possible that one or both terminals do not press the wires against the live parts of the socket well enough. In new sockets (or those that have been in use for less than a year), the clamping screws on these terminals were simply not tightened during installation.
An outlet can overheat and even catch fire if it is used to power an electrical appliance that is too powerful or several electrical appliances, the total power of which creates a current that exceeds the permissible current of the outlet. By the way, the permissible current value and operating voltage are usually indicated on the front panel of the socket. For example, you can read there: 10 A, 250 V. This means that electrical appliances with a total power of no more than 2.2 kW can be plugged into the outlet. A socket designed for a current of 16 A can plug in electrical appliances with a power of up to 3.5 kW. You can try to repair an outlet that is heating up.
Sequential instructions for installing sockets
On the one hand, this is a simple job, but any task must be approached carefully and responsibly. Since there is no room for error here, it is not safe for the person installing the device in the first place. And in general, working with electricity requires a calm approach, so you need to do everything slowly. We will tell you step by step how to connect an electrical outlet quickly and safely.
How to connect an outlet - step 1
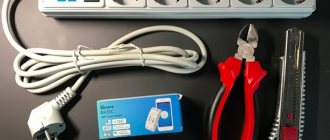
First of all, before starting work, we will prepare the necessary tools.
- socket - with or without grounding, depending on the wiring;
- mounting box (socket box) compatible with the new socket and suitable for installation to the type of wall;
- voltage indicator (tester) - to determine the phase;
- Phillips and flat screwdrivers - for installation;
- knife - for stripping wires;
- nippers - for trimming;
- alabaster or plaster - for fixing the socket box in a solid wall.
How to connect an outlet - step 2
Power outage
Turn off the switch in the electrical panel on the landing or in the apartment. To do this, the handles of the machines need to be moved down, then the indicators on them will change their color from red to green. If there are numbers there, they will change from one to zero. We recommend writing a notice on the corridor of the landing for neighbors so that none of the residents independently turns on the switch for supplying electricity to your apartment.
How to connect an outlet - step 3
Checking wires
Inspect the device from the inside to see if it is connected with two or three wires. As a rule, this is phase and zero. In apartments of modern construction, grounding is added to the latter. There are two plate buses installed inside the socket - for phase and zero. It happens that on each of the buses there are two terminals, designed as if for convenience during installation. Often the mistake of those performing such installation for the first time is that the phase and neutral wires are clamped into the terminals of one busbar.
A fairly common mistake when installing a double socket - the phase and neutral wires are clamped into terminals on the same bus
How to connect an outlet - step 4
Removing the old socket . To do this, you need to remove the cover from it. Using a screwdriver with an insulated handle, unscrew the fixing screw located in the center and remove the cover, removing the socket from the mounting box. Do not touch the contacts with a screwdriver, as they are live! Use a screwdriver to loosen the contact clamps and pull out the conductors.
How to connect an outlet
How to connect an outlet - step 5
Installation of the junction box
In order to install a new electrical socket, you need to replace the old socket box, if it is from Soviet times, with a new one.
Remove the old box and immediately clean the wall space of plaster and dust. Then check whether the socket box extends beyond the level of the wall and, if necessary, widen the hole. For solid walls, use alabaster or gypsum mixed with water to a thick paste. The wall needs to be moistened with water and the mixture applied into the hole. Then thread the wire through the socket and insert the box, aligning it with the wall. If you find cracks around, you need to cover them up and wait a few minutes until the material: alabaster or plaster hardens.
How to connect an outlet - step 6
Stripping wires
We cut the cable that is too long with wire cutters so that it protrudes beyond the wall by about 5–7 cm. Carefully remove the outer sheath and remove 5–10 mm of insulation from each conductor.
How to strip insulation from wires
How to connect an outlet - step 7
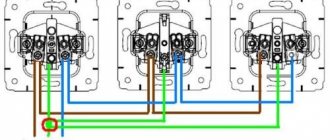
Selecting a socket connection diagram
Now you need to decide how exactly you will connect the sockets, in what way. Using our diagram, you can familiarize yourself with the options for connecting to your home electrical network:
- Sequential . This is the connection of the socket to the socket.
- Parallel. In this case, each device is supplied with its own line from the common one, through a distribution box.
- Mixed option . Some sockets are connected in parallel, and some in series.
Choose one option or another based on the expected power of the connected household appliances. If some powerful devices will be connected to the outlet, for example, an electric heater, an automatic washing machine, it is better to connect a separate line to it. If no special loads are expected, you can choose a sequential circuit.
How to connect an outlet - step 8
Connecting the socket
If the electrical outlet is not grounded, connect the wires in any order. We remind you that the phase should be on the right and zero should be on the left. Although, there may not be any markings on it.
In a device with grounding, it is permissible to swap the wires, but it is advisable to place the phase to the L , and the neutral conductor to the N . Important! Grounding must be connected to the contact marked ⏚ or PE! If there is no marking, we connect to the central contact, which leads to interacting characteristic antennae inside the socket.
So, you have already freed the new socket from the cover, now loosen the clamping screws of the contacts, then insert the conductors into them one by one in accordance with the markings and tighten them carefully. The main thing is not to allow insulation to get into the clamp; make sure that the stripped part of the wire gets into it.
Checking and connecting the device
Before attaching the cover to the outlet, it remains to connect it to the electrical network. We take two or three wires, depending on the type of wiring, and strip them using a knife or side cutters - with or without grounding. The wires are fixed with clamping screws, after which the base of the socket is secured in the cup holder with screws. Traditionally, “ground” corresponds to the yellow-green wire. It connects to the middle pin of the device. You connect the remaining two wires to the remaining extreme contacts; they are intended for the plug of electrical appliances.
How to connect an outlet - step 9
Securing the mechanism
Re-check that you have connected everything correctly and tighten the contacts with a screwdriver. The conductor strands should fold like an accordion; after making sure of this, insert the mechanism into the mounting box.
This entire structure should be placed horizontally; if you notice a skew in any direction, straighten it. Tighten the side screws, which will open the spacers and secure the mechanism. There may be additional screws on the body of the socket box. Then, for a more secure fixation, wrap them too.
How to connect an outlet - step 10
Installing the cover
Socket cover
Before installing the cover, check whether your device has a decorative panel. If yes, then install it first. Next, place the top cover of the socket against the body and secure it with a screw.
How to connect an outlet - step 11
Turning on the electricity
Now move the toggle switch to the reverse position so that the indicators show a red light. At the same time, watch carefully so as not to confuse the circuit breakers.
How to connect an outlet - step 12
Checking the socket.
This is the last step in the process of installing and connecting an outlet in your home. Let's check if you did everything correctly. To do this, turn on the electricity supply. If, after turning on the electricity, the light is on and the machines have not been knocked out, then you have done your job perfectly. However, you cannot immediately turn on any electrical appliances; first you need to check the outlet just in case.
To do this, take an indicator screwdriver and touch all the contacts one by one. At the same time, the control lamp on the right contact should light up. It should not light up on the left contact and the light on the ground antenna of the indicator should not light up.
Checking the outlet
Features of installing sockets on a plasterboard wall
Let's consider another option for installing sockets. Here we will immediately say that even before installing the plasterboard sheets, a cable is pulled, enclosed in a special corrugated pipe for safety.
A special feature in this case is the installation of the socket boxes themselves. There are several models for drywall, but they all have one thing in common.
On both sides of such a socket there are pressing feet, which move upward along the groove intended for this purpose when the screw (screw) is screwed in. Thus, the paws will press the socket box from the back of the plasterboard sheet.
Their design, as well as the body, can be different. There is a body shape in the form of a truncated cone, that is, when moving upward, the legs will also diverge to the sides. There is a guide groove shape. In it, when the screw rotates, the foot first rotates 90 degrees and then progressively moves upward. This does not affect the installation order.
Before installation, the tabs must be in their lowest position. Afterwards you need to cut and then squeeze out windows in the socket boxes for the passage of wires. In the first - from the bottom for cable entry and from the side for the switching channel with the second socket. In the second - only on the side for switching.
Markings on the wall
The socket boxes are prepared - you can move on to markings on the wall. Find the place where the supply cable is hidden under the drywall. The standard distance between the centers of socket boxes is 71 mm, if they are planned to be assembled into a single block. This segment breaks off along a horizontal line.
In order to mark the center of the holes in the wall, without hitting the posts or lintels, you need to use a special crown with a diameter of 68 mm. Other piercing and cutting objects are acceptable, but there is a risk of going beyond the boundaries of the cut, and this will lead to unreliable fixation. Then the cable is passed through the hole in the bottom of the first socket box, at the same time the socket box is inserted tightly into the cut-out socket, so that the side along the outer circumference rests against the surface of the drywall. After this, the second socket box is inserted into its socket.
The socket boxes need to be aligned vertically and then secured by moving the presser feet. The screw must be rotated until you feel that the foot rests on the drywall. Then, another half turn is made on both screws, this finally secures the structure. Under no circumstances should you overtighten - the foot may begin to crumble the drywall from the inside. Therefore, it is necessary to insulate the ends of the wires, then carefully roll them up and hide them in the electrical box.
Is WAGO worth using?
Personally, we don’t see any problems. Of course, if it is possible to purchase original terminals. In our opinion, “wags” are indispensable in such situations.
- Connecting lamps. For example, in a slatted or suspended ceiling there are a lot of points, and fiddling with twists or other methods is not very effective.
- Layout of lighting lines. Typically, lighting fixtures use LED bulbs, so the power is low. Even the simplest 222 series terminal blocks will do.
- Connecting temporary lines. For example, you are renovating a new building and need to install a temporary line for power tools. And then take it apart when the permanent one appears.
- Connecting to a bare wire sticking out of the wall. Often old wiring breaks off (especially aluminum) when trying to twist it. If you only have a small “tail” sticking out of the wall, you can put a WAGO on it and get out of the situation. For aluminum wiring, use Series 2273 or another rated for that material.