Today, the kitchen is the room where not only food is prepared. Family members gather here to dine and receive guests quite often. Therefore, the kitchen requires a variety of household appliances that simplify and even decorate our lives.
The kitchen apron is the area above the work surface. It is very functional: not only does it protect the wall from splashes, but also because it is on it that there are sockets for electrical appliances used for preparing various dishes: a multicooker, an electric stove, a mixer, a meat grinder, etc.
But before you install sockets on the kitchen splashback, you need to determine their number, and this depends on how many appliances you plan to have in the future. Therefore, first of all, you need to make a project for your kitchen, which will describe in detail their number and location. But when installing sockets, you should also take into account the visual placement, namely at what height it will be best for you to use them.
Quantity definitions
The question of how many power points there should be is very simple. After all, you definitely know how many appliances there will be in your kitchen. To reach their number, you need to add a few more auxiliary sockets. You also need to consider the following nuances:
- for powerful devices that require constant switching, you need to make separate sockets;
- you need to install them separately for the fume hood;
- for other kitchen appliances you need about 3-4 pieces.
When installing sockets, you must follow certain rules. What are they?
How to install correctly
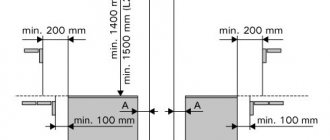
- Kitchen sockets behind countertops are installed at a height of approximately 10cm.
- The cable that goes from the household appliance to the outlet should not exceed 150cm.
- The outlet for the hood is installed at a height of approximately 50-60mm from the kitchen cabinets.
- For small household appliances it is necessary to install at a height of approximately 1 - 1.4 m from the floor level.
- For lighting, the height of the sockets should be 2000mm from the floor and 1100mm from the work surface.
- But you should remember that experts recommend connecting at least three sockets in parallel above the work area. It is best to “throw in” a new three-core copper wire - for European-type devices.
Selection by components
The base is made of ceramic or plastic material. Ceramic is able to dissipate heat and is flame resistant. The plastic base, on the other hand, is not as fragile, and some types of plastic can also resist fire.
The metal used for conductive parts is brass or bronze with various coatings. When choosing a socket with brass elements, you need to take into account their low reliability in conditions with high humidity. It is also undesirable to use it with aluminum wires, since these materials oxidize upon contact and slow down the conduction of electricity.
When choosing which sockets are better, it is difficult not to pay attention to models with bronze contacts or pressure springs - their rating surpasses all reliability indicators. True, such sockets are very rare - these are premium products and are not purchased in stores for the mass consumer.
An integral part of a modern outlet are grounding contacts, which allow you to save equipment, wiring, as well as the life and health of their owner. In addition, such a protective element is capable of removing static voltage that periodically appears on the housings of electrical appliances and “jerks” users when touched. This is especially true for the use of water-related devices. There is no need to take risks - you need to choose a manufacturer of household sockets that has taken care of such an element.
The fastening mechanism is built into the inside of the socket - it is responsible for the reliability of fastening the device. If this unit is not critical for external sockets, then the internal spacer must be resistant to mechanical loads.
The choice of outlets is also influenced by the quality of the front panels. They do not transmit current and do not hold the entire device in place, but they provide an insulating layer that prevents foreign substances from getting inside. The choice of a rosette front panel can be timed to coincide with the interior design of the room - then you need to separately pay attention to their material and style of execution. Some manufacturers produce sockets with several options for front panels, which can be freely changed without interfering with the internal part.
Errors
When installing this type of device, inexperienced technicians can make a number of mistakes:
- There is no need to place the outlet for the hood in the area where it is located.
- There is no need to take into account the size of the plinth behind the work surface.
- If the kitchen apron is made of plastic material, then installation should be done after it is installed.
- The wall must be grooved on the apron.
- Place the sockets as far as possible from the sink to prevent water from entering it - this can lead to a short circuit.
- Installation should be carried out before installing the kitchen unit.
- The wiring must be of an acceptable cross-section.
- From the above we can conclude that when installing sockets you should be very careful, taking into account even the most insignificant nuances and details. The price of a mistake is very high!
- Once you have drawn up a plan for the placement of devices, you can begin to implement it.
Installation features
During installation, it is important to connect the wires correctly.
Installation of external sockets is carried out in the following order:
- The electricity is turned off at the input circuit breaker to prevent damage from stray currents.
- Marking is being carried out. The body and holes are outlined.
- The cable is brought to the attachment point. A reserve of 10 cm is made.
- The body is disassembled. The wires are screwed to the terminals. Plus is brown, zero is blue, earth is yellow-green.
- The base is screwed to the wall. Fasteners are selected based on its structure.
- A lid is screwed to the body to cover the internal parts.
- The strength of the installation is checked by inserting and removing the plug several times.
After testing the product, electricity is supplied to the room.
Preparing for installation
To visually mark where the devices will be, you need to mark their location with a simple pencil. When installing them, great importance is attached to the material from which the kitchen apron is made. If you have, for example, a tiled or plywood floor, then it is quite enough to just very carefully make a hole in it for installation.
Difficulties may arise when you have a glass coating. Then you need to know all the measurements and calculations in advance, make all the markings and give them to the manufacturer of such an apron, who can make the holes in advance according to your plan for the location of household appliances.
You should be aware that there is no provision for the installation of hidden power sources on kitchen surfaces.
This means that their connection is carefully wound together, then insulated and well fixed to prevent overheating. You also need to separate the phase and neutral wires in different directions.
After completing all these manipulations, we proceed to installation.
Installation process
Before installing sockets on the apron, that is, above the kitchen work area, you need to make sure that you have everything for this. You will need: hammer drill, grooving chisel and bit, internal boxes, screws, distributor box, dowels, three-wire cable and double 16 Amp sockets. At the same time, you need to remember that they need to be installed at a level where small children cannot reach them. Overhead fastenings must be done so that other communications in the house are not damaged.
After the layout of the sockets has been drawn up, we begin their installation in the wall:
- Using a hammer drill you need to increase the size of the recess. If in place of the new outlet there was an old one, you should turn off the electricity supply and dismantle it.
- Install the distribution box.
- Use a hammer drill to drill holes for electrical boxes.
- Grooves are made in the concrete structure.
- The wiring needs to be placed in grooves and secured. The wire sheath will help with this.
- Wiring is placed in special boxes.
Read also: How to hammer finishing nails
- Single-color wires need to be connected only to one side of the future outlet; on the other side they are connected with three express terminals. As a result, each terminal should have 5 identical wires coming from the sockets and one wire of a certain color that needs to be routed to the junction box.
- A sand-cement mixture is made, which is used to cover the grooves for wiring.
- Check the correct connection and, if everything is correct, the sockets need to be secured.
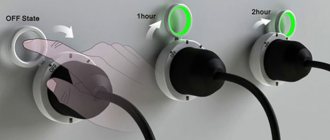
Today, very often, so-called retractable sockets are used. They are located inside an MDF apron. Therefore, there are no wires on the surface. This product can be rotated in any direction. But this is most likely just beautiful than practical. When installing, remember:
- the cable must connect uninterruptedly to the network;
- constant access to socket fittings so that when they break, they can be replaced;
- there should be a lot of space under the surface, and this excludes the presence of cabinets and bedside tables.
You should also take into account that if you have a decorative kitchen apron, you should not place a rosette on the design or ornament, so as not to spoil its appearance.
Consider all these criteria, and then your renovation will not bring you much trouble.
Kitchen renovation begins with design. At this stage, it is important not only to think about the style of the interior and the location of furniture, but also to plan the placement of sockets. The effective functioning of household appliances, safety and ease of work in the kitchen area depend on the correct layout. Do-it-yourself installation of sockets in the kitchen is done according to the rules. Recommendations from specialists will help you complete the installation. This article will help you find out how to hide sockets in the kitchen with your own hands.
Colored sockets look original in the kitchen
Sockets are placed depending on the location of household appliances and the configuration of furniture structures.
Caliper
The new sockets are made of two layers:
- base – galvanized steel
- cover - polycarbonate
What benefits does this provide? Polycarbonate provides additional electrical safety.
Even if somehow a phase from the wiring breaks through to the socket body, the front part of the caliper will be reliably insulated. And touching it with your fingers will not give you an electric shock.
But often, many electricians unscrew and disassemble sockets to find a fault, without even removing the voltage from it. This function will greatly protect you from accidental electric shocks.
And the presence of two layers allows you to increase the strength of the entire structure by about 50% compared to a traditional galvanized steel caliper.
Proper layout of sockets: how and where to hide them
Planning for the placement of power supplies is carried out before repairs. The design takes into account where the furniture sockets will be located and where the equipment will be placed.
Wall grooves for cables and wiring are carried out before finishing.
A place is determined for the stove, refrigerator, hood and dishwasher.
A kitchen outlet is planned for each electrical appliance. At the same time, the recreation area provides the opportunity to connect chargers or a laptop.
Sockets are available in the following varieties:
- Surface-mounted sockets in the kitchen are installed on an open cable. In this case, the cable is routed along the surface of the ceiling or wall. They are characterized by ease of fastening and high-quality fixation.
- Built-in electrical sockets are located at the same level as the work surface. They eliminate the need to run cables through the room and serve as a decorative element.
- Portable mechanisms are a design with a special housing that protects the device from external influences. In this case, extension cords with a power plug at the end are used.
Sockets in the countertop - very convenient in the kitchen
How many sockets will you need?
At the planning stage, the number of outlets is determined. For convenience, kitchen equipment is divided into sectors:
- In the lower sector there are devices that are intended for large-sized equipment. These are appliances that are located under the countertop. These include ovens, dishwashers, refrigerators, and cooktop outlets.
- The middle sector is used to connect mobile household appliances that are used on the work surface but stored in other places. This type of equipment includes a food processor or coffee maker.
- A device for connecting an air conditioner, hood or TV is mounted in the upper tier.
The electric stove or refrigerator must be constantly connected to the network. In addition to the main power sources, spare ones are planned. For a small room there can be 3-4 of them.
When choosing power supplies, you should pay attention to the following points:
- for the kitchen, models with moisture-proof properties are selected, which are equipped with seals and lids;
- powerful items of household devices are installed on separate wiring of the electrical network, this is how the socket for the hob is mounted;
- main devices are installed taking into account the amount of large equipment;
- The power supplies are switched on;
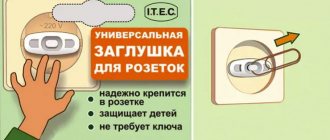
- if there are children, choose devices with plastic curtains or plugs.
A retractable socket block is used, with the help of a rotating mechanism the devices are hidden or opened for use.
Rosettes are made on a beautiful apron
How the external connection device works
Socket design
External sockets have approximately the same design, if you omit additional options.
The product consists of the following parts:
- Body-base. Made from ceramic or polycarbonate. Serves for wall mounting, placement of conductive parts and additional options.
- Current conduction mechanism. Consists of bolt terminals and spade contacts. Serves for network and consumer switching.
- Grounding. It consists of external side springs connected to a mounting terminal.
- Clamping mechanism. A self-regulating device that ensures constant contact with the wire.
- Front panel. Performs protective and decorative functions. Made from wood, metal or plastic.
When choosing an external socket, it is recommended to ask the seller for a quality certificate so as not to purchase a fake.
Rules for installing sockets and work regulations
After completing the plan with markings of all electrical appliances, installation is carried out. The power source for the hood is mounted under the ceiling. In this case, the device should not come into contact with the gas outlet and should be mounted at a distance of at least half a meter from the window opening.
Some interiors require hiding sockets in the kitchen. At the same time, the space is not cluttered with unnecessary elements.
It is difficult to install a nest next to the stove. This requires damaging the surface.
To avoid breaking panels and wall surfaces, a variety of surge protectors and extension cords are used that can replace triple sockets for the kitchen.
There are certain rules governing the installation of power supplies:
- The minimum height for placing power supplies is 20 mm from the baseboard.
- For built-in furniture, internal power supplies are used. They are installed inside the drawers or the socket is mounted in the countertop.
- Switches are installed at a height of 500 mm from the floor surface.
- The place for placing sockets is located at a distance of a meter from electrical equipment.
- Spare devices are being installed. There must be at least three of them.
- Maintain a distance of 50 cm from the electrical socket to the gas line.
Installation work is carried out after communication with a specialist.
Read also: Sulfation and how to desulfate
The placement of power supplies is carried out in compliance with the recommendations:
- Do not install devices near a sink or gas stove.
- Electrical sockets and devices are located in places that are difficult for children to reach.
- It is worth taking care of the waterproofness of the wires.
- The relocation of an outlet in a panel house is carried out after an electrician has inspected the room.
Corner socket - ideal option
Sequence of installation work: should height and other parameters be taken into account?
Ventilation, gas and water lines must not be touched when carrying out electrical work. Additional sockets are installed at the entrance to the kitchen. It is recommended to install double sockets in the free corner.
The spare device is placed under the dining table.
For a regular outlet, the following installation sequence is recommended:
- Places for devices are marked on the walls and apron. The number of wires from the incoming cable is calculated.
- The overhead socket is easy to install, but it is not safe. Therefore, indoor installation is recommended. To do this, paths for wires are made along the surface. A hammer drill and a chisel are used.
- At the locations of the power sources, holes are made that correspond to the dimensions of the box.
- Wires are laid along the laid grooves, which are first placed in a special corrugation. This is the material that protects the wire. Then a plastic box is mounted.
- An outlet is installed and connected to the electrical network. A functionality check is being performed.
The installation process requires electrical knowledge and certain skills. If you have no experience in this matter, then it is better to entrust the installation to a specialist.
When performing installation, you should follow some recommendations:
- The nests are equipped with special covers that will prevent water or dirt from getting into them.
- The wiring is carried out according to a previously drawn up project.
- Corner sockets save space.
- If it is necessary to move the socket without damaging the wall, then the cable is routed along the baseboard. This method will not spoil the kitchen decor.
- Separate switches are mounted under the power supplies.
- The cross-section of the wires must be at least 2.5 mm.
- For electrical appliances, plugs are important. There are models with straight plugs and those turned 90 degrees.
It is worth remembering that the total power of electrical appliances should not exceed the allowable limit for the power source.
Equipment with a metal casing that can come into contact with water is pre-grounded and connected through a circuit breaker. Some power supplies are equipped with special protection during production.
With electrical knowledge and skills, you can install sockets yourself. This allows accommodation to be tailored to individual needs.
In modern houses and apartments, the kitchen is the room that is filled with a variety of household appliances more than others. For this reason, a large number of electrical outlets are usually installed in the kitchen, and in this article we will talk about how to do this correctly, without resorting to the help of specialists.
Screw or screwless contacts
Modern and most old models also differ in the technology for connecting conductors. The newest sockets have screwless terminals that allow you to very quickly both connect and disconnect cables or wires.
There are still heated debates among electricians about which contacts are more reliable. Supposedly screwless, they reduce the area of contact with the wire.
This reduces current-carrying capacity and reliability. However, such a dispute is reminiscent of the age-old question, which is better: Wago or twist?
Here a lot depends on the quality of execution and operating conditions. There are sockets where a fairly powerful spring exerts pressure on just one point - for example, from manufacturers Gira, Legrand, Schneider.
But ABB has a spring with less elasticity, but it presses at two points simultaneously.
Use all products according to standards and recommendations and problems will never arise. For example, in some European countries, at the legislative level, the use of screw terminals has been prohibited since the 60s.
The main advantage of screwless terminals is that such connection does not require further maintenance. As the manufacturer assures, after installation, subject to rated loads, you will not look into such an outlet again for many decades.
All older sockets use screw technology. The stripped wire strands are clamped with traditional screws.
Moreover, the clamping force is also normalized. Professional installers use special torque screwdrivers for this.
Such contacts are much more labor intensive during installation and disassembly. In addition, it is advisable to periodically tighten these clamps, that is, maintain them. And this entails dismantling almost half of the structure of the entire outlet.
Wires pressed with a screw during temperature fluctuations - heating at maximum load and cooling when it is turned off - can shrink. And accordingly, the contact will weaken over time.
In high-quality sockets, the conductors in screwless contacts are in a constant state of tension, no matter how hot or cold.
In addition, they have a limiter template on the reverse side, which shows how accurately in millimeters the insulation needs to be removed from the core.
What you need to know about kitchen sockets
The location of sockets in the kitchen has some features:
- due to the fact that there is water and fire in the kitchen, sockets must have the appropriate protection class;
- the location of sockets in the kitchen is directly related to the placement of electrical equipment and the height of the kitchen furniture;
- There are a large number of places in the kitchen where sockets can be placed: worktop, kitchen cabinets.
Important! Most kitchen equipment has high power. This factor must be taken into account when selecting the optimal sockets to avoid fire from overvoltage.
From an installation point of view, overhead sockets for the kitchen are the simplest solution.
Sockets of this type have certain advantages:
- Ease of installation . Not in all cases it is necessary to groove walls to lay power wires. This helps to avoid additional cash costs and saves time.
- Ease of use. Kitchen overhead sockets are especially convenient when new powerful electrical appliances are installed in the kitchen. It is much easier to install the socket on top of the wall covering without violating its integrity.
- Relatively low price.
Degree of protection
Since the installation of a surface-mounted socket is often carried out outdoors, in damp, dirty rooms, the material and design must be strong enough. Each device indicates the possibility of protecting the mechanism from dust and moisture. If the letters IP and two numbers are written on the electrical outlet, then the first number will indicate the degree of protection from solid pollutants, the second - from liquid pollutants.
For wet rooms and streets, it is recommended to buy devices labeled IP44 - IP68. Their body is perfectly protected from all damaging factors; there is a cast body and rubber inserts for sealing. For an apartment, you can buy a socket with a degree of protection of IP21.
Placing overhead sockets in the kitchen
The location of sockets in the kitchen is directly related to the location of electrical appliances that will be connected to the electrical network.
All electrical equipment in the kitchen can be visually distributed into three levels:
- Lower level. It houses built-in appliances in the lower cabinets for the kitchen: washing machine, oven, stove. Overhead kitchen sockets at this level are mounted at a height of about 15 cm from the floor level. It is prohibited to install a socket directly behind an electrical appliance. Each electrical appliance that must be turned on at all times requires a separate electrical outlet. A practical option for a refrigerator, washing machine and dishwasher would be to install surface-mounted electrical outlets with grounding.
- Average level. This includes equipment that is installed on the worktop: toaster, blender, mixer. Typically, outdoor electrical outlets are installed either immediately above the backsplash or under the upper cabinets. Socket blocks consisting of 3 or more electrical outlets have become very popular.
- Top level. It contains electrical appliances that are located at the top: lighting, hood. The installation height of electrical sockets on the upper level is about 10 cm from the top plane of the kitchen cabinets. In addition to the work area, you need to remember about electrical outlets on other walls.
Determining how many sockets need to be installed in the kitchen is not difficult at all. It is necessary to count the number of electrical appliances that will be installed permanently, that is, they will be constantly connected to the network, then the number of electrical appliances that will be used periodically, as needed (mixer, blender) is calculated. To this number you need to add another 2 to 5 points, and the result will be the number of sockets that will need to be installed.
Read also: In what year was the printing press invented?
After purchasing the necessary equipment and materials, installation work can begin. The process of installing electrical outdoor sockets can be divided into several stages. If necessary, you can find many photos and videos on the Internet that show in detail instructions for installing surface-mounted electrical sockets.
By following simple instructions, you can connect an outdoor outlet in the kitchen with your own hands.
Fastening
Sockets are fastened in both traditional and new models either with screws located in the socket box or with clamps. When tightened, the grips dig into the walls of the socket box.
However, the design of the improved models has its own peculiarities. The so-called “double tooth” technology is used here.
It allows you to increase the tearing force by about one and a half times.
Another difference between a high-quality socket is the presence of a special profile, the so-called “dovetail”. It makes it very easy to install sockets and switches in blocks.
If you need to connect two or more mechanisms under one frame, according to the Pocket Electric level, you set the very first one perfectly exactly, and mount the second and subsequent ones using a dovetail.
As a result, all mechanisms will be quickly and smoothly installed in their seats.