Socket arrangement
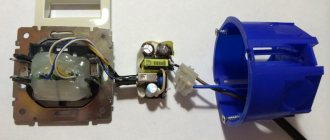
Most types of sockets have a similar design. The base is a plastic or ceramic base in which connection terminals and fasteners are located. A front panel is attached to the base of the device, which performs protective and decorative functions.
The electrical part of the sockets consists of metal terminals, which have a shaped spring part on one side for tight contact with the plug pin, and on the other a clamping element for connecting wires. A screw with a spring washer is most often used. There are three metal terminals. Two are located symmetrically for connecting the neutral and phase conductors, and the third is for connecting the grounding.
To secure the socket in the wall, curved legs are used, which move apart and rest against the walls of the socket when the fastening screws are tightened. For reliable fixation, the end of the legs is shaped like a dovetail. Modern sockets are also attached with self-tapping screws to the top of the socket box.
Brief overview of characteristics and prices
The domestic electrical goods market offers a wide selection of socket models with two inputs. Products vary in design, technical specifications and prices.
Most popular products:
- Legrand Valena - grounding, screw terminals, 16 A, IP20, 375 RUR;
- Legrand Valena Allure - grounding, spring terminals, protective curtains, 16 A, IP21, 650 rubles;
- Legrand Etika - grounding, screw terminals, 16 A, IP20, 185 RUR;
- Legrand Quteo - grounding, spring terminals, protective curtains, 16 A, IP21, 220 rubles;
- Legrand Quteo - grounding, screw terminals, water protection, 16 A, IP44, 525 rubles;
The product range consists of mechanisms with white and colored covers.
How to independently remove an old socket from the wall and install a new one
In order to replace the socket, you need to take some preliminary steps and prepare the necessary tools. The work consists of several stages:
- removing the decorative panel;
- loosening the screws securing the wire cores;
- removing fasteners and loosening the spreading legs;
- actually, dismantling.
Installing a new socket is done in the reverse order.
Tools
To dismantle and install the socket, you must have the following tools:
- screwdrivers with flat and Phillips blades;
- knife for stripping insulation;
- side cutters;
- pliers.
The type and size of the screwdriver blade must match the slots of the screws used.
A discrepancy between the dimensions will lead to the spline breaking, which will complicate further work.
Safety regulations
It is important to remember that all work is performed only when the voltage is turned off.
The power is turned off at the input panel and measures are taken to prevent unauthorized switching on. Immediately before performing work, you need to make sure that there is no voltage on the network cable. A special probe is used for this. It is not advisable to use a voltmeter, since if the neutral conductor is faulty, it will not indicate the presence of a phase.
Dismantling process
First of all, remove the decorative cover.
Different manufacturers have their own methods for attaching the cover to the base of the socket, but the most common method is one or two screws located between the holes for the plug pins. To prevent the screws from getting lost, they can be held on the reverse side with locking washers. The lid is often secured using latches. Here you need to be careful not to damage the latches.
It is recommended to first release the base of the socket from the wall and then disconnect the wires. In old sockets, the screws stick strongly to the terminals and it is often impossible to unscrew them while holding the socket suspended. The screwdriver may break off and cause injury.
It's easier to loosen the screws while the case is still attached to the wall. Then remove the housing and finally disconnect the wires.
It is important not to apply bending forces to the wires, since the insulation of old wires is fragile and may crack or crumble. Aluminum conductors can break, and they cannot be extended inside the wall. You will have to change the section of wiring between the outlet and the junction box.
Stages of work with an external device
External sockets are distinguished by the fact that their base is not recessed, but is attached to the outer surface.
When installing a new socket, do not pull it too hard to the surface so as not to break the housing. If you place plastic washers under the screw heads, the risk of breakage can be reduced.
Attaching a new mechanism to the cores
Before installing a new socket, prepare the ends of the cable and the mounting location for the socket. The length of the conductors must be such that they can be easily connected to the terminals. It's not scary if there is some margin in length. The wires must be carefully moved in opposite directions from the base of the socket to the walls of the socket box.
Before installing a new socket, the ends of the wires are cleaned of oxides. Bent parts are straightened with pliers. The length of the stripped part must be such that the wire completely enters the fastening part of the terminal, without leaving a bare part outside. If necessary, the core is shortened using side cutters. When breaking off the cores, you need to remove the insulation to the required length. To remove insulation, you cannot use pliers or side cutters, since the core, crushed by the cutting edges of the tool, will break. This is especially true for aluminum wires.
A sharp knife is used for stripping, and the process itself is carried out in the same way as when sharpening a pencil, cutting the insulation at an acute angle to the surface of the core.
Do I need to remove sockets before wallpapering? What should I do if wallpaper glue gets into the socket?
We decided to hang wallpaper ourselves, but we can’t decide on the sockets, whether to remove them or not, what should we do if wallpaper glue suddenly gets into the socket?
Author of the question
djbonko
Answers:
Are you planning to hang wallpaper and doubt your abilities? Advice from experienced specialists will help you avoid mistakes when performing work in difficult places: around switches and sockets.
Gluing wallpaper around sockets and switches is not that difficult
Preparatory work: let's not forget about safety
The easiest way to apply wallpaper around switches and sockets is after partial dismantling of electrical appliances. Before starting this work, turn off the power to the room, and then:
- Unscrew the screws and remove the protective cover of the socket. The contact group in the mounting socket is left in place
- Carefully pry the switch keys with a screwdriver or a small chisel and remove the decorative panel-frame from it
- insulate open screw terminals with wires with masking tape or securely cover them with thick polyethylene, tucking the ends into the technical hole.
Features of dismantling an old triple or double socket
Dismantling a double or triple socket without any special differences, since this type of sockets has the same number of terminals for connection as a regular one.
All switching is carried out structurally at the very base of the device. The difference may lie in the size of the socket box, but for dismantling and subsequent installation this is not important.
If you follow the recommendations given, working with home electrical wiring does not require special education or experience. The main thing is compliance with safety requirements. You cannot work without turning off the electricity. You need to have the necessary tool (list in the article above), and then you can get the desired result without additional costs.
Preparation
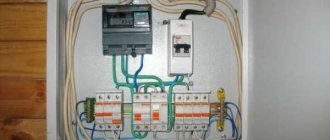
Before any work with sockets, the voltage must be removed, for which the machine is turned off. You don't have to turn off the power to the entire apartment. You just need to find the group that the outlet belongs to, and then turn off the circuit breaker. In this case, you should definitely check the lack of phase in the socket with an indicator or multimeter.
Checking the voltage in the socket with a multimeter
If you turn off the main package switch, then there is a complete guarantee that the outlet will not accidentally become energized. In this case, it won’t hurt to stock up on a flashlight that will provide the necessary lighting.
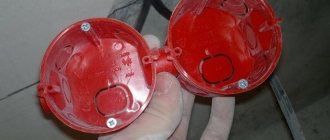
Inserting a new socket box into an old one
Another way is to completely replace the socket boxes with new ones, although removing them from the wall is quite difficult. It is best to do this using a hammer drill, carefully removing the plaster around the socket box, being careful not to damage the wires.
Fault diagnosis
Has the light gone out in your house, garage or shed? Before you take a screwdriver, you need to find out the possible cause. There may be several of them, identifying them is not difficult:
Burnt out incandescent lamp. Sometimes in such cases, when turned on, it may flash, blink or burst, and only then go out. If this happens, then there should be no doubt - the lamp requires replacement. You should turn the switch to the “off” position, carefully unscrew and replace the burnt out bulb with a working one. If the lamp simply does not turn on, then to diagnose it you will also have to unscrew it from the socket, see if the tungsten filament is intact, or simply try to insert a new lamp in its place. If after the manipulations the light turns on, then everything is in order and nothing else needs to be done.
- If replacing the lamp did nothing and the light still does not want to turn on, the socket may have failed. To check this assumption, you need to unscrew it and put another one in its place.
- If there is no response, there are no options left - the switch itself is faulty.
If you have spare electrical accessories and several screwdrivers at home, you can immediately begin repair work. The only difficulty is to correctly locate the mounting points and not damage the appearance of the switch when removing it from the wall.
The fact is that the reason for the inactivity of the on/off mechanism can be easily eliminated using home methods, and replacement will not be required, then it will be possible to put the repaired switch back in place. And given that manufacturers now pay great attention to the design of their products, all screws, clamps and other fasteners are usually hidden under the frame. Therefore, when dismantling, without knowing the detailed structure of the fittings, you can easily damage the keys or frame, and this will significantly worsen the external data.
Safety regulations
Strict adherence to safety regulations is an integral stage of the preparatory work that must be carried out before dismantling any type of outlet. The first thing to do is to turn off the power to the part of the room in which the work will be carried out.
Typically, in older residential buildings, electrical wiring can be divided into three groups: lighting, sockets, and electric ranges. Accordingly, to de-energize the sockets, you need to turn off the circuit breaker in the distribution panel that is responsible for supplying voltage to the sockets. After this, you need to make sure that there is no voltage in the electrical network.
You can check this in several ways:
- Use a screwdriver - a voltage indicator.
- Use the switch button to turn on and off the lights in the room.
- Connect any household electrical appliance to an outlet and check if it works.
If dismantling the outlet is carried out in the dark, care should be taken to have a good source of artificial lighting.
Any work related to electrical wiring must be done with dry hands.
Floor rose columns
The floor rosette column deserves special attention. It is a telescopic stand made of aluminum or plastic that rises from the floor and rests on the ceiling without requiring dowels. It can accommodate electrical installation devices of any European standards. Inside, the column is divided into 2 channels for separate conduction of power and low-current lines. Electrical communications are supplied to the device through floor channels or a suspended ceiling.
USEFUL INFORMATION: Using a timer socket
A double-sided column is an ideal solution for offices and other premises where it is necessary to simultaneously connect a large amount of equipment. Each column can have up to 32 modules measuring 45 × 22.5 mm. In this case, sockets can be mounted on 1 or 2 sides.
A mini-column differs from a column in height. This stand rises above the floor to a height of 25 cm or 68.5 cm and is also equipped with a large number of sockets.
Now we install the finished socket boxes.
Safety rules for operating electrical installations
Some install socket boxes without cable wire. It is pulled into the box after the fixing solution has dried. The reason is that in some circumstances the cable can knock the outlet block off the desired level. There is no right option - you should do what is most convenient.
Installation of socket boxes
The most rational installation path is a triple socket in one socket. The latter is a block with three slots on a common frame. The installation of a composite housing of three sockets and a whole module (triple at once) is identical.
Tools required for installation:
- hammer drill or drill (depending on the wall material - concrete or brick, respectively);
- special attachment (crown with special incisors and a radius of 35 mm);
- hammer with chisel;
- screwdriver;
- spatula (preferably two - narrow and medium).
Stages of work:
Drill a hole. Take a hammer drill (drill) and a crown. The drill bit of the tool is pressed against the designated centers and drilled until the bottom of the nozzle touches the wall. It is recommended to break the concrete remains (when the hole is already ready) with a chisel (built into a hammer drill or a hammer). Make a groove. This is a hole for routing cables. Holes should be pressed on the back panel of the socket box. Their number is similar to the number of cable cords (that is, three). Another groove is needed for the power cable. The diameter depends on the latter. Make holes for the wires. They are made between two cable holes. It is necessary that the diameter of the drill matches the diameter of the corrugation where the wiring will be inserted. You can resort to corrugated pipe, but this is not necessary. Fix the socket box in the wall. To do this, the box is secured with alabaster (it holds better and dries faster). The mixture is used to cover the inner walls of the opening. Then place the block there and keep it there for a while (for a strong fixation)
It is important to take care of the amount of mixture, otherwise it will seep out or the socket will hold weakly. The consistency should not be too thick or thin
Complete drying of the mixture will take from 1 to 2 hours.
Connection
Basic Rules:
- connecting electrical outlets of any type must be done when the power supply is turned off;
- open wiring electrical cable must be laid in a special box or protective corrugation.
Video: how to connect an outlet.
The algorithm of actions is as follows:
- de-energize the electrical wiring (by turning off the corresponding circuit breaker);
- disassemble the socket;
- place the base at the intended location and mark the holes for fasteners, usually there are two or four of them;
- in the case when the installation is made on a wall made of brick or concrete, the marked holes are drilled and a plastic dowel is inserted into them. The base of the socket can be screwed to a wooden surface with self-tapping screws. If the wall is made of plasterboard, then a special plastic fastener is used - “butterfly”;
Butterfly fasteners for drywall and PVC
when the base is screwed, electrical wiring wires are connected to it; to do this, you will need to carefully break out the corresponding hole on the desired side of the box
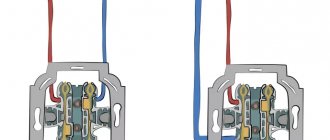
The plastic in the place where the wires are supplied is thinner, so there will be no problems with this; we connect the wires to the terminals, the photo shows how double surface-mounted sockets are connected (pay attention to the correct polarity, especially for the ground wire, if any); How to connect a 2-gang socket
How to connect a 2-gang socket
How triple surface-mounted sockets are connected is shown in the figure below
Please note that the ground wire is not connected from socket to socket, but to each separately. A 4-socket outlet is connected according to the same principle;
Connection diagram for 3-socket outlets
- after connecting the wires, the socket or group of sockets is assembled;
- The power supply is turned on and the operation of the devices is checked.
As you can see, if certain safety rules are observed, overhead sockets can be connected without problems. Their cost in various regions of Russia is almost the same as in Moscow, so there is no point in citing it.
Do-it-yourself installation in an apartment wall: instructions
Safety rules for the operation of the contact network of electrified railways - organizational and technical measures
There are certain requirements for installing sockets in an apartment. You must first calculate the power required for the power point. Consider the nuances of installation in rooms with different microclimates. The power outlet requires a special connection.
Capacity calculation
Power is the main characteristic of an electrical device. Before purchasing an electrical outlet, calculate the total load it will withstand. Also consider whether the electrical wiring can withstand such a load. Look for data in special tables that show core cross-sections, material, voltage, current and power of the wire.
Bathroom standards
The bathroom is a room with high levels of humidity. If a power point is installed here, then adhere to the following rules:
- sockets must be installed at least half a meter from grounded parts (pipes, sinks, batteries);
- the electrical socket is placed at a height of 50-100 cm from the floor;
- above-plinth devices are mounted no closer than 30 cm from the floor.
Also, the electrical outlet must be stable, durable, with a certain degree of moisture and dust resistance.
The bathrooms use a hidden type of electrical wiring.
Installing a double socket
A double socket is used to connect two household appliances at once. They are stationary and prefabricated.
A fixed socket is installed in the same way as a regular one
It is important to ensure that the cables are connected to the conductive plates, otherwise a short circuit will occur
A prefabricated product is more difficult to install. For installation, you need a conductor of the same length as that connected to the main socket box. This means that a network with three wires (2 power and ground) requires three additional cables. Additional ones are stretched between the socket boxes. In the one in which there is an output of the main electrical wire, pairs of cables (main and auxiliary) are connected to the terminals. In the second socket box everything is connected as standard.
Installation of universal electrical outlets (power)
Power sockets are needed to connect powerful appliances: washing machine, water heater. The design differs from a conventional product: it is much thicker and is designed for a load of at least 40 Amps.
Before connecting, make sure that the wiring meets safety requirements. Otherwise, you cannot connect the power outlet, otherwise a fire may occur. A separate line is allocated to it, leading to the distribution panel.
A power outlet is installed in the place where the power cable exits. This is usually next to the stove. Fastening is carried out with dowels.
The degree of protection must be at least IP20.