The secret to longevity of LED lamps
I noticed this thing. LED light bulbs are positioned on the market as the most reliable, economical and durable. Manufacturers promise that they will last 10 years. In fact, they work exactly until the warranty expires. Although they could shine longer.
The Chinese save on everything they can - driver components, LEDs, board and case materials. As a result, the light bulbs become overloaded and overheat. LEDs are operated in extreme conditions!
I noticed this when another light bulb stopped shining after a year. I decided to take it apart and see what the problem was. It turned out that the resistors and capacitors were selected so that the LEDs worked at their full power. Not surprisingly, one of them burned down.
Theoretical background
LEDs operate at low voltage - about 2-3V. But most importantly, for normal operation it is not the stability of the voltage that is required, but the stability of the current flowing through them. When the current decreases, the brightness of the glow decreases, and an excess leads to failure of the diode element. Semiconductor devices, which include LEDs, have a pronounced temperature dependence. When heated, the junction resistance drops and the forward current increases.
A simple example: a stable voltage source produces 3V, with a LED consumption current of 20mA. As the temperature rises, the voltage on the LED remains unchanged, but the current increases to unacceptable values.
To eliminate the described situation, semiconductor light sources are powered from a current stabilizer, also known as a driver. By analogy with fluorescent lamps, the driver is sometimes called a ballast for LEDs.
The presence of an input voltage of 220V, together with the requirement for current stabilization, leads to the need to create a complex power supply circuit for LED lamps.
Disassembly
It was decided to extend the life of the light bulb in the most barbaric way. I'll start from the beginning - with disassembly.
- Take a sharp knife. We wear gloves to avoid cutting ourselves.
- We put the light bulb on the table.
- We insert the knife blade into the microslot between the diffuser and the middle part of the lamp.
- They are connected by some kind of sealant.
- Lightly press the knife on top and roll the lamp over.
- A couple of minutes, and the sealant is cut off, and the shade comes out of the latches of the middle part.
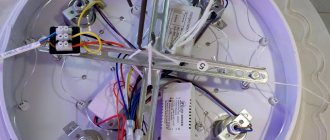
- Under the cover, the LEDs connected in series on the board will appear.
- Unscrew 2 screws and unsolder. Cut hot melt glue in a circle.
- We take out the board by prying it with a knife.
- Behind it is a driver that can be pulled out with your fingers. That's it, the light bulb is disassembled.
It is structured very simply:
Terrarium
A cute craft made from a burnt out lamp, a souvenir - a terrarium. Yes, some will say that the craft is completely useless, but still it is quite cute and will complement the interior.
We recommend reading:
Crafts made from epoxy resin - stylish, original and beautiful products and decorations made from epoxy (110 photos)Crafts from seeds: step-by-step instructions and tips for choosing the most beautiful ideas for crafts
Crafts from airy plasticine - ideas for creating beautiful crafts, the main steps and a description of how to make a craft correctly (100 photos)
Numerous photos of crafts made from light bulbs confirm this - it seems like a cute little thing, created with your own hands, but how perfectly it fits into the interior of a particular room.
The terrarium can be filled with moss, pebbles, toys, cute twigs, shells - whatever you want.
The terrarium is installed on a structure made of wire or on any other stand. The wire should be made of copper, thick - it is flexible and will fit perfectly with the lamp.
Recovery
This video inspired me to make my own light bulb:
We recommend: I stained linoleum with glue - I easily removed it in 10 minutes using regular dimexide
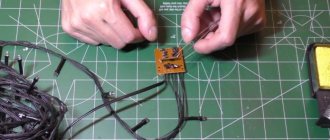
- We find a burnt out LED (or several).
- They are usually marked with a black dot. In my case, the entire LED was burnt out.
- We paint out the fire victim with a knife or screwdriver.
- We drip flux onto the exposed contact and apply a drop of solder.
This way we restore the circuit and the light bulb starts working again. But! There's one catch. The voltage then increases and the LEDs will light up one after the other. Perhaps the light bulb will work for another month. Or maybe just one day.
Candle
An old light bulb can be used to make a candle. This is a very simple job, you just need:
- drill the base;
- remove all internal elements;
- place a cotton wick inside the flask;
- fill everything with oil.
The whole job will take about ten minutes, but what a wonderful candle it can turn out to be.
You can pour a candle out of paraffin. To do this, place a wick in a drilled lamp and fill it with paraffin. Then carefully break the flask. Now the light bulb-shaped candle is ready!
There are a huge number of ideas for making crafts from lamps; you just need to show your imagination and working together with your child can bring pleasure, delighting you with the end results. The main thing is not to let kids play with glass crafts.
To avoid injury due to negligence. What's even worse is that the child may swallow the glass. Therefore, after making a craft, it is advisable to put it away where access for children is limited, or to carefully monitor the actions of children.
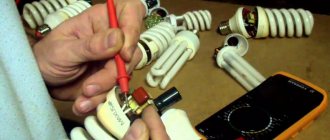
Brightening Up
At the stage of replacing the resistor, one could stop - put the lamp back together, glue (tape) the diffuser... But the light seemed not bright enough to me. The question was how to fix this. I took the simplest route.
To increase the brightness of the light bulb, I took an old CD. I modified it a little and got a powerful reflector.
- Widened the central hole of the disk. To do this, I used a 35-point carpenter's pen. You can cut a hole with any other handy tool. Not the point.
- I glued the board with LEDs to the disk. I took hot glue. I spread it on the reflective side of the CD (around the hole). I pressed the board with its back.
- I reassembled the light bulb in reverse order. Where necessary, we solder the contacts. We do not change places of wires, even if the length allows. The light will flicker.
- I taped the seam where the case meets the CD so that the structure is strong and does not fall apart. The diffuser was thrown away.
Bottom line. A non-working LED light bulb turned into a kind of mini-spotlight. It’s uncomfortable to look at, but the garage is 200% illuminated! Of course, this option is not suitable for home. As well as for the street (damp rooms). There, brightness will have to be sacrificed for the sake of aesthetics and safety.
We recommend: 5 ingredients that make strawberries even tastier
I foresee that many will say, why bother repairing and extending the life of LED lamps? Today the price for them is very affordable. Everyone can afford to throw away the old one and buy a new one. But out of principle, I decided to get the most out of it. I am one hundred percent satisfied with the result. The garage is as bright as day. In 3 years not a single LED has burned out. The lamp has become twice as bright and lasts three times longer (and this is not the limit)!
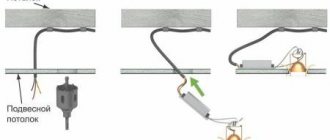
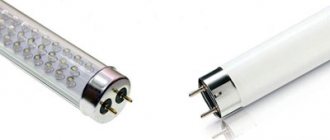
Conversion of a lamp with electronic ballast
If the model of the illuminator is more modern - an electronic ballast choke and no starter - you will have to make an effort and change the connection diagram of the LED tubes. Components of the lamp before replacement:
- throttle;
- wires;
- cartridge pads located on both sides of the body.
We get rid of the throttle first, because... without this element the design will become lighter. Unscrew the fastening and disconnect the power wires. Use a narrow-tipped screwdriver or pliers for this.
The main thing is to connect 220 V to the ends of the tube: apply phase to one end, and zero to the other.
LEDs have a peculiarity - 2 contacts on the base in the form of pins are rigidly connected to each other. And in fluorescent tubes, the contacts are connected by a filament, which, when heated, ignites mercury vapor.
Lighting devices with electronic ballasts do not use a filament, and a voltage pulse breaks through between the contacts.
It is not so easy to supply 220 V between contacts with a hard connection.
To make sure the voltage is correct, use a multimeter. Set the device to resistance measurement mode, touch the two contacts with the measuring probes and take measurements. The multimeter display should show a zero value or close to it.
LED lamps have a filament between the output contacts, which has its own resistance. After applying voltage through it, the filament heats up and causes the lamp to work. Further connection of the LED lamp is recommended to be done using 2 methods:
- without dismantling cartridges;
- with dismantling and installing jumpers between the contacts.