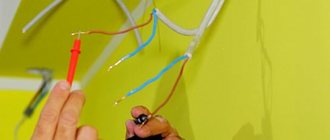
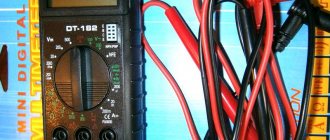
Probes are an integral part of all multimeters, which comes complete with the measuring device, regardless of its model. Good probes have been performing their task well for many years. But it also happens that a few days after purchasing a multimeter, one or even both contacts fail due to a broken wire, broken tip or cracked insulation. To protect yourself from such a nuisance, you need to purchase high-quality and reliable multimeter probes, with good wires and durable tips. Many people prefer to make them themselves. In this material we will talk about the varieties and features of these elements, and also figure out how to make homemade probes for a multimeter.
Universal probes
These products are the simplest and cheapest. They are included with most inexpensive multimeter models. The cables of these elements are equipped with PVC insulation, and the plugs and lug holders are made of plastic. A thin wire is attached to the steel electrode from inside the holder. Such tips can easily come off if not handled carefully. It is clear that there is no need to talk about durability and high reliability here.
Different models of universal contacts have unequal lengths of the central electrode of the plug and the protruding part of its body. They also differ in the mounting depth of the plug.
A budget option
Measuring probes, in which the wires are PVC insulated, plastic is used as the material for plugs and holders, and the tips themselves are made of steel, as a rule, the most inexpensive.
They are included in the kit for budget multimeter models, such as DT-838 or DT-830B. Test leads are selected in different colors to correctly connect the device to the circuit being measured. The standard electrode thickness for such products is 4 mm, and the length varies depending on the model. The shape of the holders may have several variations, but this minor design feature does not affect reliability.
Drawing . Inexpensive multimeters are equipped with appropriate probes.
Such products are not the best option; any careless movement can lead to the tip coming off. In addition, we should not forget about the disadvantages inherent in PVC insulation, they are as follows:
- the shape of the wound wires is retained, which leads to inconvenience during work;
- low heat resistance, insulation is easy to damage with a soldering iron;
- The wire becomes stiff in the cold and may crack.
It should also be noted that stylus tips with needles with a diameter of 4 mm are not suitable for all jobs. For example, to take measurements from electronic boards where SMD components are located, thin tester probes will be required. The only advantage of budget models is their low price. Such products are fully justified when using a multimeter at a non-professional level, that is, for domestic purposes for minor repairs.
Branded products
The multimeter can have a probe made of various materials. High-quality and reliable contacts can be distinguished by the following characteristics:
- Multimeter probe leads are made of highly flexible material.
- The holder insertion is flexible and sealed. The vein in it holds tightly and does not give in to random jerks.
- The surface of the product near the base of the holder does not slip and can be comfortably held with your fingers during measurements. The best option is a holder with a rubberized surface.
The video shows an example of such products:
Silicone probes have all of the above properties. These parameters are responsible for the high popularity of such products.
Often the holder inputs are made of plastic, but in this case they must have special recesses, otherwise the element will not have the required flexibility. On almost all branded models, plugs and electrodes are equipped with caps that protect the elements from contamination and minimize the possibility of puncture injuries.
These products were developed taking into account the experience of using earlier models, and therefore are distinguished by their thoughtfulness and ease of use. The wire of such contacts has sufficiently high strength and flexibility, is resistant to accidental jerks and does not crack when bent.
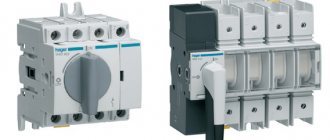
Professional equipment
Here are the characteristic distinctive features of a quality instrument:
- wires with silicone insulation, they have good flexibility and heat resistance;
- the holder and plug must have flexible sealed inputs; thanks to this design, the wires will not break out of them, even if an accidental jerk is allowed;
- the holders have a rubberized coating and are equipped with special protrusions for easy grip with your fingers;
- the electrode needles (and often the plugs) are equipped with special removable caps. This type of protection has two functions: it prevents contamination of the contact surface and significantly reduces the risk of getting a puncture injury;
- anodized or gold-plated electrodes;
- small internal resistance of the wire (ideally about 0.04 Ohm).
Products from the following brands meet these requirements: Fluke, Unitrend, Mastech, etc.
Figure Flucke styli complete with crocodile clips
As a rule, good professional probes are collapsible, which allows you to use special attachments for them. It makes sense to talk about them in more detail.
Probes for SMD mounting
When working with SMD elements, it is periodically necessary to carry out measurements, which can only be done using thin probes connected to the tester. These products are equipped with sharp brass or stainless steel needle-shaped tips. They are necessarily protected with caps, which minimize the risk of electrode fracture or accidental injury to the technician.
For SMD installation specialists, such elements are most convenient to use. With sharp probes you can not only pierce the wire insulation, but also scrape off the solder mask from the desired area of the board surface and then carry out measuring work. Although the thickness of this needle is very small, the element can easily withstand a voltage of 600 V for a long time.
For measuring work when installing SMD components, multimeter probes are also provided. They allow you to measure the required parameters of a part both on the desktop and directly on the board.
During the measurement, the component is clamped with pliers, which guarantees the quality of the contact. These products have a fairly short cable, but a long one is not needed to work with SMD.
If the measurement process requires maximum care to prevent the electrode from touching other parts, then it is best to use probes with holes at the ends.
With their help, you can take measurements both on printed circuit boards and during electrical installation work, without fear of accidentally causing a short circuit.
Refinement of the multimeter mount
Another inconvenience when taking measurements with a multimeter is the lack of a third hand. You constantly have to hold a multimeter in one hand and use the other to work with two probes at the same time.
If measurements take place at your desk, then there is no problem. Put the tool down, free your hands and work.
What should you do if you measure the voltage in a panel or in a distribution box under the ceiling?
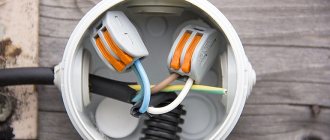
Crocodile tips
This version of the tip is also available on the modern market and is in considerable demand. In some cases, it turns out to be preferable to sharp electrodes. The size of the “crocodile” may vary, but in any case it must have a reliable shell made of dielectric material.
Connecting tips can be made in the shape of “crocodiles” and are used as an additional element for a standard probe. Often, the kit for the multimeter includes tips in the form of clip-on “crocodiles”, which, if necessary, can be either detached or attached.
It is also necessary to mention the kits, which include several different tips. When starting work, the master himself selects the one he needs and screws it in like an attachment. This feature allows in some cases to significantly simplify the measurement process. So, for example, a crocodile can be connected in turn to different sections of the electrical circuit being tested, while the other tip is attached to ground as a terminal.
Technicians who work with terminal components prefer terminals designed in the form of clips and hooks. With the help of such elements it is convenient to carry out measuring work on printed circuit boards, as well as to hold the terminal components in place during measurements. These tips, as well as needles and crocodiles, can be included in the delivery package.
Overview of various attachments
Many manufacturers provide different types of attachments for connecting to the measuring wires, which makes the probes universal and significantly expands the scope of their application (see Figure 5).
Figure 5. Test leads and attachment set
Thanks to this set, you can choose long or short needles, depending on the need, change the thickness of the tip, for example, when you need to make delicate measurements, etc.
To check SMD components, it is convenient to use a special pliers attachment; testing with it is shown in Figure 6.
Figure 6. Checking the SMD resistor
The alligator clip (see Figure 4) is no less useful; it can be used to connect to a device for taking measurements, while during the testing process your hands are freed, which allows you to make other measurements.
Using an attachment that has a spring-loaded hook (Figure 7), you can connect to most attachments on printed circuit boards.
Figure 7. Spring-loaded hook attachment
The terminal adapter attachment makes it easy to connect to a laboratory power supply to monitor voltage and current.
Figure 8. Terminal adapter
Concluding the topic of professional measuring leads, you should pay attention to one significant drawback of such products - the relatively high price. For example, original Flucke probes with a set of attachments cost about $60.
How to make homemade probes?
As we said above, many people prefer not to buy new ones when factory probes break down, but to make them themselves. Let's consider two popular options for making homemade products.
Standard homemade probes
To make them you will need dismountable fountain pens (without refills) and dart tips for darts.
The operating procedure is as follows:
- Disassemble the fountain pens and try on dart tips for them.
- Having selected the appropriately sized components, insert the dart tips into the handles instead of the rods, after heating them with a gas burner.
- Place a piece of solder inside the handle, after moistening it with soldering acid and heating it.
- Place the cable there.
- Wait until the solder cools down and the probe elements are fixed.
For additional fixation, the dart tip can be glued.
The entire device is clearly shown in the video:
Thin homemade probes for piercing insulation
Now let's figure out how to make thin probes for a multimeter with your own hands. To do this, we will need collet pencils using replaceable leads, and sewing needles of suitable thickness.
The production of thin probes is carried out as follows:
- Solder the cables to the needles.
- Insert the needles inside the pencils until they hit the center of the collet. To prevent them from going inward when pressed, they should be glued into the collet.
- Solder the plugs to the cables.
It is advisable to apply colored heat shrink to the resulting products. When working with a hair dryer, you need to be careful, as the flow of hot air can cause deformation of the plastic.
Pen and pencil caps can be used as protective elements.
The video shows an example of making needle probes for checking small parts:
Multimeter backlight
A function that the multimeter lacks in poorly lit areas is display backlighting. Solving this problem is not difficult, just apply:
- 2 LEDs soldered in series to each other
- reflector - an ordinary piece of gold from chewing gum
- microswitch of any type
Make a hole in the side of the housing for the switch. Glue the reflector under the indication display and solder two wires to the crown contacts.
They supply power to the switch and then to the LEDs. The structure is ready.
The final result of a homemade modification of the multimeter backlight will look like this:
The backlit battery will be used up much faster, so do not forget to turn off the switch when there is enough natural light.
Testing
According to reviews from many users on the Internet, the homemade probes presented above are devices that are no worse in operation and performance than household models. They can check the voltage in any electrical appliance. It is recommended to carry out the first testing using personal safety equipment and on a small device. Subsequently, you can use homemade products for other needs.
In general, test leads are indispensable multimeter devices that are produced on the market in large quantities, despite the fact that in many cases they are included with the measuring device. There are different types, differing from each other mainly in quality and durability. You can make them yourself, following all the prescribed recommendations by users.
Determining the exact battery voltage
In order to find out the actual battery voltage yourself, you will need at least one accurate resistor with a nominal value of 2 or 2.2 kOhm with an error of 0.5%. This resistor value was chosen due to the fact that when a microammeter is connected in series with it, the total resistance of the circuit will be 5000 Ohms. Consequently, the current passing through the tester will be about 300 μA, and the needle will deflect to full scale.
I=U/R=1.5/(3000+2000)=0.0003 A.
If the tester shows, for example, 290 µA, then the battery voltage is
U=I*R=0.00029(3000+2000)=1.45 V.
Now knowing the exact voltage on the batteries, having one exact resistance and a microammeter, you can select the required resistance values of the shunts and additional resistors.
Assembling the power supply
The power supply for the multimeter is assembled from two 1.5 V batteries connected in series. After this, a microammeter and a 7 kOhm resistor pre-selected at nominal value are connected to it in series. The tester should show a value close to the current limit. If the device goes off scale, then a second, small value resistor must be connected in series to the first resistor.
If the readings are less than 300 μA, then a high-value resistance is connected in parallel to these two resistors. This will reduce the total resistance of the additional resistor. Such operations continue until the needle reaches the scale limit of 300 μA, which signals an accurate fit.
To select the exact 97 kOhm resistor, select the closest one that matches the nominal value, and follow the same procedures as with the first 7 kOhm one. But since a 30 V power supply is required here, the multimeter’s power supply will need to be reworked from 1.5 V batteries.
A unit is assembled with an output voltage of 15-30 V, as long as it is enough. For example, if it turns out to be 15 V, then all adjustments are made on the basis that the needle should tend to read 150 μA, that is, half the scale. This is acceptable, since the tester scale when measuring current and voltage is linear, but it is advisable to work with full voltage.
To adjust the 997 kOhm additional resistor for the 300 V range, you will need DC or voltage generators. They can also be used as attachments to a multimeter when measuring resistance.
Resistor values: R1=3 Ohm, R2=30.3 Ohm, R3=333 Ohm, R4 variable at 4.7 kOhm, R5=7 kOhm, R6=97 kOhm, R7=997 kOhm. Selected by fit. Power supply 3 V. Installation can be done by hanging elements directly on the board.
The connector can be installed on the side wall of the box into which the microammeter is embedded. The probes are made of single-core copper wire, and the cords for them are made of stranded copper wire. The shunts are connected using a jumper. As a result, a microammeter turns into a tester that can measure all three main parameters of electric current.