Every car owner wants to achieve maximum illumination in their garage. This is due to the fact that the garage often turns into a workplace, in other words, a workshop. It is here that every car owner can carry out competent maintenance of his car. Also, proper lighting in the room will help you quickly find the necessary tool or park your car.
LED lights are the best option for quality lighting in your garage. They produce much more light in comparison with similar lamps. The illumination level is superior to all competitors. Purchasing LEDs is a guarantee that you will no longer damage your vision in complete darkness, and the work done will be much better.
Don't forget about the huge range of LEDs; they can come in different shapes and sizes. This helps you choose the right model specifically for your conditions. These factors include many nuances, such as the size of the garage. It is also worth mentioning the incredible service life, which can reach six years.
Requirements and standards for light in the garage
Lighting standards in garages are laid down in the building codes and regulations 05/23/2010 “Natural and artificial lighting” (instead of SNiP 23-05-95) and the set of rules 52.13330.2011 “Natural and artificial lighting”
Minimum illumination level requirements: value given in lux
In addition, it is worth considering the energy efficiency of the lighting system and its safety. Hot and explosive liquids stored in garages pose a danger. Therefore, wiring and light sources must comply with fire safety requirements.
Because the garage is not the cleanest room. It contains moisture and dust, so lighting fixtures must have high moisture and dust resistance.
Lighting from a Philippine lantern
The Philippine lantern for our latitudes is generally a rare exotic, unfamiliar to few people. It has one advantage - it is absolutely free.
The name of the flashlight came from the places where it was actually invented. By the way, there is a whole volunteer organization engaged in such lighting, with a very telling name - “Liter of Light”.
Everything is based on the refraction of natural light from the sun. This flashlight is made from a plastic bottle filled with water.
The manufacturing procedure is as follows:
- the bottle is thoroughly washed until shiny, all labels are removed
- a rectangular stainless steel screen is placed on top
- The water in the bottle is diluted with chlorine or bleach. These components are needed so that the liquid does not bloom and does not have to be changed frequently.
- the bottle needs to be filled with water 3cm above the screen itself
- a hole is drilled in the roof where such a lamp is fixed
To prevent leaks, all joints are sealed with silicone.
One such flashlight is comparable in lighting power to a 50-watt incandescent light bulb and covers an area of up to 10 m2.
In order to increase the level of illumination, you will have to mount several such devices on the roof.
However, you need to be objective; this method of lighting is more applicable to some kind of shed with junk than a garage where a car worth several thousand dollars is stored. No one in their right mind would put holes in their roof for a water bottle.
Therefore, we will now focus on more practical lighting methods.
Organization of lighting in the garage
Multi-level lighting
When organizing lighting, some factors are taken into account:
- ceiling height and total area;
- layout of work areas and lighting standards for them;
- material and color of wall, ceiling and floor coverings (light colors reflect light, while dark colors absorb light);
- selection of the type of lamps and associated equipment.
From SNiP 05/23/2010 it is clear that different areas require different luminous flux. Therefore, it is wise to zone lighting in the garage for areas where individual work is being carried out. It is convenient to provide general lighting and local illumination of work areas. For example, organize general lighting for the car storage area and local bright lighting in the inspection pit and repair area. The inclusion of such zones should be organized by separate groups of switches.
It is recommended to use multi-level lighting: it is most effective, especially when the ceiling height is above 3 meters.
- Ceiling lighting.
- Light at a height of 1.8 m from the floor.
- Light at a height of 0.75 m from the floor.
- Light at a height of 0.4 m from the floor.
Also, general lighting fixtures must have a durable protective shade with a light diffuser. And on lamps located below one meter from the floor, it is worth installing a metal grill to protect them from damage.
A lamp intended for local illumination must be located outside the field of vision of a person during operation so as not to dazzle or irritate the eye. Such lamps must also be securely fastened in the desired position.
Lighting devices can be stationary and portable. Stationary ones are fixed in a certain place. Portable lamps include table lamps, lanterns, and spotlights. They are indispensable when repairing a car, when you need to illuminate a hard-to-reach place.
Useful tips from an electrician
- If you have divided all the lighting into certain zones, it is advisable to install the switch directly next to it. For example, near the mechanic’s table, near the hood, etc. If desired, you can install pass-through switches that will allow you to turn the lighting on and off, both from the entrance and from the zone itself.
- In case of a power outage, install emergency lighting in your garage. Halogen lamps or 12 V LED lamps are perfect for this. If the power goes out during repairs, you can always continue by powering the emergency lighting from the battery.
- If you have a spotlight at the entrance, connect it through a motion sensor, this way you will save on street lighting and can create a kind of alarm system.
- For greater efficiency, the luminous flux from stationary lighting in the garage must be diffused, which can be achieved with the help of lampshades and reflectors. But portable local illumination can be done with one beam of light for a specific point.
- Install a grounding loop and lay a third wire in the wiring, this will prevent electrical injury and fire due to a short to the frame.
- When choosing materials and devices, purchase products from well-known manufacturers.
Types of light sources for the garage
Characteristics of various light sources
There are four types of light bulbs suitable for domestic spaces. Their comparative properties are presented in the table.
Incandescent lamps
A classic version, familiar to everyone since childhood. The advantages include the low cost of the lighting device, reliable operation at sub-zero temperatures and in conditions of high humidity and dust. Good color rendering index: colors are not distorted. But incandescent lamps do not burn for long and consume a lot of electricity. The light output from them is the lowest. The light is warm. To protect against glass bulb fragments, it is recommended to place incandescent lamps in a special protective shade.
Halogen lamps
Similar in design to incandescent lamps, only iodine or bromine is added to the inert gas in the flask. Due to the addition of halogens, service life and light output are increased. A halogen lamp can withstand sub-zero temperatures, humidity and dust, but breaks due to voltage surges. Costs more than an incandescent lamp. Energy consumption is high. It is advisable not to mix used lamps with ordinary glass, since the halogen bulb is made of quartz glass. It is undesirable to touch halogen light sources with bare hands - this will cause the bulb to blacken and damage the lamp. The light is warm.
Fluorescent lamps (FL)
Fluorescent lamps are much more expensive than incandescent lamps. The flask is filled with mercury vapor, which makes the light source dangerous if the integrity of the flask is damaged. Additionally, there are difficulties with disposal: it is prohibited to throw away LL with household waste. It takes time to warm up before reaching the power level declared by the manufacturer. LLs do not work well at temperatures below +5⁰. They are sensitive to voltage changes, high humidity, and frequent switching on and off. Low color rendering index. The advantages of fluorescent lamps include low energy consumption, long service life, and high level of light output.
Light-emitting diode (LED) lamps
They have the highest level of luminous efficiency and burn longer than other types. Continue to work if the bulb is damaged. They shine at low temperatures and high humidity. They have a wide range of color temperatures:
- warm white (warm white, WW) – color temperature 2800-3300 K;
- neutral white (NW) – 3300-5000 K;
- cold white (cool white, CW) – over 5000 K.
A cool or neutral color is more suitable for a garage, depending on how long you work in it. Cold light invigorates, increases performance, but over a long period of time causes discomfort to the eyes and nervous system. Cold is suitable for short-term use. For long-term work, it is better to choose neutral light. LED light bulbs are energy efficient: they consume the least amount of electricity. The disadvantages of LED lamps include high price and sensitivity to voltage changes. Some models are powered by 12V, which will require additional equipment.
Thus, when choosing lamps for a garage, first of all, you should be guided by the duration of operation in it. For short visits, an incandescent or halogen lamp is sufficient. When working for a long time, it is better to use LED light sources: having spent money on purchasing light bulbs, you will forget about replacing them for a long time and save on electricity bills. Fluorescent lamps are best used in a heated garage. And in an unheated room they should be duplicated with incandescent or halogen lamps.
Solar panel and wind generator
Although panels and wind turbines are no longer particularly rare in our stores, few people would risk installing a solar battery on the roof of a garage far from their home.
The factor of theft and vandalism cannot be ignored here. Moreover, such sources have a lot of disadvantages:
- high price
- Difficulty connecting. Most likely, you will have to invite a specialist.
- purchase of additional equipment - storage batteries
- direct dependence on weather conditions
Calculation of the number and power of lamps for the garage
The luminous flux is calculated based on the area of the room (m2) and the illumination standard. According to SNiP 05/23/2010, for storing a car, the illumination must be at least 20 lux, and for repairs ten times higher than 200 lux. If we take a standard garage with dimensions of 6x4 m, then its area will be 24 m2. We multiply the values of the norm and area and get the required luminous flux: 200 × 24 = 4800 lumens (lm). Let's round up to 5000 lm.
Remember that SNiP provides minimum values. If you want a brighter garage, increase the lighting.
Next, we will convert the resulting number of lumens into more understandable watts and the number of light bulbs. A table of comparative powers of different types of lamps will help us. (The power of halogen light sources is the same as that of incandescent lamps).
Comparison of power of lamps with the same luminous flux
Luminous flux values are approximate; You can find out more precisely on the packaging of a particular light bulb. Based on the table, the calculated 5000 lm can be obtained in different ways (the calculation is given for LED light bulbs and other types of similar power):
- two 30 W LED bulbs (fluorescent 80 W, incandescent/halogen 200 W);
- four 15 W LED bulbs (fluorescent 30 W, incandescent/halogen 100 W);
- seven 10 W LED bulbs (fluorescent 15 W, incandescent/halogen 60 W).
You can use an even larger number of low-power lamps, but this option is not very convenient for a garage.
For convenience, the luminous flux should be evenly distributed throughout the room. Therefore, the most convenient option is the second one, with four 15-watt LED bulbs evenly suspended on the ceiling. However, the final option depends on the specific dimensions of the garage.
How to choose the optimal lamps
The following types of lamps are suitable for garage lighting:
- incandescent lamp;
- halogen;
- luminescent (energy saving);
- LED
Among all existing lamp designs, LED lamps are confidently in the lead. They have many advantages:
- low power consumption;
- long service life;
- silent operation;
- smooth glow without flickering.
In addition to technical characteristics, LED garage lamps are convenient due to their variety of shapes and design options. There are different color options, from cool blue to warm red. The most natural color rendition occurs with the yellow color of LED lamps, but each person has his own preferences and concept of comfort.
Examples of light source distribution schemes
As mentioned above, lighting a garage with one powerful lamp is irrational. However, if you choose this option, then it is better to mount the only light source on a rotating bracket. This way you can vary the light flux and direct it in the right direction.
But it’s still better to use more lamps. They can be arranged in different ways. Since there is usually a car in the center of the room, it is more effective to illuminate the side spaces rather than the center. After all, it is in them that you will carry out certain work. A good option would be to place ceiling lamps along the walls, and one of them should be placed above the hood of the car.
The same effect can be achieved by placing lamps in the corners or along the walls under the ceiling.
Lamp placement options
The easiest way to illuminate work areas is with a regular table lamp, mounted low above a workbench or table. Remember that the light source should not dazzle or hit your eyes. It is convenient if the lamp can be turned in the desired direction.
Wrong table lighting option
The right table lighting option
It is more difficult to illuminate hard-to-reach places: wheels, etc. There are several ways:
- bottom lighting (at a height of 0.4-0.7 m from the floor level);
- use a portable light source - the simplest and most effective option (for example, an LED spotlight);
- mount rotating lamps on a bracket - the light can be blocked by a person.
Multi-tiered garage lighting
LED lamps - choosing the optimal scheme
We have looked at all the positive and negative characteristics of LEDs. Of course, there are more advantages, but it is worth remembering the main idea - if you are not ready to spend money on lighting, then you should not even think about LEDs. If there are no problems, then you need to create a diagram and location of future sources. To do this, you need to take into account several very important rules:
- The light should be distributed evenly throughout the room. LEDs direct light in one direction, so you will need several of them at once. You need to carefully study all the parameters of the garage and arrange the lamps so that it is equally light everywhere. There should be no dark areas left. You can use local or general lighting method. In almost every car workshop, LED lamps are installed with this particular option, which allows you to quickly and efficiently service the car.
- A modular system is a special distribution element that will allow illumination of only certain areas of the room. This will not only save on energy costs, but will also significantly improve the functionality of your garage. Quality lighting is light that illuminates only the required area. If your garage is very small, then this method is not suitable. After all, just a few diodes can easily illuminate the entire room. If the garage is large, you should think about a modular system.
- It is not necessary to purchase and include only diodes in your circuit. If you have a large garage, then even with infrequent use you will pay impressive sums for light. To avoid this, you can consider installing energy-saving lamps or, as a last resort, fluorescent lamps.
Types of portable garage lights
A portable light source for a garage can be powered by batteries, an accumulator, or an electrical outlet. Degree of protection – IP44. In addition, it must have a metal casing to protect against mechanical damage and a mounting device: a hook, a magnetic holder, a stand, etc.
A huge number of mobile lighting devices are produced. The best types of lamps are presented below.
Portable LED lamp AVS CD607A – the best choice in terms of service life
Luminaire AVS CD607A
pros
- Bright: number of LEDs – 60 pieces.
- Powered by a built-in battery, it shines for up to 7 hours without recharging. You can charge either from a 220 V network or from a 12 V cigarette lighter. Fast charging time: 2-3 hours. Charger included.
- Service life: up to 100,000 hours.
- Double fastening: hook or magnetic holder with 360⁰ rotation function.
- Shockproof housing.
- Operating temperature range: from -60⁰С to +60⁰С.
Minuses
- One of the disadvantages is the lack of a charging control function: you will have to measure the time yourself.
- The lantern is not dismountable.
- Price: about 1800 rubles.
Portable lamp with switch UNIVERSAL 966U-0105 – the best choice for the price
Lamp UNIVERSAL 966U-0105
Characteristics:
- Powered by 220 V mains.
pros
- You can use any light bulb with an E27 socket with a maximum power of 60 W.
- Metal lamp with anti-corrosion coating.
- Hangs on a hook.
- PVA type wire of different lengths: 5 (model 0105), 10 (model 0110), 15 meters (model 0115).
- Switch on the handle.
- The price depends on the cord: 300-400 rubles for a 5-meter cord.
Minuses
- Low degree of protection: IP20.
- The wire becomes hard in cold weather.
LED stationary battery lamp NORDBERG 1911 3.6 V – the best in built-in functions
Lamp NORDBERG 1911
pros
- 2 brightness modes: maximum (800 lm) is enough for 2.5 hours of operation, minimum (440 lm) – for 5 hours.
- Lithium-ion battery with a capacity of 5000 mAh 3.6 V. Charging time 4 hours. Charging occurs via a USB connector.
- Aluminum body with rubberized edges.
- Built-in battery indicator.
- There is a connector for charging a mobile phone.
- Overcharge, overdischarge and automatic shutdown protection functions.
Minuses
- Price: about 3000 rubles.
- Poorly protected from impacts.
Portable LED lamp SOROKIN 40.110 is the most reliable.
Lamp SOROKIN 40.110.
Characteristics:
- Service life 15,000 hours (under ideal conditions)
- Color temperature 4000-4500 K.
- Operates from a 220 V network.
pros
- Protection degree IP65.
- A ten-meter flexible cord with PVC braiding with reduced fire hazard and increased frost resistance (from -50⁰С to +65⁰С).
- Steel hook for fastening the flashlight and magnetic holder.
Minuses
- Quite expensive, about 1800 rubles.
- Not very bright: luminous flux 450 lm.
Lighting in the garage pit
You won’t see anything in the viewing hole without artificial light. However, the pit is a complex object in terms of electricity. The difficulties are as follows:
- high humidity;
- a person in a pit is grounded through the ground or wet concrete;
- it is impossible to quickly leave the pit in case of danger.
Therefore, it is recommended to use low-voltage lighting for the inspection pit: a maximum of 24 V DC and 36 V AC. However, it is easiest to install 12-volt lamps. There are many of them available and they are inexpensive. Low-voltage light sources require an additional power supply. The transformer is mounted strictly in the distribution board. Do not use an autotransformer.
The lamps must be waterproof, the light from them must be directed mainly upward - to the bottom of the car. Protective shades are installed on top of the lamps and grounding is provided. Lamps that are mounted on the walls of the pit should be in a niche at shoulder level. It is better to paint the walls with white paint.
Lamp in a niche
Sockets and switches are mounted outside the pit on the walls or in the panel to avoid short circuits due to liquid leakage.
The wiring must be hidden and protected from moisture with a special cable channel.
An interesting option is to use LED strip. It is sealed and low voltage. The specific power must be at least 4 W/m.
Illumination of the inspection pit with LED strip
Any other waterproof low-voltage lamps will also work well. The main thing is to position them so that the light goes upward.
Options for lighting the inspection pit
Internal organization
The LED lamp is designed as follows:
- The light source is a lamp consisting of LEDs. The power is directly affected by the number of lamps and their type.
- The number of LEDs in a light bulb can vary from one to dozens.
- The LEDs are combined into a common chain, which is connected to the control circuit via a power supply.
- The design of the lighting device includes a heat sink, since heat removal is necessary to avoid overheating during operation. The quality of the radiator affects the stability and durability of the entire device.
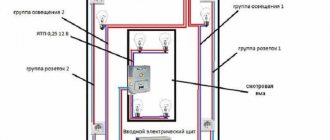
Examples of electrical wiring diagrams in a garage
So, the necessary lamps are planned and selected. They should be asked. To do this you need to draw a diagram. On the diagram, mark the general layout of the garage, and on it:
- space for the distribution panel and meter;
- cable laying locations (external or hidden);
- sockets, switches, lamps, distribution boxes;
- equipment that needs to be powered.
It is convenient and economical when general and local lighting are connected to different switches. The right and left sides of the garage can also be illuminated separately.
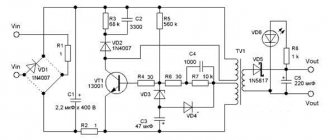
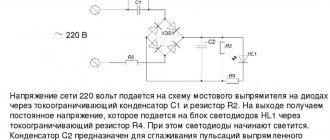
The simplest garage power scheme includes:
- input machine, RCD;
- step-down transformer for low-voltage power supplies;
- machine for general purpose sockets;
- automatic machine for powering light bulbs;
- wiring and equipment;
- meter if the garage is powered separately.
For powerful devices and the inspection pit, it is necessary to install separate automatic triggers.
Examples of electrical circuits for a garage
The diagram is useful to measure and count the number of wires needed. The total amount should be increased by 20-25%. (Multiplying by 1.2-1.25).
Main conclusions
The use of LED structures is the most convenient, safe and economical option for garage lighting. The ability to operate autonomously allows you to carry out planned actions even when the power is turned off, and the absence of flicker increases safety when working with rotating elements. High power and pleasant, realistic color rendering make it possible to provide high-quality and comfortable illumination of all areas of the garage.
Previous
LEDs: Which is better: xenon or LED lamps for cars?
Next
LEDsCurrent parameters for connecting an LED: how to determine and calculate the correct ones
Required electrical appliances and materials
To install electrical wiring yourself, you need experience and qualifications. In the absence of skills in working with electricity, it is prohibited to engage in laying an electrical network.
To install the electrical network, you should immediately prepare everything you need. To mark the walls you need a level and pencils. Lines for laying cables, places for sockets and lamps are marked on the walls.
You will need a hammer drill and a screwdriver (or a regular screwdriver).
In addition, you need to directly purchase lamps, switches, sockets, an electrical panel, VD (RCD), and wires. Moreover, sockets and wires are selected taking into account the total power of electrical appliances. To calculate, you need to add up the power of lamps and other devices that will be powered by one wire, and select a wire from the table.
For example, for equipment with a total power of 3 kW, a copper cable with a cross-section of 1 mm2 or an aluminum cable with a cross-section of 2 mm2 is suitable. Wires can be hidden (under plaster) or external (in cable ducts and corrugations). In any case, the cable must be protected from moisture, dust and mechanical damage. For a closed line of wires you can use a VVG cable, and for an open line - VVGng-LS.
VVG cable
If the walls are plastered, then it is safer to make hidden wiring. If the layer of plaster is thick, then you can lay corrugation in the groove. This will allow you to quickly replace the cable if it breaks.
Corrugation | Cable channel |
The minimum distance of wires from heating devices is 15 cm. Rotation of wires is allowed at right angles at a distance of 10-15 cm from the floor and ceiling. And the minimum height for placing sockets is 60 cm from the floor level.
The capacity in garages, unless you are just using it to store your car, is quite high. For fire safety, it is worth using a circuit breaker with a small rated protection current as a general switch.
16 amp circuit breaker
Local lighting can be equipped with conventional switches. It is better to mount all switches on the main distribution panel. It also houses a step-down transformer with a separate switch for low-voltage lighting of the inspection pit.
All wire lines are connected to a common circuit breaker and a high voltage circuit breaker (differential switch, also known as an RCD) with a leakage current of 10 -15 mA. The VD turns off the network when a leakage current appears, for example, when a person comes under voltage.
The automatic machine and the HP can be replaced by one device: a differential automatic machine. Leakage current: 10-15 mA.
Differential machine with an operating current of 16 A and a leakage current of 10 mA.
Home production
In order to save on the purchase of lamps for the garage, there is a desire to make one with your own hands from available materials. There are many options for producing lighting fixtures for the garage, but we will look at one - the ceiling type for lighting the engine compartment.
To produce a garage lamp you will need the following material:
- four boards measuring 20x8 cm (larger sizes are also possible);
- 2-3 cartridges with E27 socket type;
- glass;
- self-tapping screws
You will also need some tools to perform the work: drill, jigsaw, screwdriver.
DIY LED lamp
The stages of manufacturing a diode lamp include:
- On one board, cut 2 holes with a diameter the size of the cartridge 27 so that you can install it. The distance between the holes is 10 -15 cm. The holes are made using a jigsaw.
- Make the same hole on the second board, only in the center. This arrangement is necessary so that the lamps installed in the lamp do not come into contact with each other.
- All four boards are connected to each other using self-tapping screws to ultimately form a square. There should be two holes on one side, and two on the other.
- The cartridges are screwed into the holes, having previously connected the wires to them. Additionally, they are clamped using self-tapping screws.
- On one side (top), a sheet of stainless steel of the appropriate size is cut out and attached to the resulting structure.
- The structure is almost ready. It is screwed to the ceiling, then the light bulbs are screwed into the sockets.
- Protective glass is installed on top of the structure, which is cut to the size of the structure. We connect the wiring to a 220 V network. The lamp is ready for use.
We use energy-saving lamps; if you screw in incandescent ones, it is prohibited to cover the structure with ordinary glass. It is necessary to use special heat-resistant glass.
There are some safety rules to consider:
- When connecting the wiring, make sure there is no voltage.
- You need to work carefully and always wear special glasses and gloves. This is especially true when working with a jigsaw, drill and glass.
- Make sure the wiring is connected correctly so as not to cause a short circuit.
- After securing the glass, make sure it is securely fastened.
- When finished, clean up the area after you, especially any broken glass.
Thus, with deft movements we get a simple but reliable lamp for the garage. The more powerful the lamps are screwed in, the greater the radiation will be. But three energy-saving lamps with a power of 15 W will be enough.
Installing a dimmer will also help you save on electricity. We recommend reading about this in more detail.
Basic lighting electrical installation work
So, the power supply circuit has been thought out, the materials have been prepared. All that remains is to install the system. When installing lighting in the garage, it is recommended to follow a certain sequence of work.
- Use a pencil to mark on the walls and ceiling the locations of lighting fixtures, sockets, switches, junction boxes, and panels.
- Draw the lines along which the wiring will be laid.
- Use a hammer drill to punch out the walls for closed wiring. For an open one, attach a corrugation or channel to the walls and pull the cable inside.
- Install distribution boxes and boxes for sockets and switches.
- Install the electrical panel. Connect the necessary cables to your machines, transformers and other equipment.
- Check whether the shield is assembled correctly. To do this, connect a light bulb to each wire in turn and turn on the machine.
- Install lamps, sockets, equipment. Check if everything is working correctly.
- If you are satisfied with the result, then complete the installation with finishing work: plaster the grooves, put protective shades on the lamps, and decorative panels on the sockets and switches.
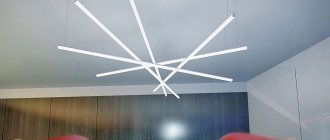
Features of installing diode lamps
Option for installing diode lamps around the perimeter
When starting to plan the wiring and designate installation locations for lamps, experts recommend installing lamps around the perimeter of the garage, as shown in the photo above. This arrangement allows you to illuminate the entire space and will not create dark areas if you have a car.
It is also recommended to choose lamps with a special matte coating, which ensures uniform light dispersion. If you use diode modules, they can be placed in special lampshades, since an open lamp will be very blinding to the eyes.
For your information. LED garage lamps can have three types of glow: white, bluish and yellowish shades. If you spend a lot of time indoors, it is recommended to install white or yellowish light, since a bluish tint causes rapid eye fatigue.
Installation of electrical lighting panel
The incoming electrical panel is installed at the entrance to the garage. It distributes electricity to individual lines and protects the system from short circuits. Since the switchboard is a kit item, you can assemble it to suit your needs.
The number of elements in the panel depends on the amount of equipment in the garage and its power. For each electrical line and inspection pit, its own machine is installed. For example, for general lighting, desktop and pit lighting. In the event of a breakdown, it is enough to turn off one section, and the rest will continue to work.
Shield assembly options
It is advisable to ground the electrical panel; the grounding current is approximately 4 kOhm.
Installation and installation of electrical panel
The electrical panel is designed to redistribute electrical energy from input to consumers through circuit breakers. For installation, select the most convenient location at the entrance. If you arrange lighting for the observation room, you can mount a separate panel for it.
Rice. 14: Installation of machines in the panel
In the panel, install circuit breakers of the appropriate rating, according to the calculation of the loads for each group of consumers that you made when choosing the wire cross-section. Most panels are prefabricated, so you can install the number of RCDs in them depending on the diagram drawn up. For example, separately for general lighting, separately for sockets and a locksmith corner. This principle of sectioning will allow you to turn off only the area where the damage occurred, while the rest of the room will receive power.
Figure 15: Connecting the distribution panel